This guide will show you how to unlock the Sea of Survivors achievement called “Thems that die’ll be the lucky ones”, where players are tasked to sink 20,000 enemies in a single run.
Achievement Overview

Thems that die’ll be the lucky ones
シンク 20 000 foes in a single voyage
Build at the Dock
Three things matter a lot: 兵器, 宝物, and the skills of your crew members.
There are two ways to reach 20,000 殺す. The first involves using a single weapon, either the cannon or harpoon. The second way is to use multiple weapons, which I find a bit easier. どちらの場合も, speed is crucial—the speed of the weapon, not the ship’s speed. This speed determines the range, also known as ballistics. We’ll discuss that more later.
今, let’s talk about what to consider before setting sail.
Having a highly skilled crew is essential: At level two:
- Make sure someone has a good understanding of ballistics!!
- Look for someone who is a bit reckless.
- Find someone with a strong discipline affinity.
At level three:
- Having a skilled merchant is crucial!
- Consider having someone who is a skilled smuggler or blacksmith.
When it comes to weapons:
- For a run with only one weapon, choose between the cannon or harpoon.
- For a run with multiple weapons, go for the harpoon.
Assuming you have all the upgrades from the shipwright at the dock, which is very helpful (I’m not sure if it’s possible without), your next step is to visit the tavern. Check under the “状態” section to see who’s currently on your ship. I recommend having at least one lifeguard to ensure your crew survives if things go wrong. You can dismiss the other crew members, except those with ballistics affinity. Look for this skill under the “スキル” section and try to hire as many as you can.
If you don’t have three members with ballistics affinity, consider recruiting reckless pirates—they can be helpful. また, crew members with Discipline affinity are valuable. Besides the lifeguard, aim to have a merchant. Smugglers or blacksmiths can also be beneficial. If you’re using only one weapon, having a blacksmith is helpful, while a smuggler is not as useful. For multiple weapons, smugglers are great, and blacksmiths are less important.
Once you’ve made your crew decisions, click on the ship. If you’re opting for a single weapon, choose between the cannon or harpoon. If you’re going for multiple weapons, the harpoon is the way to go.
Sailing and Loot Advice
Treasure advice:
When it comes to the red (merchant) ボックス, there are items of varying importance.
重要:
- Envelope
- クロス
- フック
- Metal hull
- Pegleg (especially crucial in a one-weapon run!)
Less Important:
- 塩
- リュート (- ランタン)
Moving on to the normal boxes, here’s what you need to focus on:
重要:
- Ballistics
- Citrus
- Efficiency (for those cannonballs)
- 精度 (skull)
- ラム酒
Less Important:
- ハム
- バウンス (- Fresh water) (- Hard tack) ((- 広める))
With these items, you’re ready to set sail. Here’s a tip: Try to acquire citrus and ballistics alongside the cross. For a one-weapon strategy, prioritize the cross and pegleg.
When you’re starting your journey, it’s crucial to have a merchant in your crew. Opt for the envelope as your choice. This decision increases your chances of obtaining other valuable red merchant boxes. If there’s no envelope to choose from, consider restarting until it appears. 重要なこと, this choice doesn’t have to be connected to the weapon you’ll use.
次, set sail to coordinates 50, -90, which is the location of the closest merchant wreck. When collecting normal loot, stick to the listed items and ignore the others. Quick sailing might be beneficial for this part.
At the merchant wreck, aim for one of the named loots. If none are available, you might consider starting over or waiting until the first merchant ship appears. もし, in these three options, fewer than two mentioned loot items are present, it’s advisable to restart for a better start.
Here are some helpful tips for your journey:
- Aim to achieve a range/speed above 300. This allows you to shoot almost everything at the point of spawning.
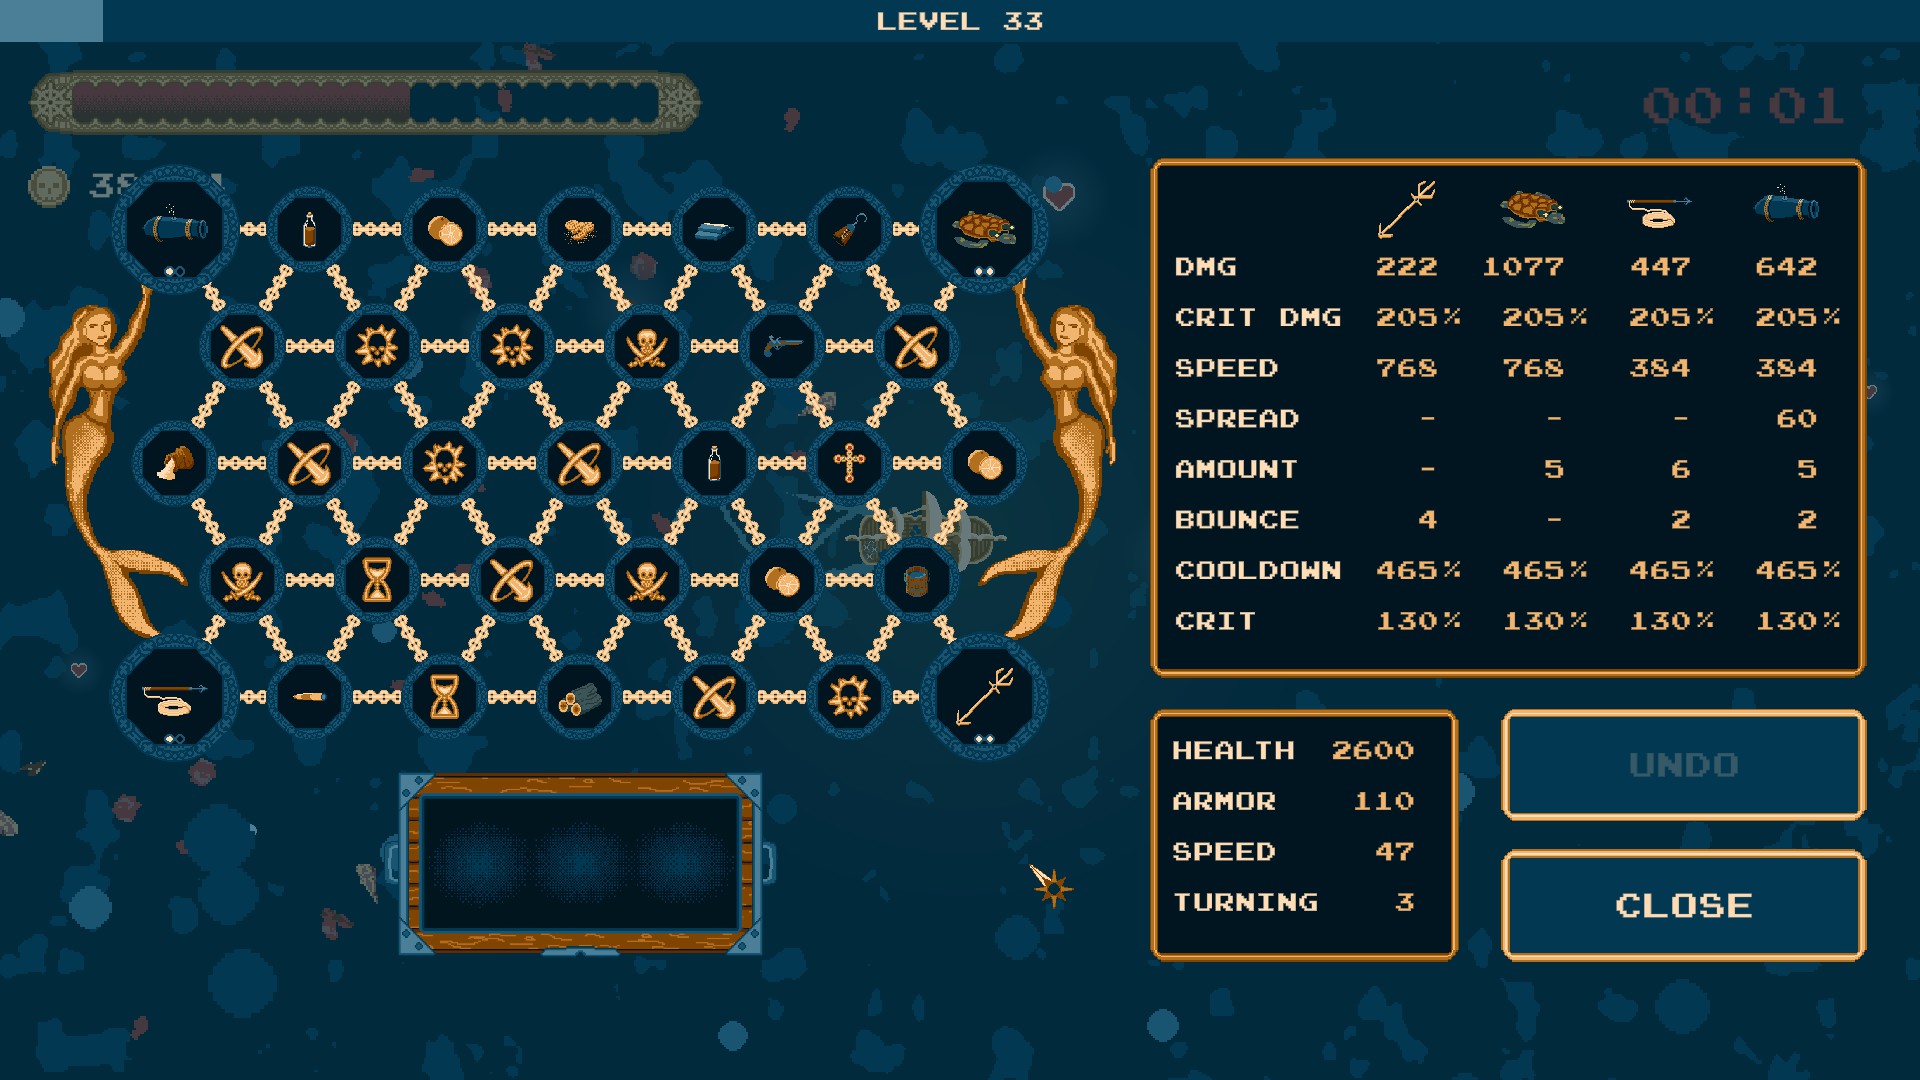
- Maintain a hexagon space for the cross and only fill in the 6 surrounding tiles with very important loot. Consider including items like citrus, 1 または 2 ballistics, metal hull, フック, pegleg in a solo weapon run, rum, or critical damage.
- Visit as many weapon islands as possible, and target at least two merchant wrecks.
- In the case of using only one weapon, prioritize the two merchant wrecks.
- Metal hull can be found at coordinates -60, -210. If you already have the metal hull, treat this location as another merchant wreck!
- For a one-weapon strategy, consider taking the ram from Rammstein, as long as you don’t connect it to other loot. Keep the neighboring three slots empty.
- For a multiple weapon run, consider the combo harpoon, 稲妻 (2×), 大砲, and cannonback (turtle). Upgrading lightning with fire can be highly effective if you increase the damage.
- The combo of cross, metal hull, and hook results in a very high cooldown. Metal hull doubles health, and when you lower it (by ramming into ships and islands), hook turns missing health into cooldown. You don’t even need to connect the metal hull and hook to the cross, as shown in the screenshot run.
- Incorporating a bit of critical damage is beneficial; 3 または 4 is good, as more can be unnecessary overkill.
- Feast items are often great, and spread, especially in a cannon-only run, can be useful as it requires less maneuvering, although close together gives more focused damage.
これが今日私たちがこの目的で共有するすべてです Sea of Survivors ガイド. このガイドは元々、次の者によって作成および執筆されました。 edopronk. このガイドを更新できなかった場合, これに従って最新のアップデートを見つけることができます リンク.