
- タイトル: PULSAR: Lost Colony
- 発売日:
- 開発者:
- 出版社:
Information about PULSAR: Lost Colony is still incomplete. これを使用してゲームの詳細を記入するのにご協力ください。 お問い合わせフォーム.
On paper the Pacifist achievement seems simple: just reach level 10 without dealing damage. しかし, it gets a bit more complicated than that. うまくいけば, this guide will help you find a strategy to get that achievement yourself, with or without teammates.
序章
あなたがここにいるなら, you’re likely trying to get the Pacifist achievement but don’t have a solid idea of exactly how to go about doing so. Over the course of this guide, we will go over what counts as damage, how we can get to level 10, and then make a final plan for how to complete this achievement. Pacifist is an interesting challenge for players, そして、うまくいけば, I can make it possible for anybody given enough time. If you’re just interested in how to get Pacifist and aren’t too interested in the specific planning, skip to the section titled “計画” for the overall process on how to do so.
What Exactly is Pacifist?
Pacifist is an achievement that requires the crew to reach level 10 without dealing any damage. This includes both damages dealt in ship-to-ship combat and damage dealt by personal firearms to on-foot enemies. When first hunting this achievement I foolishly believed that on-foot damage did not count, and I was quickly proven wrong (おっと). This opens a unique challenge in which the crew has to somehow gain enough experience to reach level 10 without doing a lot of the normal actions in the game. それで, how exactly can we gain experience?
Gaining Experience
私の知る限りでは, there are four main ways to gain experience in Pulsar. Let’s go through them in order of usefulness:
1. Destroying enemy ships
As should be quite obvious, destroying enemy ships in a pacifist challenge would immediately render the challenge a failure. Normally crews will amass quite a good deal of experience from combat, but unfortunately for us, we cannot resort to this method. 特に, damaging and killing on-foot creatures and NPCs does not give experience but still voids the challenge.
2. Completing missions
On the note of dealing damage to on-foot hostiles, most missions, 残念ながら, require the crew to defeat quite a large number of enemies. しかし, there are several missions that can be completed quite easily without dealing any damage. We will talk about these in the final roundup at the end of this section.
3. Probing asteroids
Some sectors will have landmarks or anomalies on the asteroids in the sector. The Science Officer (or anyone who has the talent to allow them to operate the scanning dish) can fire probes into these anomalies in order to gain experience or research materials, although we’ll go over later why this won’t be useful for us.
4. Jumping to an unexplored sector
This method will be how we gain the majority of the experience needed. The crew gains only 1 experience point every time you jump to a new sector, but what’s important is that you can jump easily, cheaply, and quickly.
Now that we know how we can gain experience, it’s time to put it together. In order to level up, you need experience equal to the level. それで, the crew would need to gain an additional 7 experience to go from level 6 平らにする 7. Since you start at level 1, これはつまり you need a total of 54 experience points to reach level 10. While you can gain some experience from doing peaceful missions, the majority of the leveling will come from visiting new sectors. Missions can be run alongside jumping, but it’s ultimately slower to do so, and not all missions grant experience. With experience being dealt with, the issue now becomes choosing a ship to start with.
Choosing a Ship
As we jump from sector to sector, reaping those sweet experience points, it’s inevitable that you will happen upon a ship that won’t take too kindly to your presence. If we were to go to level 10 solely by jumping, we would require 54 jumps to make it there. No matter what ship you start with, there’s no way it will like taking residual damage over 54 ジャンプする. それで, let’s just not take damage. All we have to do is simply cloak the ship.
For those who are unaware, there are three ships in the game that have cloaking capabilities: The Stargazer (A.O.G.), The Carrier (A.O.G.), and a ship unlocked by finding the lost colony, The Sylvassi Swordship. 結局のところ, it’s not extremely important which ship you choose as they all can reach the same end result. The unlockable ship comes equipped with the Sylvassi Cloaking System which requires less power, but it starts at Chaos level 3, which is a surprisingly big downside for this challenge (more on that in the addendum). 残念ながら, firing a probe while cloaked will drop the cloak, so probing into the nearby asteroids is not an effective strategy when we want to avoid combat at all costs.
I would personally recommend choosing The Stargazer. Not only does it already have a lowered EM signature should the cloak go down by accident, but it comes equipped with the Instant Warp Charge program by default. The program requires 5 charges to activate, meaning you will have to charge the drive every other jump, but it can cut down the time of travel immensely since you will primarily be focused on traveling. The Carrier or the unlockable ship both function perfectly for this achievement, but The Stargazer offers just a little bit more than they have. Now that we have a ship, we’re ready to begin the execution of the plan.
計画
If you’ve read through everything before this section, you will already have an idea of what we’re doing. そうしないと, here’s the short of it: Begin a new game in The Stargazer, although any of the three ships that have cloaking capabilities will work. Play as a robot or Sylvassi so you don’t require oxygen; this will allow you to turn of the oxygen generator and oxygen filter so the reactor heats less during warp drive charging. I would personally refrain from adding any AI to the crew as they would likely mess up the settings of the ship, causing it to overheat or drop the cloak.
The crew will start at The Estate. Here you could pick up a smuggling mission if you want; しかし, none of these missions provide experience. You can use the money to buy fuel capsules, but you shouldn’t need any more money to do that. With the starting 5,000 クレジット, you can buy more than enough fuel capsules to make it to 54 ジャンプする. Here’s where the plan splits a little bit.
If you plan on continuing the save after getting the achievement, you’ll want to decrease the power on the science sub-system so that “センサー”, “sensor dish”, と “shield processors” all have no power. Since you start with a pretty pitiful reactor, these systems eat up enough power to really cause the ship to gain heat when charging. By cutting these systems, you will barely heat up at all when you charge, and if you lower the power of the “other processors” – which in this case is the jump processor/ARX-JP – you can make it so you don’t take on heat at all when charging, but you still charge relatively quickly.
If you don’t plan on continuing the save, strip the ship of its main gun, 砲塔, ミサイル, all programs save the Instant Warp Charge and all processors except the ARX-JP. You can sell these for some money that you can use to buy things like fuel capsules, but more importantly, it just means you won’t deal some damage accidentally if the ship decides to auto-target.
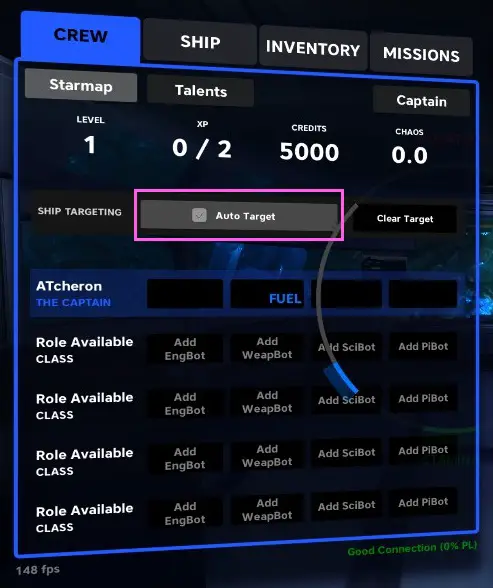
On the note of auto-targeting, make sure to disable the ship’s auto-targeting when you start. This can be found in the TAB menu, although only the captain can toggle this. If it is enabled, the ship will fire any turrets if the cloak goes down, which would obviously nullify the achievement.
ついに, after all this preparation, it’s time to start. Start by plotting a random course anywhere through the galaxy; as long as it doesn’t go through infected space, you’ll be fine. On the engineering screen, turn off all the auxiliary systems (whether or not to include the lights as well as personal preference), turn the allotted power of both engineering and science to the max, and activate the cloak. Make sure to have the sensor power on the science sub-system disabled so they don’t draw power, さもないと, you’ll heat up pretty fast.
Once cloaked, charge the warp drive, angle yourself towards the next system, and take off. The cloak will persist through jumps as long as it has enough power. With all the subsystems disabled and the auxiliary power pumping into the main reactor, it should always have enough power. ここから, all you need to do is jump enough times to get to level 10. What’s very important however is to save after every jump. When you jump into an empty sector, there’s a chance to have beacons alongside any normal ships patrolling the area. One of these beacons can be a Warp Disable Beacon, which will instantly end the run. Since you are unable to deal damage to the beacon, you can’t warp out of the sector, so you are completely stuck. The only way to get out is to go to the last save and avoid that sector.
One trick is to try to reach as many repair depots and planets as possible. These sectors give you experience for jumping to them, but they do not have a chance of spawning enemies or beacons, effectively making them free experience. さもないと, the plan is to just jump, charge and repeat. Keep an eye on the temperature of the reactor while you’re at it; even with the minimal heat gain, 後 50 jumps it can possibly get to the point of overheating. Use some coolant to cool it down, or wait while you’re not charging the drive if you’re patient. うまくいけば, you have some patience, because ooh boy is that a lot of jumps.
結論
良い, hopefully after all those jumps you were able to make it to level 10 and grab yourself the Pacifist achievement. うまくいけば, this guide was able to help you. If there’s something I missed, tell me in the comments. Even after playing for about 100 hours I still probably don’t know a lot of mechanics, so any extra knowledge is appreciated. I’d also appreciate it if you took the time to leave a rating on the guide; while it’s not particularly lengthy by any means, it did still take a few nights to put together. 乾杯!
補遺: 船
On the note mentioned in the “Choosing a Ship” section about chaos level:
When doing this achievement myself, I chose the unlockable ship due to the more efficient Cloaking System, ignoring the fact that it starts the galaxy at Chaos 3. I think that the higher Chaos level increased the chance of beacons spawning, which caused me to run into a lot more warp disable beacons than I otherwise might have. While doing so many jumps will end up with the galaxy at around an extra 1.5 Chaos levels, that’s not nearly as high as the 3 Chaos that ship starts with, which is why I believe The Stargazer is the best for this.
これが今日私たちがこの目的で共有するすべてです PULSAR: Lost Colony ガイド. このガイドは元々、次の者によって作成および執筆されました。 ATcheron. このガイドを更新できなかった場合, これに従って最新のアップデートを見つけることができます リンク.