基本ガイド 一般的なゲームの原則と成功した戦略の概要を説明します. これには、の概要が含まれます 特典, マスク, ボスに対処する方法に関する武器の種類とヒント.
この執筆時点で他のガイドがないので, これが何もないよりも良いことを願っています.
はじめにゲーム要素と一般的なゲーム要素
こんにちは, そして、このガイドをチェックしてくれてありがとう. 私は自分を専門家と呼ぶかどうかはわかりませんが, 私はこのゲームを打ち負かしました、そして他にガイドがないので, 私は最初のものを作ることにしました.
Living the Nightmareは、Reanimate Gamesによる最初の公式にリリースされたゲームです, そして、それは甘いゲームですが, 混乱していると感じたいくつかの側面があります, 奇妙またはあいまいなところ、それらについての情報を共有したい, 私は彼らに説明してもらいたいと思っています.
このガイドは、ゲームのコントロールとGUI要素に一般的な知識を想定しています. マニュアルとチュートリアルの両方が、ゲームの操作方法について良い説明をします. 両方を試してみることを強くお勧めします, 特にチュートリアル, それは実際にメインゲームのバックストーリーに役立つので.
悪夢を生きることは (たいてい) ターンベースの戦略ゲーム. 管理しなければならないリソースがたくさんあります, あなたの生存と進歩を最適化することを目的として. いくつかは明示的です, 機器の耐久性など, 心, アクションとアクティブなアイテム. しかし、それほど明白ではないがまだ重要なリソースもあります, ポジショニングなど, 敵の産卵とルールセット.
ゲームの目標は、戦闘でいくつかのボスを倒し、したがって、 “走る”. ボスに直面するには、まず腐肉神社として知られる特別な地図の場所をアクティブにする必要があります. そして、彼らがアクティブになるために, セット数の敵を殺す必要があります.
特に, あなたはあなたの資源を利用することによって敵を殺し、神社に到達します. あなたはするであろう, 理想的には, ほとんどの場合、敵を倒すために装備された武器を持っています. モンスターを殺すことはあなたのリソースの一部を消費します: 武器は攻撃によって使い果たされます, 敵を危険にさらすことは、攻撃されることであなたの心を取り出すことができることを意味します, 等. しかし、敵もそうです ランダム これらのリソースのソース. これにより、機器を釣りたいと思う瞬間が生成されます, またはあなたがしたいかもしれません “ストックアップ” 今後の上司のために. これのすべてのポイントは、ゲームエクスペリエンスを考えることです リソースのユーティリティを最大化します. あなたはあなたがあなたの与えられたツールからより多くを絞ることができるほど良いプレーヤーになるでしょう.
に “ゲームの概念” 存在するゲーム要素について話します, しかし、ゲーム自体内で名前が付けられておらず、十分に説明されていません. またはいくつか, のように 踏みつけ マニュアルで説明されています, しかし、彼らの完全な範囲ではありません.
最初, そして、私が話す最も重要な要素はです アクションエコノミー. アクションはあなたが持っている最も重要なリソースだと思います, 彼らはいくらを測定するからです 選択 あなたはゲームの状態にあります, したがって、あなたが制御できるもの. あなたがするほとんどすべてが行動を取ります. 移動にはアクションが必要です, 攻撃は行動を取ります. だからあなたは本当にあなたが与えられたターンで持っている行動を最大限に活用したい. しかし、より多くの行動を取得することは、一般的にあなたの行動経済を拡大するための最良の方法です, あなたの特典や機器にも結びついたものもあります. より多くのダメージを与え、より多くの正方形に当たる武器は、より少ないダメージを与える武器よりも厳密に優れています。. 同じく, また、より良いです “並ぶ” 動きすぎずにいくつかを殺す敵.
特にボスはあなたの行動の巧妙な使用に関するものです. いくつかの, Hydraがそれに到達するのに十分なアクションがない場合、Hydraが効果的に膠着状態になる可能性があります.
これを念頭に置いて、私が最高の特典を信じていることを提案する理由です, マスクと武器はそうです.
私が話したい2番目の概念はです 無意味な状況
. スプラッタタイルの上に立っている場合 (即死) あらゆる面で敵に囲まれていると、この順番で殺すことはできません, または、手の届くところに安全なタイルのない腐肉のバイパーと酸性浴に囲まれています, あなたは勝てない状況にあります. それらの状況に対処する最良の方法は、それらが起こる前に2つか3つのターンです. 無意味な状況は実行キラーです. 常に脱出ルートを持っていることで、好ましくない状況を避けてください, 将来の敵の行動を計算し、少なくとも1つを維持します
緊急アイテム, 浄化塩など. 例えば, 理想的には, あなたは常に驚きの範囲の敵のスポーンのために少なくとも1つの弾丸を持っている必要があります. あなたがターンの行動に従事する前に、あなたがやろうとしていることだけでなく考える, しかし、あなたがそれをやった後にあなたがどのように終わるか. あなたはこれをほとんどの部分で行うことができます…
敵の行動はです (ほとんどの場合) 予測可能. Monsters will almost always (unless blocked by other monsters or terrain) go towards you and attack you. Since most monsters have a range of 1 (“近接攻撃”) and a movement of 1, that means that with any mask you can outrun most monsters. And if you can outrun them, you can pick them up one by one, even with your fists. Therefore the only really dangerous and tricky monsters are the ones that move several tiles per turn, or have ranged attacks: Sidewinders, Slaveners and their upgraded versions, along with Acid Baths are the most dangerous enemies in my opinion. Ranged attacks are the source of most of my losses.
Think of it this way. Every hex an enemy can attack in their turn is “制御された” by them. So the more hexes they threaten, the more space they control, and the less choices あなた 持っている. But even those enemies will always move towards you if you do not end up in their attack range. A high level strategy involves “taunting” an enemy into moving into a hex that will block that awful Sidewinder and keep it off you for a while.
It’s worth noting that because of the above, being able to right-click enemies and pan out routes is incredibly important. Shortened sight range is a very, very bad state to be in.
This leads me to the final concept I want to introduce:
位置決め
. Ending a turn blocked off by trees on four sides, and with several enemies converging on your only two accessible hexes is a bad position to be in. A wide open field is better, especially during the first two world states. Later though, Acid Baths and Trappers will swarm up on you so it’s not that ideal. There is sadly, no absolute better position to be in, it depends a lot on what equipment you have. Tight chokepoints favour high damage, one handed weapons. Sparse obstacles can let you funnel enemies into groups of three, perfect for shotguns or power tools. Lots of trees and height differences may block you from reaching that awful Slavener Spitter that already took two of your hearts.
For bosses, しかし, since they don’t give a crap about trees or rocks, you almost always want a wide, clear open field. They don’t get stuck behind trees, but you do. So if you already cleared two shrines and are five kills from that kickass boss music, run away until you find a good clear field first.
それで, in summary:
はい, weapons are important, but those are not your only tools. Having lots of actions, trying to kill as many enemies in one attack, making sure you choose the most efficient route to reach a shrine in terms of movement and using the terrain to your advantage. The more you control the game-space, the better your odds of success are.
This game is turn based… until it’s not.
While the game behaves, most of the time, as a turn based game, you can break the game’s logic here and there. Do not click on enemies too quickly, I’ve had moments where I waste an action “攻撃” an enemy I just killed. Or lose on a good mask because I killed two enemies too quickly. and the game just imposes the second one on you.
There are two odd mechanics you are invited to exploit within the game’s turn based environment. Dodging exploding enemies, and squashing.
Dodging exploding enemies is simple to grasp, but tricky to execute. Enemies such as the Volatile Worm will explode once damaged. Anything in the six surrounding tiles will be caught in its explosion, including terrain. If you have no firearms, or spears, you can avoid eating the whooping two hearts of damage by moving to an adjacent hex in real time. That means you actually need to click clearly and quickly which hex away you want to move to before the worm explodes. The amount of time you have varies, sometimes it’s a generous four seconds, some times it’s nearly instant. ほとんどの場合, I don’t suggest risking it. Use a firearm instead.
It’s also worth noting that if you are one kill away from the next milestone, you won’t have a chance to dodge! So don’t hit an exploding worm when you have 9/14/19 殺す!
While squashing is mentioned in the game manual, it’s not very clear what it means. 基本的に, a lot of enemies have a small chance to spawn a Haunter enemy (including Haunters themselves!) そしていくつかの敵, like the Worm Food, 意思
いつもspawn up to three worm enemies once killed. If you can spare it, it’s always a good idea to move to a hex occupied by an enemy once your final attack hits. Thankfully you have a lot of time due to the gratuitous gibs death animation. This is especially good for the Worm Food line of enemies, a successful squash will immediately kill the three worm spawns and net you
FOURkills for the price of two actions.
Same limitation applies as above! If you are one kill away from a milestone, you won’t have the chance to squash that enemy! It’s not as bad as eating two hearts of damage, but you still worth keeping in mind.
兵器
With the information given above, I hope I can back up the following claims as to which weapons, masks and perks are the best.
My criteria is the following, action economy rules supreme. So the equipment that lets you maximize actions will be the better one.
You will rarely have much of a choice in which weapon to use. Mostly you will get a weapon and use it until its durability is less than five, then a new weapon choice will pop up. There are some exceptions to this. 時々, you will get lucky and enemies will drop weapons constantly. Or you may get the Puzzle Cube item, and oh boy, will these beefed up monsters have such sights to show you. The most common way to have a “選択” in which weapons to use, しかし, is by visiting Places of Power and finding their Treasure Chest.
We have four close combat (CC) weapon types and three firearm weapon types. For CC weapons, we have one-handed melee, two-handed melee, power tools and spears. For guns we have pistols, shotguns and rifles.
ほとんどの場合、, weapons within the same type will be either straight upgrades or downgrades from one another. 例えば, the Machete is just a strictly better Knife, and the Chainsaw is a strictly better Head Trimmer. Weapons that hit more hexes are better than weapons with less threat range, and more damage is always better. There are some things to note about weapon properties. Some weapons have critical strike, or stun. Critical strike is better, since killing an enemy outright is better than stunning it. Both can get you out of a bad spot, by cancelling an enemy you couldn’t otherwise kill. But since these are chance based, they are too unreliable to count on, so don’t do it. Knockback is pretty bad. While there are some enemies you can just keep away forever from with clever use of knockback, enemies with ranged attacks or >2 hexes of movement (あなたが知っている, の
actually dangerous enemies) will force you to move towards them with every strike, or you’ll eat damage next turn. It also makes it harder to “stomp” on enemies. This costs you an extra action and may compromise your positioning, so I suggest avoiding knockback weapons if you can.
それで, which close combat weapon group is the best? I think it’s 槍. The only weapon group that could compete is power tools, with their general high damage and generous 3-hex attack range. スピア, しかし, are like having a gun with >20 durability and no need for bullets. You can still kill two enemies in one attack (そしてあなたはそうすべきです, spear durability is precious), but you save so many actions by having an extra hex range. While you can kill enemies three at a time with power tools, you still need to be next to them. And that’s only for common fodder. Spears really shine against bosses, by letting you deal with their tricky attack patterns much more safely. Try cheesing a Wicker/Burning Man with a spear weapon and you’ll see what I mean.
Summary for CC Weapons: Avoid knockback weapons, prefer spears if you have a choice.
今, let’s talk about firearms. There’s a lot less complexity involved, and all firearms come in strict tiers. You have revolvers, which are superseded by the Magnum, shotguns which evolve into the SPAS-12, and the rifles which become sniper rifles. Shotguns can hit up to 4 hexes at once, but it’s rare to line up so many enemies that neatly. Rifles and snipers can hit up to an amazing 3 hex range. The only thing good about revolvers is that they are better than nothing. Magnums have plenty of ammo at least. でもそれ以外は, rifles beat pistols easily.
それで, which is better? Nearly all of the time, and especially after you beat your second boss and are hounded by Acid Baths and Executeds, you want Rifles. Being able to do away with these pesky long-range enemies in tough situations is just too good to pass on. The SPAS-12 is decent in the mid-game, the burst range can save your hide from getting mobbed. But it’s far more likely that enemies will out-range you than swarm you.
Summary for firearms: ライフル. Almost always go for rifles.
There are three “兵器” that fall outside your normal arsenal: thunderfist, pyrokinesis and blood rage. These items take over your full kit. Your mask, CC weapon and firearm will be removed and you’re stuck in this “モード” for its durability. Also while you may still have active items, you can’t actually use them. So right away this tells us you have no “get out of a bad situation” tools when you enter these states.
These states are activated from special items, or as a result of activating an Arcane Shrine. ほとんどの場合, I think they are pretty bad and should be avoided. Pyrokinesis relies upon you setting things on fire and then luring enemies to those fire hexes, but bad news, bosses appear to be immune to fire hexes. Even more bad news, Volatile Worms will walk up to the fire, explode and hit you anyways, so you always need to be at least 2 tiles away from exploding enemies. Thunderfists grant you 2 points of damage per punch, and the damage spreads to connected enemies, giving you a respectable clearing power. Blood Rage is the best one, 私は思う, it refills your full actions on every kill. You can chain kills and blitz through enemy lines very quickly. This is particularly useful for the Hydra bosses.
Once you punch out all of these magic punches’ 耐久性, しかし, you’ll be left with a pseudo-mask and no weapons! So you could end up basically screwed and forced to punch bosses to death. So while these are definitely cool, I don’t think they are that useful. There are reasons to use them, しかし. Trading away a crap mask (Like Raizo), or as mentioned above, Blood Rage can help you kill the otherwise annoying Hydra bosses.
まとめ:
Don’t use magic fists if you can help it. Don’t use arcane shrines if you have good gear.
マスク
Masks are super good. You really, 本当に, really want to always have a mask. Even the worst mask is better than nothing, as all masks give you at least +1 アクション. Once you learn to play carefully, it’s very unlikely you’ll ever go without one. Being reduced to 2 actions in World Stage 2 is basically a death sentence, so don’t let that durability go to 0.
It’s very rare that you get to choose between masks, but here’s a mask tier list. I’m not 100% sure if this tier list is definitive, but it should be a good enough guide. I’m starting from best to worst masks:
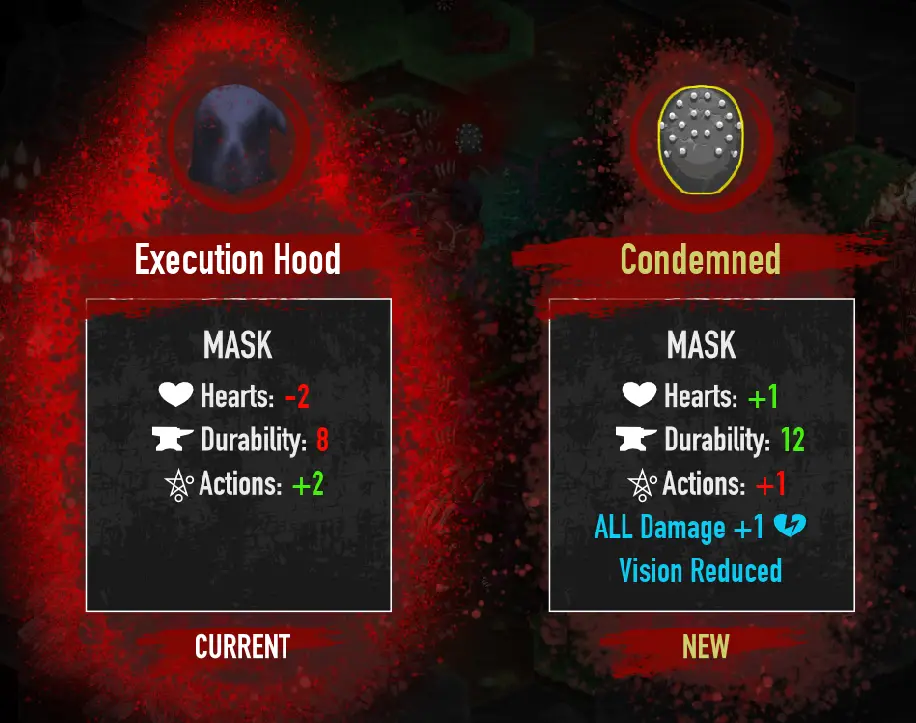
Execution Hood (ハート -2, Actions+2):
Since I believe action economy is paramount, I believe this is the best mask. はい, -2 hearts is quite limiting, but the amount of options this mask gives you should save you from far more damage than those -2. Ideally though, それ -2 should be a non-issue. I suggest you don’t play expecting to get hit. Even then consider that you retain your previous HP as temporary hearts. This mask and the Will+ Perk will let you dance around bosses, always stay ahead of enemies and have more choices than the game has planned for. It’s really that good.
Betrayer (ハート +1, アクション +1, ダメージ +1 But it is kill or be killed)
The flavour text on this mask is ominous and not informative at all. What it means is that the mask may damage you, 非常にまれです. For most practical purposes, consider it to just give you +1 to all damage. The only time the mask “betrayed” me and dealt damage to me was when I went away from keyboard for a long while and then decided to click on the mask for it’s lore. It’s very rare and under normal play it shouldn’t happen. いずれかの方法, これ +1 damage applies to your fists, weapons and firearms. More damage means you need less attacks to kill enemies, and thus you save on actions, 耐久性, と 弾丸. The only thing this mask doesn’t give you is more movement.
Thornshroud (ハート 0, アクション, +1, Attackers take 1 ダメージ, Farsight)
また, while you shouldn’t play expecting to get hit, this mask’s special ability will at least save you from getting combo’d to death if surrounded. This mask will kill Sidewinders that slip past and get you. The real good part is the Farsight, しかし. More information means you can plan your future turns better.
Skull Cage (ハート +2, アクション +1, Stuns Attackers)
Similar to the above, this mask will save you from getting combo’d if you’re in a bad position. But you shouldn’t get into bad positions in the first place. Spitting Slaveners being stunned will let you catch up to them and kill them though, そして +2 hearts makes you somewhat beefier.
シンビオート (ハート +1, アクション +1, Protects Hosts From Ranged Attacks)
So remember that part of the guide where I said ranged enemies are the most common run-killers? うん, 良い, this mask helps with that. The problem is that every acid spit it deflects takes away from its durability. Wearing this mask in World Stage 2 will save your from a lot of damage, but then leave you with no mask. So if you’re in that position, better start running towards a treasure chest or hope you have a Featureless Mask active item in the ready.
Tenryu (Hearts+1, アクション +1, Smites an Enemy every 10 殺す)
This is just your basic mask, except with a neat extra ability. 毎 10 kills you do, it will smite a nearby random enemy, killing it outright. You don’t get to control which enemy, と 10 kills is quite a lot actually. So don’t rely on it, just think of it as a small help.
The Mask (ハート +3, 耐久性 20, アクション +1)
I don’t bother much with counting durability, but with double the durability of most masks, it’s one of this mask’s features. This is just a better standard mask. It will make you tough, it will take a lot of hits, but that’s it. It’s just a good mask.
Famine (ハート 0, アクション +1, +4 (Temporary) ハート, Prevents Heart Drops)
Famine is an odd mask. It will give you a lot of durability short term, しかし
you will slowly die and there’s nothing you can do about it
. と +4 心, it’s very unlikely you’ll die before you swap to a better mask. It won’t hurt you, but don’t stick with it for too long.
犠牲 (ハート -1, アクション +1, Slightly Increases Heart Drops)
The only reason this mask is better than the standard masks is that you manage to cheat death quite often with it. しかしまた, this mask’s whole deal is centred around recovering from getting hit, which you shouldn’t do anyways.
Death Mask (ハート 0, アクション +1, 20% Chance to Negate Damage)
別の “standard mask, でも少し良くなった”. And very slightly at that. The only thing that this mask has over the standard ones is that you could get lucky and avoid more than one heart of damage. But that’s it. It’s almost functionally the same as the previous one.
Burlap Sack (ハート +1, アクション +1) & Brown Bag (ハート +1, アクション +1)
これらは、 “standard masks”. They do nothing special, just give you another heart and an action. The burlap sack has slightly more durability, if that matters. You usually get these at the start of the game, then switch to something better and never look back.
Condemned (ハート +1, アクション +1, All Damage +1, Vision Reduced)
There are only two masks worse than the standard ones in my opinion. And this is one of them. You’d think “hey you just praised +1 damage a while ago, why is this so low?”. 良い, reduced vision really, really sucks. Being hit from a blindspot by ranged enemies and walking into an until then invisible enemy range will kill you pretty fast. Against bosses, particularly the Phantoms? Could be suicidal. はい, vision is それ important.
Raizo (ハート +1, アクション +1, Substitution no Jutsu)
This is just a standard mask with a penalty. 何 “substitution no jutsu” means is that every time you get hit, you will teleport 3-7 hexes away, randomly. The good part: you will very randomly get lucky and telefrag an enemy. The bad, you lose control of your positioning and you can get hit, get teleported into an unwinnable situation, get hit again, 繰り返す, and run lost. Controlling your game state is very important, this mask randomises it. This mask will, most of the time, penalise getting hit with even more damage. Only wear it if the alternative is nothing, and be super careful until you can switch to something better.
まとめ:
Execution Hood or Betrayer if you can. Avoid Raizo and Condemned.
特典
You get to pick between 3 perks every time you activate a Carrion Shrine. Perks can pretty much make or break a run, and is one of the parts where RNG can wreck you the most.
I’ll get straight to the point.
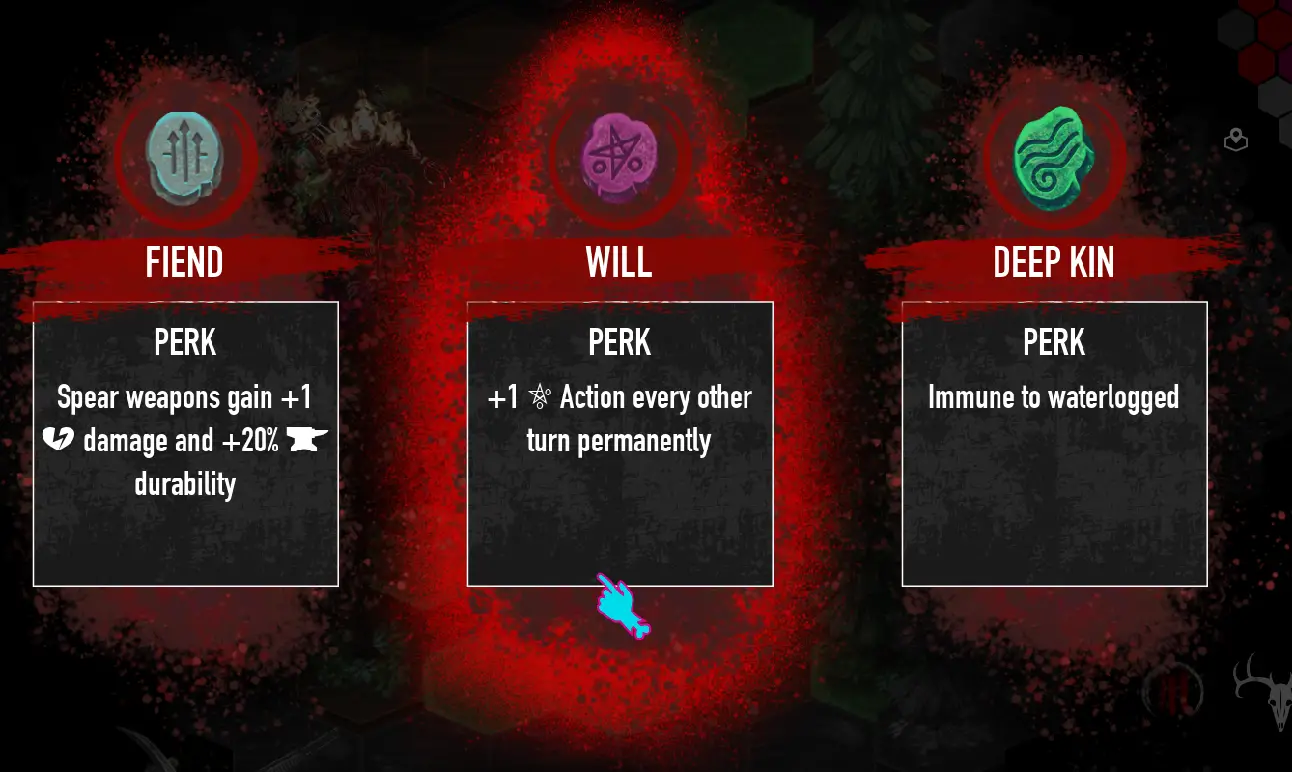
Will is the best perk.
Will+ wins runs. It’s just one more action, 永遠に. With one more action you can escape that troublesome boss’ attack range. You can reach the Hydra. You can squeeze that extra attack that finishes an enemy that would otherwise kill you. Action economy is king, this perk gives you that. Always pick Will.
The second best perk is Destroyer. 10% その後 15% chance to refund an action when you kill an enemy. It’s not as good as the safety of always having one more action, but if you get lucky you can have turns that are absolutely devastating. After picking WIll, pick Destroyer.
Then we have Professional and Hunter. ない 100% sure if Professional is better than Hunter, but I think it is. Firearms are your main “get out of a bad spot” 道具. Professional makes every firearm have +1 damage and come with full bullets. For weapons such as the revolver, that basically means one bullet is now worth 2. Professional in World Stage 2 saves lives by sniping away those awful Acid Baths. Professional+, the Sniper Rifle and the Betrayer Mask can cheese you past even the third boss. Hunter saves you a lot of actions by letting you ignore height difference in hexes, and Hunter+ gives you a small chance to shoot without consuming bullets.
I’d put here the Mask Durability Perk. You really don’t want to be without a mask, and more durability can do wonders for masks such as the Symbiote. It’s not gonna win you runs, but it’s always helping you.
Now we have Clown. Clown gives you a small chance to stun enemies every time you hit them. The good: this applies to all attacks. You’ll be hitting enemies enough that you’ll get your fair share of stuns, which makes life easier. The bad: it’s a small
チャンス, and if you’re playing the game correctly, you should be killing or kiting enemies without any need for a random chance at stunning them.
Further down we have the weapon boost perks. There’s one for single handed CC, two-handed, and spears. Since I believe spears are the best close combat weapons, I think Fiend is the only of these perks worth taking. The main problem with these perks is that you can’t really rely on getting the weapon whose type you got a perk for. Unlike Professional, which applies to all firearms, and you should always have a firearm ready. So these perks are more of a “if you get a weapon of this type the game becomes substantially easier until its durability runs out”. Fiend+ spears are super good, しかし, and can earn you a run if you get that lucky.
Now we have Deep Kin. Its only use is if you want to move to the lake biome and just stick there for the rest of the run. Deep Kin+ makes you immune to grave chill. Why would you plan on getting hit by Haunters in the first place though?
The perk that lowers the chance of a bad event in an arcane shrine is doubtful. Arcane shrines should only be used in desperate times, and spending a whole perk on something you’ll only activate three or so times, 運が良ければ, is wasteful. The expanded duration perks for thunderfists, pyrokinesis and blood rage are pretty bad. 前述したように, I don’t think those are good “兵器”. Of those, blood rage is the most decent, and so should be the only one worth considering. But you could very well spend the rest of your run without seeing any of those “兵器”, それで, why pick them?
Finally we have the worst perk, 暴君. No more bullet drops, but more heart drops. More bullets would save you more hearts than whatever you’d get from this. It’s just better to control the battlefield with more firearm uses than hoping to recover if you’re hit. Never pick Tyrant.
まとめ:
Will is the best perk, then Destroyer, then Professional or Hunter. Mask Durability or Fiend if there’s nothing better. Never pick Tyrant.
To do: Boss Encounters
I’ll get on this soon!
いずれかの方法, I hope this guide is of help to some. I haven’t written a game guide in a while. I’m open to comments, and while I try to back up my claims, I’m interested to see if there’s something I’ve overlooked. Good luck in the nightmare!