- タイトル: スピリアの英雄たち
- 発売日:
- 開発者:
- 出版社:
Information about Heroes of Spyria is still incomplete. これを使用してゲームの詳細を記入するのにご協力ください。 お問い合わせフォーム.
During your time in Heroes of Spyria, you may come across areas where you get stuck. This partial walkthrough is intended to help you with these areas. It is recommended that you try to solve these puzzles on your own before reading the walkthrough.
章 2: Book Puzzle in Order of the Wind
In the restricted library of Order of the Wind, there are several books on several pedestals. Each book has a letter on its cover. There is a large stone tablet in the middle of the north wall. When the heroes examine it, それは読みます “The wealth of knowledge is open to those who seek it here.
解決:
- Notice that the word “OPEN” changes color as you examine the tablet. 続行するには, the players must arrange the books on the north wall to spell “OPEN”, with OP to the left of the tablet and EN to the right. Players can only hold one book at a time, so they will have to shuffle the books around a bit. Once the word is spelled out, the passage forward will open.
章 3: トロッコ “Razing a Family” Sidequest Solution
The Razing a Family sidequest contains a minecart puzzle. 部屋は2つあります. The first room is meant to teach players the basics, while the second room is meant to be more challenging. しかし, if you are having trouble with it, you can find the solutions below.
部屋 1
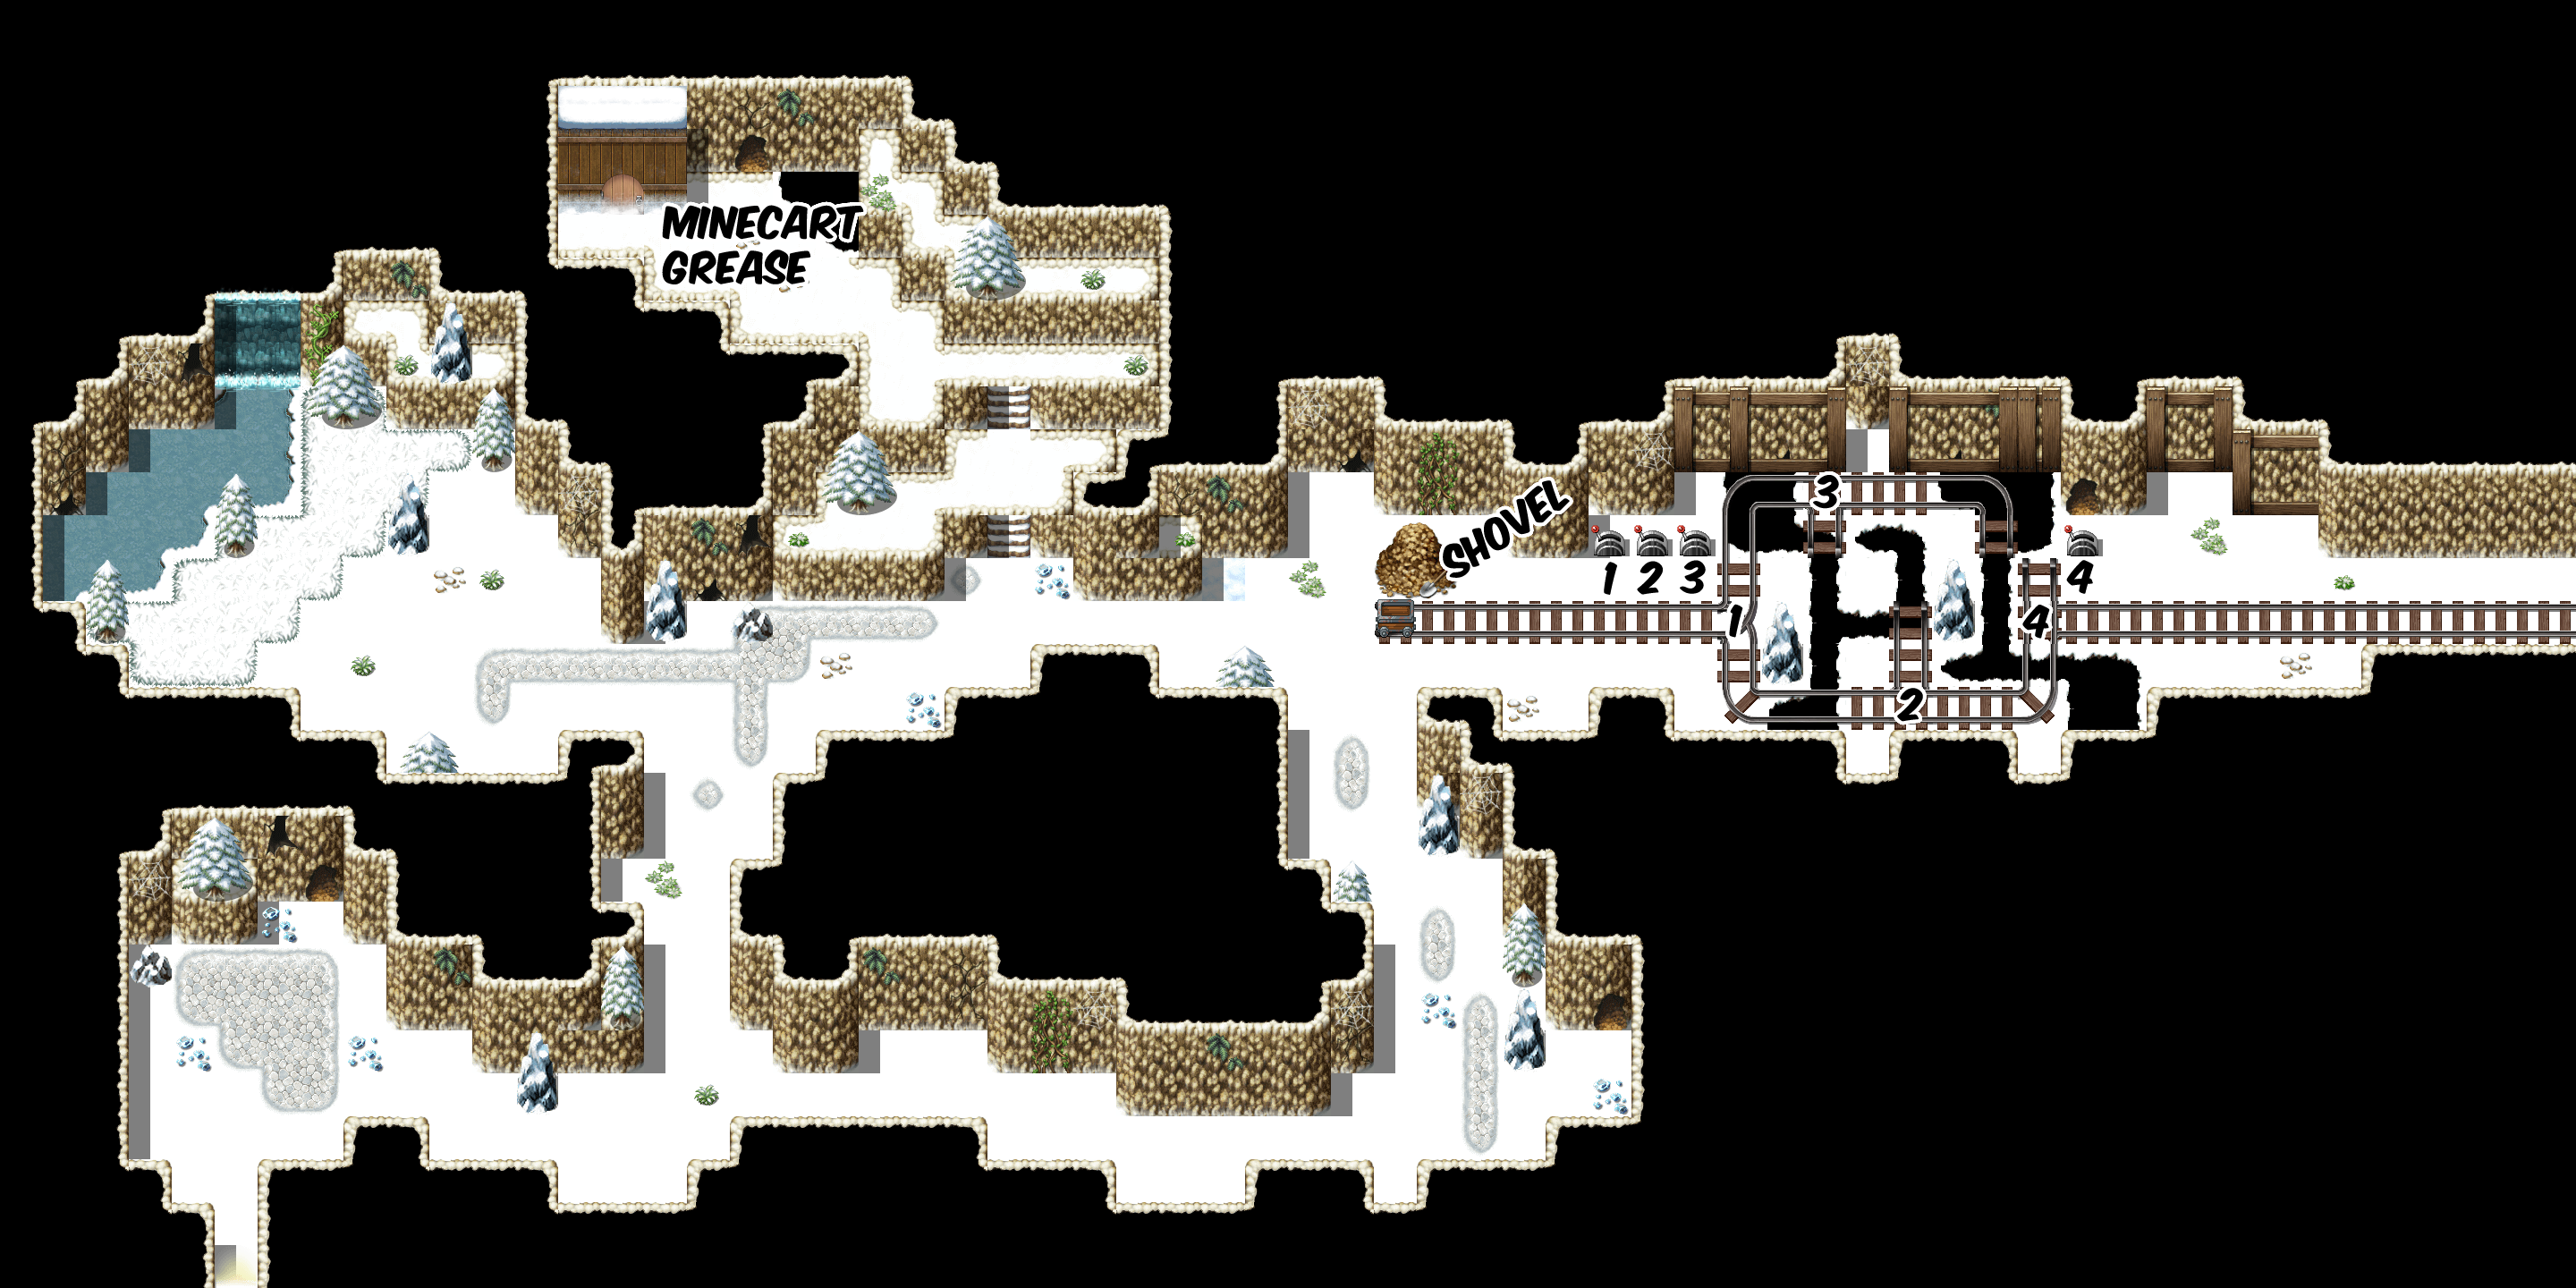
- Before the mine cart can be pushed, the wheels must be greased. If you try to push it, you can move it a few spaces, しかし最終的には, it will become too heavy and you will be told so. Go north to the small hut to find the grease, then apply it to the mine cart. It will now move much easier.
- がある 4 switches that change the direction of the tracks. 3 アクセス可能です, その間 1 ではありません.
- Next to the mine cart is a shovel. 掴んでください. You can now use the shovel in the gravel pit to fill the mine cart.
- If you fill the mine cart with gravel and then push it, it will go to the end of the track as currently configured and unload its load.
- Switch the tracks and push the filled minecart to the end of each section to make a walkable path to switch 4.
- Hit switch 4 and jump into the mine cart. You will drive to the next screen.
- (オプション) Before you fill each section with rocks to build the bridge, you might want to hop in the empty cart and drive it first. You will be dropped into a hidden room below, which you can easily get out of. But in this room is a rusty sword. Getting it will start an optional side-quest to reforge the blade.
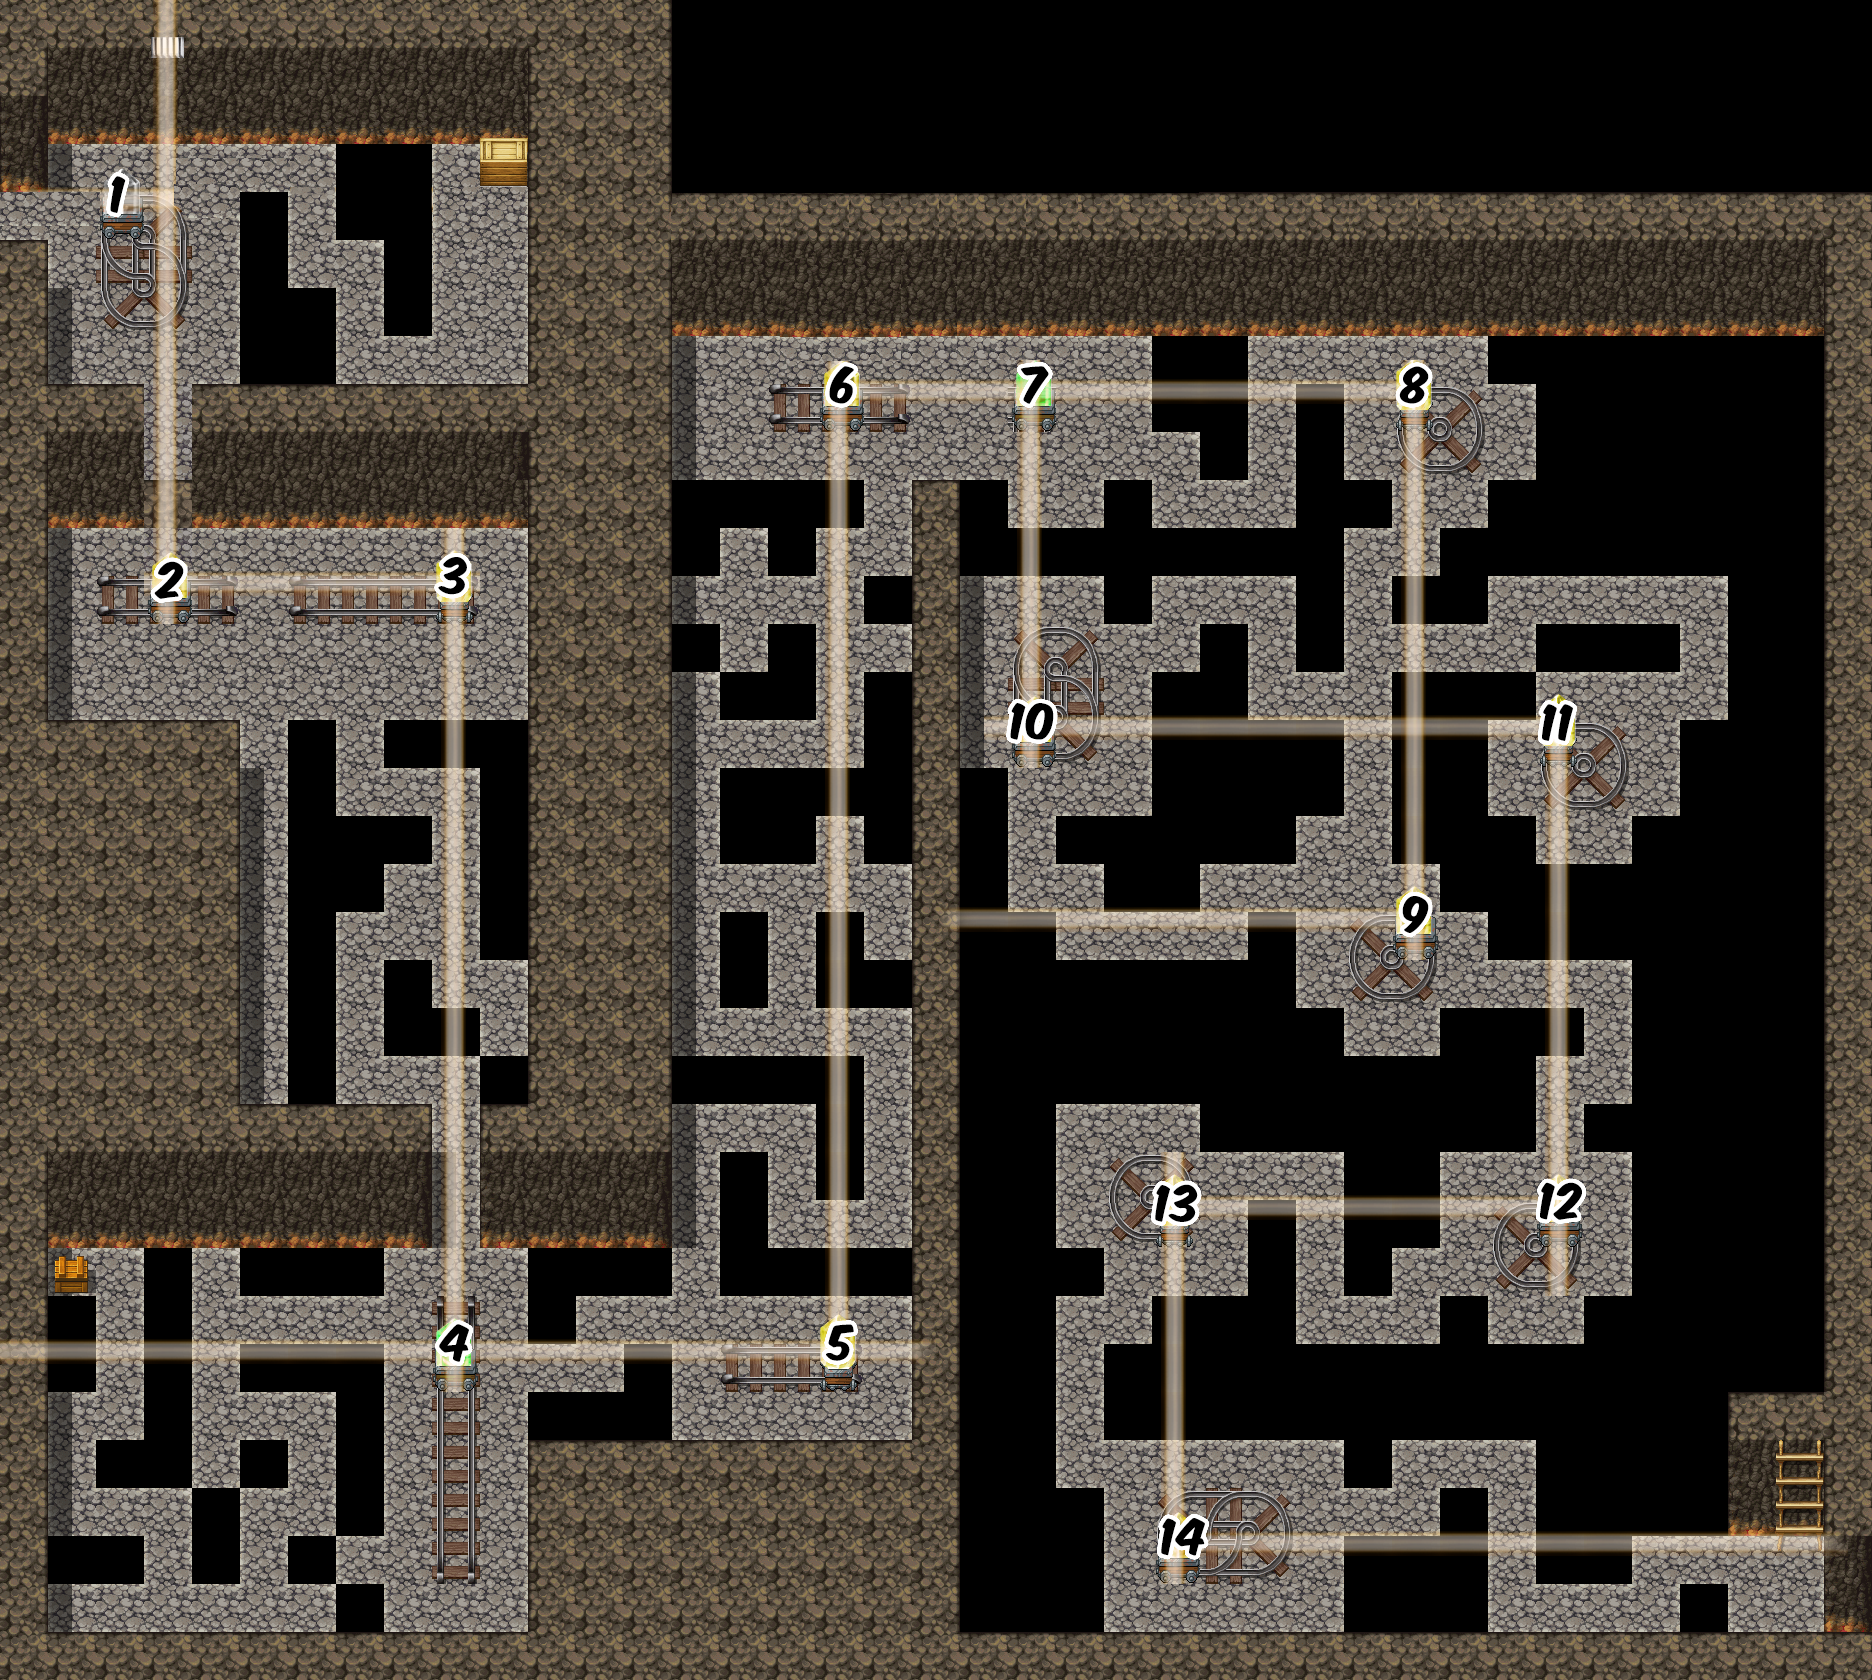
部屋 2

- You will enter the 2nd room on the right side near two switches.
- (オプション) Jump back in immediately to reach the middle chest. You can drive the cart back to the lower right to hit the switch to change to segment 6. Drive it back to the chest and then back again. This will bring you back to where you started.
- Go ahead and hit switches 1 と 2.
- Drive the cart up to the upper switches (3, 4 と 5).
- Hit switches 3 と 5.
- Drive the cart to paddles 4 と 6.
- Drive the cart back and you should be at the top of the map. Leave the cave to continue.
章 3: Conveyor room solution
この部屋で, the party will split into two groups. Madilyn and Winter will explore the western side, while Auryn and Davos will explore the eastern side. A series of switches must be thrown by both parties in order for both to advance.
Not all conveyors are switchable. The map uses color codes to indicate which switches control which conveyors.

- 初め, let Auryn’s group ride the lower belt to switch 2. This can now be hit.
- Have Madilyn’s group ride the lower belt to switch 1. ヒットしてください. This will allow Auryn to traverse backwards.
- Switch to Auryn’s party and go down, それならそうだね.
- Switch back to Madilyn’s party and use the same lever (レバー 1) また.
- Switch back to Auryn’s group and go right to button 3. ボタンを押す 3.
- (オプション) Have Auryn’s group go north on the conveyor to get the chest. Switch back to Madilyn’s party and hit button 1 again to make him backtrack.
- Madilyn will have to press button 1 again for Auryn to go left (if she hasn’t already pressed it for the chest) and then up.
- Have Auryn’s party navigate left, それから上へ (上で述べたように) to button 5. This button is optional and will allow Madilyn to access a chest in the upper left corner of the map. Whether you hit the switch or not, jump into the pipe to return to the center.
- Continue with Auryn’s group and ride the upper belt (marked red) to the crossing.
- Switch back to Madilyn’s group and finally head north.
- (オプション) If Auryn hits switch 5, she can ride the belt to the optional chest and then hit the switch to return.
- Have Madilyn’s group hit switch 4.
- Back with Auryn’s group, they should be able to continue north on the belt, which will take them to switch B. Hit that switch and go through the pipe to emerge in the center again.
- ついに, with Madilyn’s group, go north on the orange highlighted belt to switch A. Hit it and take the pipe back to the center.
- Hitting both pads A and B will reverse the central conveyor and allow the party to proceed.
章 4: Catacombs solution
Players will find themselves in a dark catacomb beneath Ivalace. So dark, 実際には, that the only light comes from a sewer grate. しかし, thanks to some conveniently placed crystals, the players can redirect the light to see the way forward. Some crystals can be moved to “スカウト” ahead so that players know where it is safe to step and where it is not.
気をつけて: if you step off the edge, you will fall back to the beginning of the room and take damage.
部屋 1 serves as a teaching room for how this mechanic works, と部屋 2 serves as a more challenging room to apply what you’ve learned. まだ, this can be a challenging area for some players. Rather than forcing you to reach for the graph paper, feel free to use the maps below.
While you can use these maps to blindly navigate to the end, here is an explanation of what is expected.
部屋 1

- Push the crystal one block to the right. This will cut the light and allow you to see enough to get to the next crystal.
- Push this crystal down to intersect the light beam. This will shoot light down and intersect another crystal, shooting light to the left.
- Navigate through this passage and push the crate onto the trigger pad. This will open a passage directly to the north.
- Now you can push the crystal up to light the way to the exit. You might want to move it up and down a few times to get the path. Or just use the map provided here for navigation.
部屋 2
部屋 2 is much more challenging. 前述したように, you can use this map to blind walk to the exit if you wish. さもないと, this is what is expected of the player.
- Push Crystal 1 into the light to see the path to the right. You might want to move it up and down a few times to see the whole path.
- Go right and push the block onto the trigger pad. This will open a passage to the south.
- Move Crystal 1 out of the way to allow light to travel through the newly opened passage.
- Continue south and move crystal 2 to intersect the light, which in turn will hit crystal 3, sending the light south.
- The left side can be moved down freely to “スカウト” the path as you adjust crystal 3, but eventually you will need to move it all the way to the right.
- Go south and you will see that the light has intersected with a green crystal. Green crystals will split the light into 2 new paths instead of 1.
- (オプション) You can move crystal 4 up and down to “探検する” the path to the left. This will allow you to navigate to a hidden chest.
- Align crystal 4 so that it intersects with crystal 5.
- This area is a bit trickier as there is no path to fully scout ahead. The player can move Crystal 5 around and make some progress, map out what they can see, and then move back to realign the crystal. 最終的に, the crystal must be pushed all the way to the right.
- As you move up the path, make sure that crystal 6 intersects with the light. This will send the light into crystal 7 and split it into two paths.
- Move forward to crystal 8 and adjust the position to the upper left corner. This will send light down.
- Move south to crystal 9 and move it to the top right position. This will send light to the left and allow you to see to reach the next crystal. Watch out for the edges.
- Go left to crystal 10 and cross it with the light. Your next stop will be crystal 11. To intersect properly, 結晶 10 needs to be in the bottom left corner, but you can move it up and down a bit to see the path first.
- Move to crystal 11 and place it in the upper left corner. This will send light down.
- Go back to crystal 9 and follow the path to the right to crystal 12. Watch the edge and move crystal 12 to the top right position. This will send light to the left.
- Move carefully to the left to reach crystal 13. Slide it into the lower right position which should send light down.
- Move south to the last crystal. Move crystal 14 all the way to the left to cross the light beam. You can move it up and down freely to explore the path ahead. Grab the ladder to escape the catacombs.
章 4: Ivalace city foundations solution
Ivalace City Foundations can be a challenging area. There are many encounters, the map is large, and it’s not always obvious where to go. Below is a map of the Foundations, along with a guide to get you through.
注記: Your party is not equipped! (Of course they are. They were in jail.) Make sure you go into the menu to re-equip their gear from the previous scene.

- The heroes will enter from the southeast corner. The only way forward is to the left and north. しかし, this will trigger a false floor and land them in the catacombs. (See this guide for the solution.) They will emerge at the point on the map marked “Catacombs Exit“
- ここから, 北へ向かう. Foundations has a series of ladders leading to underground paths. From this point there are two ways you can take.
- (オプション) パスB will take you to an area with a few items and a lost girl. You can choose to take the girl with you to help guide her out of the dungeon. Note success or failure doesn’t matter if the girl becomes knocked out. In combat she is mostly useless. Although she can be used to an effective degree to use items such as potions on party members, or molotov cocktails on enemies.
- If you took path B, 後戻りする. 取る path C to the north.
- (オプション) To the northeast of here, どうぞ path D to reach a chest.
- The way forward is obscured by a false wall. しかし, light shines through it, as well as a carpet, giving the player a hint that the wall is passable. Navigate to section E and take the passage at path F to the north.
- ここから, simply go right and take path G 右の方へ.
- The exit is locked. To progress from here, 頭 右 to the next area.
章 4: Antechamber riddle solution
The Antechamber of the Source contains a riddle in which the players are expected to examine 3 colored statues. The statues make statements. A tablet in the central northern area explains that one statue always tells the truth, one statue always lies and one can do either.
Based on this information, the players have to determine which colored statues are which. To paraphrase:
- The Paladin always tells the truth
- The Illusionist can tell a truth or a false
- The Assassin always lies
The statues individual statements are as follows:
- Green Statue: I AM THE ILLUSIONIST
- Red Statue: BLUE SPEAKS TRUTH
- Blue Statue: I AM THE PALADIN
Based on this information, you need to figure out who is who. がある 3 colored switches on the north wall that are used to determine who the player thinks is who. When you think you have set the switches correctly, test them with the yellow switch on the far right. If you are correct, the way forward will open.
SOLUTION
- Blue is the Paladin, he was telling the truth. Red is the Illusionist, but he decided to tell the truth. This leaves Green as the Assassin.
説明:
- If we assume that Blue is the Paladin, as they claim, then Red cannot be the Assassin, or else they would be lying about Blue. That leaves the Illusionist. It also means that green lied, which makes him the assassin.
- If we assume that blue is the assassin, then red could possibly be the illusionist. But that only leaves green as the paladin, and they claim to be the illusionist. So this combination is invalid.
- ついに, if we assume that Blue is the Illusionist, then Red could possibly be the Assassin, covering for Blue’s lie. They can’t be the paladin because blue would have lied. しかしまた, green claims illusionist. No one claims Paladin. So this combination is also invalid.
All bromide locations
章 1
Hiro’s Bromide 1: Hiro’s house 2F in the wardrobe on the right side of the house.
Winter’s Bromide 1: Frostbite Inn on the right side in the inn room on a table.
Madilyn’s Bromide 1: Shalav Temple Ruins on Crescent Island on the right side near the tablet.
章 2
Madilyn’s Bromide 2: The Order of the Wind in the room right of the main chamber in a bookshelf.
Hiro’s Bromide 2: Pleasure Island Casino right of the bar on a side table.
Winter’s Bromide 2: Davos’ guest room on top of a barrel.
Davos’ Bromide 1: Icedale Castle 2F in the dining room to the right of the throne room on a chair.
章 3
Hiro’s Broom 3: North of Auryn’s house on the side of the cliff.
Winter’s Bromide 3: Winter’s mother’s house in her old room on a shelf.
Madilyn’s Bromide 3: Fort Tetryn Order of the Wind Storeroom, right of the main entrance down.
Davos’ Bromide 2: 3rd Seal on the right side of the main room on a skull statue.
章 4
Winter’s Broom 4: The Golden City dwelling between two beds.
Madilyn’s Bromide 4: Ivalace Order of the Wind main room right of the desk on a shelf.
Hiro’s Bromide 4: Mining cave near Bredon Village.
Davos’ Bromide 3: Temple of the Source room on the right.
章 5
Davos’ Bromide 4: LEGION Fortress north of the bridge on a barrel before crossing the lava a second time.
Hiro’s Broomstick 5: Dark Citadel 2F up on the right on a dragon statue.
Madilyn’s Bromide 5: Realm of Bahamut in the lower left corner of the map.
Winter’s Bromide 5: Ivalace Slums, north of the inn.
これが今日私たちがこの目的で共有するすべてです スピリアの英雄たち ガイド. このガイドは元々、次の者によって作成および執筆されました。 WhatsUpHiro. このガイドを更新できなかった場合, これに従って最新のアップデートを見つけることができます リンク.