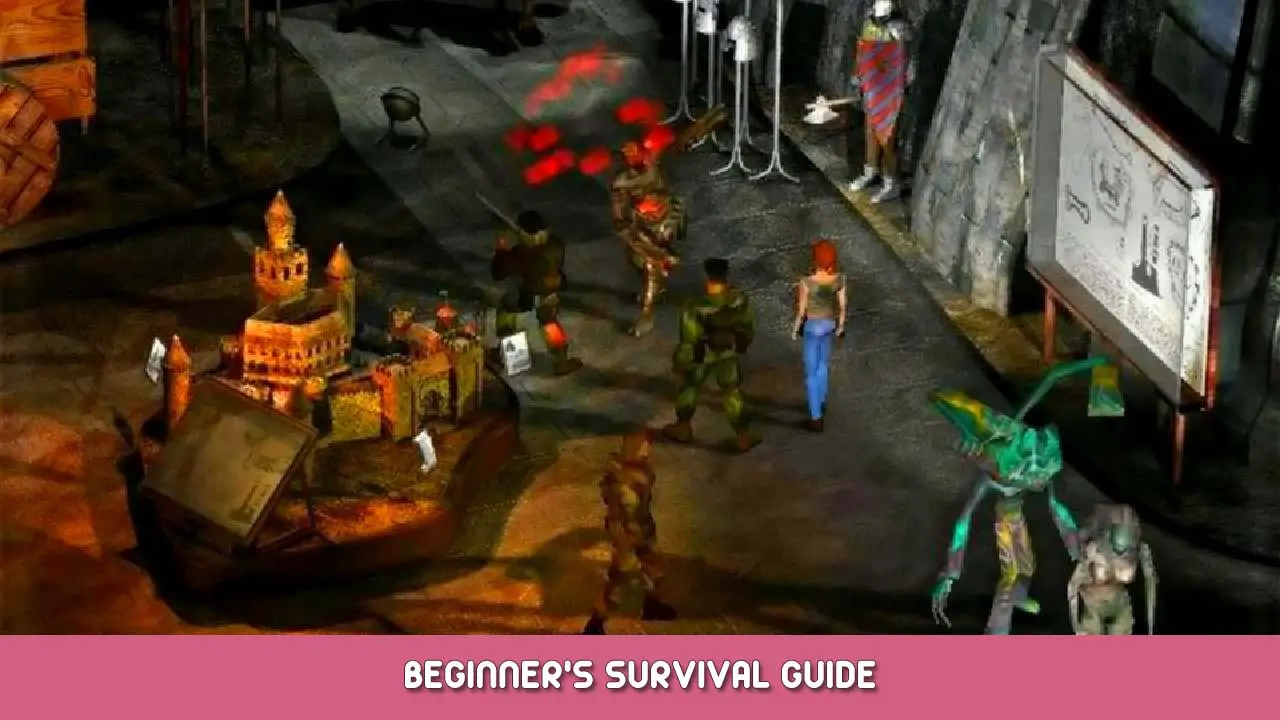

- タイトル: ゴーキー 17 Beginner’s Survival Guide
- 発売日:
- 開発者:
- 出版社:
Information about Gorky 17 Beginner’s Survival Guide is still incomplete. これを使用してゲームの詳細を記入するのにご協力ください。 お問い合わせフォーム.
A Guide for new Players helping out with gameplay mechanics and how to optimize your chances of surviving the battles
序文
This Guide aims to give new players a helping hand if they struggle in certain parts of the game or have trouble understanding gameplay elements.
Later parts of this Guide give some tips to the areas without going too much in-depth (They are also put in Spoiler so use them only when you can’t move forward!)
Please refer to Walkthrough Guides for more detailed help for each encounter/puzzle.
Also take a look at the manual if you haven’t since there is no in-game tutorial.
ノート: One thing i advise to skip in the manual is the story explanation (especially 2nd half) since it spoilers way too much!!!
Character Stats and Leveling Up
When damaging or killing Monsters the Character is rewarded with experience and at certain points gets an ‘Level Up’ と 5 Points to distribute in the following categories (except Walk Range):
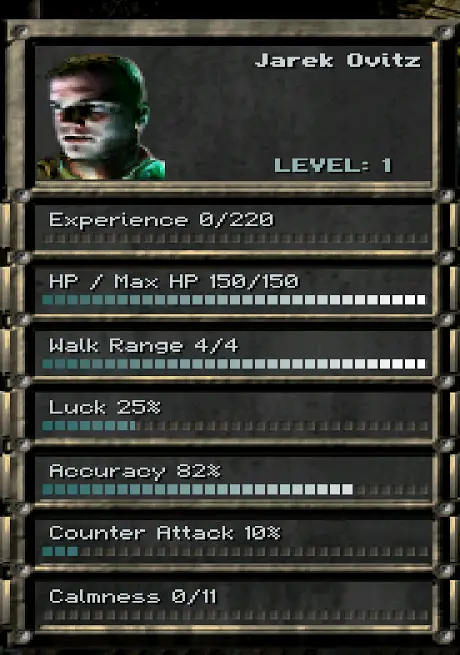
– First Priority: HP Pool
Bigger HP Pool is the first thing you should raise.
Ovitz for example has 150 HP from the start which is perfect enough for the rest of the game.
Therefore raise the other 2 main Chars HP Points to “150”
– Second Priority: 正確さ
Good Accuracy prevents missed shots which can be fatal depending on the circumstance.
A Value of “95%” is the minimum but you can go to “100%” if you feel more secure with that.
– Third Priority: 運
Having a big Luck Value gives you in return chances to inflict critical shots for more damage.
You can raise the value as high as you want since there is no minimum here and this would be the last Category you need to focus on
The other values like “Calmness” または “カウンターアタック” are very situational:
–Calmness avoids getting in “怒り” Mode for one round which ensures bigger damage but low accuracy. Not really worth spending the few points for this
–カウンターアタック is a valid alternative if you don’t want to raise your Luck Status since it gives you higher chance to inflict a counter attack upon being hit by a monster. The only downside is that you can only attack with your current equipped 武器, so in case you got for example a weapon currently charging there is no way to counter attack!
Additional Characters for your Party
You will encounter Survivors throughout the Game which may or may not join your group and help even in coming battles.
For those Characters outside the main three there are certain rules which apply to them:
- They are only temporary and 意思 leave your party at certain cutscenes
- Not all can handle every weapon which makes sense since most aren’t even military trained
- Some require help and if you are too late or don’t have the right tool you may lose them!
The best way to use them once they join your team are the following tips:
– Leveling Up
Most of them have a low HP Pool so you can use the same advise as for your main characters by raising their HP Points. Alternatively if they have low Accuracy you may want to raise those stats at the same time.
– Weapon Equipment
Give them a basic weapon like the Pistol, a Knife/Bat/etc. and Throwable Objects like Grenades, ウォッカボトル, 等.
This should suffice for them since their stay is limited.
– Take away their Equipment before they leave!
When the Cutscene appears where they depart from your group, they will also take with them all the items in their inventory!
Make sure to save often and take their equipment away before they leave!
探検
Outside Encounters you walk around with your Team to find the exit to each Area.
Here are some few tips to help you what to look around for:
– Key Items are to be used in the current Area
Leaving aside story relevant items you gather, some items you find can be used to gain access into new areas (keycards, キー, 等) while other items only work in combination with the environment to get new items (チェスト, 等)
Keep in mind that such items are to be used in the current area you found them since they have no use in the next area so make sure you have found every part of the map where to use them!
– Extra Chests during Combat Phase
During the first Area (ポート) で 2 Encounters you will find chests lying around during a fight. It’s important to know that these chests only exist during this fight and disappear afterwards so make sure to get to them before you end the fight!
– Explore the Areas for Chests before engaging Boss Encounters
Boss Encounters are fixed throughout the game, but they don’t put themselves in the way so you can decide to explore other parts of the area for looting more equipment before engaging them.
This small Difference can sometimes make a Boss Fight much easier (especially at the beginning!) so make sure to look around as much as you can before venturing into these fights
戦闘
Here are some important tips to keep in mind during battles:
– Don’t rush…
Let the monsters come towards you while you can use the round(s) to position yourself more favourably. Especially later on you get more AoE (影響範囲) Weapons like Grenades, Rocket Launcher etc. which greatly benefits from monsters being “herded” in clusters for dealing maximum damage.
– …but don’t delay unnecessary!
On several Maps, reinforcements come at certain rounds if you take longer taking out the enemies that were present on start.
Depending on your resources you can use this to gain extra experience points since combat is the only way getting them and encounters are fixed throughout the game.
– Block the Entrance for Reinforcements!
If you fail on certain encounters, try to remember where new monsters spawned after a couple of rounds. By blocking the grid where they would enter with one character you effectively block them from entering the map. Use this to increase your chances of winning the encounter but be aware that the moment you move the character away before all enemies are wiped out it will spawn next round as soon as possible!
– Use Close Combat Weapons to save Ammo
At the beginning you won’t have many weapons or even ammo, so you need to use the close combat weapons you find or have as default (ナイフ). Some of those weapons have a better damage retention on heavier armor while others excel on lighter armor so make sure to read those infos in the inventory before.
– Enemies with AoE Damage can’t hurt themselves
Some Enemies like “牙” use AoE Weapons (例えば. ロケットランチャー, 等) to deal Damage on multiple Characters but will make sure they have enough distance and space to use them. You can use this to your advantage by cornering them if the situation allows it since they can’t fire their weapons if cornered without any possibility to move!
– 位置決め
By attacking an enemy on his sides or even behind gives some extra damage (+2 for side and +4 for rear attacks)
This is also valid for your characters so make sure to position yourself correctly 前に you end the round so that enemies won’t score extra damage on you
– About Immunities and Weaknesses
As in the Manual described, enemies are immune to certain elemental attacks (fire/energy/etc.) or status changes (stun/freeze/etc.)
The Game tells you when an enemy is immune to such a type of attack and will list it automatically from then on when you hover over the enemy and see symbols under their name:
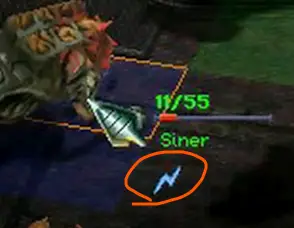
This Info is tracked throughout the game, so you don’t need to memorize each immunity once discovered.
As a rule of thumb you can mostly expect that enemies who use rocket launchers are immune to fire (they are vulnerable to explosion weapons though)
Tips for each Area
I will show you some tips here in this section, but please refer to these only when you have no clue or need some extra help since most of these are spoiler!
ポート
- You can use the plank you find near the bodies to reach the shotgun where the boat landed on the cutscene
- Against the Boss “Grandma” you can use the tactic to shoot one shot of the napalm launcher (you need the gas tank into the tunnel to get it) and kill its children. Afterwards the Boss will only attack the one who killed her children. With your remaining Characters corner her until she can’t move and thus can’t attack anymore. Your other character should go in defense position all the time
- In the North Left Section of the Area where you encounter a Boss, when you go more on the right you find a cabin with a safe. If you go from there north you get an encounter with a “singing monster”. If you protect it from the garcias you get a “ヒント” about the Password for the safe after the enocunter
Sewer
- In the last fight before exiting the Area, you fight against a Fang and some Hounds. To make this fight easier, you can corner the fang until he can’t move anymore and thus unable to attack back
博物館
- Use the tactic to block the grid where enemies would spawn in the first encounter after entering the card in the terminal
- You can find the Character “Medusa” which will join your team if you save him. If you reach the rooftop section of the museum and go further after the boss encounter (スティンガー), you will lose him and forced to fight it. It doesn’t have to end like that if you don’t further explore but return back with the new card to exit the museum. He will then help you out in the city area
- If you further explore the rooftop and fought against Medusa, you can find a new character (Slavsky) further south-east who will only join your team if you use a stun grenade on his hideout
市
- You can actually avoid the boss fight against “人形” which is under an archway near the truck in the south where you get back to the northern street. Just go around from where you entered the city and go westwards
- The Device you find in a parking garage to attract monsters also works against soldiers!
- You need a crowbar to get the ION Cannon which is located south where a matrix disc is hidden
研究室
- You can also avoid the boss fight against “Incubus”. Just don’t step onto the white light 🙂
- Against the invisible enemies you need to remember on which grid they finished their action or use the rifle and see on which grid the range suddenly is shorter which gives a hint where it lies. Explosive Weapons like Rocket Launcher can kill them in one shot and Grenades can also help out spotting them due to their AoE