- タイトル: FINAL FANTASY II
- 発売日:
- 開発者:
- 出版社:
Information about FINAL FANTASY II is still incomplete. これを使用してゲームの詳細を記入するのにご協力ください。 お問い合わせフォーム.
Leveling in Final Fantasy II can be a complicated matter: between the difference in leveling system (compared to other installments) and seemingly random criteria for leveling up specific stats, even a veteran Final Fantasy player can become confused. A leveling guide can, したがって, be of significant aid to those who recently bought the game. しかし, most existing leveling guides focus on power leveling through the use of nifty tricks, without digging deeper into how these tricks work or providing any alternatives for them. したがって、, this leveling guide will take a different approach: instead of handing the reader a handful of tricks to level stats and skills effectively, this guide will first attempt to explain the criteria required to level up each stat/skill, after a which a section is provided on how to use this information in practice. さらに, this guide will focus on leveling stats/skill through regular gameplay (つまり. progressing through the game with (比較的) little grind). While this will not allow you to fully max out each stat on each character, it will definitely prepare you for the final dungeons of the game, where proper allocation of stats and skills matters greatly.
前文
This guide is based predominantly on personal experiences playing the game (in combination with some (基本的な) 研究) と, したがって, should be treated as such. While most of the information in this guide should be reproducible and verifiable, some aspects of the game are even (まだ) unknown to me. I will try to indicate whenever this is the case within the guide. さらに, I will try to update the guide when new information presents itself. さらに, this guide is specifically designed for the Pixel Remaster of Final Fantasy II. したがって, information listed in this guide might ない apply for other versions of the game. 最後に, while the purpose of this guide is to provide new players with information, advice on how to build your characters is (たいてい) beyond the scope of this guide. While general advice on which stats to raise and which weapons to use will be given (または, 少なくとも, links to appropriate sources), this guide will not tell you which builds are most viable, as nearly any build can be made viable, with some care.
Leveling stats: General breakdown
Before elaborating on the leveling process of weapons and spells, それはです, 多分, interesting to focus on the stats behind them. These stats will be familiar to most Final Fantasy players (as they tend to get re-used often), but should be briefly treated nevertheless. The image below shows a list of end-game stats for one of my characters:

The stats listed here are from top to bottom:
- 強さ: Raises the damage and accuracy of physical attacks (including bows).
- 精神: Improves the potency of white magic spells, whether damaging or healing.
- 知性: Raises the damage and efficiency of black magic spells
- スタミナ: Increases your maximum hit point total by the value of the stat on level up. Also raises your magic defense.
- 機敏性: Improves your evasion stat and raises your initiative in battle, allowing you to attack first more often.
- 魔法: Increases your maximum MP total by the value of the stat on level up. Also raises your magic defense (similar to Stamina).
- 攻撃: This stat is determined by your weapons (またはその欠如) and your strength stat. それ, したがって, cannot be raised directly through training (only indirectly, through strength gains).
- 正確さ: Two numbers are shown here: a multiplier and a percentage. The multiplier states the maximum amount of hits a character can make with a weapon and is determined by your character’s skill with said weapon. The percentage is a hit chance, which is determined by the equiped weapon and your character’s Strength stat. したがって, while the multiplier can be directly raised by training your weapon skills, the percentage is only indirectly raised through Strength gains (or weapon upgrades).
- 防衛: Reduces damage taken from physical attacks by the stat’s value (最小限まで 0). Is determined solely by the character’s armor (and can, したがって, not be leveled).
- 回避: Determines how many “ヒット” of an opponent’s attack you can evade. The two numbers are analogous to the numbers seen for accuracy: the multiplier determines the maximum amount of hits you can evade, while the percentage is the chance to evade each individual hit. Only the multiplier can be leveled directly by getting targeted (repeatedly) by a physical attack.
- Magic defense: Determines your resistance to magical attacks (both damaging and non-damaging). In a similar vein to Evasion, the multiplier determines the (見えない) number of (見逃せない) hits you evade, while the percentage is the chance to evade each individual hit. As damaging magic spells always have a minimum amount of unavoidable hits, these spells will still do damage, even if your magic defense is maxed (50% of their maximum amount, in the best case scenario). もう一度, the multiplier can be leveled directly by becoming the target of a magical attack.
As listed above, がある 8 stats that can be leveled directly: 強さ, 精神, 知性, スタミナ, 機敏性, 魔法, Evasion and Magic Defense. The leveling criteria of each of these stats will be treated more in depth in the following section.
Leveling stats: In depth analysis
強さ, Spirit and Intellect:These three stats are lumped together, because they have similar leveling criteria (when compared to one another). Each of these stats will level when the player performs an action affected by the stat. 例えば, Strength will level up by using physical attacks, Spirit will go up by using white magic and intellect will go up by using black magic. It is important to note here that the chance to level these stats is non-zero (but small) even after a single action and rises steadily with each action performed. したがって, while attacking (or using a magic spell) more often per battle raises the odds of gaining a stat level up, incidental level-ups from a single attack or spell-use are possible. This is quite contrary to how leveling works for weapons and spells, as will be discussed later on in this guide. While I am uncertain how many actions will guarantee a level-up, I have found out that this number is (最も可能性が高い) 間 10 と 20 attacks for Strength, with similar number being found for Intellect. While I haven’t researched the effect of the opponent’s battle rank on the level gains of these stats, 私 (個人的に) haven’t experienced a drastic upsurge while progressing throughout the game. したがって、, the influence of battle rank will likely be small to negligible.
Intermezzo: What is battle rank?Battle rank is an (見えない) parameter which indicates each opposing monster’s power. It ranges between 1 と 7 for most monster in the game and can be found for each monster species in the bestiary. Some skills will level up faster against monsters of a higher rank, while others seem unaffected. まだ, knowing the average battle rank of the creatures you’re fighting can greatly improve your leveling efforts.
スタミナ:Stamina is the most commonly grinded stat among Final Fantasy II players for one simple reason: it’s easy to grind to max level. The odds of a Stamina level up are determined by a single criterium, namely the amount of hit points lost during a battle. Please note here that, contrary to other versions, any loss of hit points is counted in the pixel remaster, even when the character is healed back to full health during combat. したがって、, most players grind Stamina by damaging themselves on purpose and subsequently healing said damage. しかし, スタミナ (およびHP) grinding does come with a risk. Throughout the late-game dungeons, the player will run into plenty of opponents (including the final boss), who can drain a percentage of your character’s hit points through physical attacks. したがって, high hit point values, combined with a low evasion stat, can lead to a significant healing influx for opponents, as well as large damage number for your characters (larger than the values your Cure spell will heal). したがって、, while grinding Stamina is simple (and well documented), it should be done at your own risk.
魔法:The Magic stat is very similar to the Stamina stat in the way it gains levels: its sole criterium for a level-up is the amount of MP used (または失われた) during a battle. While MP can be lost by casting spells during combat (with the potential of gaining an Intellect or Spirit level), another way to lose MP is by using spells like Sap, Osmose or Swap on your characters. The advantage of this method is that your characters lose MP faster, but a disadvantage is that they don’t use the MP they lost on the leveling of other stats and spells (except for Sap, Osmose and Swap). 一般的に, it should be simple enough to gain levels in Magic for any character that casts multiple (high-level) spells per battle without grinding, but if capping MP is something you wish to do, grinding has (比較的) little downsides. Do note that MP caps at a rather low value (999), thus much Magic grinding isn’t needed to end up with the maximum amount of MP.
機敏性:Agility is one of the most important stats in Final Fantasy II, as it raises Evasion and gives you the opportunity to act first. It is also one of the most discussed stats in the Final Fantasy II community, as there is no real concensus on how to level the stat reliably. Some claim that Agility is leveled by evading your opponent’s attacks (through constant defending), but I have found that this didn’t work when I tested it, even after prolonged periods of evading attacks with characters that wore two shields. Some state that Agility gains are entirely random and they’re right to some degree, but there is one stat that will affect Agility gains: 回避. While my proof for this is anecdotal, I did notice during my playthrough that Maria (who was dual wielding knives) fell behind with regards to Agility compared to Firion and Guy (who both wore a shield), despite having the highest Agility stat at the start of the game. それから, after she equiped the Main Gauche (which greatly raises evasion), she suddenly started to gain on them once more. This result is, furthermore, consistent with other players’ findings. Aside from raising Evasion, けれど, no other course of action seems to (大幅) influence Agility gains. I have witnessed characters gaining an Agility level after a protracted battle with lots of evading and after short battles, where the lucky character neither dealt nor received a blow. したがって, my only conclusion is that the only criterium for an Agility level-up is the presence of a character in battle (生きている, つまり), with the chance for a level-up being improved by increasing Evasion.
Evasion and Magic Defense:Both these stats are lumped together as their leveling criteria match each other: both stats can be raised by getting targeted repeatedly by physical and magical attacks respectively. Do note that the targeting part is key here: attacks don’t have to connect to gains experience in these stats. さらに, it seems that the amount of experience correlates with the number of times a character is targeted, with a possible lower threshold that needs to be reached depending on the stat’s level. しかし, I can’t state the latter with certainty, as the experience gain for both stats is invisible. It should be noted here that these stats are influenced by the opponent’s battle rank: opponents with a higher rank will yield more experience (this is one of the secrets behind the forced Captain spawn trick). したがって、, if you want to efficiently raise Evasion and Magic Defense, wait until later in game, when you are stronger and can reliably access higher rank opponents. 一般的に, don’t worry about Evasion and Magic defense in the early game, as the worst thing enemies will do is poison you. If you do find yourself in need of extra Evasion, try using spells like Blink and Shell (after leveling them) to gain extra Evasion and Magic Defense respectively.
最後にメモとして, it should be mentioned that three of the main characters (Firion, Maria and Guy) will each receive a permanent 10 point bonus to Strength, 機敏性, Spirit and Intellect upon interacting with the crystals at the top of Mysidia tower. これらは 10 free levels of each stat that you don’t have to grind if you play it smart. したがって、, excessive level grinding can be disadvantageous in this case.
Leveling weapon skills: Weapons overview part I
Now that the statistics behind the skills are discussed, it is time to get into the bulk of this guide: skill leveling. Weapon skill is the first topic up for discussion, but before we can do that, we first have to discuss the weapons themselves.
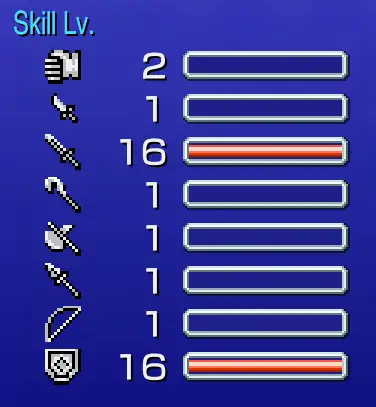
Weapon overview:In Final Fantasy II, がある 8 different weapon skills that can be leveled up: 剣, スピア, Staves, 軸, ナイフ, 弓, Shields and Unarmed. Each skill governs a different weapon type and can be raised to a maximum of 16. Each skill is shown on the right side of the status screen, as shown in the figure below:
各武器, except for the bow, can be dual wielded (シールドを含む). Dual wielding weapons will allow you to attack with each equiped weapon each turn, which raises (合計) ダメージ. Equiping a weapon and a shield will only allow one attack. If two shields are equipped, only one attack will be made as well and it will count as an Unarmed attack in the Pixel Remaster. それにもかかわらず, your shield will still gain levels alongside your weapon, despite no attack being made with it. An overview of the various weapon types will be given below.
剣:Swords are the most powerful weapon type in the game. Not only are they the most prevalent weapon type in the game (と 14 different swords to use), but the strongest weapon in the game, 正宗, is a sword. These facts, and their decent-to-good accuracy, make them a staple for at least one of your fighters. Due to their broad variety, upgrades for the sword are (比較的) easy to come by during the game, which smoothens out the spikes in your character’s power curve. さらに, swords like Defender also greatly improve your Evasion. One disadvantage of swords (and most weapons in general) is their penalty to magic use. In this regard, swords give a penalty of 50%, which can be significant if it’s the character’s only penalty (much less so if other sources, such as armor, give penalties as well). それにもかかわらず, Sword users can still use spells, but expect a dip in damage/healing output (except when they use the most powerful swords, as those have a smaller magic penaly). On a final note: while swords are among the most powerful weapons in the game, this should ない encourage you to make everyone in your party a Sword user, as you only receive a single copy of the most powerful swords during your playthrough (with additional copies being hard (or impossible) to obtain in the Pixel Remaster).
スピア:Spears are a weapon type that sits in the (broad) mid-range when it comes to offensive potential. Spears trade in damage (compared to the sword) for additional accuracy. This is useful during early parts of the game, but loses most of its shine late game (when high Strength values compensate for low accuracy). まだ, the strongest spear (the Holy Lance) caps out at a reasonable 90 base attack (と 70 base Accuracy), which isn’t much lower than most other weapon types (barring swords). A common trend with spears, しかし, is that they often seem to deal some type of elemental damage (or deal extra damage to certain types of monsters), どれの (situationally) improves their power. さらに, spears have a magic penalty of 40%, which is a slight improvement compared to weapons like Swords and Axes. 一般的に, けれど, spears are mediocre (but not bad).
Staves:Staves are one of a few special cases among usable weapon types, as they’re one of the few weapon types that can effectively be used by magic users. The magic penalty of Staves is only 5% (except for the Mace, Mithril Mace, Werebuster and Power Staff, which have a penalty of 20%), which is low enough to effectively use spells. それとは別に, staves aren’t very powerful, trading in even more base attack power for accuracy. それにもかかわらず, for a spellcaster they’re the strongest weapons around. The Diamond Mace (or Diamond Staff) in particular sports a base attack power of 90 with an Accuracy of 75, making it (技術的に) better than the Holy Lance above. 残念ながら, you’ll only receive one of those, so your damage output will not be stellar. それにもかかわらず, Staves are a very good choice if you want to make a battlemage- or cleric-like character.
軸:Axes are the weapon type of choice for any character relying on brute force. ゲーム序盤, they gain a boost in base attack power, in exchange for a decrease in accuracy. This additional power comes in handy if you’re fighting opponents with high defense stats (which can negate weaker attacks). Just like swords, けれど, they sport a magic penalty of 50%, making them unsuitable for magic users. 試合終了までに, けれど, swords win out on Axes, both in power and accuracy. This doesn’t mean that axes are useless, けれど. Axes still have an edge when it comes to base attack power (compared to other weapon types), while their low accuracy can be remedied with a high Strength stat. The Rune Axe, 特に, is a good example of this, と 95 base attack power and 60 base Accuracy. It should be noted here that this axe can be obtained as a random drop several hours before its peers, making it a powerful upgrade at that point. Other honorable mentions are the Ogrekiller (extra damage against giants) and the Poison Axe (one of the few weapons to inflict a status effect on enemies). 結論は, Axes are a solid weapon type with great potential for a secondary fighter who isn’t using swords.
Leveling weapon skills: Weapons overview part II
ナイフ:Knives are the second weapon type in this guide that can be used effectively by magic users, 彼らのように, あまりにも, have a magic penalty of 5%. 残念ながら, Knives aren’t very powerful early on in the game, 彼らのように (もう一度) trade base attack power for accuracy. Their base attack power is even lower than Staves of a similar ranking, making them somewhat unreliable in combat. それにもかかわらず, they do gain in power tremendously as the game progresses, making them nearly as strong as some of the weapons listed above (the Cat Claws cap out at 86 base attack power and 80% base Accuracy, which is still respectable). Their greatest benefit, けれど, comes from the secondary effects attached to them. 例えば, Main Gauche is the first weapon you obtain with an Evasion bonus that can rival a shield, while Ripper deals additional damage on top of its regular damage (which bypasses Defense entirely). Even knives like Cat Claws and Orichalcum deal additional damage to Spell Casters and Aquatic creatures respectively, giving them a (situational) edge.
全体として, Knives are a decent weapon type, despite their lack of power.
弓:Bows are an unusual weapon type for this game: They’re the only two-handed weapon type and the only weapon type which is fully effective from the back row. They’re also ridiculously underpowered. Most bows even lag behind in power compared to knives of the same rank, despite being used with both hands! This means that your damage with bows will be pitiful at best. Their accuracy isn’t great as well, so using them near the start of the game will leave you with a serious handicap. Bows also have the greatest penalty to magic of all weapons: a whopping 70%. This means that they shouldn’t be used by magic users (who are better of slinging spells). One advantage of the bow, それにもかかわらず, is that they add a double strength bonus to attack (つまり 99 additional attack at maximum strength). 残念ながら, this isn’t enough to salvage them, as their power near the end of the game remains lackluster (90 base attack power for Yoichi’s Bow is quite poor, as you can’t use a second weapon). したがって、, you should try to avoid using bows in this game (unless you want a challenge).
シールド:Shields are a special weapon type, as they aren’t used for attacks at all. それにもかかわらず, shields have a small amount of base attack power, although I’m not certain if it is used in any calculations. 前述したように, equipping one shield will only leave your character with one weapon to attack with, while equipping two shields will make your character perform an Unarmed attack. Shields will, furthermore, level up alongside your weapon (counting the number of turns you attack with said weapon for their experience gain calculations). The greatest benefit of shields (besides their resistances) is the fact that they yield large amounts of Evasion. This Evasion bonus is multiplied by the level of your shield skill, resulting in obscene boosts to Evasion at higher Shield levels. The aforementioned elemental resistances are another reason to equip shields, as they vary from various elements and poison to resistance related to status effects. A downside to shields is their high penalty to magic use, sitting at a hefty 70%. それにもかかわらず, it is advised that any non-magic users wear shields during the first half of the game, as they’ll need the additional Evasion to stay in the game.
Unarmed:Unarmed is a weapon type unlike any other weapon type in the game. As unarmed characters use no weapons, the base attack power of their fists scales with the skill’s level. This scaling is quite strong (で 8 points per level for both fists), which results in unarmed characters outperforming weapon users by a significant margin power-wise. 例えば, レベルで 16, 両方 fists will have a base attack power of 128, which is only surpassed by the 150 base attack power of Masamune (of which you have only one). さらに, the base Accuracy of the unarmed skill is set at 80, so it isn’t lacking in that regard either. さらに, fists have a magic penalty of 0%, so fighting unarmed can be a viable option for a magic user.
There are some downsides to using unarmed attacks though. Unarmed requires you to go all-in with regards to its use. Using unarmed with another weapon is impossible (as only the equipped weapon is used), while using unarmed with a shield drastically reduces its power (に 64 と 32 for main- and off-hand use at level 16 それぞれ). This means that it will not be viable to equip any weapon as an unarmed fighter. 加えて, unarmed fighters don’t benefit from the extra evasion gained from weapons and shields. Even a generic weapon will provide 2 points of Evasion per weapon level in the Pixel Remaster (から上がって 1 point in the original version). それは 32 points at skill level 16 (または 64 if you’re dual wielding) that your unarmed fighter will miss out on! This will only increase if your character equips one or more shields. As Evasion is your most important source of protection in Final Fantasy II, this means that unarmed fighters are glass cannons by default: Their offensive power will be high, but they’ll be strapped for Evasion (と, 結果として, 機敏性). したがって, unarmed can be incredibly powerful, but requires careful character building to provide sufficient Evasion. As this character building takes time (and effort), using unarmed near the start of the game isn’t advised.
Leveling weapon skills: Raising weapon skills efficiently
Now that the basic discussion of the various weapon types is out of the way, focus can be placed on the leveling aspect. Leveling of weapon skills is quite similar to the leveling of most stats, しかし, それにもかかわらず, has a couple of key differences. These differences will be explained below.
用語: What is an attack?In order to properly explain how weapon leveling proceeds, I will first have to define what constitutes an attack. An attack is an offensive action made by your character with one of their weapons (or one of their fists). それ (明らかに) requires the use of the Attack-command, but it has no other criteria. An attack can consist of one or more “ヒット” あるいは “逃す” entirely, but this does not matter for the game. Regardless of the outcome, whenever an attack is performed, it will be registered as such and count towards the number of attacks needed to gain experience. This also applies to attacks made against your own party members, as the target of the attack isn’t a criterium for experience gain either. したがって、, leveling weapon skills by attacking your own party members is possible (and viable). Another thing of note here, is that character who dual wield weapons make two separate attacks, which both count equally towards experience gained for their weapon skill. したがって、, the fastest way to gain experience in a specific weapon type is to dual wield two weapons of said type.
main hand attack:
off hand attack:
Threshold for experience gain:As most players, who have played past the first hour, have noticed, gaining experience for your weapon skills requires some serious effort from the player’s end. Most players will get their characters’ weapon skills to 3 または 4 early game by fighting bands of goblins and hornets, but will suddenly hit a wall (or ceiling), where they will gain little to no experience from regular battles until later on in the game. This is due to the criteria the game has in place for a weapon skill to gain experience. 分かりますか, one of the criteria the game places on experience gain for weapon skills, is that a sufficient number of attacks has to be made with the weapon to register for an experience gain. The number of attacks required can be calculated by the following formula:
# of attacks + opponents’ (平均) battle rank > level of weapon skill
For goblins and hornets (with battle rank 1), this means that the number of attacks has to be equal to (or greater than) the level of your weapon skill to count. Most players don’t take this into account and will attack a band of 4 goblins with 3 (or sometimes 4) キャラクター, leading to a character making either 1 または 2 attacks per battle (which isn’t enough to register at weapon level 3 以上). したがって、, the best practice for efficient weapon leveling is to let one character attack per battle (while the others use the defend-command or (守備的な) 呪文). This will allow this one character to make enough attacks to register for an experience gain, instead of all characters falling short of the mark. You might ask now: what if I only meet a single goblin? 良い, その場合, you simply use an offensive spell to defeat it, as spells have a different threshold altogether.
Gaining experience at higher weapon levels:By using the strategy mentioned above, the average player might be able to gain a couple more weapon levels from simple, early-game encounters. まだ, a new obstacle looms on the horizon: the number of enemies that can appear during battle is capped at 8. したがって、, fighting goblins and hornets will only get your weapon skill to level 9 せいぜい (assuming each attack will defeat one enemy). This means that a different strategy is needed to reach double digits in your weapon skills. 一般的に, there are two ways to go about this (which can be combined).
The first is to find opponents with a higher battle rank. As can be seen from the formula given above, less attacks are needed to gain experience (at a given weapon skill level) if the (平均) battle rank of your opponents is higher. 例えば, if your weapon skill is level 9, and your opponents’ battle rank is 4, それから 5 or more attacks are needed to gain experience. The second method is to fight opponents who can take more than one attack and live. There are various enemies in the game with high defense stats, who can easily take more than one attack: Land Turtles, Adamantoises, all manner of Flans, Gigas, Golems… The list is long. By using the defensive capabilities of these enemies, you can rack up a considerable amount of attacks per foe, which will allow you to reach the lower threshold even at high weapon skill levels. These two methods often go hand in hand, as quite a few of these enemies will have a higher battle rank. したがって, in order to level your weapon skill efficiently, you will have to remember two things: 攻撃 (increasingly) powerful opponents and attack often (with a single character) as your weapon level goes up.
Leveling magic skills: Spell overview part I
Now that we have discussed the various weapon types and how to level their skills, it’s time for magic. Magic works a bit different in this game, compared to other Final Fantasy games. 初めに, there is only one version of each spell (the base version), instead of the -ra, -aga and -aya upgrades you find in the other games. 例えば, Final Fantasy II only has the Cure spell, but no Cura, Curaga and Curaya. その代わり, as you level Cure, the rank of your Cure spell will increase and, それと一緒に, its power. Second of all, the amount of MP a spell uses is equal to its rank. それで, レベル 10 Cure spell will cost 10 MP. 三番目, everyone in your party can learn any spell from tomes that can be found throughout the game. したがって, you can mix and match spells for your characters as you please. It should be noted here, けれど, that your characters can learn up to 16 different spells, which is still rather limited despite the lack of upgraded versions. 4番目, and most obviously, spells can be leveled in this game, which improves the spell’s potency to varying degrees, depending on the spell. A brief overview of all the obtainable spells in the Pixel Remaster will be given below.

Spell overview: Black magic:
- 火, ブリザード, Thunder, Scourge, フレア: These spells are lumped together, as they all deal damage of some type: Fire deals fire damage, Blizzard deals ice damage, Thunder deals lightning damage, Scourge deals poison damage and Flare has no element related to it. Of the bunch, Flare deals the most damage (double the amount of base damage as the other spells), but it can’t hit for additional damage against opposing monster with a weakness, like the other spells can. It should be noted here that all of these spell, except for Flare, can be absorbed by specific opponents with immunities to them. This will cause the spell to heal the enemy instead of damaging it, which can come in rather conveniently if your trying to level a spell. It should also be noted that casting a damaging spell on an entire group divides its damage by 8. したがって, use single target spells if you want to deal serious damage.
- ドレイン, Osmose: These spells drain HP and MP respectively. While HP is easy enough to come by, MP is worth mentioning, as it’s limited in supply. したがって, 2つの, Osmose is the most useful. それではまた, most players use Osmose to drain the MP of their own characters (to level the Magic stat), so it’s mainly used for that. It should be noted that both spells have an opposite effect against Undead foes (のように, they will Drain/Osmose you).
- 寝る, 気絶させる, 停止, 混乱, 盲目, 呪い: All these spells apply a status effect to your opponent (or your own characters, if you are so inclined). They all inflict the status effect they’re named after (except for Stop, which inflicts stun). They also need to be leveled rather rigorously to inflict these status effects reliably, as each level adds an additional charge to your non-damaging spells (similar to how “ヒット” work with weapons). You’ll mostly see them used against you by all sorts of Spellcasters, unless you choose to level (one of) 彼ら.
- ヒキガエル, 壊す, 死, ワープ: These are all instant-death spells when used against most, 全部ではないにしても, opponents. While they require rigorous training, most of these spells can trivialize the game when used effectively, as they can end battles in one move (through targeting the entire group). Toad deserves a special mention, as even most of the bosses can be toaded (including the final boss), making this spell an easy way to play through the game. Of these four spells, both Toad and Warp have other uses: Toad also cures the toad status on your characters, while Warp transports the party to the previous floor of the dungeon out of combat. This can be an effective way to raise the skill of this spell.
- 速攻: This spell deserves its own bullet due to its function. Haste works by adding an additional swing to the target’s attack for each succesful “cast” (where the maximum number of casts is equal to the spell’s level). This can increase the number of “ヒット” of your fighters drastically (even at weapon level 16), raising your damage output with both weapons. When used in conjuction with Berserk (以下を参照してください), it raises your damage exponentially, allowing most fighters to slaughter even defensive bosses with impunity. 残念ながら, Haste does not stack, as it selects and uses the most potent of multiple Haste buffs instead. それにもかかわらず, Haste is one of the most powerful buffs in the game and is easily obtained as a random drop from Sorcerers. 最後に, it should be noted here that Haste is rather dangerous on enemy Spellcasters, as they can buff their fighters with Haste to break through your Evasion (with often devastating consequences). したがって, if the opposing Spellcaster has Haste, try to take it out as soon as possible.
- ベルセルク: Berserk is another spell that deserves its own bullet, due to the way it works. It adds an Attack bonus to the target’s main-hand weapon, which is equal to the caster’s Intellect/4 +5 for each succesful “cast” (for a single-target spell). This makes it a very potent buff, as it can easily add a significant amount of Attack, even at moderate intellect scores and spell levels. What makes it even more powerful is the fact that it can スタック. This means that if several Berserk spells are cast on a single fighter, their damage will quickly rise to astounding levels. It should be noted here, that the spell’s power will be far lower when it’s cast groupwide, as this will split the spell’s accuracy in half, while dividing the Intellect bonus by the number of party members. While the tome can only be bought late game, it can be found as a common drop from Magicians in the game (making it rather easy to obtain early on).
- オーラ: Aura is another spell with a rather specific function: It adds a damage bonus against specific creature types for each succesful “cast” (まで 8 different types). This damage bonus usually comes as an additional Attack bonus (commonly +20). While a creature type bonus is added for each succesful “cast”, these bonuses are not cumulative. したがって、, attacks against an Undead Dragon would not benefit from both the bonus vs. Dragons and the bonus vs. アンデッド. それにもかかわらず, the wide variety of bonuses make it a useful spell, if you’re not using Berserk instead. 確かに, of the two Attack buffing spells, Berserk is the better of the two. まだ, if you have spell slots to spare, this spell could add some variation.
Leveling magic skills: Spell overview part II
Spell Overview: White magic:
- Cure: A staple spell in Final Fantasy, Cure heals the HP of your characters. さらに, from Final Fantasy II onwards, Cure damages Undead opponents, thus doubling as a situational offensive spell. The healing done by Cure is influenced by the spell’s level, the caster’s Spirit stat and the caster’s magic penalty from gear. When cast on your entire party, the amount of healing provided by Cure is divided by 4. 最後になりましたが、重要なことです, Cure can be used out of combat, どちらが いつも make the skill gain experience (the same applies to other out-of-combat spells) とです, したがって, the most efficient way to level the skill. しかし, Cure can’t target characters at full health (out of combat), so the player has to (intermittently) damage their characters in order to level Cure out of combat. This is where the Cure-Teleport trick comes in, as Teleport can be used out of combat as well and damages the character that uses it. The only disadvantage of leveling Cure out of combat, is that your characters will not gain any Spirit or Magic stat levels from the repetitive use of Cure, which reduces healing output and available MP.
- テレポート: Teleport is a nifty spell with quite a few uses. It’s most obvious use is that it can teleport your party out of a dungeon (which eliminates a lot of backtracking). The only price you pay for this (apart from MP) is that the caster’s HP is drained by a considerable amount. The amount of HP drained depends on the spell’s level and follows the following formula:
HP drained = (1-1/(17-spell’s level))×最大HP.
したがって, レベルで 1, the spell will drain (まで) 15/16 最大HPの, レベルで 2 it will be 14/15, 等. This HP draining effect allows the player to use Teleport to damage their characters out of combat, which is why it’s used for the efficient leveling of Cure. さらに, Teleport can also be used in combat as an instant-kill spell. While it works similar to other instant-kill spells, the main advantage of Teleport is that your opponents still drop loot, making it one of the more popular instant-kill spells in the game.
- Basuna, Esuna: Both of these spells work in a similar way, but are complementary to eachother. Both spells heal status effects, but while Basuna heals temporary statuses (寝る, confusion, paralysis, venom, silence and mini), Esuna heals persistent statuses (毒, darkness, amnesia, curse, toad and petrification). Both spells also heal only a limited subset of these statuses at level 1, with more status effects being healed as the spells level up. 例えば, Esuna will not heal petrification below level 5, while Basuna will not heal confuse below level 6. さらに, Esuna has a small chance to heal KO’ed characters above level 7 (similar to Life’s effect). Of these two spells, only Esuna can be used out of combat (on characters with a persistent status effect).
- まばたき, シェル: These two spells are eachother’s counterparts in many ways. Blink will raise the recipient’s Evasion multiplier, while Shell will raise the recipient’s Magic Defense multiplier. This makes both of these spells quite powerful, as they can allow you to evade most physical attacks and status effects. It should be noted here that only succesful “casts” will raise the multiplier, so even at high spell levels their effect will be small if your Spirit stat isn’t properly leveled. さらに, these spells can, allegedly, stack with themself (like Berserk), although this is only verified for the original version.
- 守る: Protect will raise the recipients defense by 1/4th the users Spirit stat per “cast”. This can make it useful for raising defense, but if you’re using Blink, you will evade most (全部ではないにしても) attacks anyways. This makes it somewhat of a niche spell.
- バリア: Barrier will give the recipient resistance to various elements (both elemental and otherwise). The amount of elements it protects against depends on the amount of succesful “casts”. As most status spells have an element associated with it, this spell will protect you from status effects from those sources. It will ない protect you from status effects applied by attacks, as those are non-elemental. This makes Barrier a niche spell as well, as its main benefit would be blocking status effects (which it only does partially).
- 壁: Wall has a chance to block Black magic spells from all sources, with the chance to block increasing with the spell’s level. As it blocks Black magic from 全て sources, it also has the ability to block Haste and Berserk spells cast by your own spellcasters. This makes it more of a liability than anything else.
- 人生: Life is Final Fantasy’s resurrect spell and revives one (以上) party members after they get KO’ed. それ, furthermore, kills undead enemies instantly. The spell can be used both in and out of combat and is a useful spell to have, if only to save on Phoenix Down. It is not an easy spell to level out of combat, as it requires a KO’ed party member. It can still be leveled in combat, even if it’s used on a non-KO’ed party member.
- ディスペル: This spell basically does the inverse of the Barrier spell: Instead of adding resistances to allies, it will remove resistances from foes. It even follows the same mechanics as the Barrier spell (including the same order in which it removes elements). It was apparently bugged in the NES version, しかし (allegedly) works in the Pixel Remaster. This spell certainly has its uses, as quite a few creatures (and most bosses) have elements they resist. それではまた, using this spell isn’t vital, unless you want to a specific spell to work against every foe you meet.
- Mini, 沈黙, 霧, 恐れ: Another series of spells which cast a variety of status effects, except for Mini, which will instantly kill any opponent affected by it. Both Silence and Fog will stop the opponent from spellcasting, with Fog being the persistent version of Silence. Fear will cause your opponents to run away, which isn’t very useful, as they don’t drop loot that way. Similar to other status effect spells, the spell’s level will only raise the odds of the spell landing. Some of these spells can be useful, but are generally outclasses by other, more useful spells.
- 樹液: This spell has a similar function as Osmose, as it reduces the target’s MP. It’s advantage over Osmose is that it works against Undead foes as well. 一般的に, it is used interchangibly with Osmose.
- Swap: Swap is a peculiar spell, in that it swaps your current HP and MP with one of your opponents. While this spell could be used to gain HP or MP from bosses (or other damage sponges), it is mostly used to level Stamina and Magic by swapping with weak opponents (such as goblins). それは, 実際には, one of the most favored tools of powerlevelers during the early game, as Minwu comes equipped with the ability (at spell level 3). それにもかかわらず, it’s quite a useful spell throughout most of the game.
- 遅い: Slow is the opposite of Haste: it reduces the amount of swings a character (or foe) makes by the amount of succesful “casts”. This can be very useful against opponents who inflict status moves through physical attacks, as they will make less attacks (which lowers the odds). まだ, if you use Blink, you’ll have little use for this spell, so either choose one or the other.
- 聖なる: Holy is the White magic version of Flare, although it’s weaker than Flare. As it runs of Spirit instead of Intellect, only use this spell on characters with high Spirit and low Intellect scores. Contrary to what the name states, それは ない deal extra damage against Undead foes.
The Ultima spell, due to its complexity, will receive its own appendix at the end of the guide.
Leveling magic skill: Efficiently raising spell levels
Now that we’ve handled the details on each of the available spells, we can discuss how to level each of them efficiently. 初め, けれど, we will have two make a distinction between to different kinds of spell use: in-combat use and out-of-combat use. While spells can be leveled both in and out of combat, the leveling progression is quite different for both cases, as will be discussed below.
Out-of-combat leveling:The first case to be discussed is out-of-combat leveling, as this is the most efficient method to level a spell. It’s also a bit of a fringe case, as only a handful of spells can be used out of combat: ワープ, Cure, テレポート, Esuna and Life. The reason this way of leveling is so efficient, is because the used spell will gain (a small amount of) experience each time it’s used. したがって、, you don’t have to spam the spell during combat hoping to reach an (見えない) threshold, as each use will count. Using a spell out-of-combat does have an additional requirement, けれど, as the spell needs fulfill its purpose to even get casted. 例えば, Cure has to heal at least one hitpoint to get casted out of combat, while Esuna and Life need a (persistent) status or a KO’ed character to work. Warp and Teleport, さらに, only work inside (特定の) dungeons and nowhere else. したがって, satisfying that condition is paramount to leveling these spells efficiently. This might be easy for spells like Warp or Teleport, but can be quite challenging for spells like Esuna and Life. したがって, these latter spells might best be leveled in combat, where they can be cast, even if there isn’t an appropriate target for them. As for the amount of casts needed per level: This amount (明らかに) increases with the spell’s level, but I have no idea what the specific numbers are. A rough guess from leveling Cure from 15 に 16 would put the amount of uses between 20 と 30 for that specific level-up, but this is only a rough estimate. While this may seem much, it is still far more efficient than leveling in-combat.
In-combat leveling:The remainder of the available spells have no option to be cast out-of-combat (they’re grayed out when used through the Magic tab) と, したがって, have to be leveled in-combat. This works similar to how weapon skills are leveled: The number of times a spell is used added to the opponent’s average battle rank needs to reach a certain threshold based on the spell’s level. Where it differs from weapon skill leveling is how this threshold is calculated. Even though I couldn’t find an equation for this, it’s quite obvious from playing the game that spells have a lower threshold for experience gain than weapon skill. Most spells (少なくとも, 私の経験で) will gain experience from incidental in-combat use up to approximately level 7 または 8. その後, repeated use is required for any experience gain to register. This means that to level these spells past level 8, focus on a single spell (or small set of spells) is needed. This threshold can, もちろん, be altered by fighting opponents of a different battle rank. 例えば, fighting foes in the final dungeon even allows level 10 spells to gain small amounts of experience after only two uses, showing once more that the threshold for spells is (a bit) more lenient. The question that now remains is: How do you level these spells efficiently. The short answer is: through repetitive use. The longer answer will be given below.
Leveling offensive spells:Offensive spells can be hard to level, as they deal increasing amounts of damage to your opponents (or your characters) as they go up in level. This can limit your usage of those spells, as your target needs to stay alive to repeatedly use a spell on them. 1つ (簡単) way of circumventing this is using spells against foes with an immunity to said spell. 例えば, most of the foes found in and near the Snow Cavern are immune to Ice. したがって、, 彼らはそうするでしょう
得health when they’re hit by Blizzard, making them the perfect training targets. This will only work for elemental spells, けれど, as non-elemental spells aren’t resisted at all. それで, if you wish to level spells like Flare, Holy or Ultima, a different strategy is needed. Another way to circumvent this issue is by casting your offensive spells on a group of enemies. This will reduce the damage done to each opponent to 1/8 of its regular value, even if the group consists of only two foes. Doing this will allow you to get a bit more spell uses out of every battle. Another way to reduce damage is by wearing bulky weapons and heavy armor. This will raise your character’s magic penalty, reducing the damage of their spells. Do note that this doesn’t work for Ultima, as this spell ignores the magic penalty from gear.
On another note: while it’s tempting to go all-out and use up all your MP in a single battle, it’s actually more efficient to pace yourself and spread your MP over a handful of battles (言う 5-10). This is because stat levels are only gained once per battle. したがって、, if you spend all your MP on one battle, you’ll only gain one level in Intellect/Spirit and one level in Magic. If you spread your (合計) MP over 5-10 戦い, the odds are quite high that you’ll exceed that amount and gain several stat levels in each, while the effect on spell leveling will be marginal at best.
Leveling buffs/debuffs:Buff and debuffs are significantly easier to level, as they will not directly harm you or your enemies (most of the time). したがって, all you have to do is repeatedly use the same spell(s) and hope enemies will not run away too quickly. As some spells will remove enemies from the field (Toad and Mini, 例えば), it might be best to use these spells on your own characters (who will not be driven away). It should be noted here that it doesn’t matter whether the spell connects: As long as it’s used, it will register for experience gain. This is particularly important for spells like Basuna, Esuna and Life, which can be leveled even if they miss their mark entirely. One thing to keep in mind here is that, because some buffs stack, they will put additional strain on the game’s CPU use. This means that an overdose of buffs can seriously slow down the game, to the point of inaction. したがって、, try not to be too greedy when leveling buffs and debuffs and try to respect your computer’s limits.
Life used on living targets:
Leveling instant-death spells:表面的には, this seems to be a difficult case: How do you repeatedly use a spell that can kill an opponent with a single hit? 幸運, there are smart ways to circumvent this for most instant-death spells. 死, 例えば, is absorbed by Undead foes, making them immune. Spells like Toad, Break and Mini can be used on your own party (with less devastating effects), while spells like Warp and Teleport can be leveled outside of combat with ease. したがって, leveling these spells isn’t significantly harder than leveling buffs/debuffs, if used properly. Even if you don’t want to apply these tactics, you can always cast these spells on a group of opponents, spreading the number of “casts” over the entire group (which ensures that they will be absorbed by the foe’s Magic Defense).
On a final note: While all spells can be leveled to level 16, most of them will not gain much benefit from the last few levels. This is due to the Magic Defense stat of your opponents. The multiplier of this stat will cap out around 8 for most endgame enemies (except for Golems and the Iron Giant). したがって、, leveling a status effect spell or instant-death spell past level 8 will all but guarantee that the spell will hit in single target cast. While the spell can be leveled further to also strike its mark when used on a group, this is more a quality-of-life improvement, as the spell will be fully reliable against single targets.
Leveling through gameplay: a practical example part I
Now that we’ve discussed methods for weapon skill and spell leveling, it’s time to examine how to use these methods in practice. そうするには, I will give a brief review on how to use these methods in regular gameplay, using the events of a regular playthrough as a guideline. While this might not be a pure powerleveling strategy, it will get you (fairly good) results over time.
During any playthrough, your party will start in Altair and your first goal will be to reach Fynn and return with a ring. Within Altair and Gatrea, you will find the basic form of any weapon available in game. In Altair, you’ll also find tomes for Cure, 火, Blizzard and Thunder, which you should try to get as soon as possible. It is also advisable to equip most (全部ではないにしても) of your characters with shields initially, to gain Agility more quickly. After buying weapons, armor and spells, travel from Altair via Gatrea to Fynn. During your travels, you’ll be accosted by Goblins, Hornets and Leg Eaters, usually in groups of 2-5. Start by training your weapons (you might not even have all of the spells) and attack with your full party for the first couple of fights. This should get the weapons of your characters to level 2 または 3 with ease. From weapon level 3 以降, focus your weapon training on a single character per battle, as they will need the attacks to raise their weapon skill levels further. When faced with a small group of opponents (1 または 2), use offensive spells instead to take them out. As your weapon skill levels reach 4 または 5, most of the groups you meet will not give you any weapon level experience anymore. このような場合, switch to focusing on spell leveling instead (which also raises Intellect). さらに, try to level Cure in-combat to gain some Spirit level-ups as well. All other stats will gain levels by themselves, although some will level up more slowly than others.
ノート: I haven’t adviced grinding HP/Stamina yet, because you’ll gain (incremental) HP gains approximately every 10 戦い, even without leveling Stamina.As you reach Fynn, try to avoid the Captains for now, as they might pose too much of a challenge for you, この時点で. その代わり, obtain the ring, return to Altair and welcome Minwu in your party. Minwu comes equipped with a large list of spells and might seem tempting to use, but you have to remember that he’s a temporary party member. したがって、, you should not invest too much time and effort into him. その代わり, you can use some of his spells to gain some HP/MP/Stamina/Magic levels, しかし、これは完全にオプションです. Make your way to Paloom and do some shopping there as well. In addition to weapon upgrades, you’ll find the Copper Cuirass, which gives as much defense as the Bronze Armor, but with less penalties, an upgrade to your Buckler (Bronze Shield) and several nifty Buff spells (まばたき, Shell and Protect). Buy whatever you need and continue to Salamand via Poft. On the way to Salamand, you’ll spot larger groups of Goblins, Hornets and Leg Eaters, alongside their upgraded versions. This will allow you to further level your weapons (through focused training) to somewhere between level 5 と 6. さらに, try to level your buff spells simultaneously (by casting them with characters who are not attacking). In Salamand, more weapon upgrades await, as well as the tomes for Teleport, 人生, Warp and Sap. As these tomes are quite expensive, you might have to save up to buy them all.
From Salamand, head out to Semitt Falls. This trip will be the first time you’ll see a full group of opponents (8 合計で), so use this opportunity to train your weapon skills further towards level 6 または 7. Once you reach Semitt Falls, further train your weapon skills on large groups, while using smaller groups for spell training. Watch out for Balloons, けれど, as they use an attack called Self-destruct, which causes significant damage to your characters. それにもかかわらず, this can be used to raise Stamina by a bit. This is also the first dungeon where you’ll encounter Undead, so use Cure (or Life, if you have it) on them to train those spells as well. As you move on to the lower levels, you’ll encounter Green Slimes and a Land Turtle (as a surprise encounter from a chest). Both of these foes are excellent for weapon training and by the end of the dungeon, your characters’ weapons should easily reach level 7. Proceed to the final boss of the dungeon (a Sergeant) and obtain the Mythril for the Rebellion, after which you can return to Altair.
After delivering the Mythril to Altair, buy some mythril weapons (とシールド) and continue to Bafsk. ここ, the only notable things to buy are more spells, of which Esuna and Basuna are the most important. それから, proceed to the Bafsk Sewers. This is a short dungeon without a boss, so you won’t level much. まだ, try to get some experience for your weapons, バフ, offensive spells and Cure while you’re there. After this dungeon, Minwu will leave the party (all gear will be unequipped automatically in the Pixel Remaster). それで, continue without him to Salamand, where Josef will join your party. Try out Unarmed combat on him or give him a weapon that’s not useful to any of your other party members. Proceed to the Snow Cavern. On the way there, you’ll meet foes that are immune to Ice (Icicle and Snowman). Use these foes to level up Blizzard, if it’s still at low level. さらに, don’t pass up on the opportunity to level Esuna and Basuna. さもないと, you’ll find plenty of Undead to kill with Cure or Life and plenty of Balloons and Grenades to get some Stamina level-ups. This cave isn’t as suitable to weapon leveling as Semitt Falls, but you’re ahead enough to focus on other aspects of the game. The final boss of the dungeon, the Adamantoise, is something different entirely. This boss has a high defense stat and is highly suitable for weapon level grinding. Take advantage of this and take him out. それから, prepare to say goodbye to Josef.
After obtaining the Godess Bell, fly to Kashuan Keep and find Gordon there, who’ll join your party. Proceed through the dungeon with care and watch out for Shadows, Wraiths and Ghasts, as they can make things hard for you. まだ, your Evasion chance should be high enough to deal with them. This dungeon will be far more suited for weapon level grinding again (as the Adamantoise is a possible random encounter), so you should be able to reach level 8 または 9 in here. まだ, don’t pass up a chance to level both your buffs and your offensive spells in here as well. さらに, this dungeon will introduce you to Ogre Magi, who can be used for some quick experience in Magic Defense. Proceed through the dungeon to reach the final boss: the Red Soul. This boss is an excellent opportunity to gain some experience for your spells, as it absorbs pretty much anything you can throw at him. It also has good defenses and some spells of its own, so it can be used to gain some Magic Defense and weapon experience as well. Defeat the Red Soul and obtain the Sunfire, then return to Altair.
After obtaining the Sunfire from Kashuan Keep, return to Altair and, subsequently, move on to the Dreadnought. Get aboard the ship and, あなたが望むなら, challenge some Captains to a battle. そうでない場合, move through the ship at a regular pace. Keep an eye out for Ghasts, Wraiths and Stunners (as they can either stun or syphon HP), but your Evasion should be high enough by now to prevent chain stuns (レベル 3 に 4). As most opponents come in smaller groups, use this dungeon as an opportunity to level your spells. Try to keep an eye out for Magicians, as they drop the Berserk tome. Teach this spell to your characters as soon as you obtain it, as it’s a great spell. さらに, this dungeon will be the first one where you can get stat boosting armor (Strength and Agility), so use it wisely. One of the chests will spawn a Hill Giga, which you can use to gain some weapon skill experience. Free the captives, blow up the Dreadnought and carry on.
Leveling through gameplay: a practical example part II
After your return to Altair, find Leila in Paloom and use her ship to get to Deist. Obtain the pendant from Deist Cavern, then collect the Wyvern egg and explore the rest of the cavern. In and around this cavern, you’ll find plenty of creatures that can be useful for weapon and spell leveling. On the weapon skill leveling side, there are Hill Gigas, Adamantoises and (as a rare encounter) Gigantoads to attack until your weapon skills are around level 10. On the spell leveling side, you’ll meet plenty of Yellow Souls, who are a somewhat weaker version of the Red Soul in Kashuan Keep. At the end of the dungeon, you’ll run into a pack of Chimera, which have high defenses (と, したがって, can give your weapon skills a boost). They’ll also use Blaze VII, which is an excellent move for leveling Magic Defense. もし, この時点までに, you’re having trouble with Evasion/Magic Defense, あなたのを使用してください (trained) Blink and Shell spells to remedy that. Drop the Wyvern Egg in the pool and return to Altair. Talk to Hilda to start a boss battle against a Lamia Queen. The Lamia Queen can use Blink herself and, したがって, can become fairly resistant to physical attacks. Abuse this to gain some weapon experience, but watch out for her physical attacks (which apply sleep) and her Charm spell (which confuses). また, use Blink and Shell if neccesary. Defeat the Lamia Queen and move on to the Coliseum.
The Coliseum is short and, したがって, will not gain you that many levels. The most important source of weapon skill experience will be the Behemoth near the start of the dungeon. これは別として, try to mainly level up spells. Keep an eye out for Sorcerers (which drop the Haste tome). さらに, look out for Specters, Revenants and Death Flowers, as they can make things difficult for you. After you free Hilda, go back to Altair, then visit the Rebel Camp before retaking Fynn. Inside Castle Fynn you can do two things: either you head straight to the throne room for the boss fight or you explore the castle for some additional encounters. Doing the latter will allow you to go up against some moderately powerful foes, including Captains and Chimeras. It will also allow you to fight some more Magicians and Sorcerors for tomes. Going to the throne room instead will put you up against a Gottos. This foe can become formidable over time, but with decent Evasion, you can still use it to level your weapon skills a bit.
Defeat the Gottos, explore the castle and talk to Paul (in the city of Fynn) to get your next clue. それから, explore the sewers beneath Castle Fynn. In these sewers, you’ll find little variety in opponents. The first floor will have you face mainly Undead (so use Cure or Life), the second floor will set you up against Brains and Changers (don’t even bother too much with them), while the third floor will have you face Killer Mantis. These foes can be used for weapon skill training. The fourth floor will reintroduce Adamantoises, while the fifth floor will have you face Stalagmites (which can be useful for weapon training in large groups). The fifth floor will also contain an encounter with a group of Rhyos (upgraded Chimera). これを有利に活用してください, but watch out for Bad Breath (which petrifies). All throughout this dungeon, you have a small chance of running into Green Souls. These are great, as they’ll mainly heal you (through Cure), while absorbing most magic. Use these encounters to level your offensive spells. Get the White Mask and head to Mysidia. On your way to Mysidia, be on the lookout for Black Flans, which are excellent for weapon training, as well as the rare Behemoth. 今頃, your weapon skills should be approaching level 12. Inside Mysidia, visit the shops for some weapon, armor and spell upgrades. Of the spells, バリア, Swap and Holy are the most relevant.
After you place the White Mask at the pedestal below the city, use your boat to get to the Tropical Island. The first four floors of this dungeon will be packed with Red Mousses and Yellow Jellies, which are excellent for weapon training. Use the other groups to train your offensive magic. また, don’t forget to visit the hidden vendor for some weapon upgrades. At the end of the dungeon, you’ll encounter a group of Big Horns, それは (また) great for weapon skill training. By the end of the Tropical Island, your weapon skill should be somewhere around 13. Return to Mysidia and find the Mysidia Cave east of the town. This cave is a treasure trove for gear and tomes, containing a Gold Hairpin and Black Garb, as well as the tomes for Drain, Osmose and Mini. It also contains a host of powerful creatures, including Black Flans, Red Souls, Rhyos and Flying Rays, which are excellent for weapon skill training. You might also find Ghosts, Cockatrices and Malboros, which should be killed as fast as possible. 残念ながら, this dungeon has no boss for you to defeat. Depending on the foes you face, けれど, your weapon skills will still be level 14 by the end of it.
After obtaining the Crystal Rod from the dungeon, use your ship to get to Mysidia Tower and get swallowed by the Leviathan on the way. The Leviathan is a short dungeon, but it has two things going for it. The first are the Bolt Fish, which absorb lightning (そして、, したがって, excellent to train Thunder on). The second is the variety of enemies who use offensive spells on you. Aside from the Bolt Fish, who use Bolt VIII, there are also Sea Dragons (who use Tsunami VIII) and a single Red Souls encounter (which use a variety of spells). を使用します。 (レア) Manta Ray encounter and the boss encounter for weapon skill training. Inside the Leviathan, you’ll also find several good pieces of gear, including the Twist Headband, Power Armlet and Power Vest. Leave the Leviathan and head over to the Mysidia Tower.
As you reach the Mysidia Tower, you’ll face of against a combination of well-known and brand new enemies. Among the new creatures you’ll face on the first couple of floors are: the Vampire Girl, the Malboro Terra and the (レア) バジリスク, which are all more trouble then they’re worth. You’ll also face Hill Gigas, Killer Mantis and Black Flans, which can be useful for weapon level grinding (although Hill Gigas are becoming a bit too squishy by this point). At the end of the 3rd floor, you’ll face a Fire Giga as a sub-boss. This creature is a serious upgrade over the ordinary Hill Gigas and immune to Fire to boot, so strike away at it with your weapons, while giving it some healing with the Fire spell (until you’ve had enough and finish him off). The next two floors will (potentially) introduce one new creature, の (レア) Ice Lizard, which will be immune to Ice. したがって、, use it to train your Blizzard spell (if you meet it). At the end of floor 5 you’ll be guaranteed to meet an Ice Giga boss, who’s stronger than the Fire Giga and immune to Ice. Try training your weapons on it, as well as your Blizzard spell.
床 6 と 7 are more of the same, with the exception of the Thunder Giga boss, who’s stronger than his cousins before him and immune to Lightning, so train your Thunder spell on him (あなたが望むなら). The final two floors introduce very few remarkable encounters, with the exception of a Gottos and White Dragon encounter (both linked to treasure chests). The former you already know, while the latter is an Ice type dragon with a party-wide Icestorm attack. As the dragon is immune to Ice and Icestorm gives some good Magic Defense experience, it is adviced to stretch this fight a bit longer than you should. Use Fire if you want to kill it fast, けれど. As you reach the final floor, you’ll obtain a variety of stat buffs from the four crystals (強さ, 機敏性, Intellect and Spirit), as well as the Ultima spell. Visit the crystals first, then take Ultima and head back to Fynn. Your weapon levels should be getting close to the maximum (レベルあたり 15), while all of your elemental offensive spells should have gotten a boost as well.
Leveling through gameplay: a practical example part III
Return to Fynn to find your next challenge: the Cyclone. To enter the Cyclone, summon the Wyvern from the mirror at Castle Fynn. While the Cyclone has 7 床, it’s not a long dungeon. 内部, けれど, you’ll find several neat weapons, including Ripper, Poison Axe and Defender. You’ll also be met with a host of Wood Golems, which are excellent for weapon training. You’ll also meet Royal Guards (who act as cannon fodder), as well as Cockatrices, Vampire Ladies, Lamias and Wizards (who should be defeated asap). Some of the treasure chests will also set you up against Generals and a Green Dragon. The former has a high enough accuracy to hit your characters (so healing is adviced), while the latter is immune to Poison. Both of these can be used for some last minute weapon leveling, although the Wood Golems might have made this redundant. After defeating these foes, you’ll face off against the Emperor, who’s actually weaker than the Green Dragon you just fought. The only annoying bit about him is that he’s defended by some Royal Guards and a Wood Golem, who have to be removed before you can attack him. This fight should be over quickly, as none of the foes are actually powerful. As you defeat the Emperor, most of your weapon skills should be at or near level 16. さらに, if you kept up with your spells a bit, those should be surpassing level 8 同じように (some even surpassing level 10). Make your way back to Castle Fynn to receive news about the Dark Knight. それから, set off to Palamecia Castle in the Airship.
As you reach Palamecia Castle, you’ll come across the upgraded version of foes you’ve met previously: Stone Golems, Black Knights, Pit Fiends and Generals. 必要に応じて, use these foes to finalize your weapon training. さもないと, smite them with (強力な) 呪文. You’ll also face off against an Imperial Shadow, a dark clone of the Emperor, who’s stronger than him. This dungeon will also introduce you to the Coeurls, who use Blaster X to paralyse your characters and can inflict instant-death on a succesful physical attack. These are dangerous foes and if your party has difficulty handling them, that’s a sign that your party needs some more Evasion/Magic Defense training (which it should get around to soon enough). Coeurls will make another appearance in the final dungeon as well, so you better prepare for them. As you reach the top floor, you’ll lose your final temporary party member and gain Leon (or whatever you called him). Leon has decent physical stats and reasonable weapon levels, but little MP and almost no Evasion/Magic Defense. したがって, you’ll need to train him a bit to make him catch up with the rest. This can be done by leveling his weapons and spells (which will allow him to gain some Evasion/Magic Defense levels as a bonus). さらに, you can level your party’s offensive and buff spells (必要に応じて), which will provide some additional Evasion/Magic Defense as well. As a general rule of thumb, try to enter the final dungeon with fully leveled weapons, spells above level 5 (preferentially around level 10) and Evasion/Magic Defense multipliers of at least 8.
To reach the final dungeon, you first have to traverse the Jade Passage. Before you do that though, visit Castle Deist to obtain Excalibur. With Excalibur in hand, enter the Jade Passage. Inside the passage, you’ll (また) find several upgraded versions of foes you already met: Abyss Worms, Salamanders, Great Malboros, Chimera Sphinxes and Scissorjaws. Some of these are utterly forgettable, but both Abyss Worms and Salamanders absorb Fire, while Chimera Sphinxes use Blaze XVI as their main weapon. This means that both your Fire spell and your Magic Defense can gain some boosts here. In addition to regular foes, your party will face three boss monster guarding chests: King Behemoth, Blue Dragon and Red Dragon. All these bosses sport high HP and strong defenses, but the Red and Blue dragons also have immunities to Fire and Lightning respectively. Use these bosses for some last minute weapon leveling (if Leon is still not at level 16) or some offensive spell leveling otherwise.
From the Jade Passage, move on directly to Pandaemonium (use Elixirs if your MP is low). Once you enter Pandaemonium, you’ll be faced with another batch of upgraded creatures: Death Riders, Mantis Devils, Lamia Queens, Mythril Golems and Beast Demons. While not exactly invincible, these creatures (and the Coeurls) are the reason you leveled your Evasion stat. Death Riders, Mantis Devils and Lamia Queens inflict HP drain, Paralysis and Sleep respectively, while Mythril Golems hit like a truck. If your Evasion is up to snuff (boosted by Blink, 多分) you’ll easily defeat these creatures. From the second floor onwards, Coeurls will start to make an appearance again, which spells doom for any character with low Evasion stats. Later floors will add Devil Wolves and Devil’s Bloom into the mix, but those are less dangerous (apart from the Devil’s Bloom’s confusion). The fourth floor has some diverging paths you can follow. You’ll also find boss encounters against Tiamat, Beelzebub and Astaroth. These bosses absorb or resist most common offensive magic types and should, したがって, be defeated through physical attacks or non-elemental magic. あなたも持っています (低い) chance of running into the Iron Giant, which is weak against Ice and Lightning and prone to running away after a few turns. Defeat it quickly (use both offensive spells and buffed physical attacks to defeat it) to add it to your Bestiary. The remainder of Pandaemonium doesn’t have much novelty to offer (apart from Masamune), so make your way to the Emperor once more. The shadow form of the Emperor is nothing to scoff at, と 15000 HP, strong defenses and resistances to all sorts of magic. It’s attacks also drain HP, which is why Evasion is favored over raw HP. Buff your party (まばたき, シェル, ベルセルク, 速攻) and hack away with physical attacks (and Flare or Ultima). A dual wielding fighter with both Berserk and Haste (single target) should make quick work of him. それと, you will finish the game with relatively little grind and decent stats.
Appendix: The Ultima spell
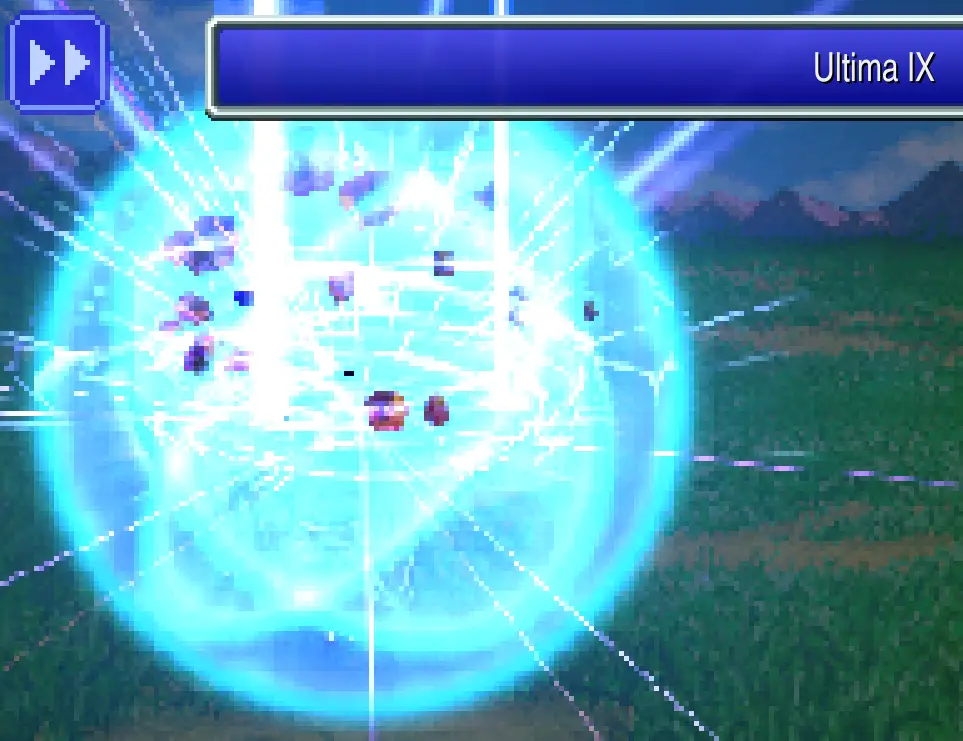
前述したように,
Ultimais a one-of-a-kind spell. Not only does it have a unique power and damage calculation, it’s also the only spell that isn’t influenced by your Magic Penalty from gear or your opponent’s Magic Defense, nor by the character’s Spirit stat. This makes Ultima perfectly suited for magic users and non-magic users alike. The Damage calculation for Ultima in the Final Fantasy II Pixel Remaster goes as following:
- Level sum = SUM(All weapon skill levels + all spell levels)
- Ultima Tier = FLOOR(Level sum/24)
- Base Damage = Ultima Level × (Ultima Tier + FLOOR(Ultima Tier/2))^2 + 100
また, for all of the readers who don’t understand mathematical notations:
- Level sum = all weapon skill and spell levels added up
- Ultima Tier = Level sum divided by 24, 丸められた
- Base damage = Ultima’s level multiplied by 1.5 × Ultima Tier (丸められた) squared + 100
The final damage is equal to the base damage + a random damage bonus (based on the spell’s base damage) + a bonus for critical hits. The damage calculations given above show that, aside from Ultima’s level, the damage of the spell is entirely determined by the total sum of all your weapon skill and spell levels. As your characters have a maximum of 8 weapon skills and 16 呪文, the highest Ultima Tier (with everything at level 16) will be 16 同じように. したがって、, the highest base damage of the spell is equal to 16×24^2+100 = 9316, which is enough to two-shot anything in the Pixel Remaster (one-shot if your lucky with the damage bonus or critical hit). It also can’t be resisted, as it’s non-elemental. As for the spell’s hit rate, it’s listed as a spell with 50% base hit rate, but I’m not certain what influences it (perhaps Spirit, but I’m not sure). それにもかかわらず, I haven’t seen the spell miss yet on my Cleric, which might have something to do with it ignoring the opponent’s Magic Defense. So there you have it: Ultima is a spell with extreme potential, as long as you’re prepared to grind every spell and weapon skill you have. そうでない場合, it’s still a pretty decent spell, which will catch up with your other spells rather quickly at a sufficiently high level (8 or above).
これが今日私たちがこの目的で共有するすべてです FINAL FANTASY II ガイド. このガイドは元々、次の者によって作成および執筆されました。 robincerpentier. このガイドを更新できなかった場合, これに従って最新のアップデートを見つけることができます リンク.