
Using supersampling to take higher-resolution screenshots without those ugly stitching artifacts
introduction
If you like to make GMod posters, you may have run into a desire to take higher-res screenshots than your monitor supports. Par exemple, je’m stuck with a 1080p monitor, which can mean that small details in posters can be difficult to see sometimes.
The common advice you hear for this is to use the « affiche » commande. Par exemple, « affiche 2 » will create a screenshot with 2x the horizontal and vertical resolution (par exemple. 1920×1080 -> 3840×2160). Malheureusement, this method can cause some nasty visual artifacts. To demonstrate, ici’s a comparison, with the same basic shot taken with multiple settings. Comme vous pouvez le voir, the second pic looks awful – the water reflection is totally broken, et là’s a clear seam where the image was stitched together.
toutefois, the album also contains a third image – a proper 4k screenshot with none of these artifacts, en utilisant « supersampling ». What exactly is this, and how can it help us?
Excuse
Excuse involves rendering the game at a higher resolution than your monitor normally allows, and then scaling it down afterward. Il’s normally used as an anti-aliasing strategy (the additional pixels allow a smoother image to be created), mais you can also take advantage of that higher resolution for your screenshots.
It turns out that graphics drivers have built-in ways to enable supersampling. Here are instructions on how to enable it for both Nvidia and AMD cards. If you already know this stuff, feel free to skip to the « What to do with supersampling » section.
Enabling supersampling with Nvidia
Nvidia’s supersampling feature is called Dynamic Super Resolution, or DSR.
- Ouvrir Panneau de configuration NVIDIA. You should be able to find it in the Start menu.
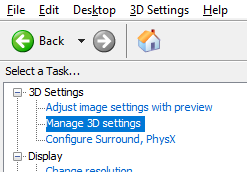
- Accédez au Gérer les paramètres 3D menu, underneath the « 3D Settings » header on the left.
- Assurez-vous de’tu es dans le Global Settings languette, rather than the Program Settings tab. (Enfiler’t worry that the setting is global – this will just enable additional resolution options in your games, ça devrait’t affect anything by default.)
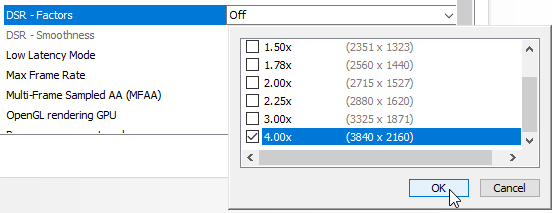
- Faites défiler jusqu'à DSR – Facteurs setting and select it.
- Underneath the Legacy scaling section, check off the resolutions you wish to enable, puis cliquez sur D'ACCORD. (Note, this is based on the pixel count and not the scale factor, so 4.00x is actually just double width and height.)
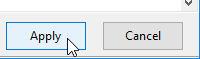
- Enfin, cliquez Appliquer at the bottom to actually save your changes.
Et toi’c'est fini! You can proceed to the « What to do with supersampling » section.

Enabling supersampling with AMD
AAMD’s supersampling feature is called Virtual Super Resolution, or VSR.
Note: Je n'en ai pas’t have an AMD card myself, so these instructions come straight from this article. If someone wants to confirm that these steps are correct, que’d be much appreciated.
- Ouvrir AMD Radeon Software.
- Click the gear icon in the upper right, et sélectionnez le Afficher languette.
- Turn the Virtual Super Resolution setting on. This will enable all supported supersampling resolution options in-game.
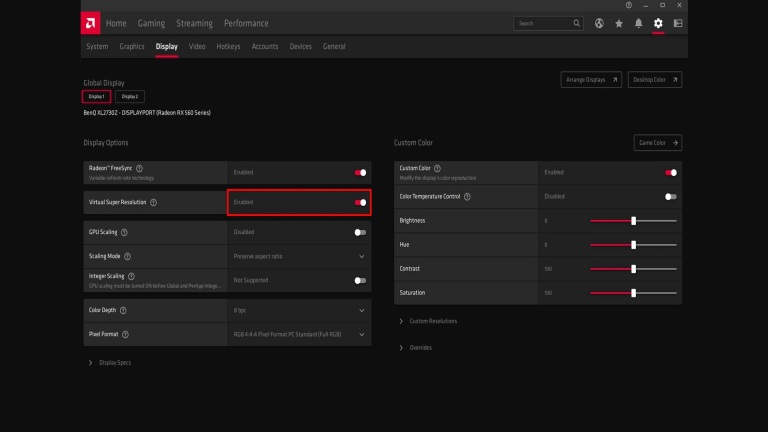
Image credit Alan Bradley, via PCMag
What to do with supersampling
So now you have supersampling enabled, but how do you use it? Il’c'est simple: une fois que tu’re in-game, aller à Possibilités > Vidéo and check out the resolution settings. Si tu’ve done everything right, you should see new option(s) that let you use higher than native resolution.
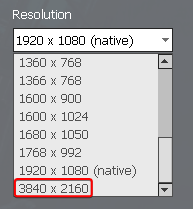
Une fois que vous’re using the higher resolution, all you need to do is use the affiche 1 commande (pas affiche 2, juste 1), or take a screenshot in some other way, and bam – toi’ve got yourself a pic with as high a res as possible, and none of those ugly stitching artifacts!
There are a couple caveats worth mentioning, pourtant:
- GMod ne’t have any UI scaling, so the UI will only show up at half scale and make things very difficult to use. je’je recommande only switching for the moment you’re ready to take the final shot. Le « mat_setvideomode » commande (described below) can help a little with this.
- Ce does not work properly with borderless window. Toi’ll only be able to see the top left corner of the screen. You need to use proper fullscreen mode if you want to see the whole game (bien que le « affiche » command will still work fine regardless).
Shortcut command to change resolution
mat_setvideomode is a console command that simply changes the resolution and display mode settings. Il’s not strictly necessary, mais ça’s a very nice convenience, since you can bind it to a key and it skips having to navigate the menus (which can be difficult while you’re set to a higher res).
The syntax is:
mat_setvideomode [w] [h] [mode]
où w is width, h is height, et mode is either 0 for fullscreen, 1 for windowed, ou 2 for borderless windowed.
A titre d'exemple, I currently have one key bound to mat_setvideomode 3840 2160 0, to set 4k resolution and fullscreen mode; and another key bound to mat_setvideomode 1920 1080 2, to return to normal 1080p resolution and borderless windowed mode.
Gardez à l'esprit, pourtant, that this ne’t let you skip turning on supersampling in your graphics driver settings. If you give the command an invalid resolution (anything that wouldn’t normally appear in the settings menu) it will just default to 640×480 plutôt. So it really is just a convenience, nothing more.
C'est tout ce que nous partageons aujourd'hui pour cela Le module de Garry guide. Ce guide a été initialement créé et rédigé par ⑨lnsmall. Si nous ne parvenons pas à mettre à jour ce guide, vous pouvez trouver la dernière mise à jour en suivant ceci lien.