- Titre: Defender's Quest: Valley of the Forgotten
- Date de sortie:
- Promoteur:
- Éditeur:
Information about Defender's Quest: Valley of the Forgotten is still incomplete. S'il vous plaît, aidez-nous à remplir les détails du jeu en utilisant ceci formulaire de contact.
This guide will teach you how to best spec your characters, why certain skills are good/bad, and general advice for navigating NG+ and the game’s most difficult challenges.
Character Builds (Azra, Berserker, Ranger, Guérisseur)
It can be difficult to determine the best way to spend each character’s skill points. je’ll show screenshots of recommended builds and explain why some skills are superior to others. This is not intended for Hero Mode, though many of the suggestions still apply.
Azra
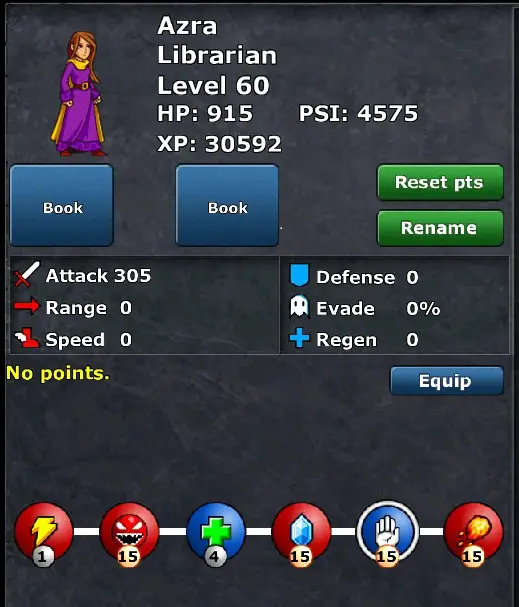
Your panic buttons are Dragon Fire, Pushback, and Crystals. Quand tu’re feeling overwhelmed, these three spells can help. Frenzy is also fantastic, providing a massive damage buff that is more effective at preventing you from becoming overwhelmed rather than saving you once you’j'ai des ennuis.
Instead of Lightning, we use our remaining points to heal. Healing can be used to protect your units from burst damage when your Healers are unable to respond quickly enough, such as the death splash effect of Abominations. Foudre, d'autre part, will do very little damage unless you invest a significant amount of points in it and can afford to spend a large amount of Psi to keep using it. Il’s best for Hero Mode challenges where you’ve fully upgraded your six defenders but still can’t do enough damage.
Berserkers

We have a few options for Berserkers. Berserkers are significantly weaker in NG+ due to enemies with thorns absolutely shredding them, massive armor some enemies have, and stronger attacks everyone has, so using them correctly becomes difficult. The build on the left demonstrates how to get good damage out of your Berserkers, whereas the build on the right demonstrates how to inflict Bleed on enemies. The Berserkers you use to inflict Bleed rarely require upgrading beyond boost Lvl 3 to do their job effectively, so you can ignore their higher level attacks if you prefer. Place your Bleed units as close to the enemy’s spawn points as possible, and your other Berserkers behind your Knights, where they will be least likely to hit thorns or armor.
The ability to regenerate and evade is highly situational. When you spend 9 points on Regen, you gain an additional +16 HP / sec, for a total regen of +80 HP / sec. If your unit is within range of a Healer, a mere 25% increase in regen will make little difference. The evasion skill is far more powerful, increasing your chance of avoiding attacks from 10% à 40%, significantly reducing the damage your Berserkers take. Ce n'est pas le cas, pourtant, protect us from thorns. These two skills should only be invested in if you absolutely need the survivability or if you don’t intend to fully upgrade your Berserkers and have points to spare.
Rangers
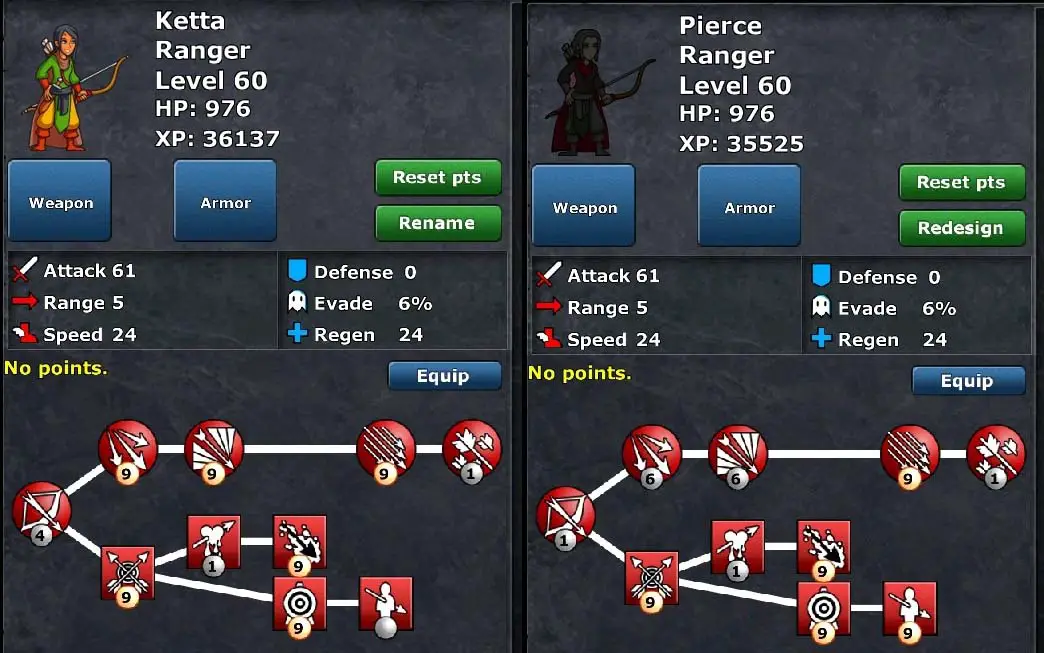
For Rangers, we have two builds. Most Rangers want to maximize their Crit, Gamme, and Poison. Because the Range trait allows them to cover vast areas of the map, even though most enemies can now evade or resist ranged attacks, this is offset by the fact that our Rangers never stop shooting. Crit and Poison are simply free damage boosts for all of our attacks.
Enfiler’t level up the Bleed skill. It has a cap of making enemies take 30% plus de dégats, ce qui est’t worth it for us. Except for one of your Archers, the Armor Pierce should be ignored (shown in the right pic). There is a Unique Bow that, when upgraded in NG+, increases the Armor Pierce effect, so there is only one unique archer who uses it.
Your remaining skill points should be spent on maxing out Spread Shot, your Lvl 4 attaque, and then dividing them among the other attacks as you see fit. Spread Shot deals the most damage per hit of any Ranger attack, allowing it to inflict the most poison and pierce the most armor.
Guérisseurs
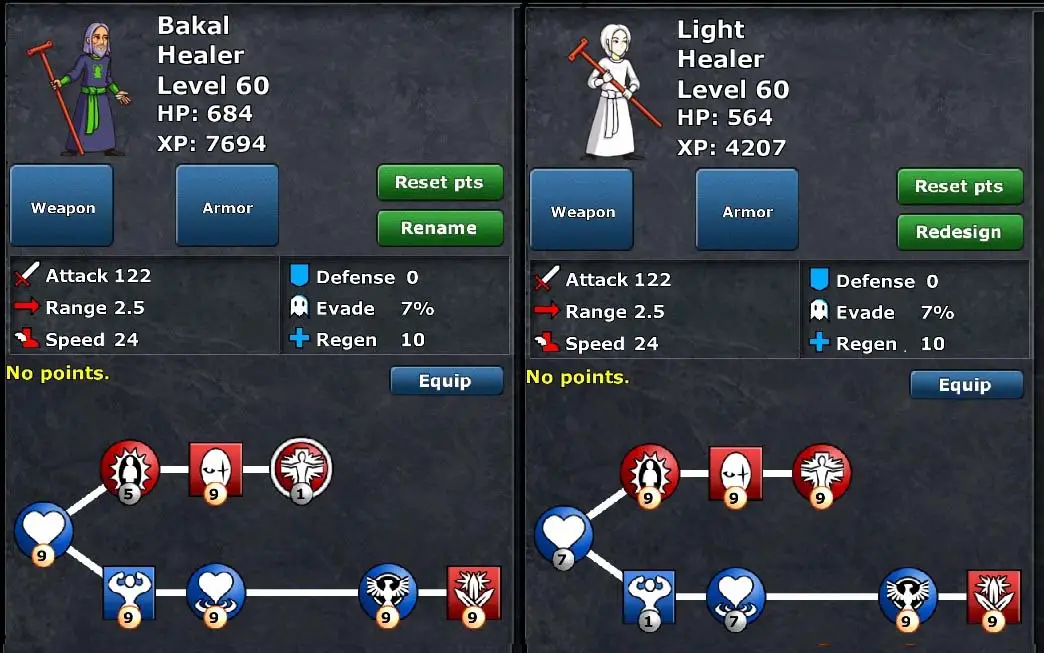
The build on the left is the one we’d prefer to use the majority of the time. Maximize Zeal for the damage buff, our healing skills, and our Healer’s HP so they don’t take damage from enemies. Blindness is also useful for preventing our units from taking damage, so time spent attacking still contributes to the survival of our other defenders.
You can use the build on the right for levels that require shadow units. We give up our Healer’s maximum HP and some healing power in order to deal more damage to shadow enemies via the light effect. With a lower maximum HP, enemies can easily kill our Healers with bursts of damage. You should try to keep Healers like this 1 tile away from enemies’ chemins, or equip them with your best light armor.
Character Builds (Ice Mage, Chevalier, Dragon)
Ice Mages
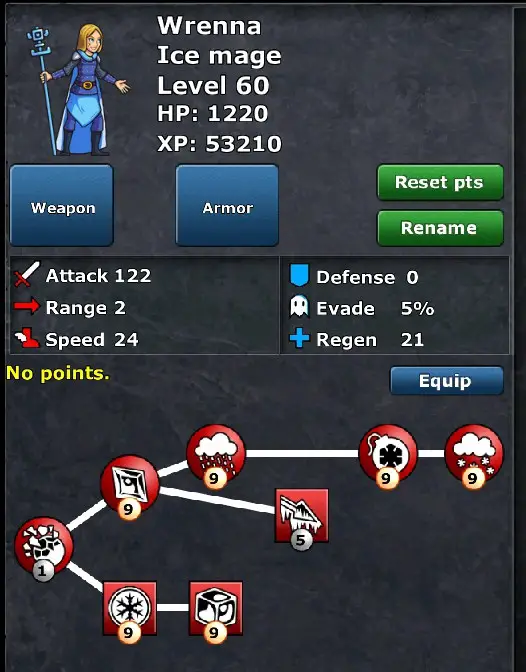
These units are crucial to surviving NG+, since the fast Worm-type enemies cannot evade their attacks and will be slowed down enough for other units to hit them. We want to max out our AOE attacks, as that gives us good damage and lets us slow down groups of enemies, and then max the Chill and Freeze of our Ice Ball for slowing down single targets. With that done we can upgrade Ice Shard and give it piercing for some DPS. Not much else we could have done really.
Chevaliers
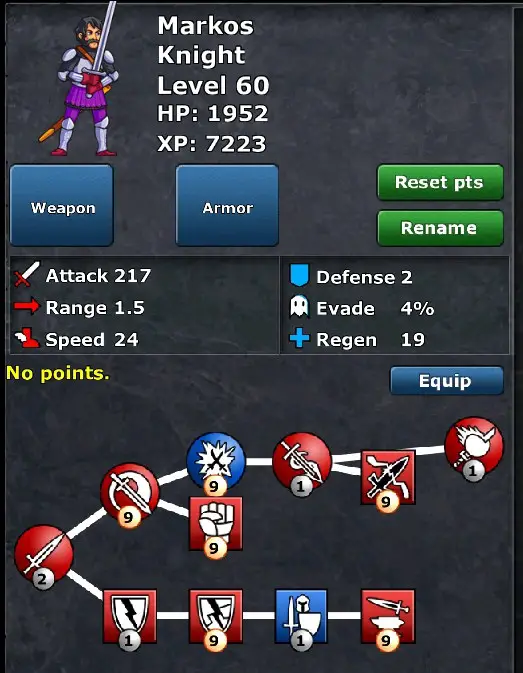
With our Berserkers dying the instant they touch an enemy with thorns, nous’ll need to rely a lot more on Knights to clean up the battlefield. Max Armor Break and Sword Training on the bottom row to destroy enemy defense and increase our damage. Nous ne’t need Armor Piercing since we’re destroying the armor just as fast without it, and our equipment will give us enough defense for almost any situation.
For our offensive skills, we want to max out the Knockback and Stun abilities. Knockback is great for slowing down armored enemies like Fallen Knights, which are immune to Chill and Freeze in NG+. Stun is for dealing with tougher enemies like Cultists, who are immune to Knockback. You should also fully upgrade your 2nd attack, Fracasser. Your Knights should always be starting the battle at least level 2 to break armor effectively on higher difficulties and to make use of Knockback as early as possible.
Your remaining points should usually be spent on Swing or Lunge, though in some rare situations you may want to upgrade Counter instead. Counter with 1 skill point has the same power as Smash with 9, and a significantly shorter cooldown, making it an amazing attack. Si tu’re getting hit. Only upgrade Counter if you can guarantee your Knights are going to be facing lots of enemies who attack, and those enemies will choose to attack your Knights.
Dragons
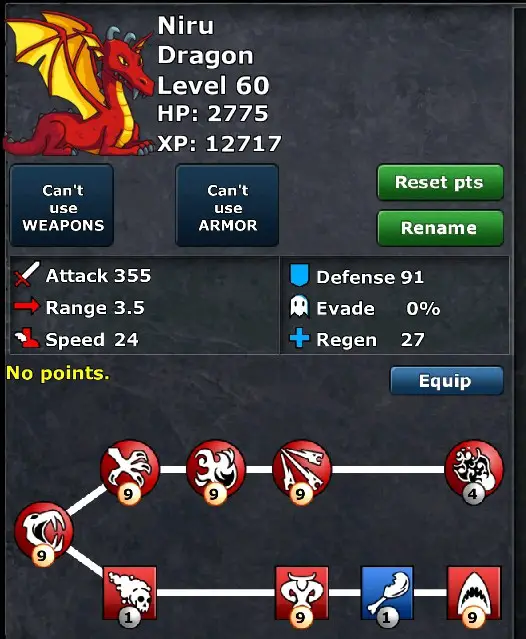
Dragons are incredibly expensive, and this means using them incorrectly will result in wasting a huge amount of Psi. To make up for how expensive they are, Dragons are also incredibly powerful, Surtout en groupes.
On the bottom row, max out your attack and the Devour skill for Bite. Devour lets our Dragons instakill enemies with <18% HP left, à condition qu'ils soient’t immune to it. Against tankier enemies, like Cultists and Cultist Priests, this can let our Dragons do over 10k damage in a single attack. Cultist Priests are one of the most dangerous enemies in the game, so for them alone this skill is worth it.
Max out Bite, Griffe, Fire Breath, and Roar. Your last couple of points can go into your LVL 5 attaque, buffing Bite’s poison effect, or boosting your Dragon’s HP. Every level except boost Lvl 5 gives us something valuable, donc nous ne’t really care about that last attack. Niveau 1 Dragons have a strong attack with more range than Berserkers or Knights, providing good damage. We can use their Devour to efficiently clean up enemies, provided our Dragons target the correct ones. Niveau 2 Dragons get a nice boost in damage in the form of their second attack, while not being too expensive. Niveau 3 Dragons have a brutally strong ranged attack, and Lvl 4 have the best move in the game, Roar. Placing multiple Dragons near each other can let them stunlock hordes of enemies. We can also put a single Dragon near a Knight or two and, une fois qu'ils’re all level 4, they can consistently stunlock the strongest enemy in a group.
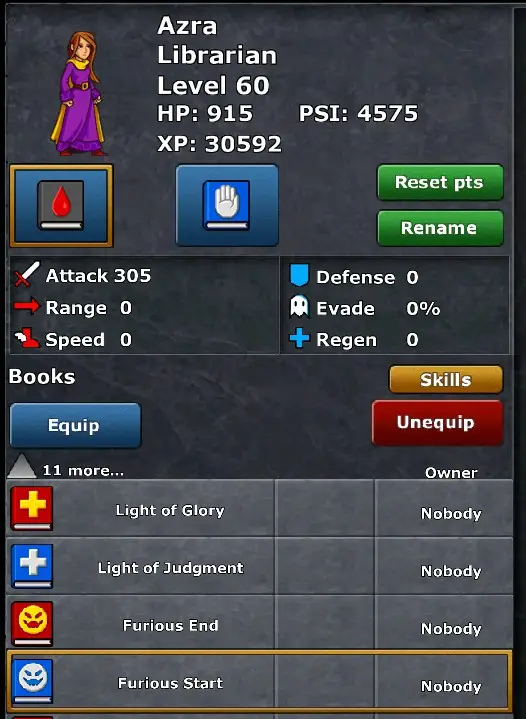
Azra’s Equipment
Le 3 best books for Azra are the Book of Blood, Slow Start, and Furious Start. Laisser’s focus on those last 2 d'abord. Furious Start applies Frenzy to units you summon. With a maxed Frenzy spell, this means units you summon get +75% attack speed for 24 secondes. Incredibly helpful if you’re moving units around, or placing units and immediately boosting them a couple times. Slow Start slows enemies down when they first spawn in, which can be incredibly helpful in many maps by letting you spawncamp the monsters.
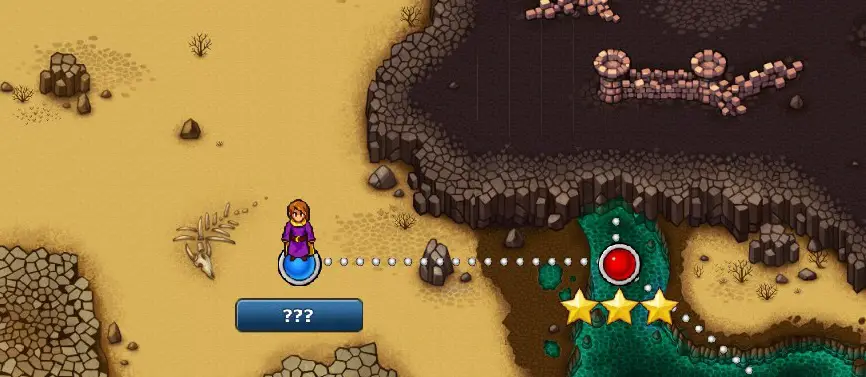
Maintenant, how the hell do you get the Book of Blood? By clicking some buttons on the main menu you can unlock 3 books for Azra on all save files, one of them being the Book of Secrets. Equip this book, and then go to the location that appears on the map next to where you first fought Zelemir. Toi’ll find a secret area where you can enter codes to get skulls which you trade for books, one of them being the Book of Blood.
Of the options available, the Book of Synergy is bad (hidden effect where it reduces the Psi enemies drop by 15%), the Book of Plagues is highly situational, and the Book of Blood is amazing. It makes all enemies and defenders always take 25% plus de dégats. Because it applies a permanent bleed effect to enemies, if our Berserkers try to apply their stronger 60% bleed to an enemy, that enemy now takes 60% more damage FOREVER. I recommend always using this book once you have it.
Aside from these, the only other book I think is any good would be Slow End, which is like Slow Start but applies to enemies when they get close to Azra. Whether you want Slow Start or Slow End obviously depends on the level and where you position your defenders, and Furious Start is amazing if you can’t really benefit from either of those.
Équipement (Upgrade Priority)
Dans +, all unique weapons and armor we obtained earlier on can now be upgraded, at the cost of skulls. Skulls are obtained from defeating levels on advanced or extreme difficulty. Some of the hardest levels in NG+ are nearly impossible if you haven’t upgraded the correct items, so here we’ll talk about what equipment you should upgrade first and how you should use it.
Stone Skulls
Tout d'abord, this game has an issue where you cannot upgrade all weapons and armor which require Stone Skulls in a single playthrough, toi’je serai 1 skull short. This means you cannot get both achievements for upgrading all weapons and upgrading all armor on the same file. À 100% the game you’aura besoin de faire 2 parties de jeu, one where you upgrade all weapons and one where you upgrade all armor. Puisque tu peux’t use all the weapons in Hero Mode, and upgrading all armor takes less Obsidian Skulls, I recommend getting all armors in your Hero Mode playthrough.
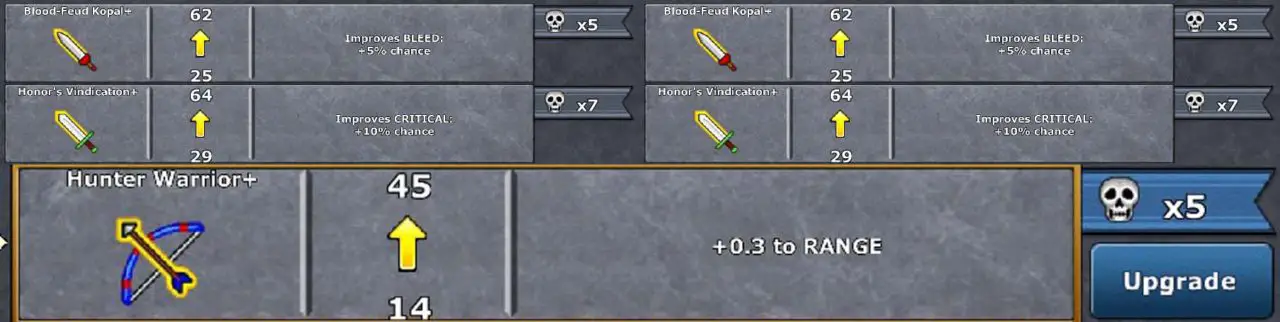
Cela dit, the first thing you should spend Stone Skulls on is the Hunter Warrior+. Follow this up with the 2 Swords and the 2 cheaper pieces of Light Armor. The Hunter Warrior+’s extra range is great, and both swords give solid buffs to our Berserkers. The Chieftain’s Tunic+ and Tiger Skin Vest+ will make your healers much more durable. The remaining weapons and armor you can upgrade with Stone Skulls all have lackluster effects, though the Relic of the North bow is nice for just a bit more damage on one of your Rangers.
Bronze Skulls
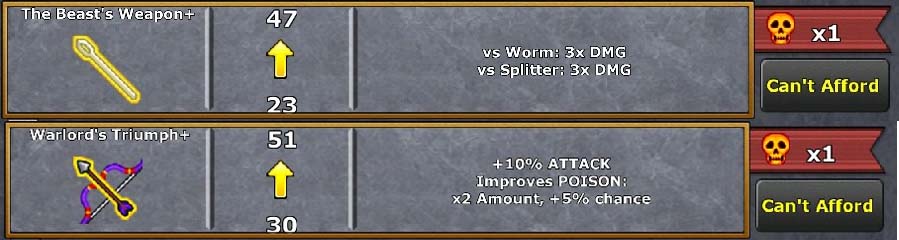
Start out with the Beast’s Weapon. Il’s effect massively boosts damage against worms and splitters, like Abominations. This weapon lets one Ice Mage of your choice shred them with ease. Suivant, you should upgrade the Warlord’s triomphe, which is an absolutely amazing bow. je’m genuinely not sure if this bow or the Gilded Death+ deals more damage, but the Warlord’s Triumph is cheaper to upgrade.
You can then upgrade the 2 épées, which boost our Knights’ capacités, and the other staff, the Executioner’s Bludgeon. The best armor to upgrade is the Strength of Wocolan for the 40% résistance physique, which can make one of your Knights virtually indestructible. Après cela, everything left is fairly mediocre.
Obsidian Skulls
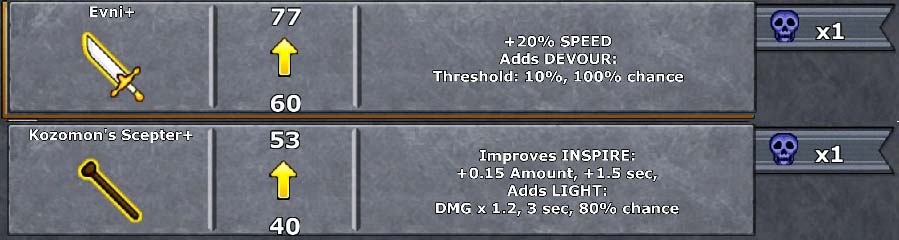
These are the really important ones, and we need to be careful how we use them or we’ll struggle to complete the toughest challenges and get more. Your first priorities should be Evni and Kozomon’sceptre. Evni’s speed boost and high damage, along with the ability to Devour enemies, are amazing and simply give a massive damage boost. Kozomon’s Scepter boosts the effectiveness of Inspire. Place a Healer with this staff near all your Rangers to massively boost their damage output.
Maintenant, the Fountain heavy armor, Keeper of the Flame staff, Gilded Death bow, and Eye of the Flame sword are all good choices. Si tu’re struggling to beat the Super Sheep+ or Eztli-Tenoch’s Right Hand+, then grab Keeper of the Flame staff to slow them down more and make those two fights easier. Sinon, I would save Keeper of the Flame for last and upgrade the other 3 in whatever order you choose.
The Platinum Fleece is the last item we spend an Obsidian Skull on, because the weapons all help significantly more with beating challenging levels to get Obsidian Skulls, and the Fountain armor has a much better effect than the Fleece. This is still a great light armor for a Healer or Ranger to have, but those units just don’t need the defense as much as your Knights do.
Équipement (Who do I give this to?)
It can be hard to keep track of all the special abilities of weapons and armor. I recommend you rename/redesign your units to easily be able to tell what the effect of their weapon and/or armor is without having to summon them first.
Épées
- Blood-Feud Kopal+: Put this on a Berserker who has the Bleed skill maxed out, and this will be your go-to unit whenever you really need the extra damage on some tougher enemies.
- Honneur’s Vindication+: Put this on a Berserker who has the Crit skill for Flurry and Flurry maxed out. Try to always have them at at least boost Lvl 3 alors ils’re always taking advantage of the sword’effet
- Edge of Order+: Give this to a Knight, and plan on them being the first Knight you upgrade to boost Lvl 4 to use this weapon’s effect as early as possible
- Commander of Legions+: Give this to a Knight, and make sure they start at boost Lvl 2 like they should to use the effect
- Eye of the Flame+: Give this to a Knight. Most armored enemies that you want your Knights to target are immune to freeze and chill, so by placing this on a Knight we reduce the chance of it cancelling out status effects. Some shadow enemies have thorns, which Knights can mostly shrug off due to having armor and hitting fewer times for more damage, making them much better at taking advantage of the Light effect.
- Evni+: Give it to a Knight. I know this is Slak’l'épée, but the higher damage and attack speed are better used on a Knight to rapidly break down enemy armor so the rest of your units can deal damage as well. In cases where armor and thorns aren’t a huge concern, you can give this to a Berserker who will be much better at using the Devour effect thanks to their Lvl 4 et 5 attacks hitting all enemies in range.
Arcs
- All your bows will go to Rangers. Shocking, Je sais. You may want to keep track of who has Hunter Warrior+, as their higher range lets you place them in spots where other Rangers might struggle to reach anything from.
Staffs
- Charlatan’s Staff+: Give this to a Healer. Ils’re more likely to need the evasion to survive. You can combine this with the Tiger Skin Vest+ for a Healer who’s virtually immune to melee attacks.
- Archsheperd Stave+: Give this to a Healer as well. The extra HP will help them survive the death splash effects of enemies, which I find to be the biggest threat to my own Healers in game. Ice Mages have higher defense and far more health than Healers, so they have very little trouble staying alive as long as they’re near a Healer.
- La Bête’s Weapon+: Give this to an Ice Mage and pay close attention to who has it. Position them where the most worms/splitters will be appearing/passing through and try to always have them at at least boost Lvl 3 for AOE attack.
- Bourreau’s Bludgeon+: Ice Mage for higher attack
- Keeper of the Flame+: Ice Mage for slowing single targets or groups with AOE attacks
- Kozomon’sceptre: Healer for stronger Inspire. Make sure to position this Healer near as many other units as possible, especially Rangers, and always have them start at boost Lvl 5.
Armure légère
- Just give it all to the Healers, they need it the most. The Chieftain’s Tunic+ and Tiger Skin Vest+ may have less defense than NG+ armor, but their effects make up for it I find. Combine the better armor with the Evasion and HP Staffs to make 2 Healers that are incredibly hard to kill.
Armure lourde
- Glory of War+: Ordures, give it to whoever you want
- Horseman’s Lamellar+: Ordures, give it to whoever you want
- Traître’s Harness+: Knights are going to get hit more, so give this to a Knight
- Strength of Wocolan+: The best defensive armor thanks to it’s massive physical resistance. Give this to whoever is getting hit the most, though that’s usually a Knight.
- Lord Warden’s Harness+: Good armor, can be used for Ice Mage or Knight
- Purity of Flame+: Give this to the Knight who has the Eye of the Flame+ so you can keep both burn effects away from your Ice Mages
- Guardian of the Fountain+: Amazing thorns effect should be given to the Knight who has the Edge or Order aka Stun Sword. The longer Stun combined with the Freeze effect will do wonders to slow down Cultists and Cultist Priests.
Trucs et astuces
More is Better: Having more units at lower levels is usually better than having 1 high boost unit. A Knight costs 40 to summon, 60 to boost once, alors 120 to boost to Lvl 3. Il’s cheaper to get 2 Knights to Lvl 2 than to get one Lvl 3 Chevalier.
Cooldown Reset: When you have a lot of Psi stored up, you can recall a unit then resummon them to reset the cooldowns on their skills. This can be particularly useful when fighting the Super Sheep+, as you can let your Healer Inspire your Rangers multiple times in succession.
Targeting Options: Changing up the targeting options for your units can make them much more effective, but you have to be careful because these options can cause defenders to make stupid decisions or ignore enemies close to Azra sometimes. Here are some settings I tend to use, and general tips
- Target Weakest: This is a great option for Dragons, as it encourages them to focus on targets they can Devour with bite. Malheureusement, they look at the amount of HP left, not the %, so this isn’pas parfait
- Target Strongest + Optimize Effects: This is generally what I have my Knights set to. It tells them to target the strongest enemies, but to also focus on breaking armor.
- Bulldog Mode: Do you like micromanaging your defenders? Non? Then you probably shouldn’t be using this. Bulldog mode is best for when you want specific enemies finished off as fast as possible. je’ll sometimes turn this on to tell one of my Knights to finish off a Cultist Priest instead of spreading his damage out or to focus on killing a Monstrosity so all 3 enfiler’t die at the same time and kill my Healers with death splash.
- Advanced Settings Take Priority: I tend to think of the top row of options, like Target First, Target Last, etc.. as the main setting, mais ça’s not really the case. Options in the bottom row are given priority, and this can cause some issues. If your rangers are set to Target First and Target the enemy with the lowest chance to resist or evade, ils’ll basically never target worms, même s'ils’re practically on top of Azra.
Applying Bleed: While thorns will shred your Berserkers, ça ne marche pas’t mean they can’t attack anyway. Il’s good to place Berserkers in range of a healer but ahead of your other defenders so they can try to apply bleed before the enemy reaches your main kill zone. With some micromanagement, you can have your Berserker attack a strong enemy with thorns until they apply 60% bleed or are almost dead, then disable all their attacks so they can stop and heal. It helps to have the Berserker be only level 1 ou 2, and slow the game down for a bit.
Comptoir: The Knights’ Counterattack is incredibly strong, doing far more damage than the level 2 attaque, Smash while having a shorter cooldown. The downside is Counter can only be used when an enemy tries to attack our Knight, et ça’s hard to guarantee this happens. One way we can ensure our Knights get hit is to make sure they’re the only unit that can be hit. Enemies also seem to keep attacking the same target over and over again until that defender is out of range. This means if your Knight is the first defender the enemy encounters, ils’ll keep hitting your Knight again and again, even when they have other options available. The one issue with this is if you place 2 Knights near each other you may find that one of your Knights is getting all the attacks and the other is being ignored, so only one of them can use Counter.
C'est tout ce que nous partageons aujourd'hui pour cela Defender's Quest: Valley of the Forgotten guide. Ce guide a été initialement créé et rédigé par Tired apprentice mage. Si nous ne parvenons pas à mettre à jour ce guide, vous pouvez trouver la dernière mise à jour en suivant ceci lien.