- Titre: Aircraft Carrier Survival
- Date de sortie:
- Promoteur:
- Éditeur:
Information about Aircraft Carrier Survival is still incomplete. S'il vous plaît, aidez-nous à remplir les détails du jeu en utilisant ceci formulaire de contact.
When everything is on fire, your carrier is not quite lost, at least not yet! This guide is a breakdown of information about Damage Control, including how to get more DC teams, damage mechanics, and important ship segments. Also discussed are the officer mechanics required for using orders, including resupply.
introduction
I have noticed that some mechanics can be difficult to learn, especially when there are several systems affecting the area, that are shown and managed in different places – Orders being the best example.
To help anyone who has stumbled onto this game and might be struggling with some of these, je’ve put together this guide on carrier Damage Control, and an aside on using Orders, as I feel these two can cause problems for the player in this demo build. je’d prefer anyone playing to get a positive experience whenever possible, and having some help with game mechanics might make a difference.
Using the Department (Équipage) Fenêtre
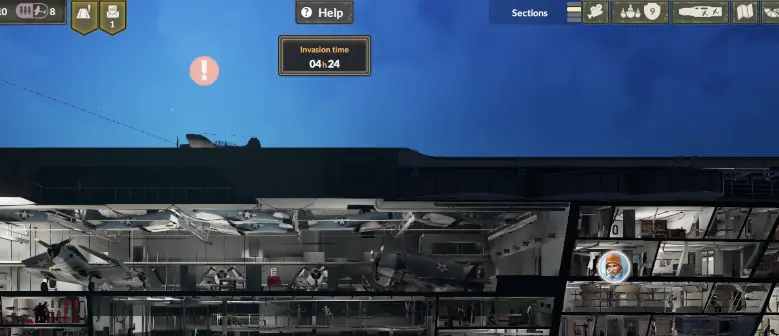
To deal with anything more than routine damage, it helps to understand the Department window. To access, click the button on the top-right of the screen with the crew silhouettes, montré ci-dessous.
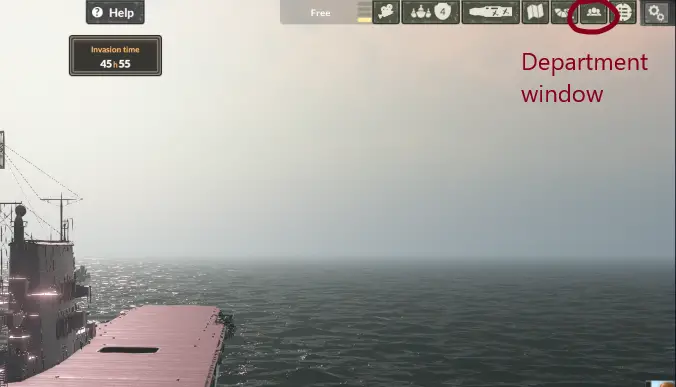
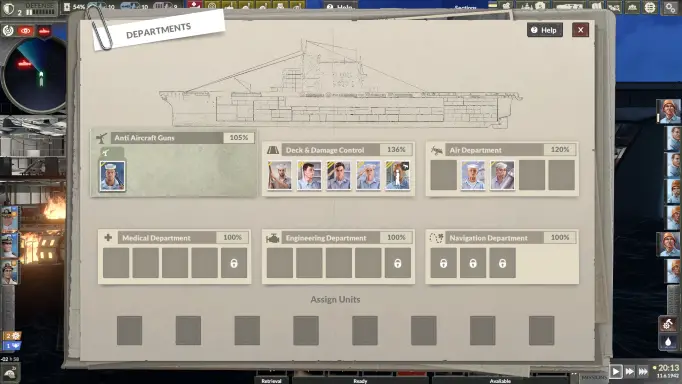
This shows you this window:
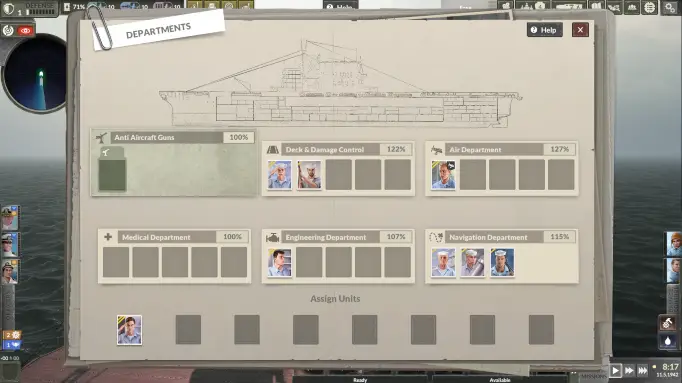
There are a few things going on here, but I will focus only on Damage Control for this guide. Dans cette fenêtre, you can drag and drop crew portraits to reassign them to different areas. When you move a crew member, it will take some time for them to run through the carrier, and a walking animation is shown on the portrait. Une fois arrivés, the animation disappears, and they start work.
The section front and centre is named Deck & Damage Control. For every crew portrait in this department, you get another DC team. If you have five crew in the department, you get five DC teams from them.
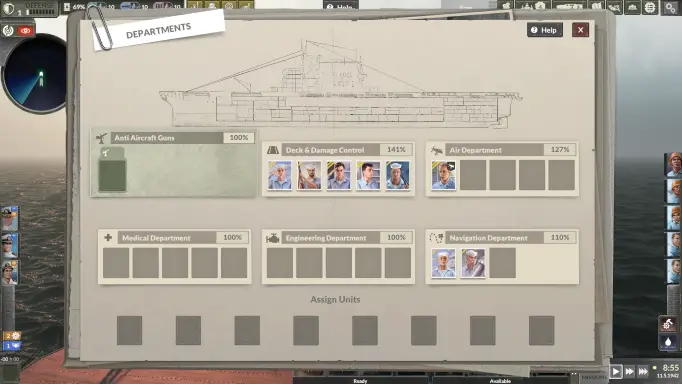
Note that some or all slots in a department can be locked if certain parts of the carrier are damaged. This will be discussed in the section below.
Damage Types and DC Basics
There are five types of jobs DC teams have to deal with. Most of these can and will occur occasionally at random. Larger quantities of damage can be caused by enemy attacks – aircraft or submarines.
Dommage
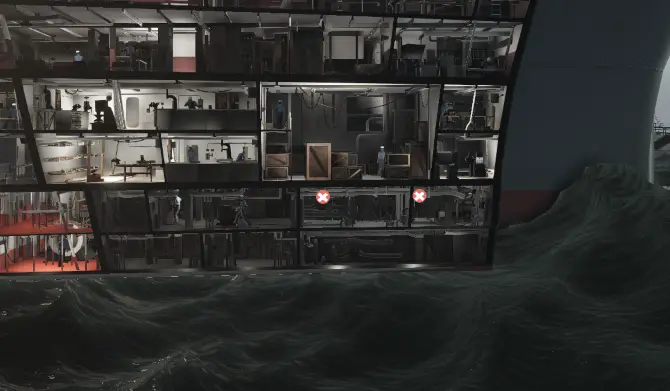
This is caused by an enemy attack. The room affected is marked with a red circle with a white X. This can only be repaired by sending a DC team to that room to repair the damage.
Malfunction
This appears to be caused only at random, and not by enemy attack. The room affected is marked with a red circle with a white broken cog symbol. This can be repaired by sending a DC team to that room.
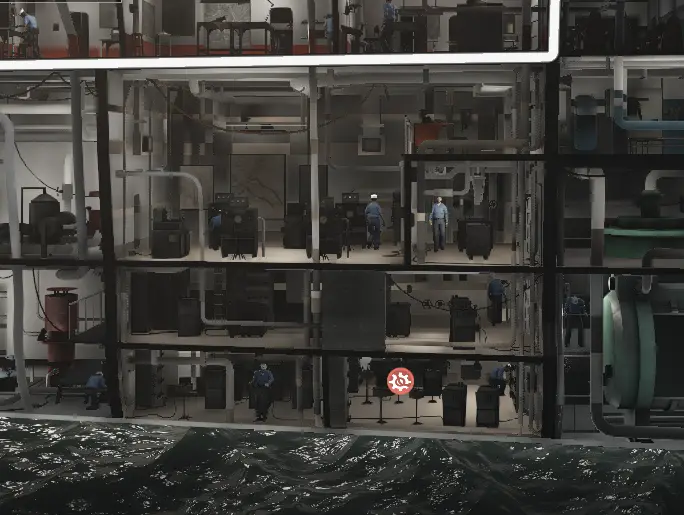
There is a second way to deal with malfunctions but has restrictions. If you have your island switches set to have at least one fault button, and you have a DC team in the Damage Control room, you can click the fault repair button in the bottom right and then the malfunctioning room to repair the fault without moving a team there.
Damage Control room: you need a DC team present if you want to use the fault repair button.
Fault repair button is shown in the bottom right. The grey indicator in the malfunctioning room means the fault is currently being fixed.
Flooding
This can be caused by chance or by an attack. A flooding room is marked with a red circle with a white teardrop symbol.
When flooding, rooms filled with water. Une fois plein, neighboring rooms begin to flood as well. If unchecked this can propagate throughout the carrier.
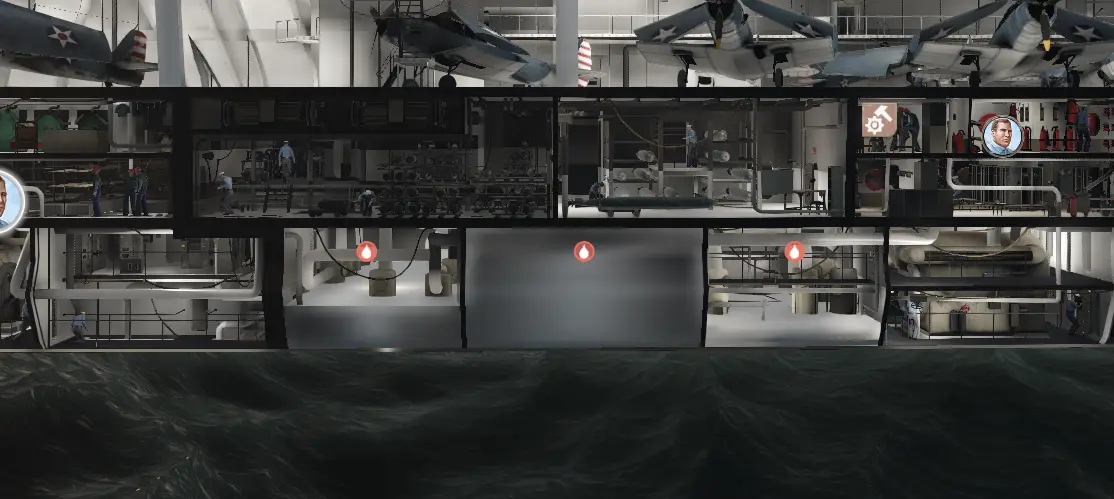
DC teams cannot enter flooded rooms. To address flooding, you need to move a DC team to the Pump Room at the bow of the carrier. While there is a DC team in the Pump Room, all flooded sections will be slowly and passively emptied.

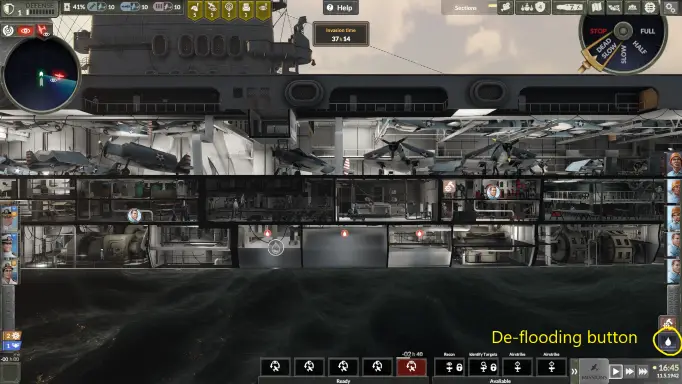
If you have your island switches set to have at least one flooding button, and you have a DC team in the Pump Room, you can also click the flooding button followed by a flooding room to actively and quickly pump out that room.
De-flooding button shown in the bottom right. The grey indicator in the left-hand flooded room means that room is being actively pumped out, and will empty faster than the others.
Note: flooding appears to be limited to the lower deck. Once the carrier below reached this point, several hours later no other sections flooded. This could be useful in a critical situation – as if nothing else, the flooding stops that room is on fire.

Feu
This can be caused by chance or by the attack. Fire is likely the most dangerous damage onboard the carrier, due to the way it spreads. Rooms on fire have a regular chance to spread fire to neighboring rooms. This chance is high enough that I recommend not relying on a single DC team to fight fires. If it takes too long to move to the room and fight the fire, it can easily spread to multiple rooms and become a larger problem.
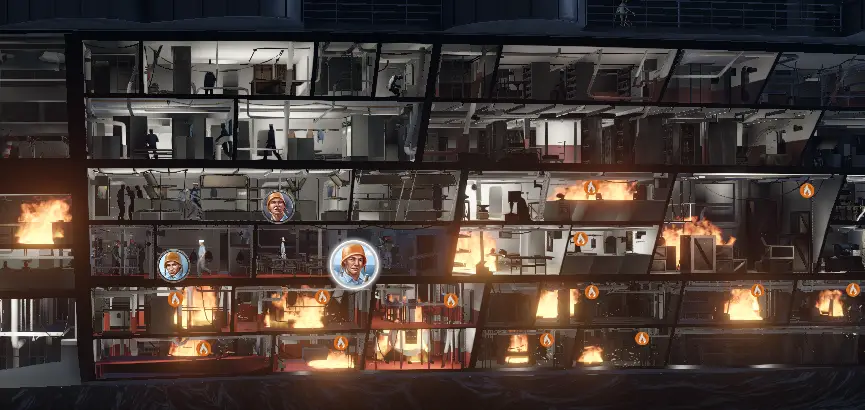
To fight fires, select and move a DC team to the room that is on fire. Une fois arrivés, they will start to extinguish the flames. Heureusement, the men appear to take no damage from moving through or fighting fires.
First note: fire can spread to a neighboring room that already has a DC team present. You cannot protect a room by leaving a DC team inside – you will likely have better results moving DC teams forward to try to clear a strip around important areas.
Second note: fire spread generally does not spread vertically between main decks. Having watched several burning carriers, there appear to only be certain rooms in the bow and aft of the carrier where fires can move from the lowest deck to the middle and upper decks. This could be useful in a critical situation – it may be possible to control the upper deck fires, then work your way down.
Crashed Plane
This is a special condition. Whenever you retrieve squadrons from a mission, there is a chance for one of the planes to crashland on deck. Quand cela arrive, the rest of the squadron is retrieved. toutefois, all flight deck instructions are cancelled, which can include the retrieval, and the flight deck is disabled until the plane is cleared.
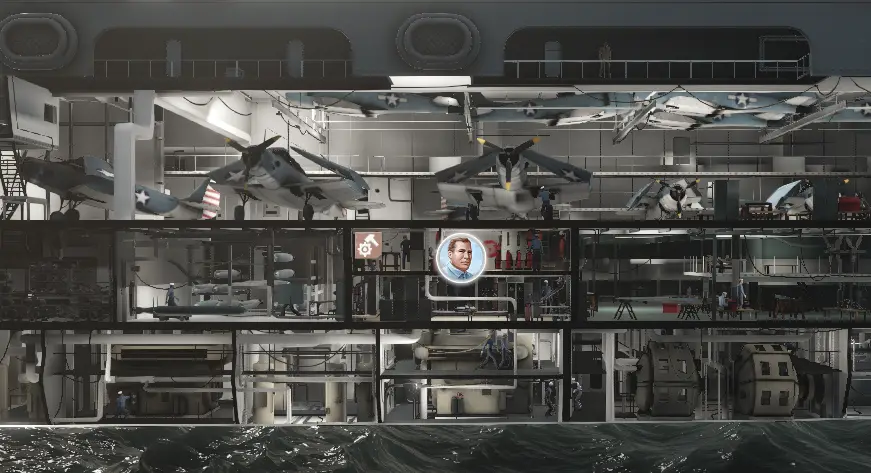
To clear, you can select a DC team and click on the red circle indicating the crashed plane. The team will move on deck and push the aircraft into the drink.
There is a second, faster option. If you have a DC team sitting in the particular room in the above image (which is where the deck access is located), and a plane crashes on deck, the DC team will automatically start moving up and clear the crashed plane. Remember that all flight deck orders will have been cleared, indépendamment de.
Important Locations on the Carrier
Most of the sections in the carrier are related to particular functions and can cause problems when damaged. Note the difference between sections and rooms. Each section consists of 2-6 chambres. Each room can be damaged, on fire, flooded, separately.
I will split the sections into two types, arbitrarily. Some sections, such as the Main Generators or Meteorology, can disable some ship functions if the section takes enough damage to be shut down. These rooms may be important if the particular room being disabled is a problem – Navigation damage preventing waypoint changes is one example.
The second section type is those that affect Department slots, such as Sickbay or the Engines. Each damaged room in one of these sections locks one slot in that Department.
In the below screenshot, the Engine room was entirely on fire, locking all Navigation Department slots and limiting the carrier to Dead Slow. There was also some damage in Sickbay and the Workshop, locking one slot in each Department.
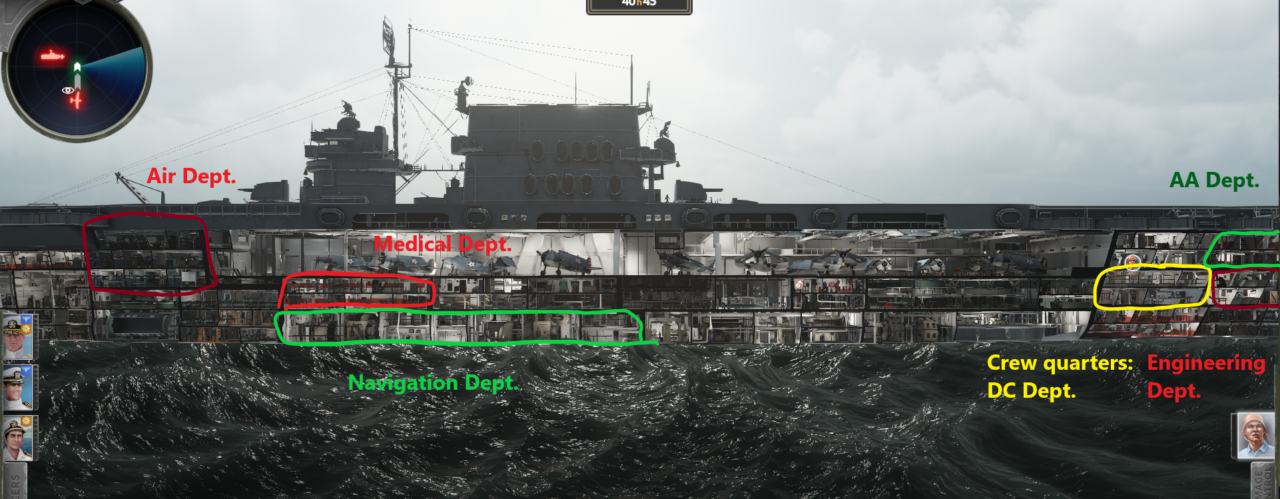
The below image marks out the sections that affect Department slots. For DC purposes, the most important one to remember is the Crew Quarters (marked in yellow). Lorsqu'il est endommagé, this section will lock slots in the Deck & Damage Control Department, removing some of your DC teams. If you have heavy damage, I would prioritize fixing this room and putting out any neighboring fires.
Getting Extra DC Teams, and How to Use Orders
Earlier I mentioned that you can have five DC teams by having five crew portraits in the DC Department. toutefois, what if your Crew Quarters section is on fire? Le cas échéant, all those slots are locked, and you would have no DC at all. Heureusement, this is not the case! You can have up to three further DC teams, regardless of how much your carrier is on fire. This also means that, when your Crew Quarters are intact, you can have up to eight DC teams, Si vous choisissez ainsi.
Island switches for +1 DC team
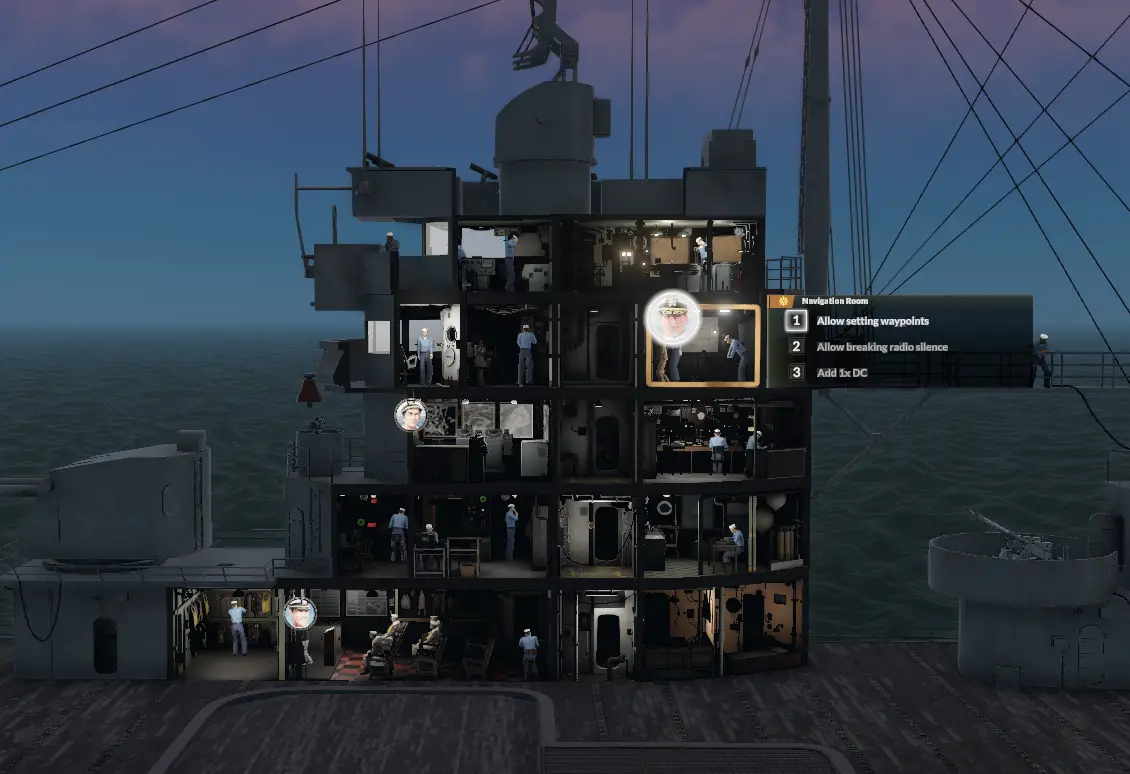
In the Island view, there is a range of rooms and your officers. Each room can be set to one of several settings, that allow different ship functions, aerial missions, et ainsi de suite. To change a room setting, you have to have an officer in the room, then you can click the button. Your officer does not have to stay once you have changed the setting, they can go on to another room!
For DC purposes, the important room is the Navigation Room. By changing to the third setting, tu gagnes +1 DC team, regardless of any damage you may have. Note that changing this setting will prevent you from changing your navigation Waypoints, until you change the setting back.
Damage Control order for +2 DC teams
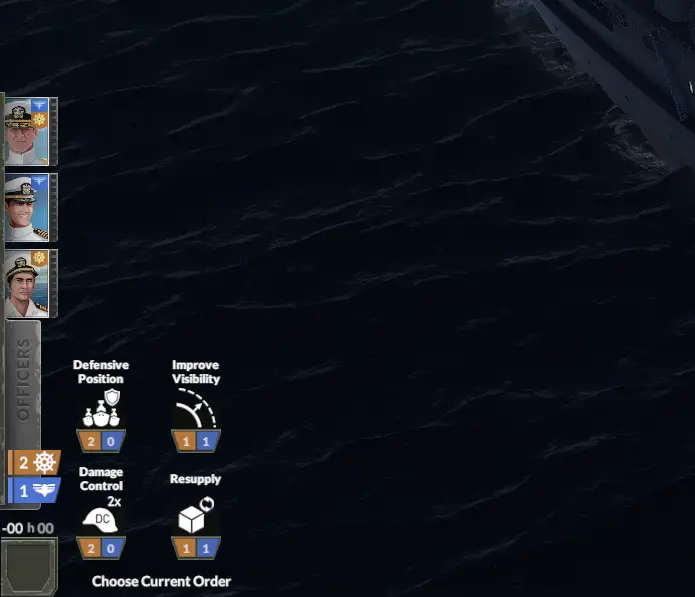
You can also use an order to give you +2 DC teams for four hours. In the bottom left of the screen is a blank button (marked in yellow below). Click this, and it will bring up the orders menu. Click the Damage Control option (marked in green) to activate the order and get the extra DC teams.

Orders in Depth
The Orders system has some extra considerations and can cause some confusion. Tout d'abord, you can only issue one order at a time, and each prevents you from using any other orders for a duration. Some planning may be needed in complicated situations.
En outre, settings in the Island may prevent using certain Orders.
Looking at the teaching of the orders in the capture above, there are numbers in the orange and blue boxes. These refer to Navy or Air ‘points’ – orange and blue respectively. To use the Damage Control order, you need at least two Navy ‘points’. To Resupply, you need at least one of each.
To get these points, you need to have the right officers in the right types of rooms. On the left of the screen, you can see the officer cards. Each has a blue or orange marker (ou les deux) showing which types of points they can contribute. When an officer with a blue marker is in a blue room on the island, you get one point. Likewise for orange officers in orange rooms.
Below you can see the Navigation Room highlighted. There is a small orange icon next to the name, and the room is bordered in orange. If you put an officer with an orange marker in here, you will get one Navy ‘indiquer’.

Note: le ‘points’ are not consumed when you use an order. They just prevent you from using orders unless you have officers stationed in appropriate rooms. Think of them more as your officers focusing on Naval or Aerial aspects of the ship, giving you the resources to supervise complex actions such as a resupply operation.
Dealing with Widespread Damage
This section is very much just me talking about some of my thinking when dealing with widespread damage in this game. It may or may not be useful, or valid in future versions.
- Even before you take damage – if there is an airstrike coming in that you cannot block completely, consider toggling the island switch and/or using the Damage Control order in order to get the DC teams ready beforehand. Moving crew portraits between departments takes time before you get the DC teams, so you might not have them ready when you need them.
- Prioritizing – assess what you need to focus on with your DC teams. I would generally focus on Crew Quarters, as damaging or losing this section would reduce my ability to deploy DC teams. Mais, depending on what else is going on, the Pilots, Moteurs, or Generators might all be important, or possibly other rooms.
- Focus fire first – I mentioned this earlier in the guide. Fire spreads enthusiastically in a carrier, whereas standard damage is immobile. Flooding, by comparison, spreads a little slower and appears to be limited to the lower decks, making it somewhat less dangerous. Large fires can be more easily combated with multiple DC teams in one area, working down the length of a deck. This can help reduce the reignitions you get as you work through the flames.
- Strategic flooding – since flooded sections won’t burn, you can theoretically use flooded sections to shield other areas. Par exemple, if most of your lower deck is flooded, you could consider pumping out the center sections, but leave rooms on either end till later. The key benefit of doing this is that you can quickly reduce the number of damaged rooms on the carrier if you are getting close to the 50% limit before sinking.
C'est tout ce que nous partageons aujourd'hui pour cela Aircraft Carrier Survival guide. Ce guide a été initialement créé et rédigé par Nepthys. Si nous ne parvenons pas à mettre à jour ce guide, vous pouvez trouver la dernière mise à jour en suivant ceci lien.