- Título: Notes From Province
- Fecha de lanzamiento:
- Revelador:
- Editor:
Information about Notes From Province is still incomplete. Por favor ayúdanos a completar los detalles del juego usando esto formulario de contacto.
Some tips on optimizing each character in your party, as well as possible strategies that can be used for most battles. Expect minor spoilers.
Kyme

The very first character you start with. Kyme is the party’s tank, and has a variety of defensive skills at his disposal.
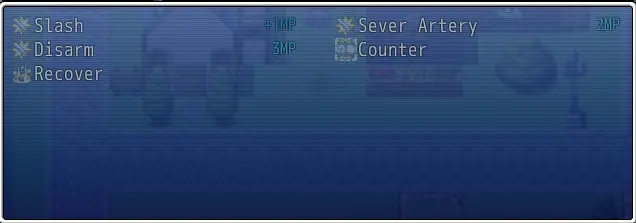
Kyme has a modest, but powerful set of skills. He can also equip shields, which gives him an additional skill depending on which type of shield he has equipped.
- A small shield gives him Shield Bash, which makes him act quicker to deal physical damage and inflict the Stun status on one enemy.
- A medium shield gives him Cover Allies, which allows him to take damage in place of his allies.
- A large shield gives him Perfect Defense, which gives him and another party member the Invincible status.
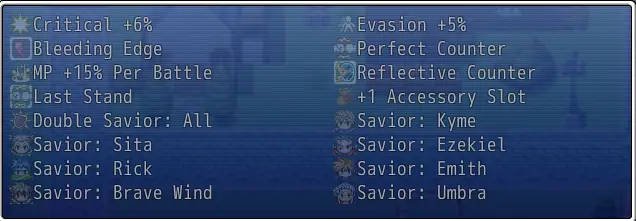
Kyme’s passives revolve around countering, the Bleed status, and defending his allies.
Max MP, HP máx., regeneración de HP, PDEF, MDEF, COND, PATK
Kyme is the best character to use equipment that increases Max MP, as it will allow him to use his skills more before running out and having to recover. Increasing his Max HP, regeneración de HP, PDEF, and MDEF are also some good ways to keep him alive and help trigger his Last Stand passive, which will automatically apply the Counter status (and the Reflect Magic status thanks to his Reflective Counter passive) when he drops below 20% HP. His Counter duration can be further increased by equipping specific swords that give +1 Counter duration and recasting his Counter skill or triggering Last Stand multiple times. A higher Counter duration allows him to cover his allies more often, defending the entire party and triggering their respective Savior passives. Finalmente, COND increases his Bleed damage, and PATK increases damage dealt by his counter attacks and his skills.
Best in Slot
- Paladin’s Sword
- Kitsune Divine Wear
- Spirit Charm
- Mystic Hot Spring Water
- Shield of the Rat Knight
The Paladin’s Sword is the strongest sword that has +1 Counter duration. The Kitsune Divine Wear and the Mystic Hot Spring Water both increases Kyme’s Max MP, while the Spirit Charm has +1 Reflect Magic duration. The Shield of the Rat Knight applies the Cover status for his first turn in battle, so you can pull off a Counter + Cover combo at the very beginning. It does nothing else after that Cover status wears off, so feel free to switch it out on the second turn for something else.
Other Recommendations
- Nefermaat’s Blade
- Equipment that resists conditions
- Petrified Wood
- Bodrick’s Lucky Charm or Mark of the Prophet
With the Shield of the Rat Knight equipped, you can start battles where physical attacks are expected by opening up with a Counter while equipped with a sword that casts Sever Artery when countering, such as Nefermaat’s Blade. This will allow Kyme to inflict Bleed on everything he counters on the first turn, which will allow him to build up his Slash’s MP recovery early. You can then switch the sword to a +1 Counter duration sword afterwards, or if you’re in a battle where many physical attacks are expected to come at you all at once, then you can keep the Sever Artery sword and continue to use the Counter skill as much as you can and need to.
Equipment that resists conditions, such as the Rat Man’s Cape, Sanity Charm, Lava Rock Armor, etc., can help Kyme overcome one of his weaknesses, which is his vulnerability to condition damage and just conditions in general. The Petrified Wood is also a good accessory to use to half any condition damage taken, in cases where enemies can inflict Bleed or Life Siphon, or he does not have resistances to Burn, Incendio forestal, Veneno, and Disease.
Bodrick’s Lucky Charm and the Mark of the Prophet accessories grant the Second Chance passive, which allows Kyme to survive with 1 HP after taking a lethal hit. They help insure that the Last Stand passive will trigger. Note that they do not add additional Second Chances if both of them are equipped.
Encimera + Cover combo
A combo that guarantees Kyme will defend the entire party from any physical or magical attacks, especially those that target the entire party. It can be pulled off in two turns by equipping a +1 Counter duration sword and a medium shield, and it will cost a total of 18 diputado. Simply set up a Counter on the first turn, then Cover Allies on the second. Due to the required setup and the heavy MP cost, the party is open to attacks on turns where Kyme is casting Counter or recovering his MP.
This combo can be pulled off in one turn by equipping a Shield of the Rat Knight, then using Counter on the first turn of a battle. If you have a +1 Counter duration sword and a medium shield equipped, then this combo can last an additional turn by using Cover Allies on the second turn. Alternativamente, if Kyme has the Last Stand passive, then he can simply cover his allies and take enough damage to bring him down to below 20% HP, which will then apply Counter and Reflect Magic automatically, or adding to their duration if they are already applied.
Encimera + Recover combo
If Kyme is the only party member remaining, then maintaining the Counter status for as long as possible is a viable strategy to slowly take down enemies, or buy some time to revive his party members. Esto requiere un +1 Counter duration sword if the enemy uses physical attacks, or the Spirit Charm accessory if they use magical attacks. On the free Counter/Reflect Magic turn, Kyme can use Recover to restore lost MP, or do pretty much anything else.
Encimera + Taunt combo
An alternative to the Counter + Cover combo. This requires Umbra’s Borrowed Blood skill. When Umbra uses Borrowed Blood: Kyme, it will apply the Taunt status to Kyme for 2 vueltas. The Taunt status will redirect single target and random target attacks to Kyme, and does nothing for multi target attacks. It’s a great strategy to use if you want Kyme to defend the party for as long as possible and if you can cover the large HP cost.
Sita

Sita is a powerful fighter who can defeat enemies quickly.
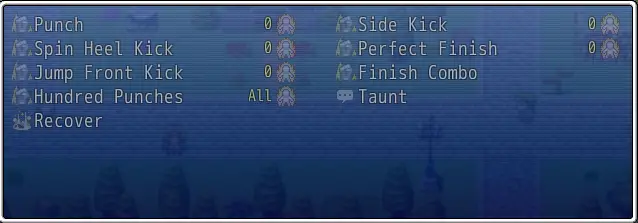
Sita can chain a combo of multiple skills at once in a single turn.
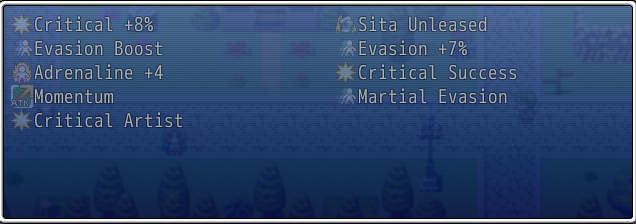
Sita’s passives revolve around dealing critical hits, evading, and maintaining ATK buffs applied to her.
PATK, Tasa crítica, Daño crítico, Evasión
Idealmente, Sita wants to land as many critical hits as possible. She can also have the highest evasion out of all characters, making evading attacks a viable method of defending herself.
Best in Slot
- Royal Armor
- Gloves of the Swordsman
- Pendant of Critical Hits
- Pendant of Melee
- Lady Luck
These equipment work for any situation. The Royal Armor is the best armor for her because it allows her to start battles with a 75% ATK and DEF buff, where she can then easily maintain the ATK buff for the rest of the battle. The DEF buff also helps her take less damage if she doesn’t manage to evade attacks. Lady Luck is one of the two evasion increasing equipment in the entire game, and it is also the equipment with the second largest Critical Rate increase. Finalmente, the Gloves of the Swordsman, and the Pendant of Melee and Critical Hits increases her damage output.
Other Recommendations
- King’s Gauntlet
- Quartz Gem
- The Pristine
- Refracting Crystal
- Belt Pouch
- Junior Assassin Badge
- Ruby Gem
- Lost Ruby Necklace
- Pendant of Glass
- Black Powder
- Rio’s Ring
- Exciting Research Notes
- Kitsune Divine Wear
If you don’t have the Royal Armor, the King’s Gauntlet can also be used to start battles with a 75% ATK buff. Sita also greatly benefits from keeping her HP above 90%, so the Quartz Gem and The Pristine accessories can be used to greatly increase both her Critical Rate and damage dealt. The Refracting Crystal accessory can be used to have Sita also maintain a DEF buff, as it gives a DEF buff equal to the amount of ATK buff she receives, adding an additional method of reducing damage taken. In cases where keeping her HP above 90% is too difficult, she can opt to use other accessories like the Junior Assassin Badge, or the Ruby Gem and the Lost Ruby Necklace. Other accessories like the risky Pendant of Glass and the Black Powder can further increase her damage output as well. For additional evasion, Rio’s Ring adds another 6% evasion at the cost of lower stats from not using rings with higher stat increases. The Exciting Research Notes and the Kitsune Divine Wear allows Sita to start with or store more Adrenaline, which can change what combo she uses every turn, or add more hits to her Hundred Punches. With so many possible options and only 4 accessory slots, you may want to use Belt Pouches to increase the number of accessory slots.
Depending on how much Adrenaline you have, the ideal combo to use changes. The Adrenaline cost for each skill goes up by 1 the longer the combo is. Por ejemplo, a combo of Punch > Side Kick > Perfect Finish costs 3 Adrenalina. Side Kick and Perfect Finish are used to add and maintain the ATK buff, while Spin Heel Kick is tricky to use, but recovers a lot of Adrenaline if it defeats an enemy. Jump Front Kick is used to help increase Sita’s critical rate so that she can deal more damage and maintain her ATK buff without the help of Perfect Finish.
Ezekiel

Ezekiel is a priest who is carrying a large cross, which happens to be an effective weapon.

Ezekiel has a mix of offensive and support skills. He can equip specific Prayer Beads to give him more skills to use. Most of his skills will go on cooldown once used.
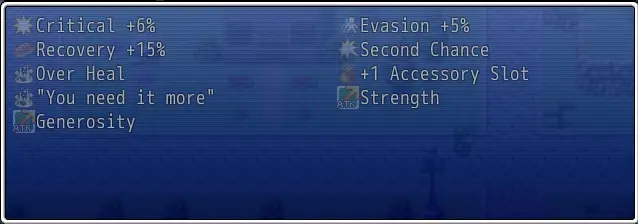
Ezekiel’s passives are focused mostly on recovery and survival.
For Support: regeneración de HP, HP máx., PDEF, MDEFFor Offense: PATK, MATK
Ezekiel lacks methods to heal himself, so giving him equipment that gives HP Regen can help with that. He also has high Max HP, which can be further increased with Prayer Beads along with equipment as well. For offense, he has more physical skills than magical skills. The single magic skill he does have, which is Smite, has a 2-turn cooldown, so focusing on PATK means he has more consistent damage for single targets, while focusing on MATK means he can wipe out groups of enemies at once.
Best in Slot (Apoyo)
- Crystalline Vest or Centurion’s Armor
- Mountain Spring Water
- Radiant HP Bead
- Sturdy Plank
Increasing Ezekiel’s Max HP means he recovers more HP. The Crystalline Vest adds more HP Regen, while the Centurion’s Armor adds more Max HP. It’s up to you to decide which one you want to equip on him. The Mountain Spring Water adds additional HP Regen.
Best in Slot (Ofensa)
- Radiant Attack Bead or Radiant Magic Bead
- Pendant of Melee or Pendant of Magic
- Gloves of the Swordsman
If you’re looking to maximize either his PATK or MATK, then you’ll want to use the equipment listed above.
Other Recommendations (Apoyo)
- Whiskey Sour
- Mojito
- Dowsing Rod
- Mending Bead
- Purification Bead
- Sanctuary Bead
- Fairy in a Bottle
- Equipment that resists conditions
- Sea Conch combined with Uktena’s Scale, Sturdy Stone, and Marbo’s Tea
- Pendant of Rebirth
- Aquamarine Gem
- Sturdy Plank
- Dancing Gold Star
- Chronomancer’s Ring
- Spider Queen’s Web
- Golde’s Gambit
- Bag of Juggling Balls
- Lamia’s Curse
- Chaos Fish
- Emerald Gem
- Zombie Flesh
- Lupa
La primera 7 equipment listed gives Ezekiel additional methods of support or ways to heal himself. The Purification Bead used to be one of the Best in Slot for Prayer Beads, pero el 1.1.7 patch nerfed its chance to remove one random condition to 50%, so it’s a bit unreliable now. el ultimo 9 equipment listed are better used along with the Dancing Gold Star or the Chronomancer’s Ring equipped, since Ezekiel has the lowest AGIL stat, making him the slowest character. The Sea Conch combo allows Ezekiel to regenerate an additional 15% HP por turno, and the Pendant of Rebirth goes well with his own Second Chance passive.
Other Recommendations (Ofensa)
- The Pristine
- Pendant of Glass
- Silver and Gold Tournament Badge
- Refracting Crystal
- Royal Armor
- King’s Gauntlet
- Hydra in a Jar
- Tome of the Rat Priest
- Guiding Light
Ezekiel’s Strength passive gives him a 20% ATK buff for every ally whose HP is full at the start of every turn, which also includes the beginning of the battle. If you want to take advantage of this, then you’ll need to plan your strategy accordingly. Equipment such as The Pristine, Refracting Crystal, Royal Armor, and King’s Gauntlet can all be used to either exploit the Strength passive or help maintain the ATK buff. el ultimo 3 accessories listed give him additional magic skills to use when Smite is on cooldown.
Slow Healing Support
Ezekiel can help keep the party topped off on HP by healing on demand. Healing spam is better used when he’s slower than his enemies, so that every hit taken is then immediately healed off afterwards.
Fast Support
A veces, you may want Ezekiel to be faster instead, so equipping either the Dancing Gold Star or the Chronomancer’s Ring will do just that. You can then use accessories that inflict non-damaging conditions like Bag of Juggling Balls, Golde’s Gambit, etc.. Bludgeon is also one of his skills that can be better used if he’s faster, so that his allies can take advantage of the ATK and DEF debuff it inflicts.
Physical Offense
Simply use Bludgeon when you can. When it’s on cooldown, alternate between Crushing Cross and Grab. Alternativamente, on turns when both Bludgeon and Crushing Cross are on cooldown, you can choose to support instead, since Grab deals little damage.
Magical Offense
You’ll want to time Smite well so that it deals the highest damage possible. For more consistent damage, equip Ezekiel with accessories like Hydra in a Jar, Tome of the Rat Priest, and Guiding Light, and use those when Smite is on cooldown. Alternativamente, you can also have him support the party while Smite is on cooldown.
Emith

Emith is the only character who primarily specializes in dealing magical damage.
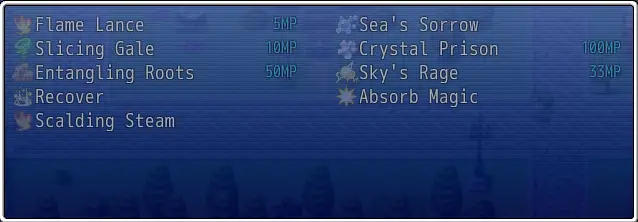
Emith’s skills revolve around using multi-element combos to make the most out of his fire and water spells. His wind and earth spell compliment his fire spell, and his ice and lightning spell compliment his water spell.
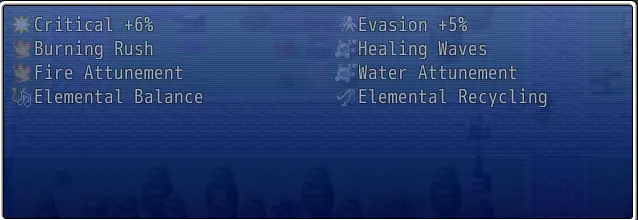
Emith’s passives revolve around the Burn, Incendio forestal, and Wet statuses.
Fire Focus: CONDWater Focus: MATK
Depending on which element you decide to focus on, the recommended stat will change. Although each elemental focus can benefit from the opposite stat, fire benefits more from the COND stat, and water benefits more from the MATK stat.
Best in Slot (Fire Focus)
- Demon Fire Staff
- God Slayer’s Robe
- Heart of the Swamp
- Dragon Flame Amulet
- Flask of Flame
- Pendant of Conditions
Focusing on COND will increase the damage of the Burn and Wildfire statuses. The Dragon Flame Amulet and the Flask of Flame lets Emith inflict both Burn and Wildfire on his first attack, regardless of which spell he uses.
Best in Slot (Water Focus)
- Demon Thunder Staff
- God Slayer’s Robe
- Pendant of Magic
- Hydra in a Jar
Maximizing Emith’s MATK is the key to dealing as much damage as he can with Sky’s Rage. Thunder staves reduce its MP cost from 50 a 33, so he can dish out more damage before having to recover his MP.
Other Recommendations (Fire Focus)
- Reaper’s Cloak
- Diseased Rat Tail
- Putrid Flesh
- Hydra in a Jar
- Pendant of Glass
The God Slayer’s Robe can be switched out for the Reaper’s Cloak, which lets Emith inflict Poison on his first attack, and the Diseased Rat Tail and Putrid Flesh accessories gives him ways to inflict Disease, further taking advantage of his COND stat. The Pendant of Glass can also further boost his COND stat, but it comes with the risk of cutting his Max HP in half.
Other Recommendations (Water Focus)
- The Pristine
- Pendant of Glass
- Silver and Gold Tournament Badge
- Flask of Flame
- Dragon Flame Amulet
- Tome of the Rat Priest
- Guiding Light
- Belt Pouch
Accessories such as The Pristine, Pendant of Glass, and both the Silver and Gold Tournament Badges can further increase Emith’s damage. The Flask of Flame and Dragon Flame Amulet are also still useful for a water-focused build, since they can help Emith recover some MP, further increase his damage through his Burning Rush passive, and trigger Scalding Steam for additional damage. With those two accessories equipped, it’s better to use them with the Hydra in a Jar accessory, since Sea’s Sorrow removes both Burn and Wildfire, nullifying the Burning Rush passive for Sky’s Rage casts. The Tome of the Rat Priest and Guiding Light adds some additional spells to use, which are just as powerful as Sky’s Rage under the right conditions. With so many ways to increase his damage and only 4 accessory slots, equipping Belt Pouches will help a lot in bringing the best out of him.
Fire Combo
Normalmente, applying Burn and Wildfire is a 2-turn combo of Flame Lance > Entangling Roots, or a 3-turn Combo of Flame Lance > Slicing Gale > Entangling Roots if you’re trying to apply those conditions to multiple enemies. The latter takes too long to pull off, so it’s better to have Umbra cast Epidemic to spread the conditions instead. Alternativamente, having the Flask of Flame and the Dragon Flame Amulet equipped lets Emith open up with Slicing Gale to both inflict Burn and Wildfire and immediately spread the Burn afterwards. He can then follow up with Entangling Roots if the Wildfire doesn’t spread to the other enemies that were burned.
Húmedo + Lightning Combo
A straightforward 2-turn combo of Sea’s Sorrow > Sky’s Rage or Hydra Spit > Sky’s Rage. It’s simple to use and deals a lot of damage, making it great for almost every battle.
Rick

Rick is a thief who has many tricks up his sleeve.

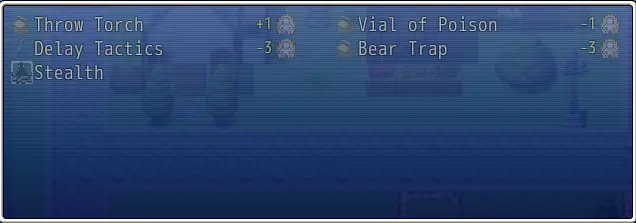
Rick’s available skills change depending on which weapons he has equipped. The first screenshot above shows what he has with a dagger and a pistol equipped, and the second shows what he has with a toolkit equipped.
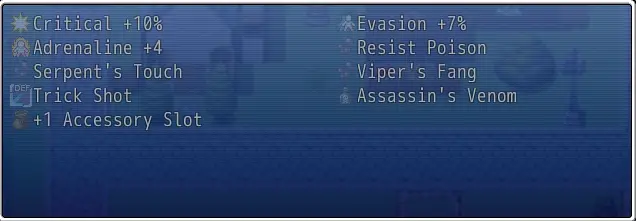
Rick’s passives revolve around the DEF debuff and the Poison status.
Tasa crítica, PATK or COND
Regardless of what weapons Rick uses, having high critical rate is important for him.
Best in Slot
- Fallen Dagger and Heaven Punisher (if focusing on physical attacks)
- Death’s Toolkit and Miner’s Toolkit (if focusing on condition damage)
- Spider Venom
- Junior Assassin Badge
- Lady Luck
Rick is best at inflicting DEF debuffs and maintaining them, which he can do with any of his weapons. Having the Spider Venom equipped on him allows him to reapply the Poison status much more often if he lands critical hits, which will not only trigger more instances of Poison damage with his Viper’s Fang passive, but also inflict and maintain the DEF debuff with his Assassin’s Venom passive.
Other Recommendations
- Pendant of Melee (if focusing on physical attacks)
- Pendant of Conditions (if focusing on condition damage)
- Pendant of Glass
- Exciting Research Notes
- Kitsune Divine Wear
- Pendant of Critical Hits
- Quartz Gem
- The Pristine
- Flask of Flame
- Dragon Flame Amulet
- Bee Stinger
- Ruby Gem
- Lost Ruby Necklace
- Black Powder
- Heart of the Swamp
- Diseased Rat Tail
- Putrid Flesh
Along with supporting the party through DEF debuffs, Rick can also deal some good damage with the right accessories. Accessories like Pendant of Melee, Pendant of Critical Hits, and The Pristine can turn him into a powerful physical attacker. He’s also one of the best characters to use for condition damage, since he can inflict Poison on his own, Bleed when Kyme’s Savior passive triggers, Burn with Throw Torch or the Flask of Flame accessory, Wildfire with the Dragon Flame Amulet, and Disease with the Diseased Rat Tail and the Putrid Flesh accessories.
Rick tends to recover Adrenaline rather quickly, especially when stealthed, so he can make pretty good use of the Kitsune Divine Wear to store more in case it recovers too quickly. The Exciting Research Notes is also great for him since he has a lot of costly skills.
The Bee Stinger combined with Spider Venom allows Rick to trigger multiple instances of Poison damage at once, which will then add a DEF debuff as well; all of this for no Adrenaline cost. It can also be paired with accessories like the Ruby Gem and the Black Powder for some additional effects.
Rick also happens to be the least risky character to equip the Pendant of Glass on, because his Stealth status makes him unable to be targeted by single target and random target attacks as long as another ally is alive.
Physical Offense
For physical attacks, I like to open up with Shadow Shot for the Stealth status, then start inflicting the DEF debuffs with Crippling Shot or Death Blossom. If the battle calls for a more aggressive strategy, then open with Crippling Shot or Death Blossom (with the Exciting Research Notes equipped) en cambio. Rapid Stab, Backstab, and Reload are reliable ways to recover Adrenaline along with the Stealth status, so you can continue to use the more expensive skills like Death Blossom or Unload.
Condition Damage
Use Throw Torch or Vial of Poison to inflict conditions, and recover Adrenaline if it’s the former. Then use Delay Tactics to trigger more instances of condition damage and HP Regen. Be careful when using it though, as it will trigger condition damage on any allies that have conditions on them as well. Bear Trap can be used anytime to help maintain DEF debuffs if needed, and its DEF debuff will work even if the Stun doesn’t. Condition damage isn’t affected by buffs or debuffs and ignores defense, so in battles where physical or magical attacks are less effective, then focusing on condition damage is a great alternative.
Brave Wind

Brave Wind is an archer who can also support his allies.

Most of Brave Wind’s skills focus on supporting one ally at a time, while the rest deal physical damage.
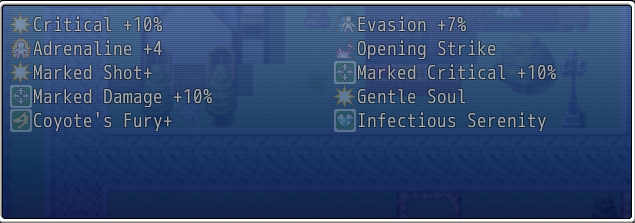
The majority of Brave Wind’s passives focus on the Marked Shot skill, with one of them being support-based instead.
regeneración de HP, HP máx., PDEF, MDEF, Daño crítico, PATK
Brave Wind is best used for support, since his damage doesn’t come close to characters like Sita or Emith. Sin embargo, should you wish to use him for offense anyway, then focus on increasing his critical damage and PATK through food and equipment. He does not require equipment that increases his critical rate, since Coyote’s Fury already guarantees critical hits.
Best in Slot
- Fairy in a Bottle
- Dowsing Rod
- Crystalline Vest or Centurion’s Armor
The Fairy in a Bottle applies Mending permanently, which when combined with Brave Wind’s Infectious Serenity passive, allows him to apply that status to his allies when he uses his support skills. The Dowsing Rod offers him a way to heal the entire party, since Nature’s Blessing is a single target heal. In the armor slot, he can use Crystalline Vest for more HP Regen or Centurion’s Armor for more Max HP.
Other Recommendations
- Mojito
- Equipment that resists conditions
- Sea Conch combined with Uktena’s Scale, Sturdy Stone, and Marbo’s Tea
- Bodrick’s Lucky Charm or Mark of the Prophet
- Aquamarine Gem
- Sturdy Plank
- Dancing Gold Star
- Chronomancer’s Ring
- Spider Queen’s Web
- Golde’s Gambit
- Bag of Juggling Balls
- Lamia’s Curse
- Chaos Fish
- Emerald Gem
- Zombie Flesh
- Lupa
The Mojito accessory gives Brave Wind the ability to both remove conditions and recover HP at the same time. The Sea Conch combo allows him to recover up to 15% HP every turn so he can focus more on healing others. Bodrick’s Lucky Charm/Mark of the Prophet and the Aquamarine Gem helps him stay alive. Dancing Gold Star and the Chronomancer’s Ring are used when Brave Wind needs to be faster than Sita, Rick, or his enemies for any reason. Spider Queen’s Web and Golde’s Gambit give him options to inflict Stun with no Adrenaline cost, although most of the time, he’ll always have more than enough. Finalmente, the last 6 accessories listed gives him more support options, some of which are best used when he’s faster than his enemies.
Apoyo
Simply buff and heal when needed. Use Pin Down to buy time or to inflict its ATK debuff.
Coyote’s Fury + Marked Shot combo
Brave Wind’s offensive combo. Marked Shot is better when it lands critical hits, so it can stack its damage bonus faster. Adrenaline can be recovered by using his support skills.
Umbra

Umbra is a necromancer who has power over death.
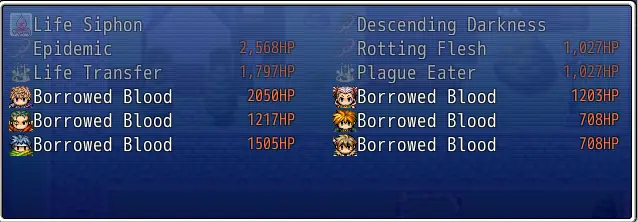
Umbra’s skills cost either her own HP or her allies’ HP. They are unique support skills that add a layer of complexity, but are very powerful when used well.
Umbra’s passives revolve around recovering HP and reducing the HP cost of her skills.
regeneración de HP, HP máx.
Umbra’s strength lies in her support skills. Since they cost HP to use, some with very high HP costs, HP Regen is highly recommended to mitigate those costs.
Best in Slot
- Mountain Spring Water
- Sturdy Plank
The Mountain Spring Water accessory provides some much needed HP Regen, while the Sturdy Plank greatly improves her Max HP, allowing her to recover more HP per turn and take more hits.
Other Recommendations
- Equipment that resists conditions
- Petrified Wood
- Sea Conch combined with Uktena’s Scale, Sturdy Stone, and Marbo’s Tea
- Bodrick’s Lucky Charm or Mark of the Prophet
- Aquamarine Gem
- Chronomancer’s Ring
- Belt Pouch
- Emerald Gem
- Zombie Flesh
- Lupa
Equipment that resists various conditions are used with Plague Eater as the one reliable method to clear conditions from all of Umbra’s allies. For conditions that can’t be resisted, like Bleed, Petrified Wood can be used to reduce its damage along with the Born in a Swamp passive, if it can’t be removed right away. The Sea Conch combo adds another way to recover HP every turn along with adding a DEF buff to help Umbra take less damage. Other ways to keep Umbra alive include Bodrick’s Lucky Charm, Mark of the Prophet, and Aquamarine Gem. Some of Umbra’s skills are better used when she’s faster than her enemies but goes second after a faster character, so the Chronomancer’s Ring should be used for strategies that call for it, along with equipping the Dancing Gold Star on the character you want to go first. el ultimo 3 accessories listed offer Umbra additional methods of support when she is using the Chronomancer’s Ring.
Umbra’s possible strategies change depending on who else is in battle with her and what she has equipped. Regardless of what strategy is used, remember to use Life Siphon whenever possible to help recover her HP.
Fast Support
Como se mencionó anteriormente, some of Umbra’s skills are better used when she’s faster than everyone but the character equipped with a Dancing Gold Star. A good example is Epidemic, and the times when you want to use it when she’s guaranteed to go second are for spreading the Confusion and Hysteria statuses. The character equipped with the Dancing Gold Star should also have the Bag of Juggling Balls and/or the Chaos Fish equipped. Then they use those accessories, which is immediately followed up by Epidemic to spread them to all enemies. Other skills that benefit from going second, or just being faster in general, are Rotting Flesh and Borrowed Blood: Kyme, Sita, and Brave Wind.
Slow Support
Some skills are instead better used when Umbra is slower, like Plague Eater. This skill combined with condition resistance allows Umbra to clear conditions from the rest of the party right after they are inflicted, since the conditions she absorbs but has resistance to will have no effect on her.
Ofensa
Umbra’s best offensive options are Borrowed Blood: Emith and Borrowed Blood: Rick. They scale from Emith’s MATK and Rick’s COND, along with her own MATK and COND. Since it’s unlikely Umbra will have high MATK or COND, the majority of the damage will come from Emith and Rick’s stats instead.
Eso es todo lo que estamos compartiendo hoy para este Notes From Province guía. Esta guía fue originalmente creada y escrita por Kiyoshiro. En caso de que no actualicemos esta guía, puede encontrar la última actualización siguiendo este enlace.