- Título: Murder Mystery Machine
- Fecha de lanzamiento:
- Revelador:
- Editor:
Information about Murder Mystery Machine is still incomplete. Por favor ayúdanos a completar los detalles del juego usando esto formulario de contacto.
This is a quick rundown of how to get an A+ on the last three cases
Introducción
Nadie’s done an A+ guide for cases 6-8, so I decided to help out. Several other users have done guides on the hidden objects and how to get an A+ on the first five, así que gané’t repeat their work.
How this game determines an A+ is a little opaque, but this is what I’ve found:
- Using a hint or making an incorrect accusation (ES DECIR, submitting an incorrect answer to How, Por qué, OMS, Qué, Dónde, Cuando) will instantly tank your score to a B, or a C with repeated mistakes. There is no penalty for randomly guessing with deductions.
- Your score is determined by how much evidence (objects on the scene and results from dialogue), how many deductions you make, and how many substantiations you’ve made. You technically don’t need to do everything, just most of everything. Por ejemplo, I’ve received an A+ for 2-1 while missing a piece of evidence and another for 8-1 without doing any of the five substantiations
- According to the patch notes, the rating system was made more forgiving at some point, and if I had to guess what was changed, the substantiations were made less relevant to the final scoring. I’ll mention some of the substantiations, but they’re not too useful to the final score
- Getting an A+ on a whole case is based on getting an A+ on all its individual scenes. If you ever slip up on a node, you can replay it after finishing the entire case. I had a weird situation where I got an A+ on Case 7 without the achievement firing, but it fired instantly when I redid a node.
Logros
Welcome to the DCA:
Complete case 1-1, the very first node with the dead politician
Episodio 1-8 Completo:
Complete each of the eight cases
Episodio 1-8 Perfecto:
Get an A+ on each episode by getting A+ grades on all its individual nodes
Dresses to Impress:
Unlock all four of Cass’s outfits.
Cadet: After a few nodes of the first case, tú’ll unlock a cup of coffee in the basement between nodes. Click on it ten times and drink ten cups
Júnior: Desbloqueado por defecto
Experimentado: Unlocked by getting an A+ on episodes 1-4
Veterano: Find the hidden objects in all of the odd-numbered cases. I’ll point them out in my directions, but another Steam user already made a good guide on the topic, linked in the introduction.
Casual Clothes Day:
Unlock all four of Nate’s outfits
Cadet: As you complete nodes, more and more perks will be added to the basement between cases. Interact with the Coffee, Desk Chair, Donut, Pizza, Pesa, Libro, and Sofa as they appear. This can be unlocked by the halfway point of the game
Júnior: Desbloqueado por defecto
Experimentado: Unlocked by getting an A+ on episodes 5-8
Veterano: Find the hidden objects in all of the even-numbered cases. De nuevo, check the guide in the introduction
Caso 6
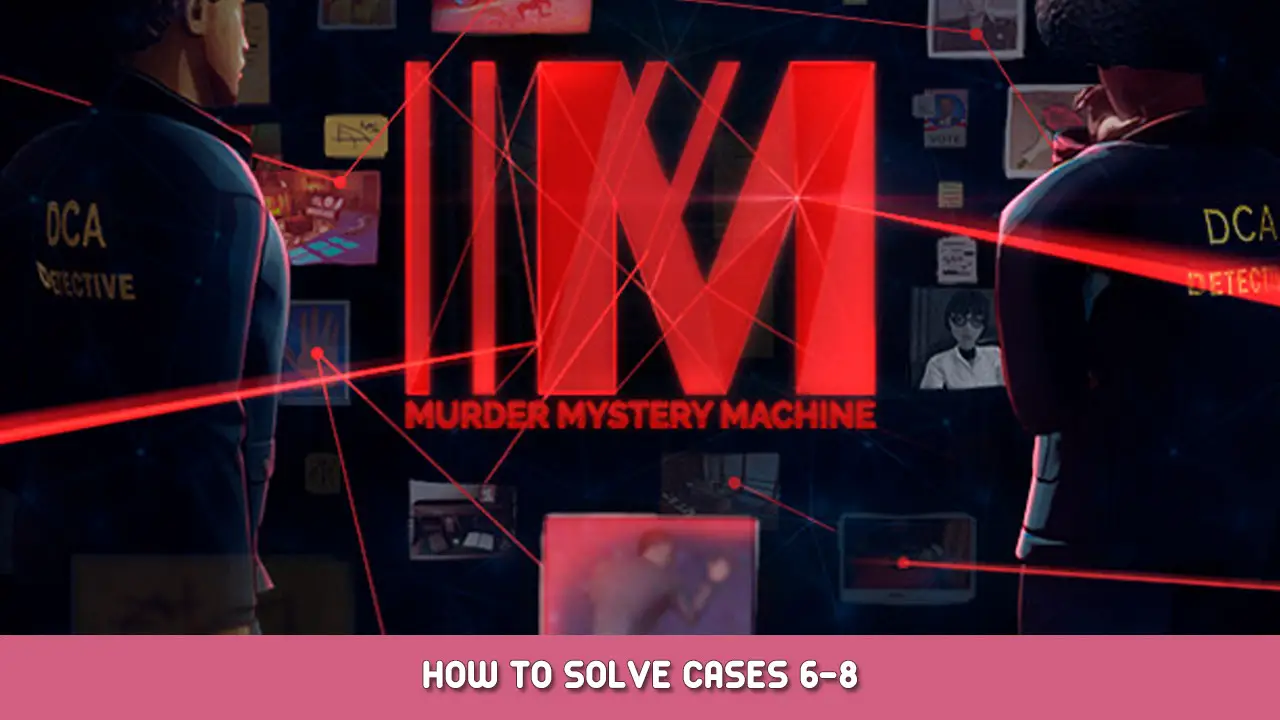
6-1
Talk to Warden Cromwell. Examine the body. Examine the towel on the floor by the mop bucket, the Incident Report on the stool, and then the Makeshift Knife in the corner. Tilt the camera and examine the Knotted Shoelaces behind the pillar and Shoeprint on Cracked Tile on the wall with shower heads. Talk to Nate.
- Link Minimum Security Wing to Dangerous Criminal, talk to the Warden
- Link Erratic Behavior to Moved for Good Behavior, talk to Nate
- Link Showprint on Cracked Tiles and Ceramic Fragments on Sole of Shoe, talk to Nate
- Link Friction Marks on Wrists with Knotted Shoelaces, talk to Nate
OMS: Unknown Assaliant
Qué: Toalla
Por qué: Cover-Up
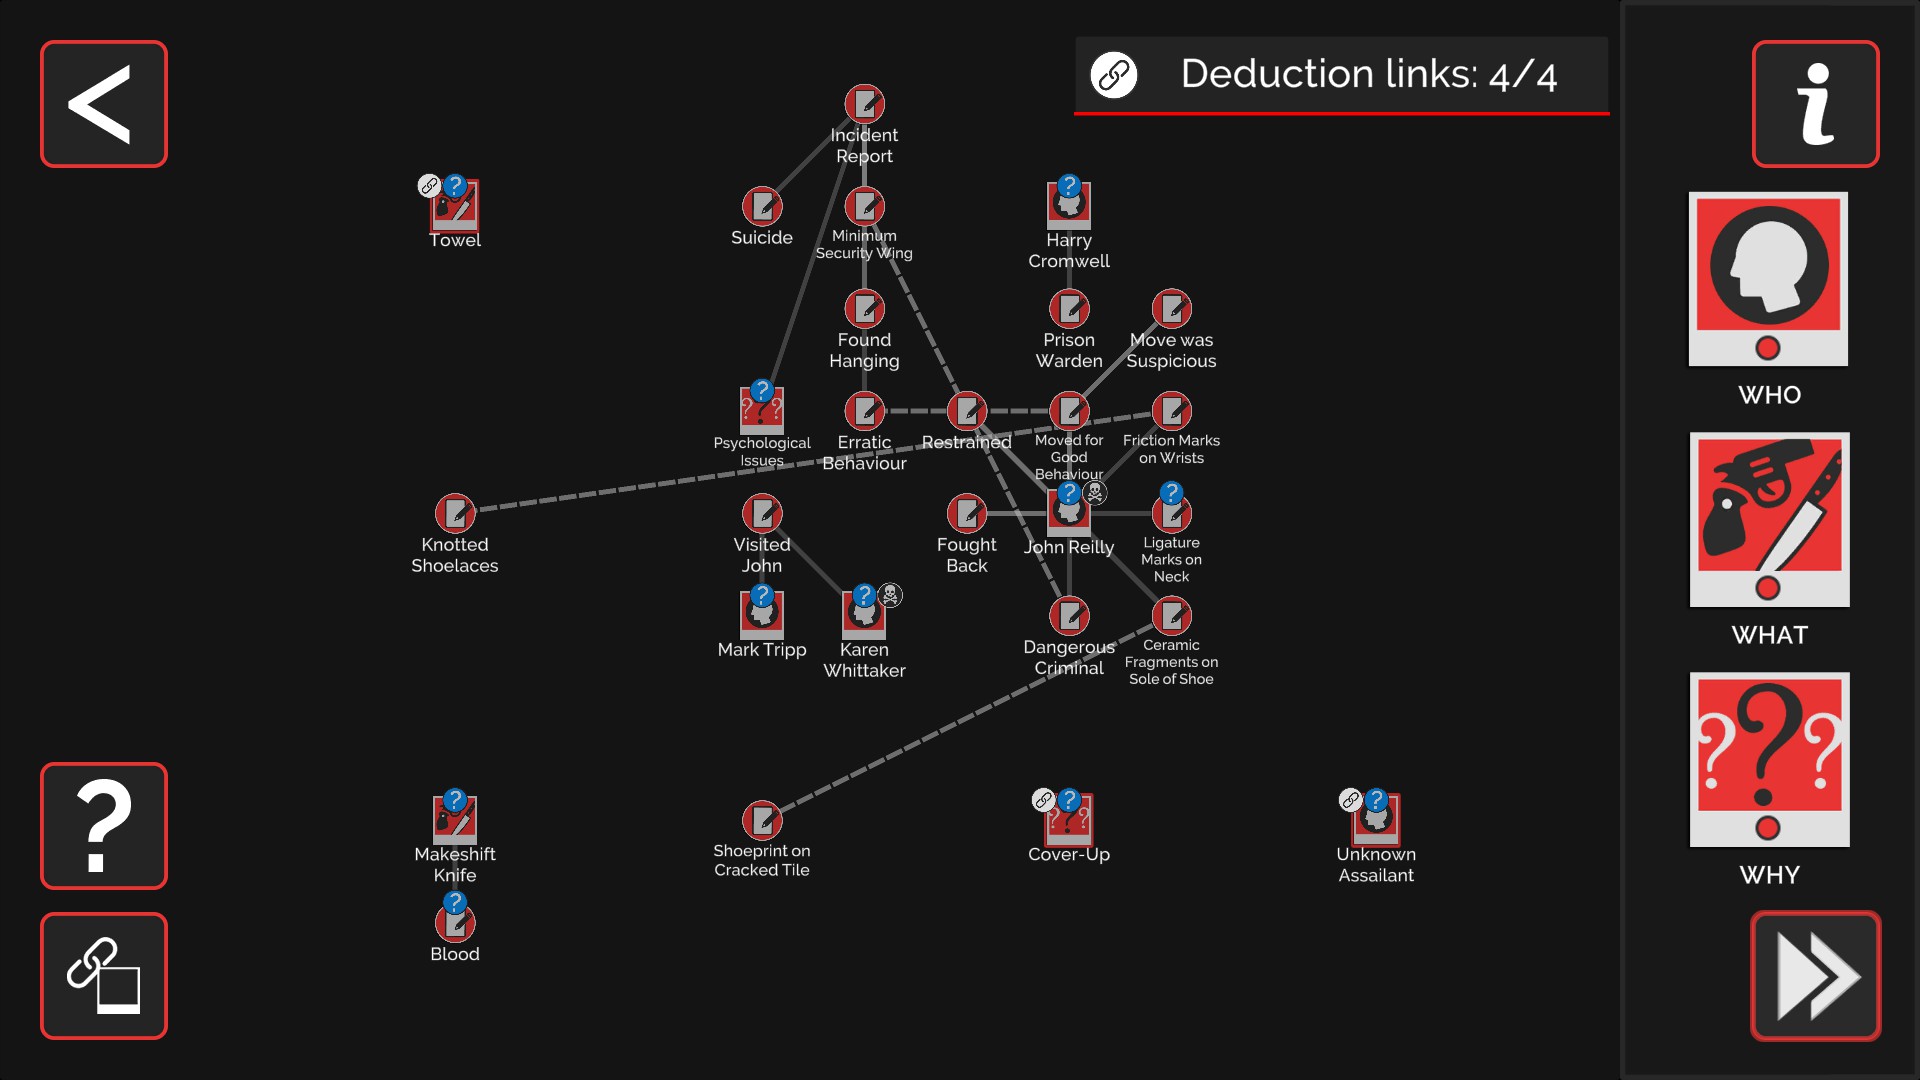
6-2
Start by talking to Nadine and asking her all questions
Examine the Undamaged Plug Socket on the book shelf, then the Burnt Pile of Books, Burn Trail, and Metallic Lighter in the middle of the room. Finalmente, check the Opinion Piece on the cardboard box in the lower left corner. Tilt the camera with the A key and examine the filing cabinet for Campaign Poster: “Health First”
Deducciones:
- Link Painter to Decorating Next Week, talk to Nadine again
- Link Faulty Electrics to Undamaged Plug Socket, talk to Nate
- Link Burn Trail to Metallic Lighter, talk to Nate
- Link Burnt Pile of Books to Burn Trail
- Link FD/006147 to Most Documents Destroyed
- Link Campaign Poster: “Health First” to Attacking Governor Johnson’s Policies, talk to Nadine. Once everything else is done, talk to Nate
OMS: Painter
Por qué: Destroying Files
Cómo: Arson
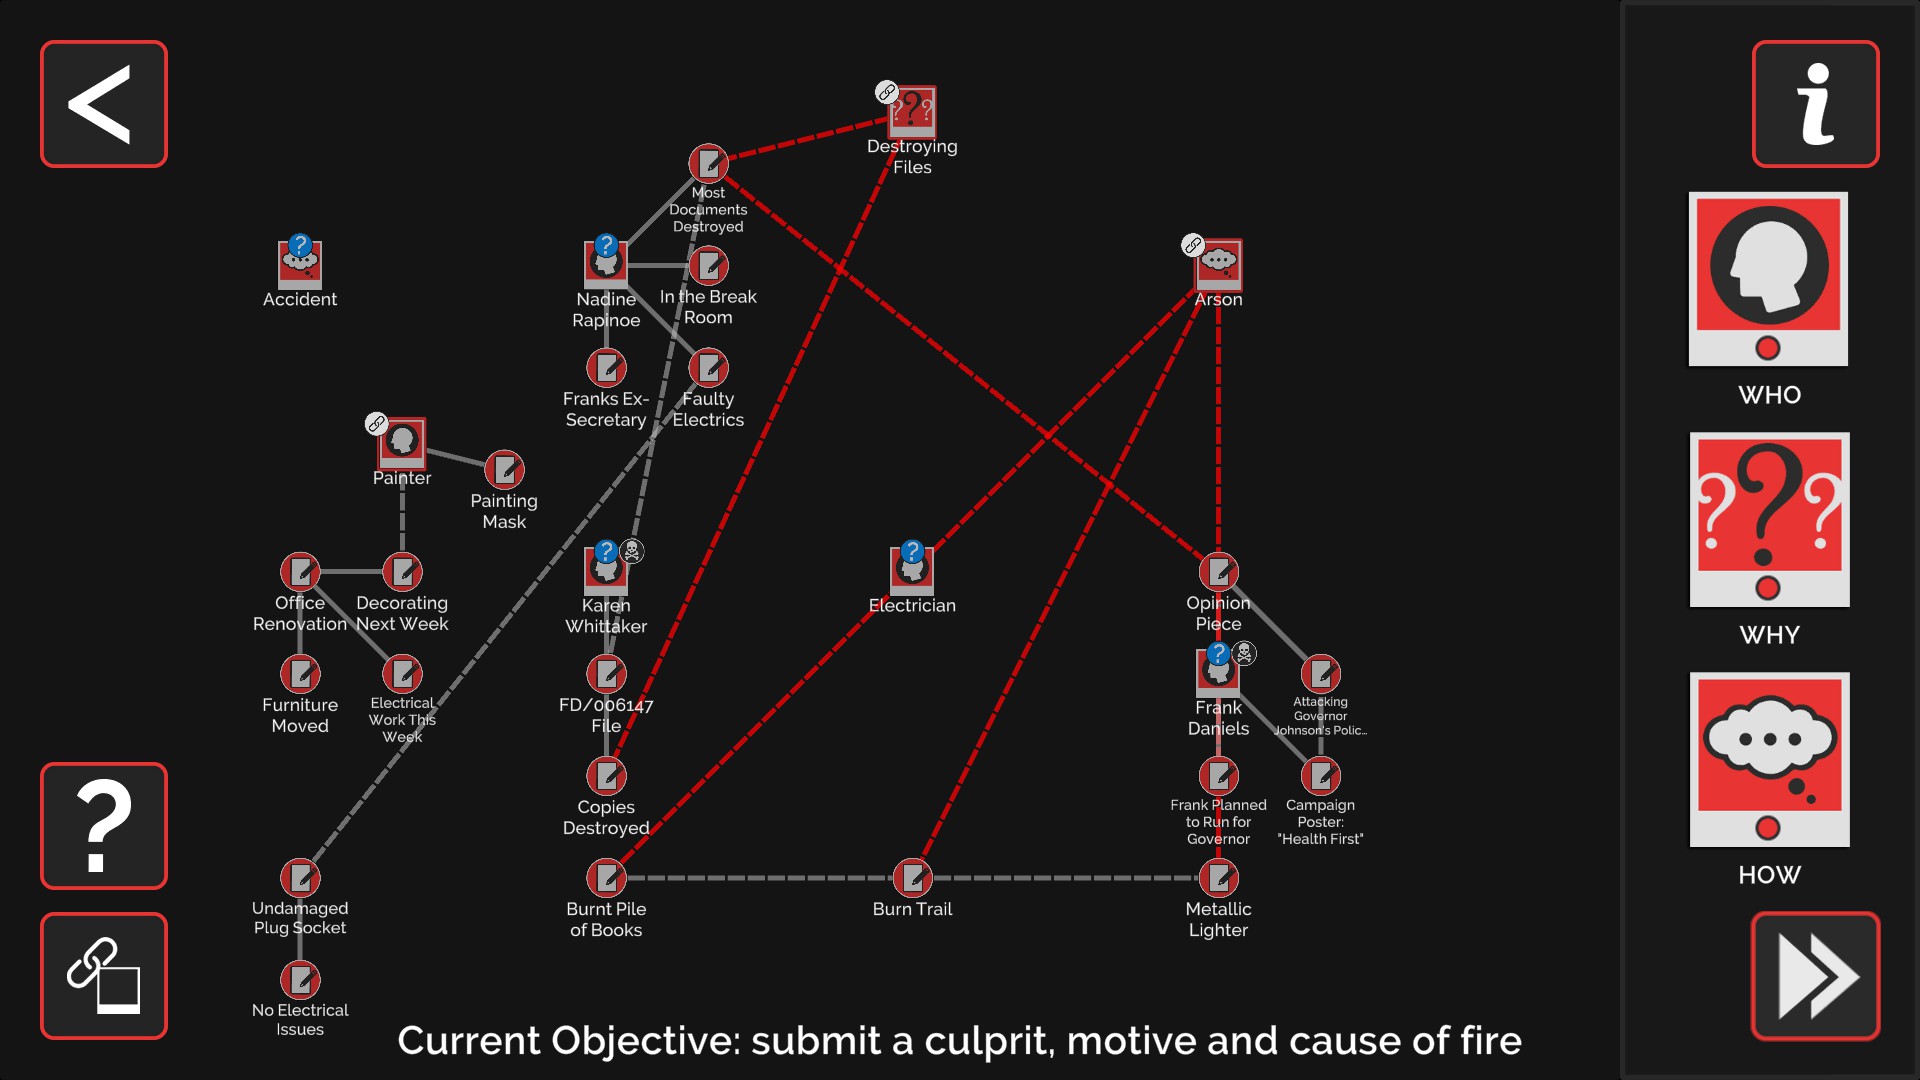
6-3
Tilt the camera and grab the hidden object on top of the iron Fireplace by the arm chairs
Talk to Connie
Examine Brian’s Medical Report on the bar. Entonces, examine Karen’s Notebook behind the bar
- Link Cost Cuts – Cheaper Materials Used to Relates to Water Treatment Plant Construction, talk to Nate
- Link Water Quality Standards Affected? to Abnormal Lead Levels in Blood, talk to Nate
- Link Water-Based Lead Poisoning? to Monthly Death Rate Up 5%, talk to Nate
Por qué: Uncovering Connections
6-4
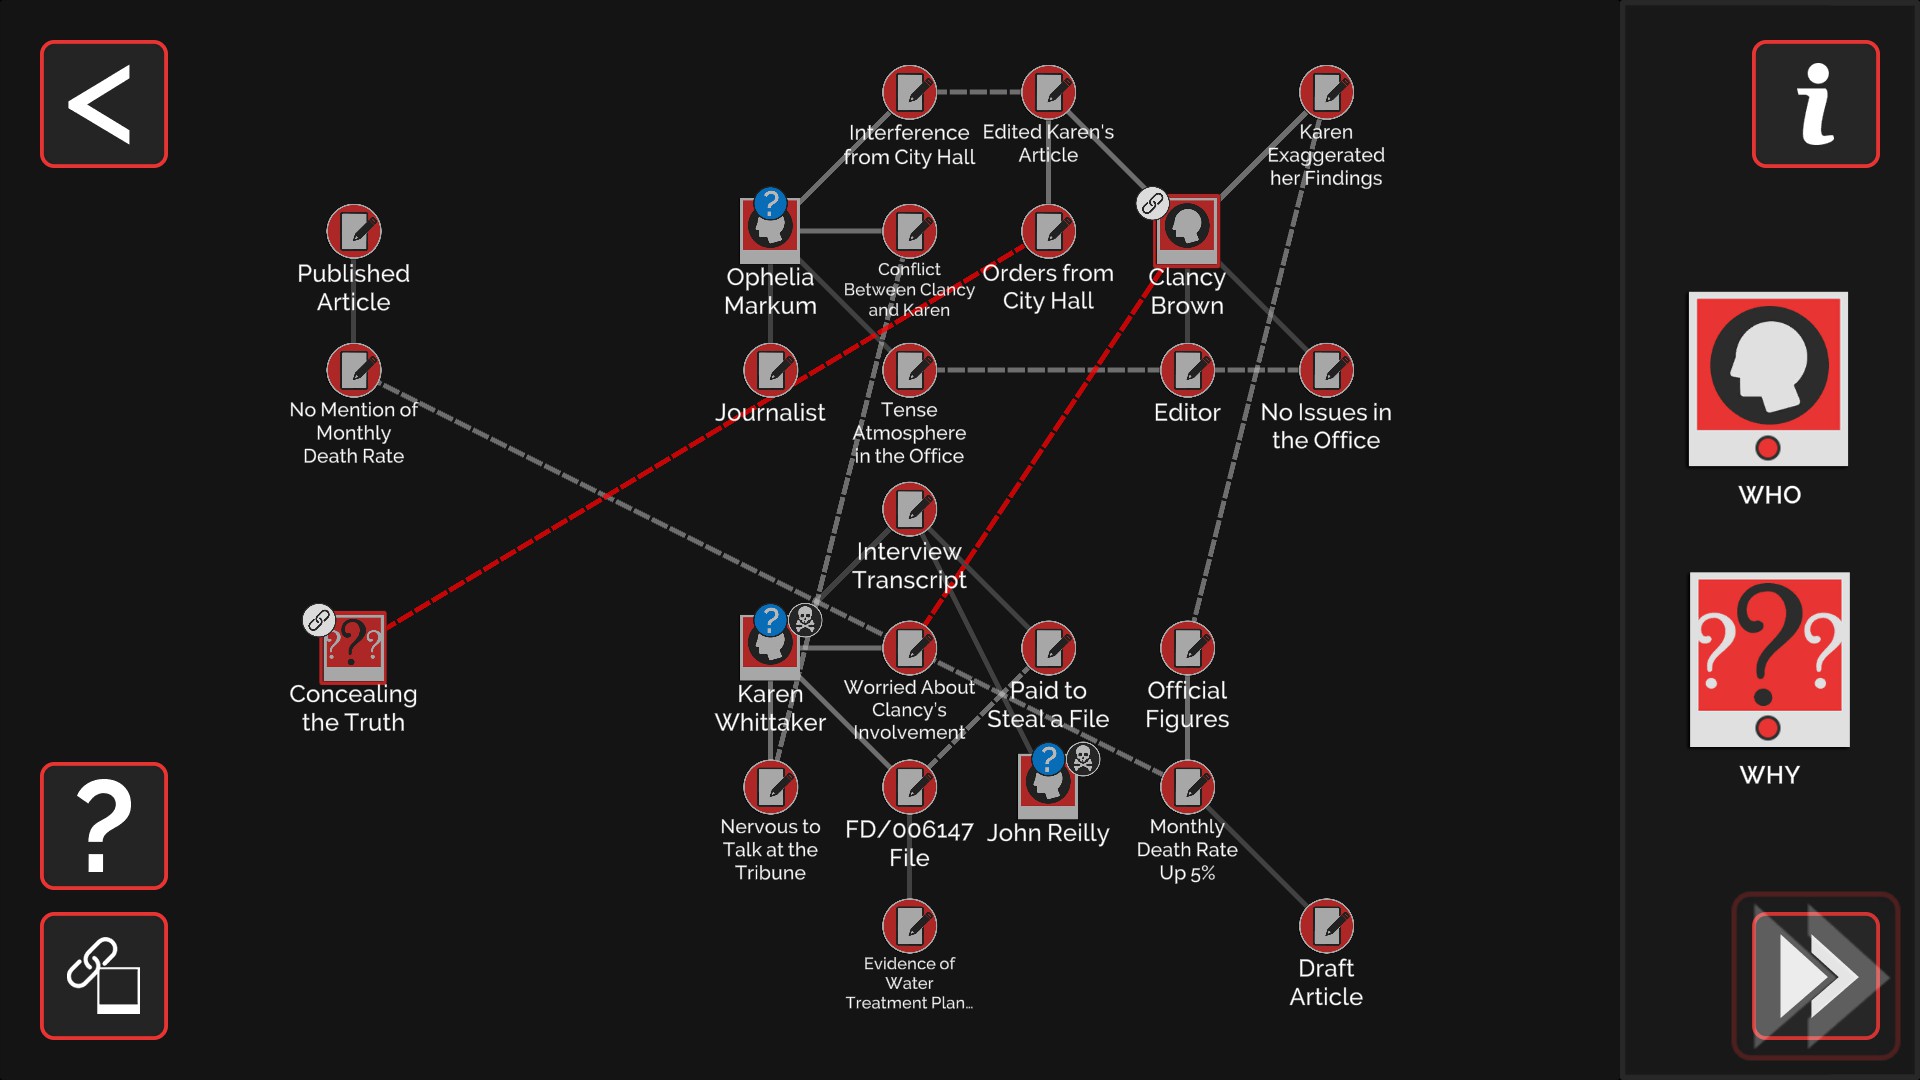
Talk to Clancy
Talk to Ophelia
Examine the blue book on the main desks for the Interview Transcript, then head to the far corner for the Published Article. Check the trash can by the printer for the Draft Article
- Link Tense Atmosphere in the Office and No Issues in the Office, talk to Ophelia
- Link Paid to Steal a Fire to FD/006147 File, talk to Nate
- Link No Mention of Monthly Death Rate to Monthly Death Rate Up 5%, talk to Clancy
- Link Interference from City Hall to Edited Karen’s Article, talk to Nate
- Link Karen Exaggerated Her Findings to Official Figures, talk to Nate
- Link Nervous to Talk at the Tribune to Conflict Between Clancy and Karen, talk to Nate
OMS: Clancy Brown
Por qué: Concealing the Truth
6-5
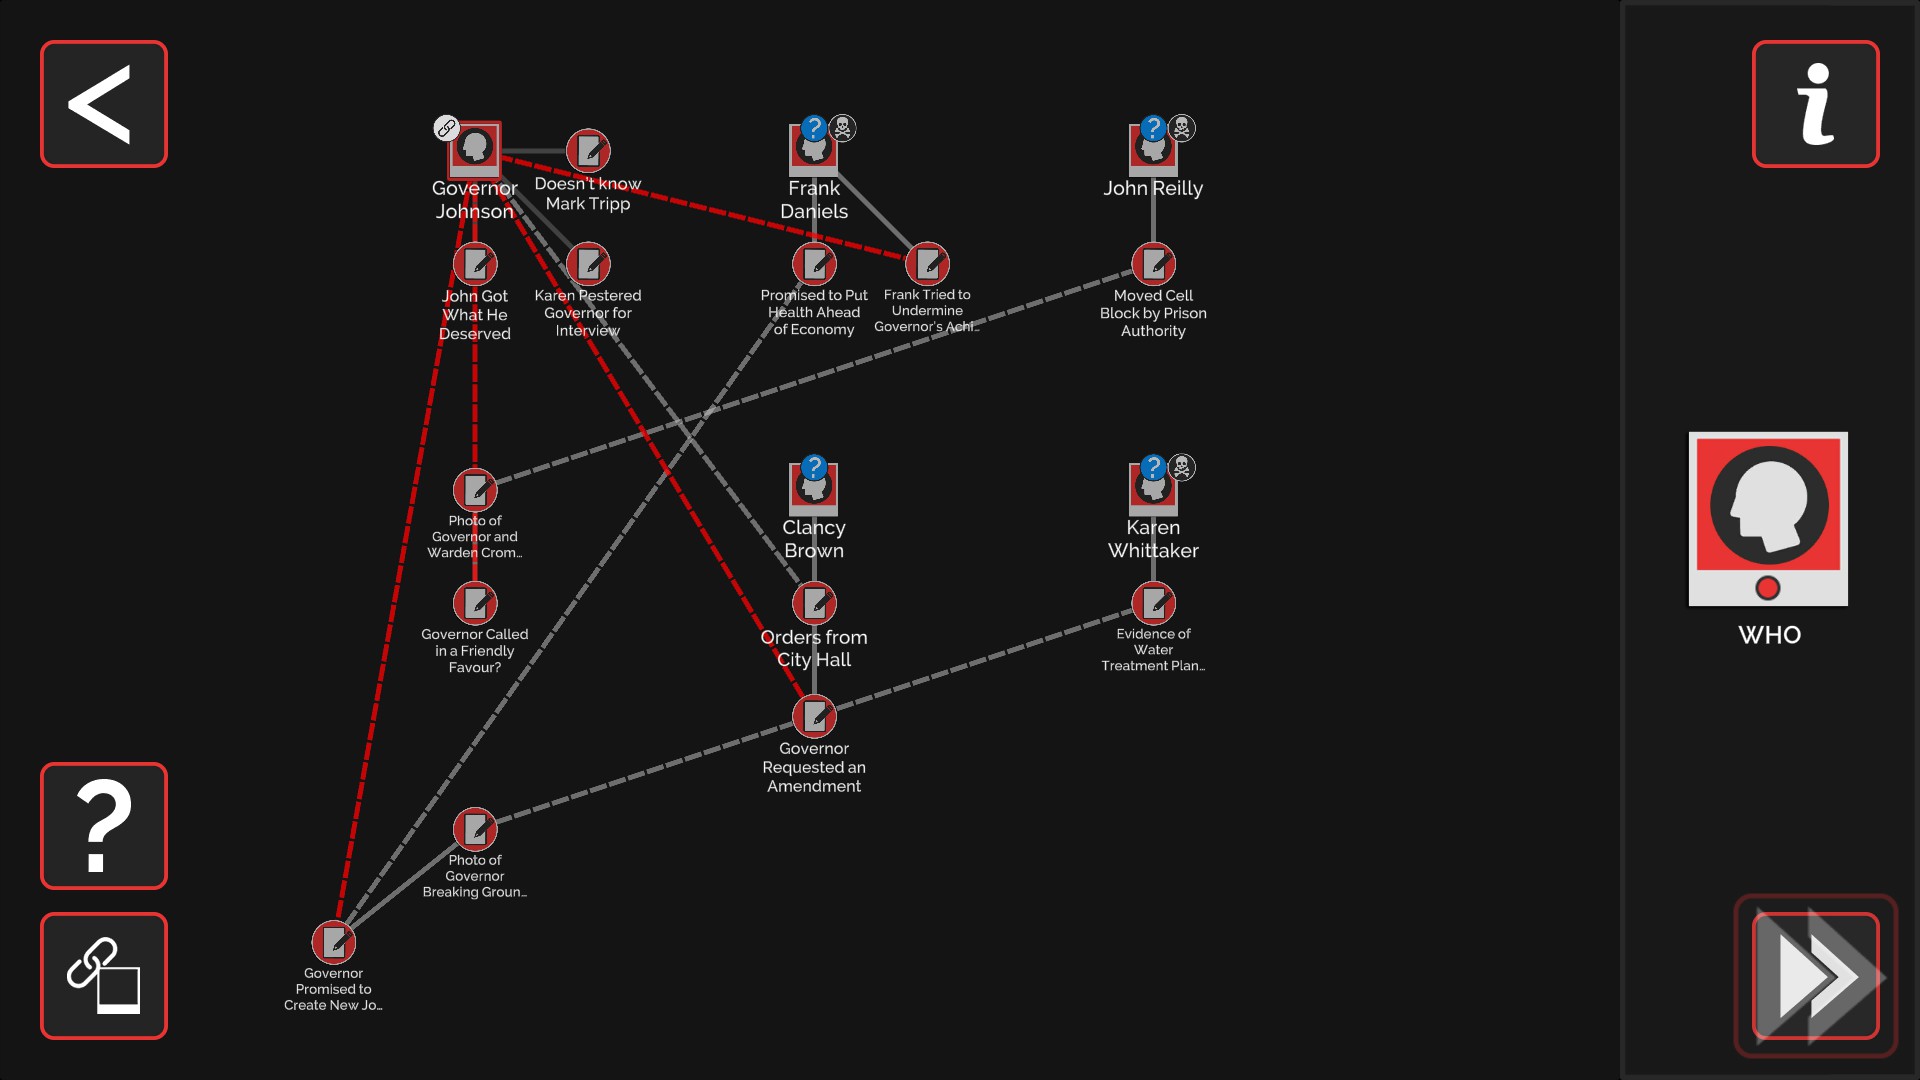
Talk to Governor Johnson
Talk To Nate
Examine photo on his desk for Photo of Governor and Warden Cromwell. Turn the camera and examine the Photo of Governor Breaking Ground at Water Treatment Plant on the wall by Nate
- Link Moved Cell Block by Prison Authority to Photo of Governor and Warden Cromwell, talk to Nate
- Link Photo of Governor Breaking Ground […] to Evidence of Water Treatment Plant Problems, talk to the Governor
- Link Governor Promised to Create New Jobs to Promised to Put Health Ahead of Economy, talk to the Govenor
- Link Governor Johnson to Orders from City Hall, talk to Governor
OMS: Govenor Johnson
Caso 7
7-1
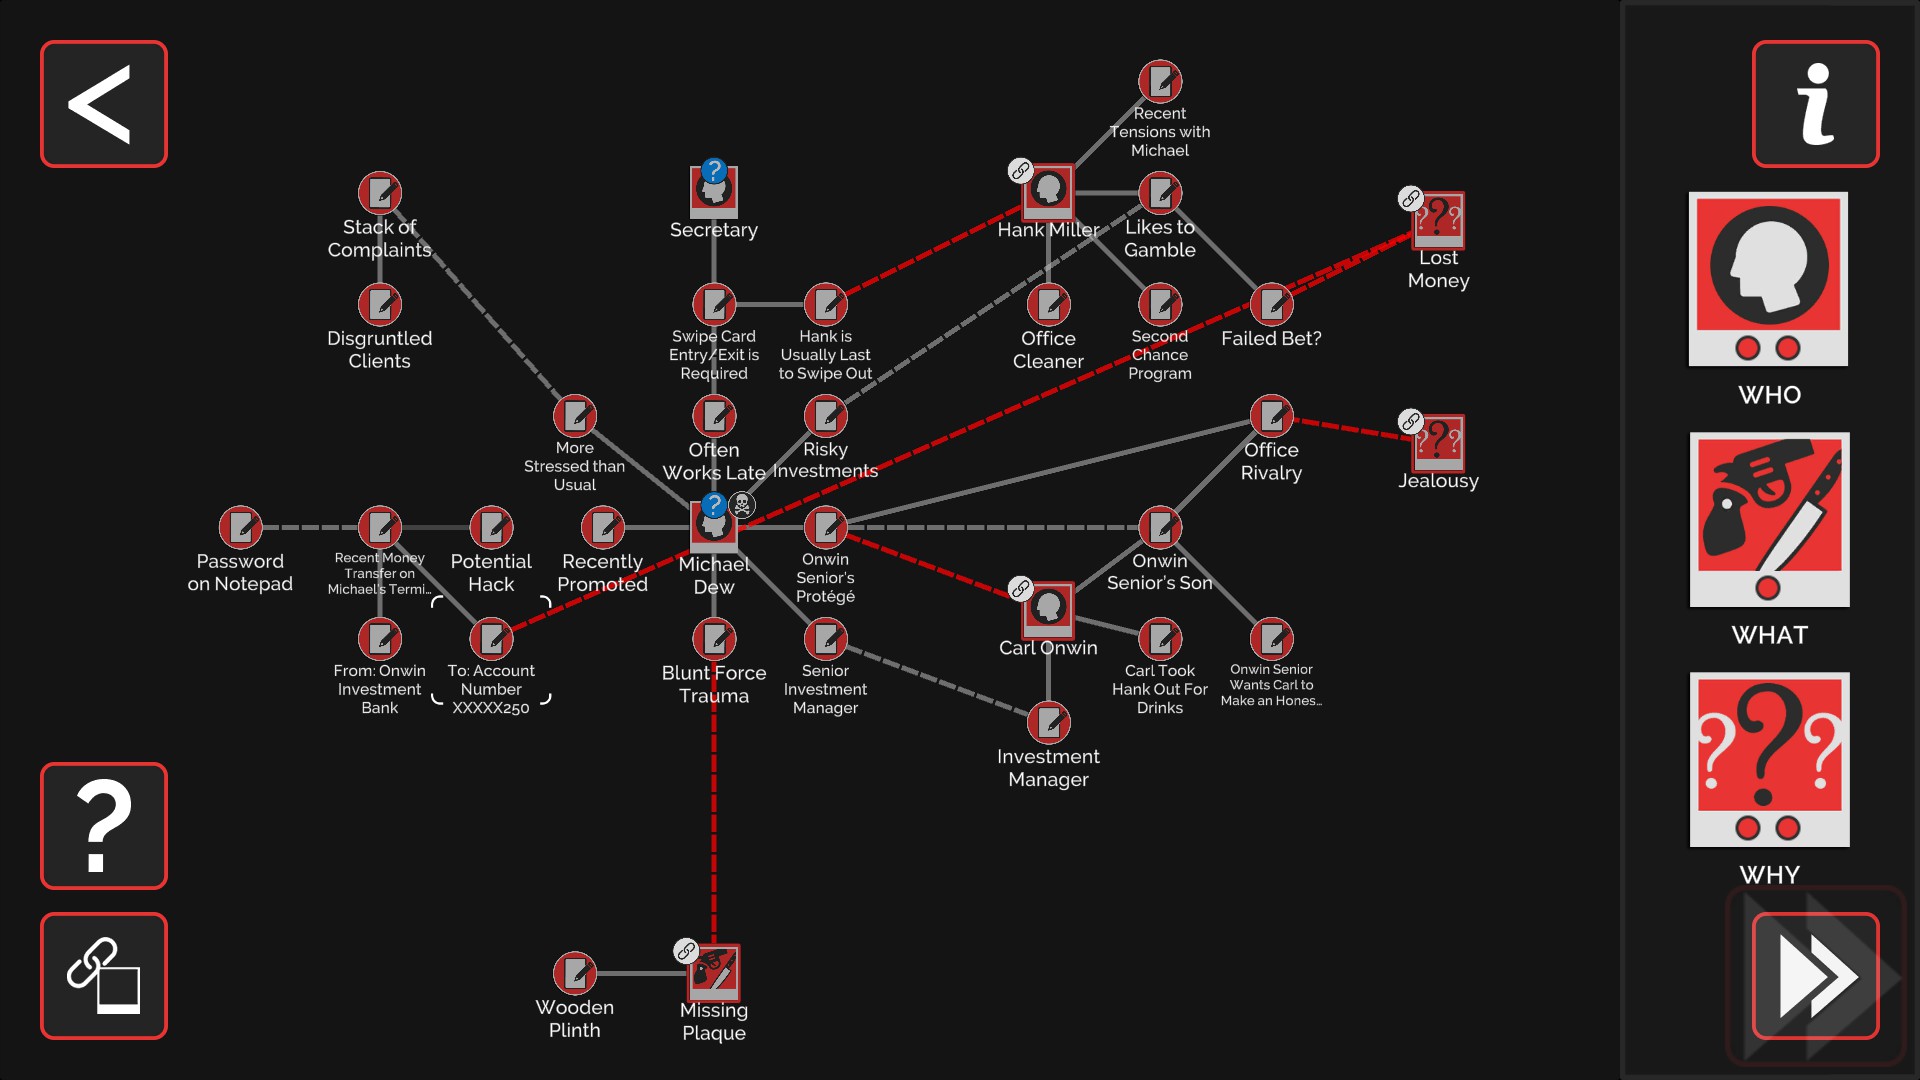
Investigate the body
Speak to the secretary
Examine the Stack of Complaints on top of the cabinets, the Recent Money Transfer in Micheal’s Terminal in front of the body, and the Password on Notepad in the drawer
Turn the camera and examine the Wooden Plinth in the corner behind the body
- Link Onwin Senior’s Protégramoé to Onwin Senior’s Son, talk to secretary
- Link Recent Money Transfer on Micheal’s Terminal to Password on Notepad, talk to Lou
- Link Risky Investments to Likes to Gamble, talk to Lou
- Link Stack of Complaints to More Stressed than Usual, talk to Secretary
- Link Senior Investment Manager to Investment Manager, talk to Secretary
- Link Swipe Card Entry/Exit is Required to Often Works Late, talk to Secretary
OMS: Hank Miller, Carl Onwin
Qué: Missing Plaque
Por qué: Celos, Lost Money
7-2
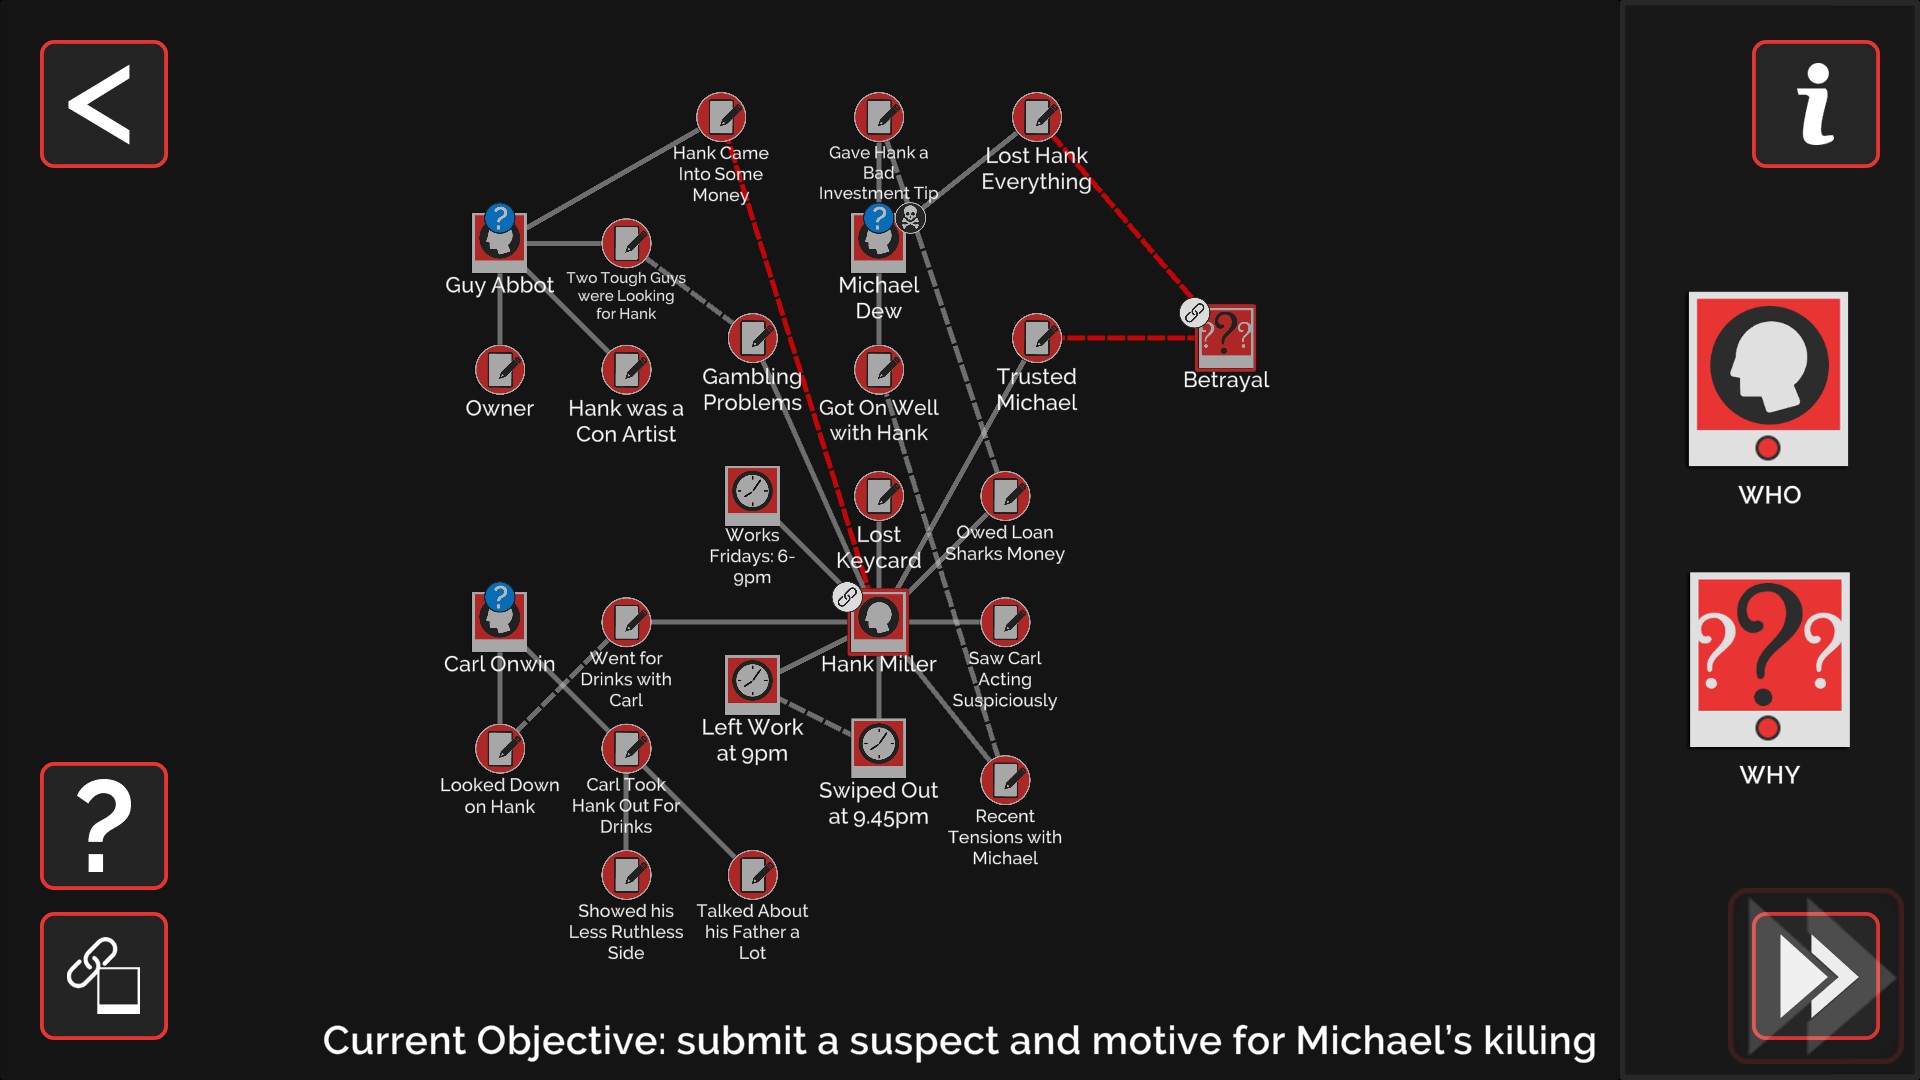
Talk to Guy
Talk to Hank
- Link Left Work at 9 PM to Swiped Out at 9:45 P.M, talk to Hank
- Link Got On Well With Hank to Recent Tensions With Micheal, talk to Hank
- Link Two Tough Guys Were Looking for Hank to Gambling Problems, talk to Guy
- Link Looked Down on Hank to Went For Drinks with Carl, talk to Hank
- Link Gave Hank a Bad Investment Tip to Owed Loan Sharks Money, talk to Hank
OMS: Hank
Por qué: Betrayal
Link Lost Hank Everything and Trusted Micheal to Betrayal
Link Hank Came into Some Money to Hank Miller
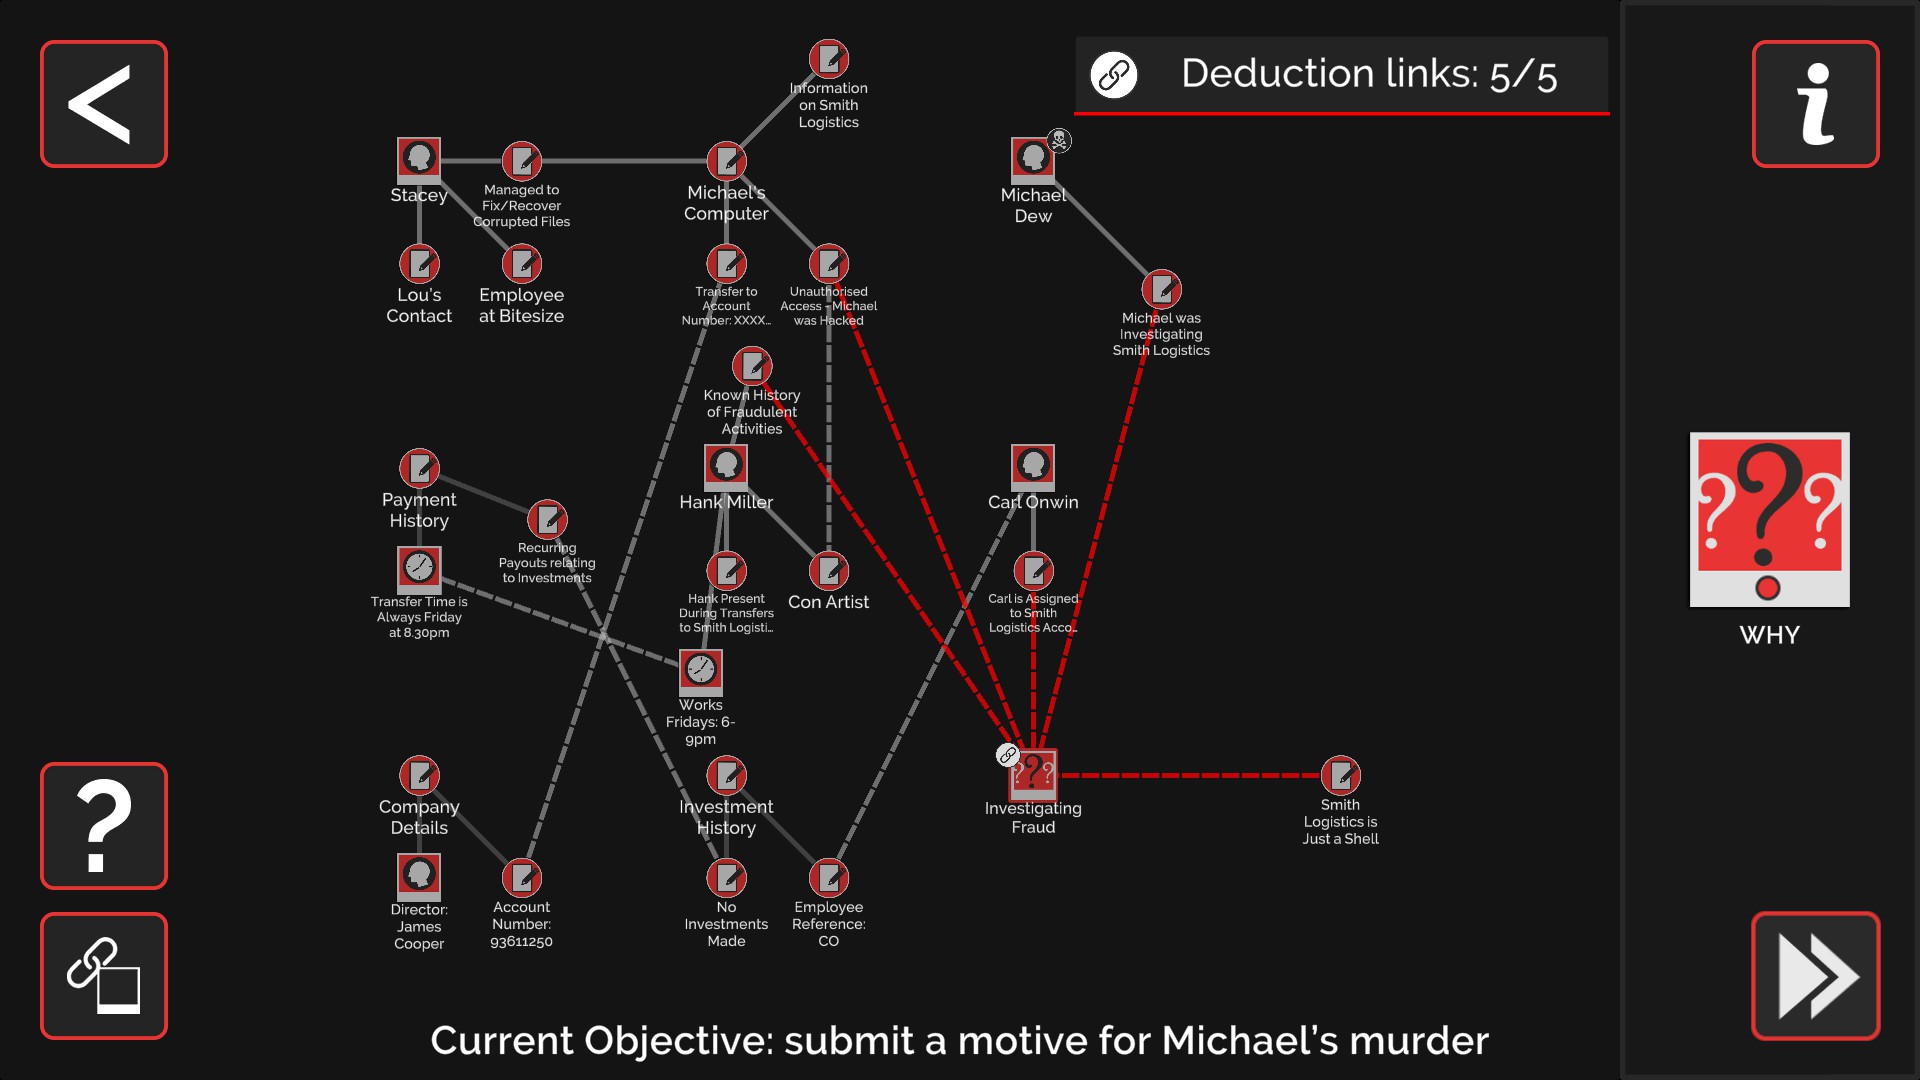
7-3
Talk to Stacey
Examine Micheal’s Computer on the counter
- Link Transfer Time is Always Friday at 8:30 PM to Works Fridays: 6-9 P.M, talk to Lou
- Link Account Number 93611250 to Transfer to Account Number: Xxxxx250, talk to Lou
- Link Unauthorized Access – Micheal was Hacked to Con Artist, talk to Lou
- Link Employee Reference: CO to Carl Onwin, talk to Lou
- Link Recurring Payouts to Investments to No Investments Made, talk to Lou
Por qué: Investigating Fraud
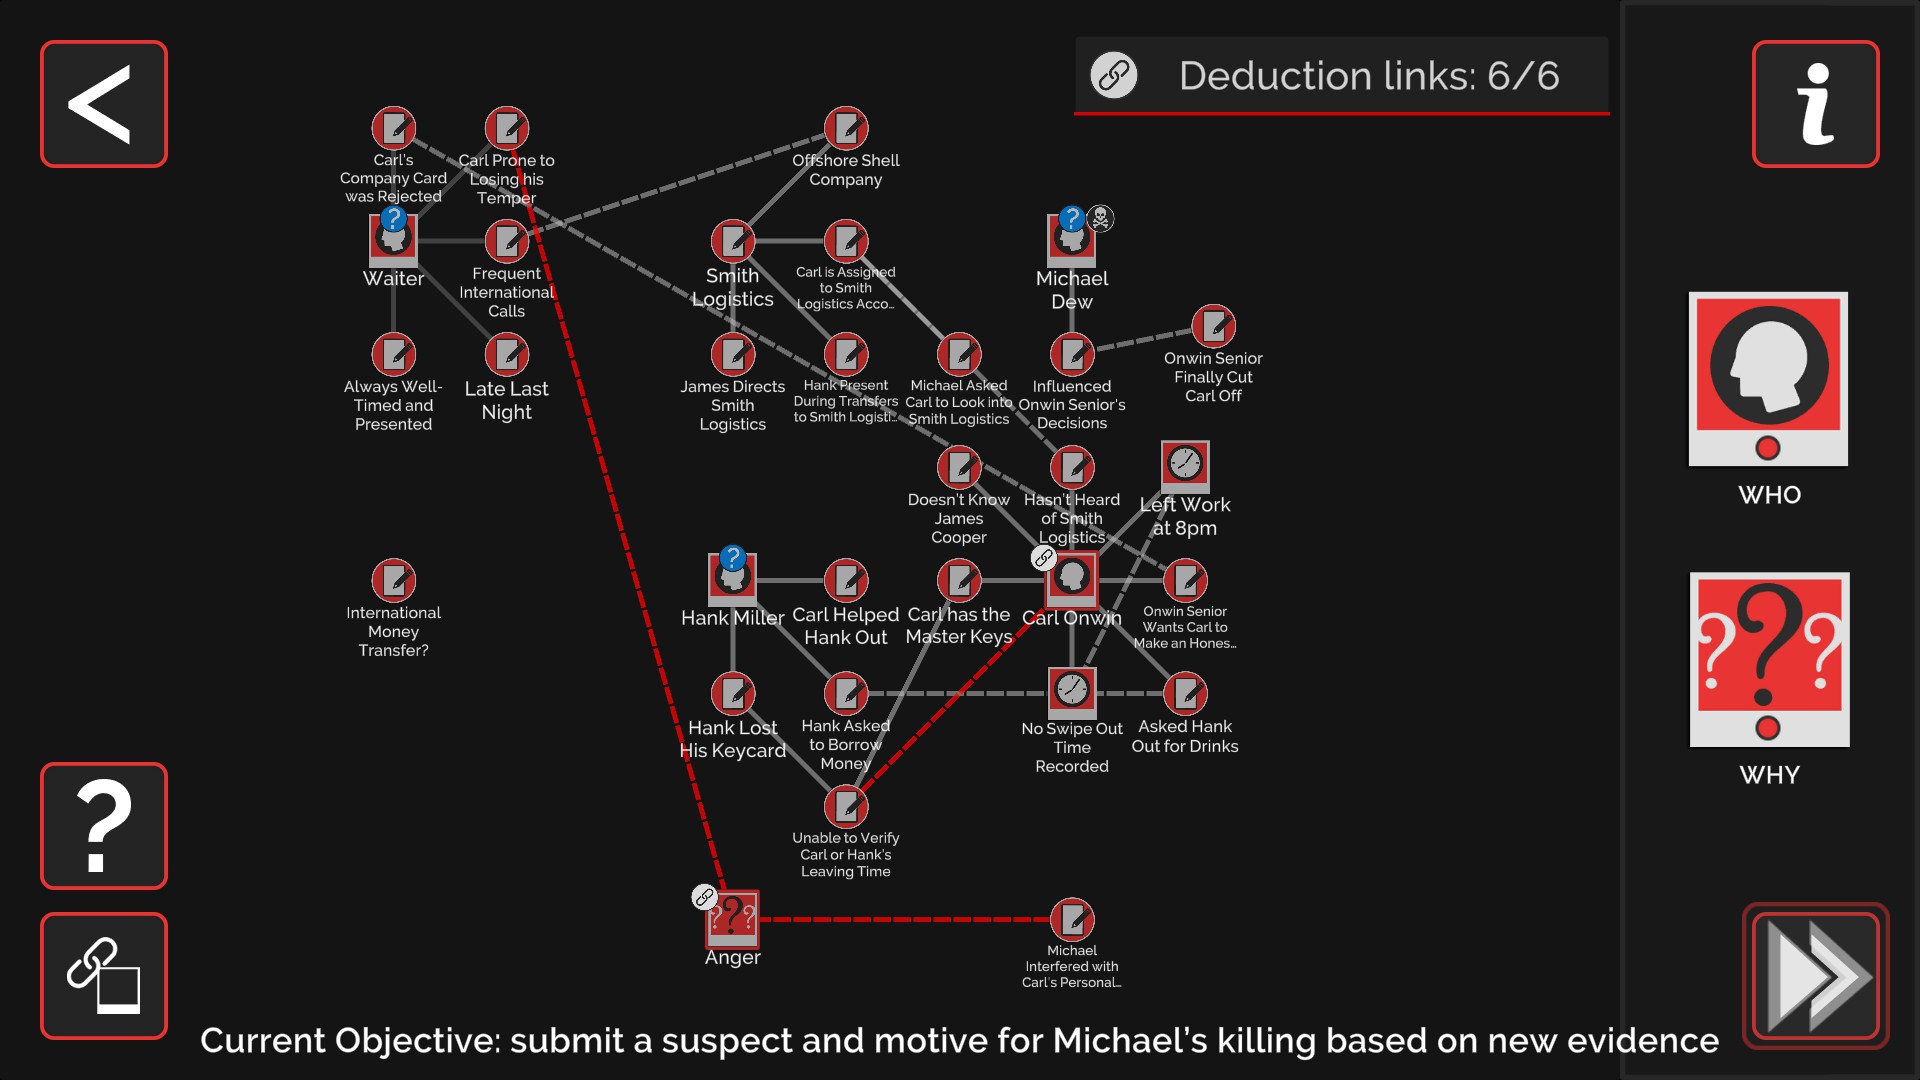
7-4
Talk to Carl and then the Waiter
- Link Carl is Assigned to Smith Logistics Accounts to Hasn’t Heard of Smith Logistics, talk to Carl
- Link Left Work at 8 PM to No Swipe Out Time Recorded, talk to Carl
- Link Frequent International Calls to Offshore Shell Company, talk to Lou
- Link Carl’s Company Card was Rejected to Onwin Senior Wants Carl to Make an Honest Living, talk to Lou
- Link Hank Asked to Borrow Money to Asked Hank out for Drinks, talk to Carl
- Link Influrecned Orwun Seniors’s Decisoions to Onwin Senior Finally Cut Carl Off, talk to Carl
OMS: Carl
Por qué: Enojo
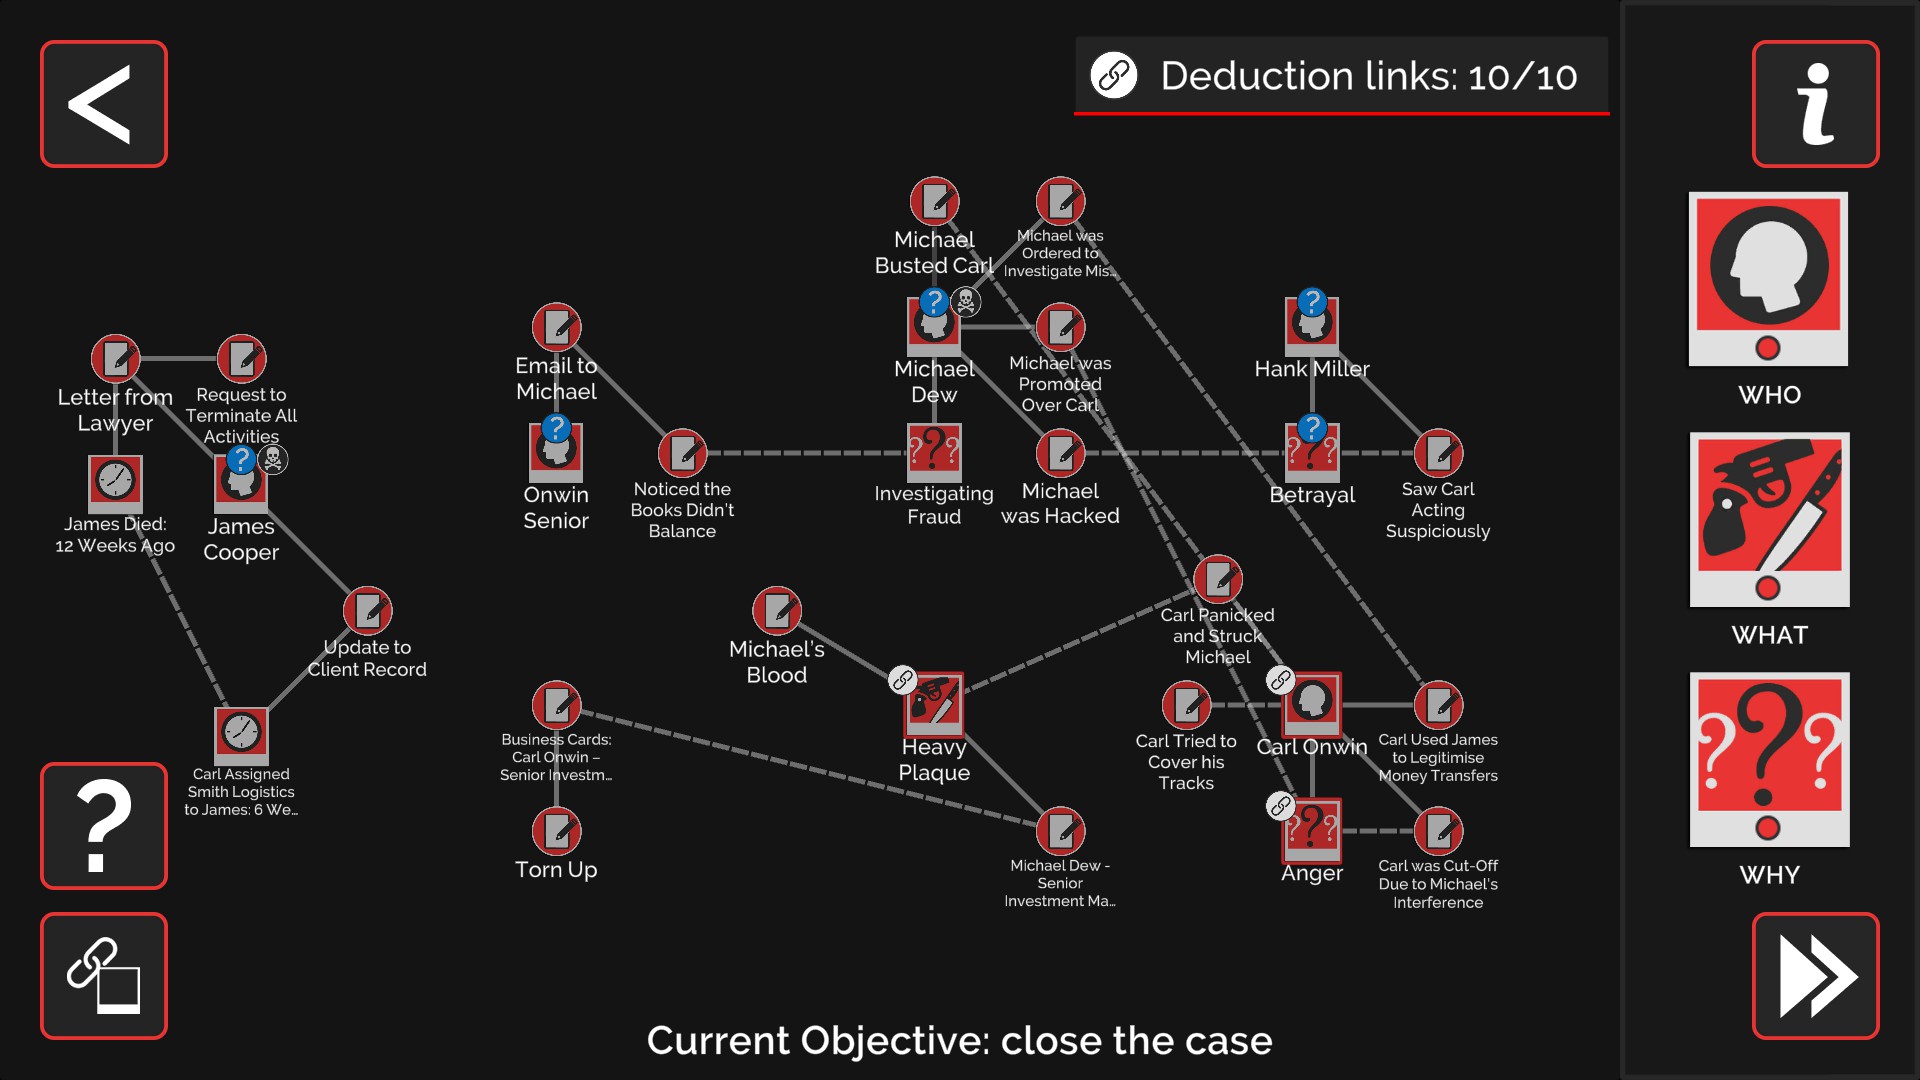
7-5
Examine the terminals beneath the painting in the boss’s office for the hidden object
Examine the desk drawer in the boss’s office for the Email to Michael. Check the trash can by the water cooler for Buisness Cards: Carl Onwin – Senior Investment Manager. Check the drawer beneath the fan at the cubicles for the Letter to Lawyer. Finalmente, look behind the secretary’s desk for the Update to Client Record
- Link Business Cards […] to Micheal Dew – Senior Investment Manager
- Link James Died: 12 Weeks Ago to Carl Assigned to Smith Logistics […]
- Link Micheal was Hacked to Saw Carl Acting Suspiciously
- Link Notices the Books Didn’t Balance to Investigating Fraud
- Link Micheal was Ordered to Investigate […] to Carl Used James to Legitimize […]
- Link Heavy Plaque to Carl Panicked and Struck Micheal
- Link Anger to Carl was Cut-Off Due to […]
- Link Carl Tried to Cover his Tracks to Carl Onwin
- Link Micheal Busted Carl to Carl Onwin
- Link Micheal was Promoted over Carl to Anger
OMS: Carl Onwin
Qué: Heavy Plaque
Por qué: Enojo
There are no substantiations
Caso 8
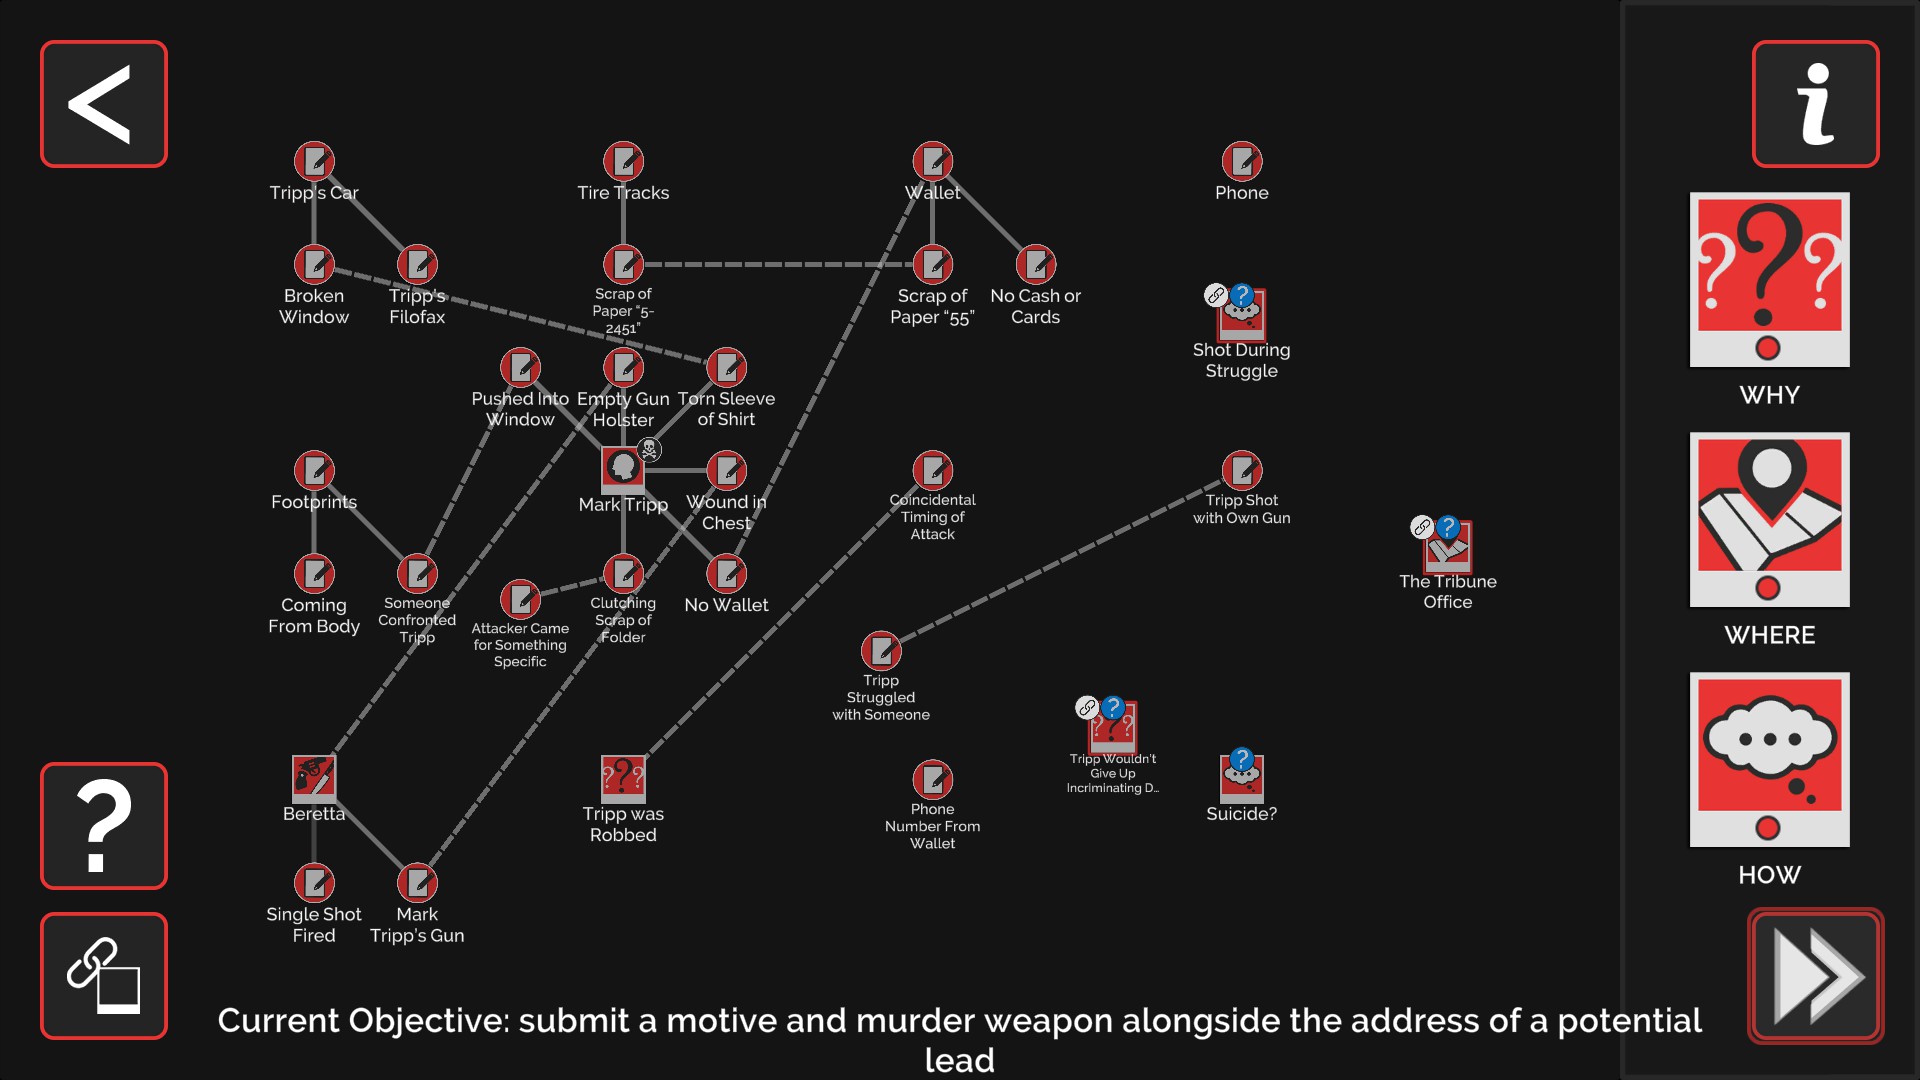
Caso 8-1
Examine Body then talk to Nate. Wallet is next to the box and Nate. By the yellow arrow is Tire Track. Huellas, Beretta, and Tripp’s Car are by the car and corpse
- Link Empty Holster to Beretta, talk to Nate
- Link No Wallet to Wallet, talk to Nate
- Link Scrap of Paper 5-2451 to Scrap of Paper 55, talk to Nate. After this deduction, use the public phone on the scene and report back to Nate
- Link Mark Tripp’s Gun to Wound in Chest, talk to Nate
- Link Broken Window to Torn Sleeve of Shirt, talk to Nate
- Link Someone Confronted Tripp to Pushed into Window, talk to Nate
- Link Tripp Struggled with Someone to Tripp Shot With Own Gun, talk to Nate
- Link Tripp was Robbed to Coincidental Timing of Attack, talk to Nate
- Link Attacker Came for Something Specific to Clutching Scrap of Folder, talk to Nate
Por qué: Tripp Wouldn’t Give Up Incriminating Document
Dónde: The Tribune Office
Cómo: Shot During Struggle
Link Tripp Struggle with Someone to Shot During Struggle
Link Phone to The Tribune Office
Link Attacker Came for Something Specific to Tripp Wouldn’t Give Up Incriminating Documents
Caso 8-2
Grab the hidden object, by the potted plant beneath the TV on the far wall
Speak to Officer Mitchell, then Nate
- Link Cass and Nage Investigating […] to Sent Order: Only Investigators […], talk to the Officer, then Ophelia. Enter Clancy’s office and examine the desk for Clancy’s Desk Drawer, and head back to Ophelia
- Link Tripp’s Filofax to Mentioned the Name Kitty, talk to Nate
- Link Was Supposed to Meet the DCA to Mentioned a Meeting With The DCA, talk to Nate
- Link Was Supposed to Share Info with DCA to Clancy was Threatening Mark Tripp, talk to Nate
OMS: Clancy Brown
Por qué: Worried About Being Exposed by Mark Tripp
Dónde: Kitty Duvall’s Home Address and Number

Caso 8-3
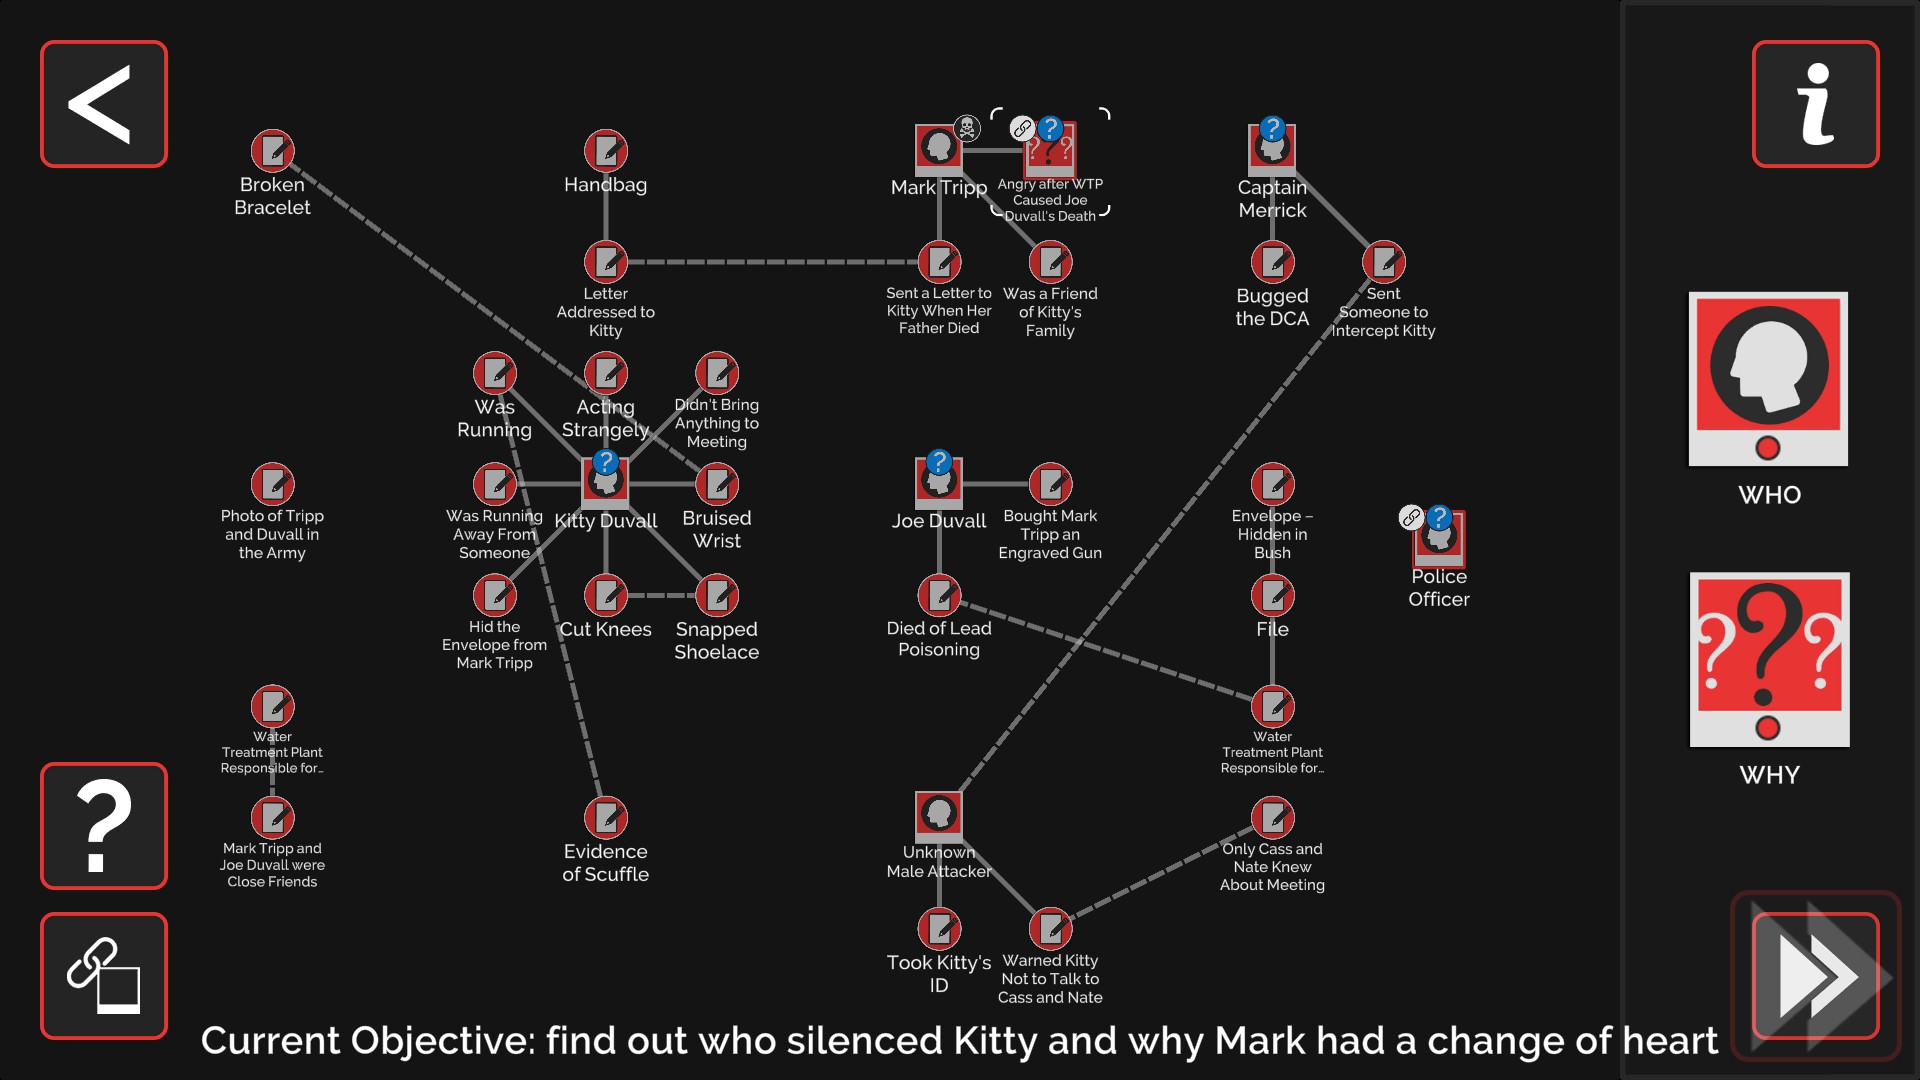
Speak to Kitty
Examine the Handbag by her bench, then the circular object on the path for the Broken Bracelet
- Link Letter Addressed to Kitty to Sent a Letter to Kitty When […], talk to Kitty
- Link Broken Bracelet to Bruised Wrist, talk to Nate
- Link Cut Knees to Snapped Shoelace, talk to Kitty
- Link Was Running to Evidence of Scuffle, talk to Kitty. Turn the camera and look for a yellow rectangle between a bush and the tree for the Envelope – Hidden in Bush
- Link Warned Kitty Not to Talk […] to Only Cass and Nate Knew […], talk to Nate
- Link Died of Lead Poisoning to Water Treatment Plant Responsible for Increase […], talk to Kitty
- Link Water Treatment Plant Responsible for Joe’s Death to Mark Tripp and Joe Duvall were Close Friends, talk to Nate
- Link Unknown Male Attacker to Sent Someone to Intercept Kitty, talk to Nate
OMS: oficial de policia
Por qué: Angry after WTP Caused Joe Duvall’s Death
Link Angry after WTP to Photo of Tripp and Duvall
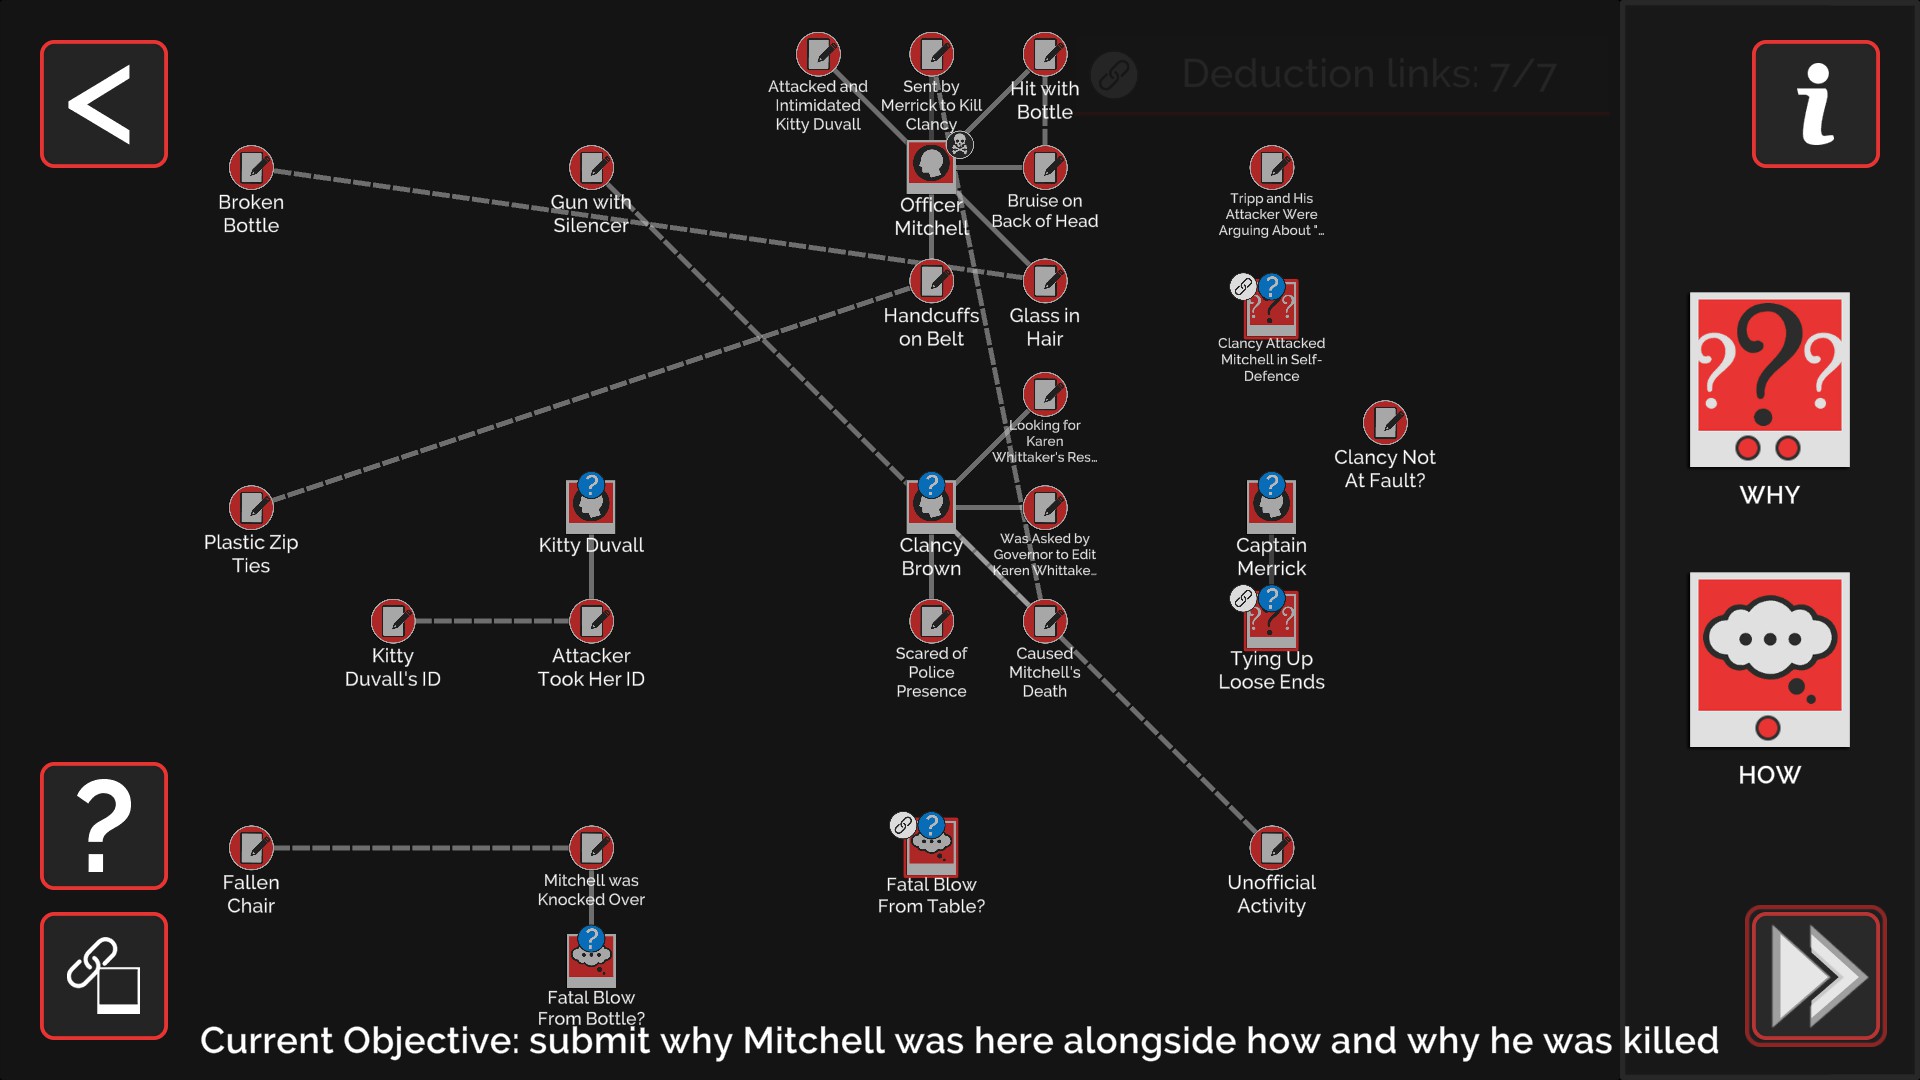
Caso 8-4
Tilt the camera and talk to Clancy
Examine Officer Mitchell, talk to Clancy
Examine the Broken Bottle by the turned over chair, then the Plastic Zip Ties by the center, then the Fallen Chair by the corpse. Finalmente, look in front of the Jukebox on the wall beneath the neon sign for Kitty Duvall’S ID.
- Link Broken Bottle to Glass in Hair, talk to Nate
- Link Hit With Bottle to Bruise on Back of Head, talk to Nate
- Link Fallen Chair to Mitchell was Knocked Over, talk to Nate
- Link Plastic Zip Ties to Handcuffs on Belt, talk to Nate
- Link Gun with Silencer to Unofficial Activity, talk to Nate
- Link Attacker Took Her ID to Kitty Duvall’S ID, talk to Nate
- Link Caused Mitchell’s Death to Sent by Merrill to Kill Clancy, talk to Nate and then Clancy
Por qué: Tying Up Loose Ends and Clancy Attacked Mitchell in Self-Defense
Cómo: Fatal Blow from Table?
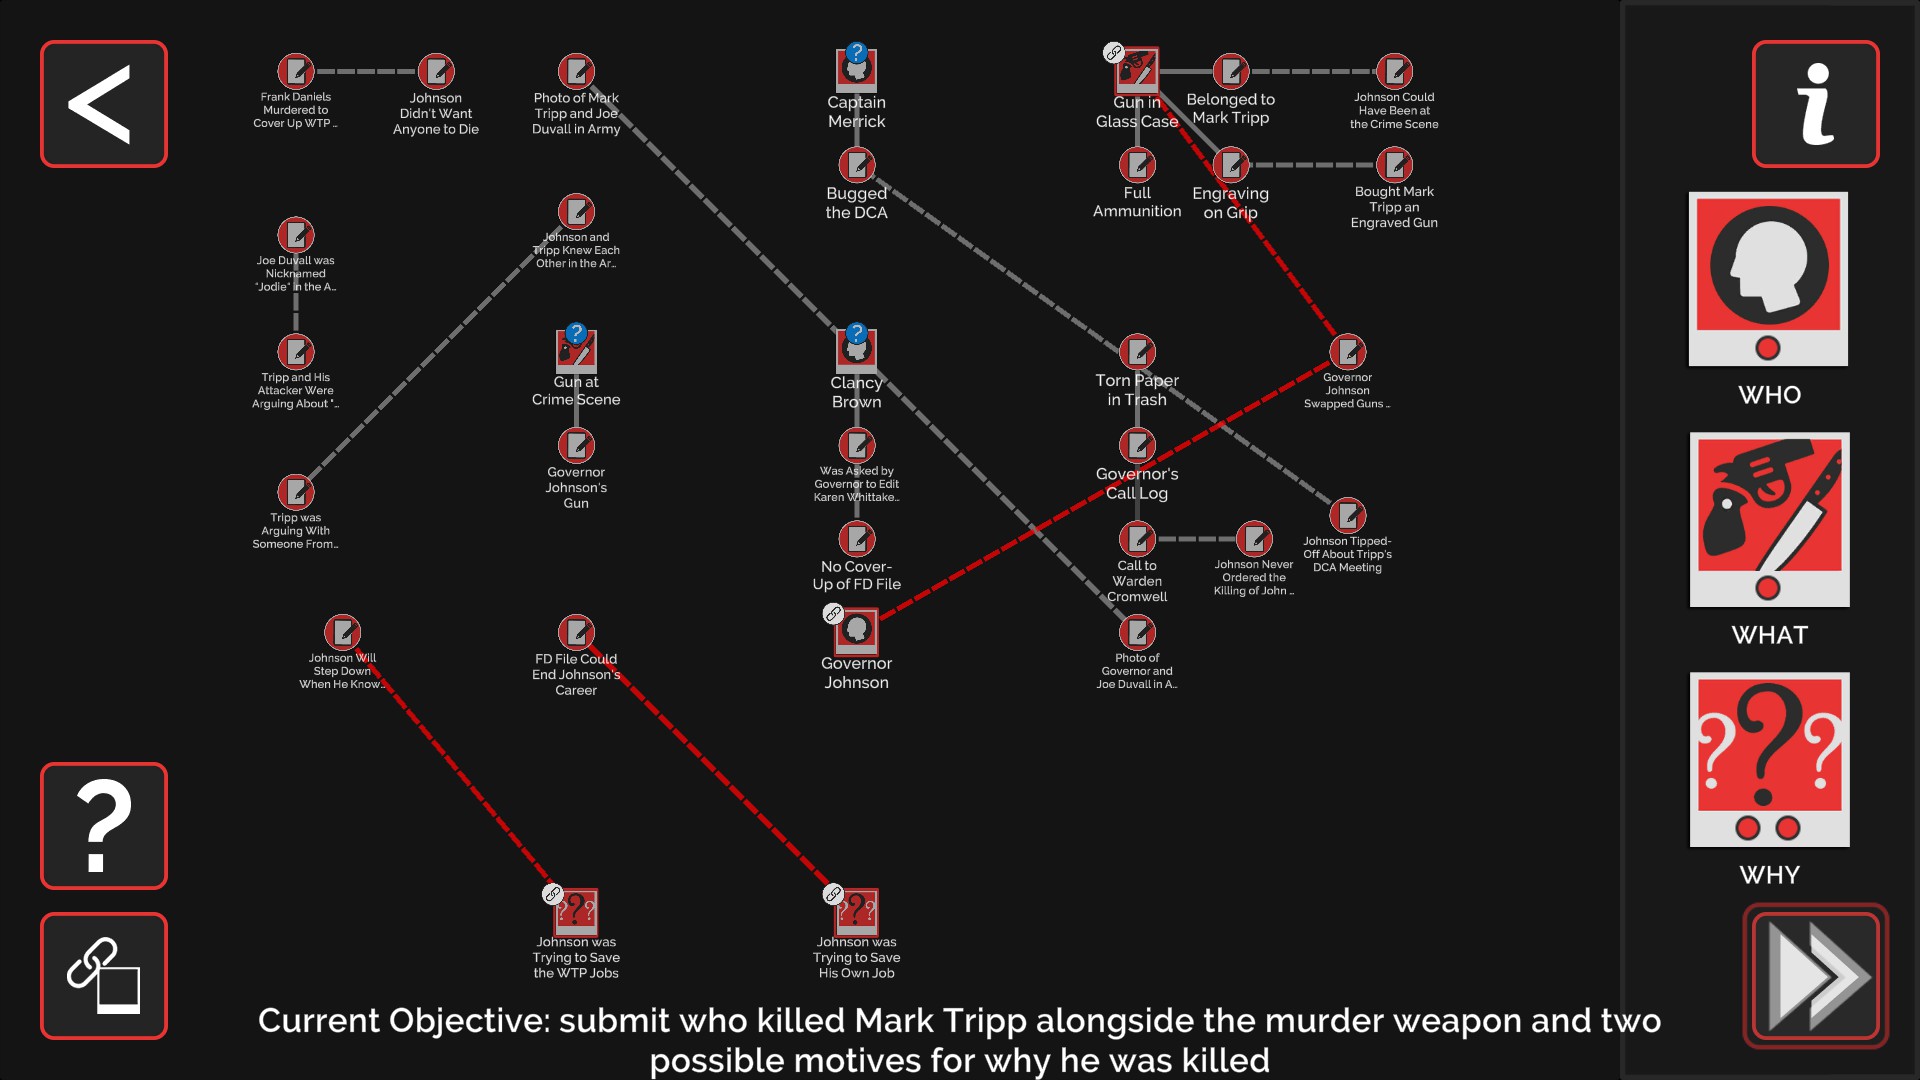
Caso 8-5
Talk to Nate and the Governor
Examine the photo on the desk for the Photo of Governor and Joe Duvall in Army, look at the trash can by the couch for Torn Paper in Trash, and check the gun case beneath the flag for the Gun in Glass Case. Talk to Nate and Governor and again
- Link Photo of Mark Tripp and Joe Duvall […] to Photo of Governor and Joe Duvall […], talk to the Governor
- Link Joe Duvall was Nicknamed “Jodie” to Tripp and His Attacker Were Arguing […], talk to Nate
- Link Bought Tripp an Engraved Gum to Engraving on Grip, talk to Nate
- Link Tripp was Arguing With Someone From […] to Johnson and Tripp Knew Each Other […], talk to Nate
- Link Belonged to Mark Tripp to Johnson Could Have Been at the Crime Scene, talk to Nate
- Linked Bugged the DCA to Johnson Tipped-Off About Tripp’s DCA Meeting, talk to Governor
- Link No Cover-Up of FD File to Was Asked by Governor to Edit […], talk to Governor
- Link Frank Daniels Murdered to Cover Up WTF […] to Johnson Didn’t Want Anyone to Die, talk to Governor
- Link Johnson Never Ordered the Killing of […] to Call to Warden Cromwell, talk to Governor to Nate
OMS: Governor Johnson
Qué: Gun on Crime Scene
Por qué: Johnson was Trying to Save the WTP Jobs and Johnson was Trying to Save His Own Job
Eso es todo lo que estamos compartiendo hoy para este Murder Mystery Machine guía. Esta guía fue originalmente creada y escrita por osososososos. En caso de que no actualicemos esta guía, puede encontrar la última actualización siguiendo este enlace.