- Título: Edición legendaria de Mass Effect
- Fecha de lanzamiento:
- Revelador:
- Editor:
La información sobre la edición legendaria de Mass Effect sigue siendo incompleta. Por favor ayúdanos a completar los detalles del juego usando esto formulario de contacto.
This guide details character and squad optimization for a sentinel in Mass Effect 2, as included in Mass Effect Legendary Edition. This guide includes a build for the Sentinel, as well as recommended Squad Members. It also includes a recommended quest order, which would allow a player to progress through Insanity difficulty with as few difficulty spikes as possible.
Shepard Build Order
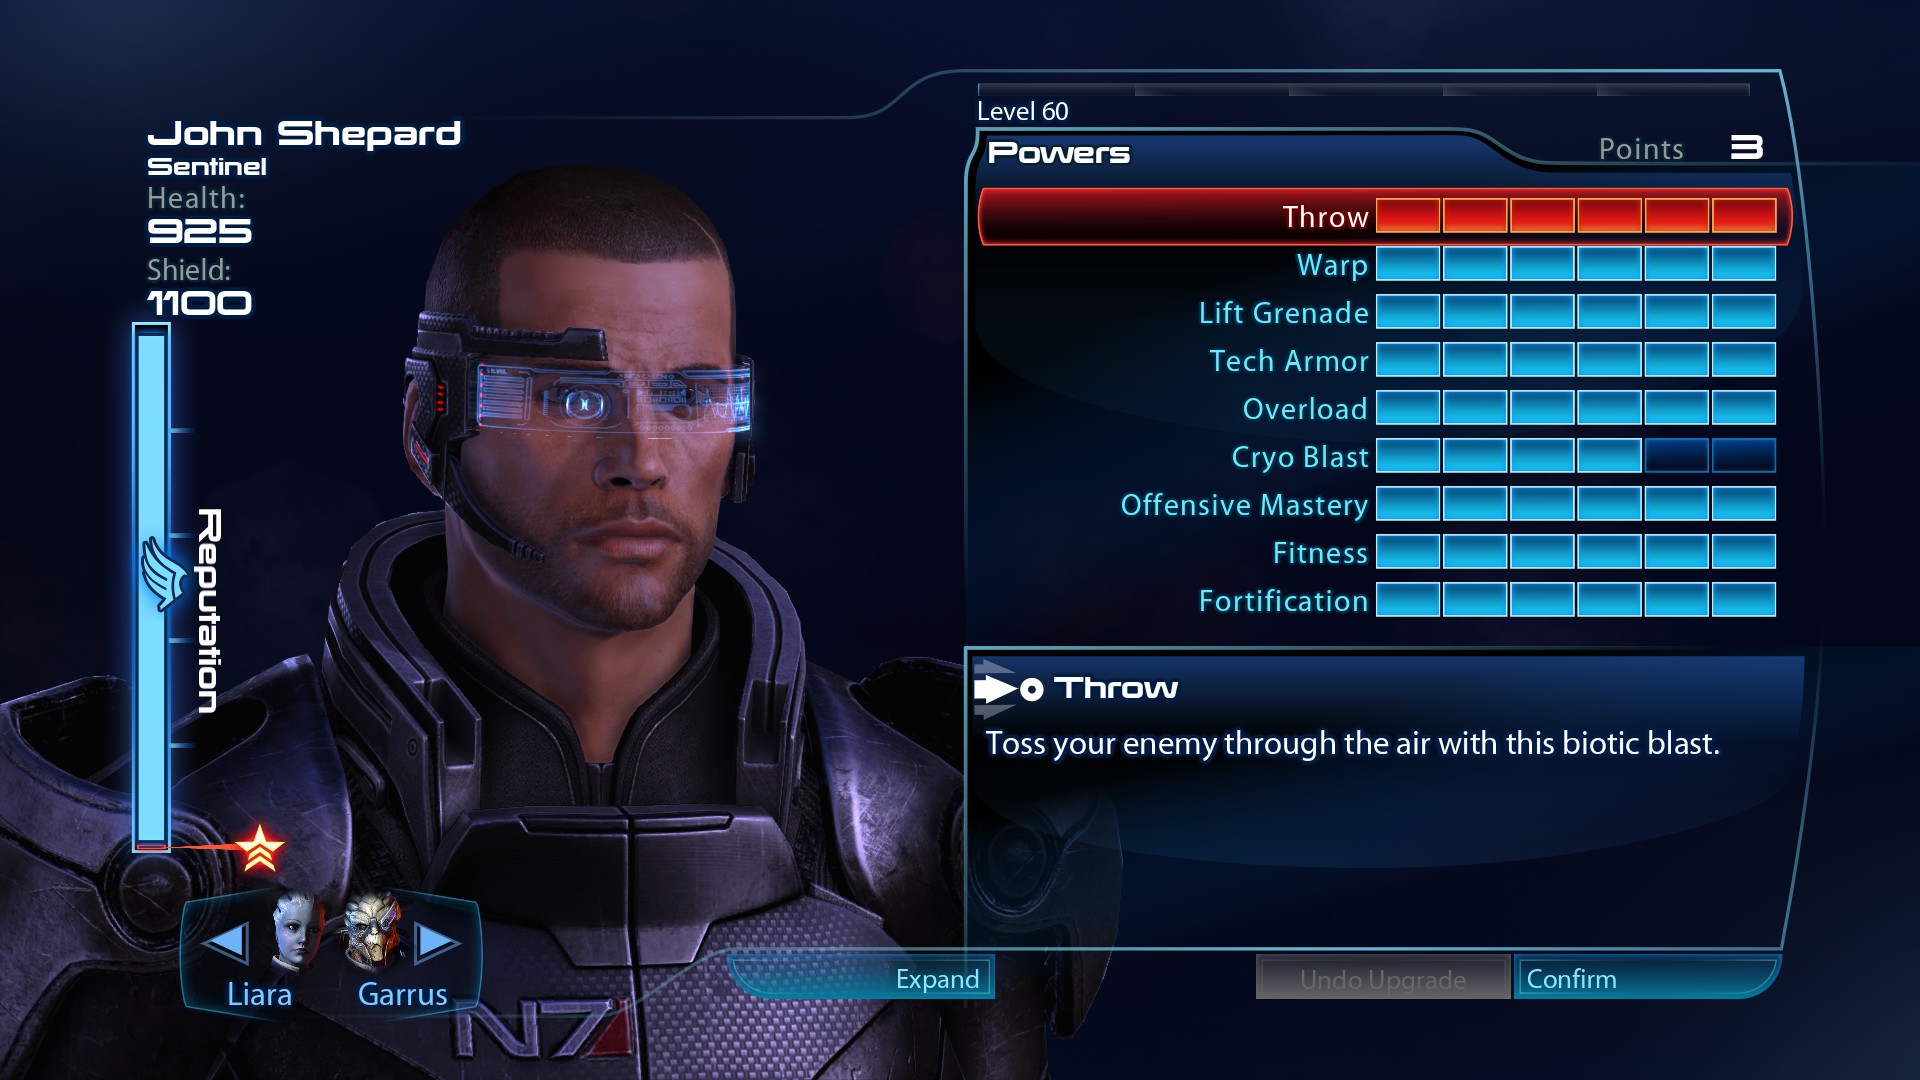
Nivel 30: Tirar 6 (Radius, Detonate, Double Throw), Armadura tecnológica 4 (Durabilidad), Offensive Mastery 5 (Force and Damage, Squad Bonus), Aptitud física 5 (Durabilidad, Squad Bonus)
Nivel 32: Armadura tecnológica 5 (Power Damage)
Nivel 33: Armadura tecnológica 6 (Durabilidad)
Nivel 34: Fortificación 2
Nivel 35: Fortificación 3
Nivel 36: Fortificación 4 (Durabilidad)
Nivel 37: Fortificación 5 (Power Synergy)
Nivel 38: Fortificación 6 (Durabilidad)
Nivel 39: Sobrecarga 1
Nivel 40: Aptitud física 6 (Durabilidad)
Nivel 41: Sobrecarga 3
Nivel 42: Sobrecarga 4 (Chain Overload)
Nivel 43: Urdimbre 1
Nivel 44: Sobrecarga 5 (Neural Shock)
Nivel 45: Sobrecarga 6 (Chain Overload)
Nivel 46: Urdimbre 2
Nivel 47: Offensive Mastery 6 (Force and Damage)
Nivel 48: Urdimbre 3
Nivel 49: Urdimbre 4 (Detonate)
Nivel 50: Urdimbre (Expose)
Nivel 51: Lift Grenade 1
Nivel 52: Urdimbre 6 (Atravesar)
Nivel 53: Lift Grenade 3
Nivel 54: Lift Grenade 4 (Radius)
Nivel 55: Cryo Blast 1
Nivel 56: Lift Grenade 5 (Max Grenade)
Nivel 57: Lift Grande 6 (Golpe)
Nivel 58: Cryo Blast 2
Nivel 59: Cryo Blast 3
Nivel 60: Cryo Blast 4 (Radius)
Intel
Armor Modkit: Escudos +5%
Remains of Reaper Destroyer: Power Recharge Speed +5%
Advanced Biotic Implants: Power Recharge Speed +5%
Weapon Upgrade Kit: Weapon Damage +5%
Intel from Battle of Arcturus: Escudos: +5%
Volus Intelligence Archives: Salud +5%
Intact Reaper Weapon: Weapon Damage +5%
Gallae’s Electronic Signature: Power Damage +5%
Med Bay Surgery: Salud +5%
Improved Geth Resistors: Escudos +5%
Miniaturized Armor Capacitors: Power Recharge Speed +5%
Research Data From Pragia: Power Recharge Speed +5%
This build focuses on providing bonuses to the whole squad, executing power combos, y durabilidad. The Sentinel is the only class Shepard has available that has a Squad Bonus that grants a 30% bonus to health and shields for the whole squad, so that’s a great addition to this build. Más, the class power «Offensive Mastery» has another bonus that grants a 10% bonus to squad weapon damage and a 15% bonus to the force and damage of squad powers. This build also focuses on executing power combos that are essential to doing high amounts of damage on higher difficulties. This build allows Shepard’s Squadmates to prime power combos and uses the Throw ability to execute the combos. Evolving Throw to have Double Throw is one of the few ways to execute 2 combos with one ability in single player. Finalmente, this build is highly durable and uses Tech Armor and Fortification to increase Damage Reduction by 90%, granting Shepard extreme survivability. Taking the Power Synergy bonuses to each Talent increase the Force and Duration of all of our powers. The downside to this is that both Tech Armor and Fortification both reduce Cooldown reduction, but since our primary power use will be Throw which has a very low cooldown to begin with, this is not a great issue.
Because this build wants to limit weight so as not to indue further pentalities to cooldown reduction, I recommend utilizing weapons with infinite ammo, elminiating the need for a sidearm. En el juego temprano, we can pick up the Particle Rifle. This weapon does more damage after it’s been «charged up» with continuous fire, so using the Magazine upgarde will make it so you can fire the «charged up’ version for longer. In the 2nd Act of the game we can play the Citadel DLC to secure access ot the M-7 Lancer which has an even lower weight then the Particle Rifle. When customizing armor, focus on boosts to Shields first and then Health, to get the most value out of your Tech Armor and Fortification.
Recommended Squadmates
Liara
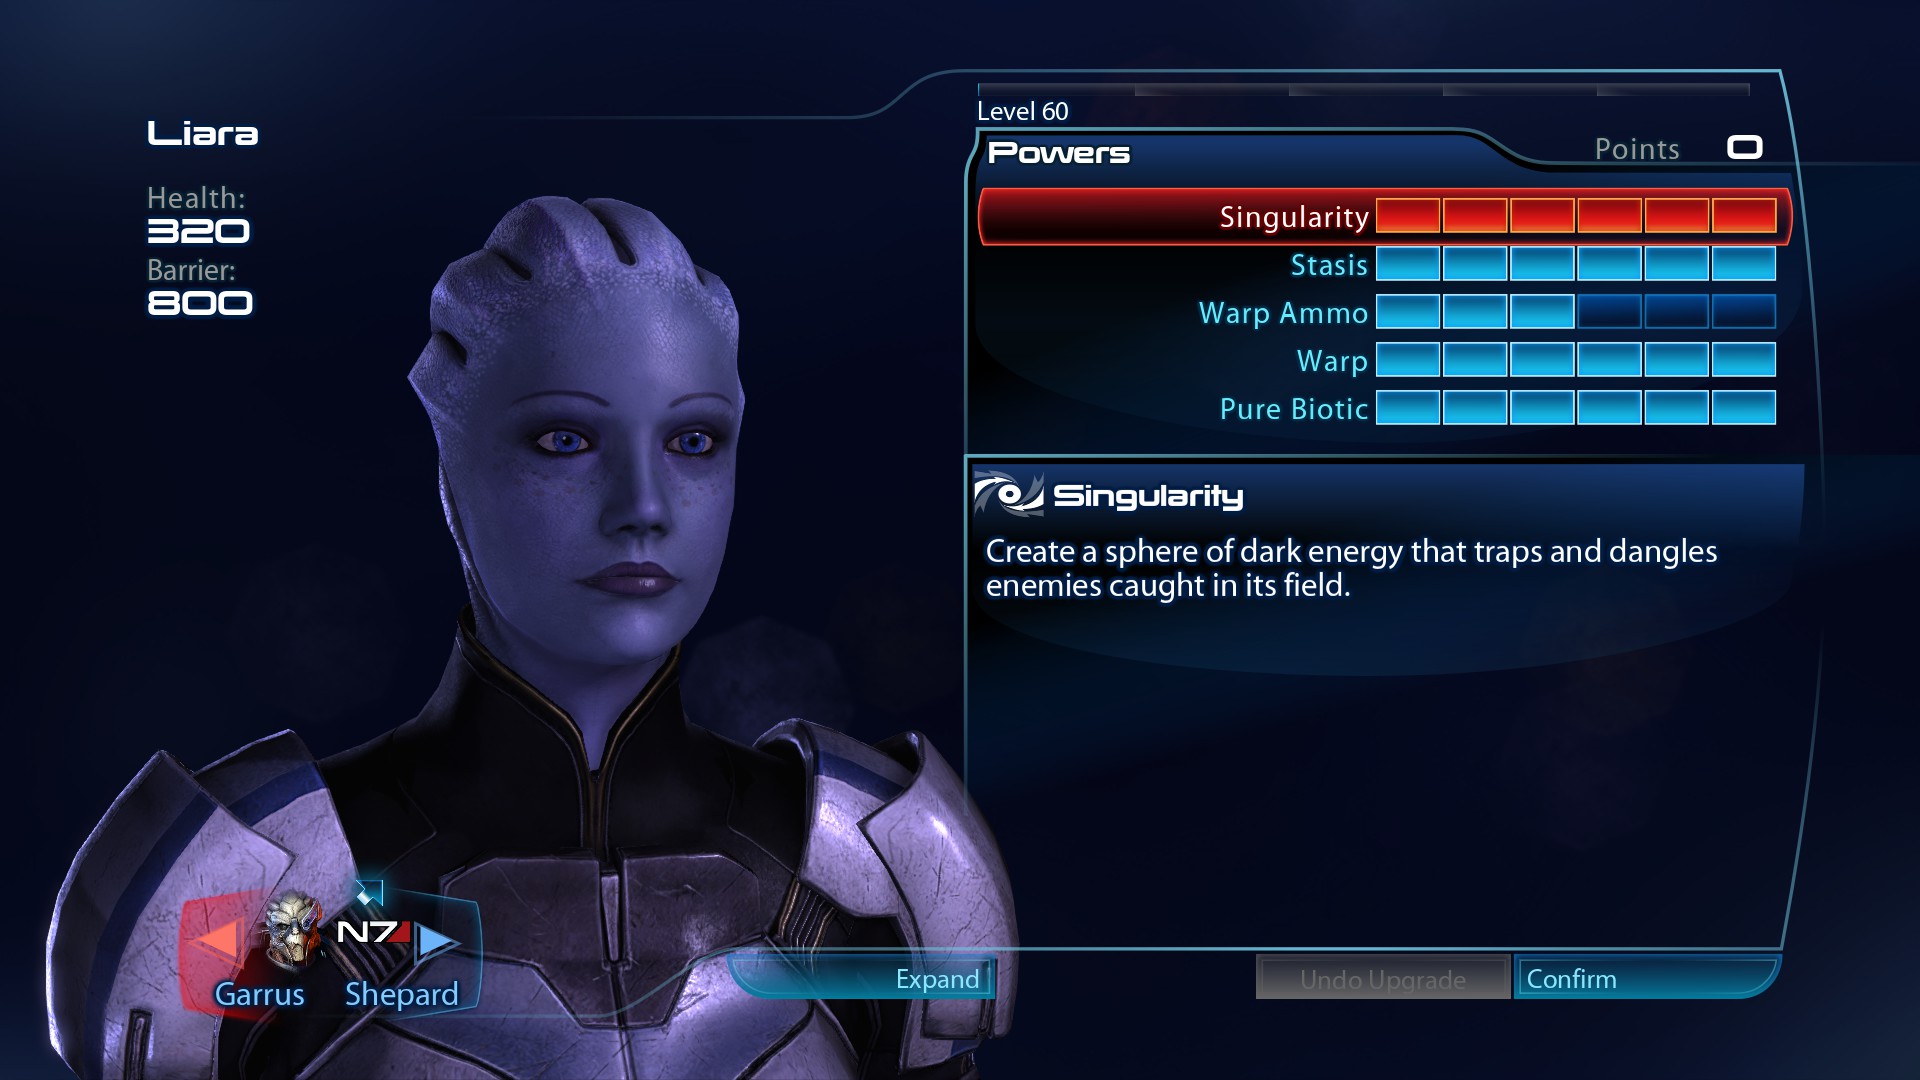
Atuendo: Power Recharge Speed +25%
Nivel 31: Urdimbre 6 (Detonate, Expose, Atravesar), Pure Biotic 4 (Recharge Speed)
Nivel 34: Pure Biotic 5 (Duration and Force)
Nivel 38: Singularidad 2, Pure Biotic 6 (Squad Bonus)
Nivel 39: Singularidad 3
Nivel 40: Singularidad 4 (Radius)
Nivel 41: Estasis 1
Nivel 43: Singularidad 5 (Recharge Speed)
Nivel 55: Singularidad 6 (Expandir), Estasis 5 (Duration, Recharge Speed)
Nivel 57: Estasis 6 (Burbuja)
Liara provides our primary method of crowd control and sets up powerful biotic power combos. She can use Singularity on unarmored enemies to disable them and set them up for biotic detonations and warp can set up detonations on protected enemies. Equip her with the N7 Hurricane and mod the weapon so that it increases power damage. Power combos do extra damage on Insanity (x3.375 damage compared to normal) so it’s essential o higher difficulties. Reduce Liara’s power recharge time with her alternative outfit and passive abilities so it’s comparable with Shepard’s Throw ability, allowing the two characters to work together to create frequent biotic explosions.
Garrus
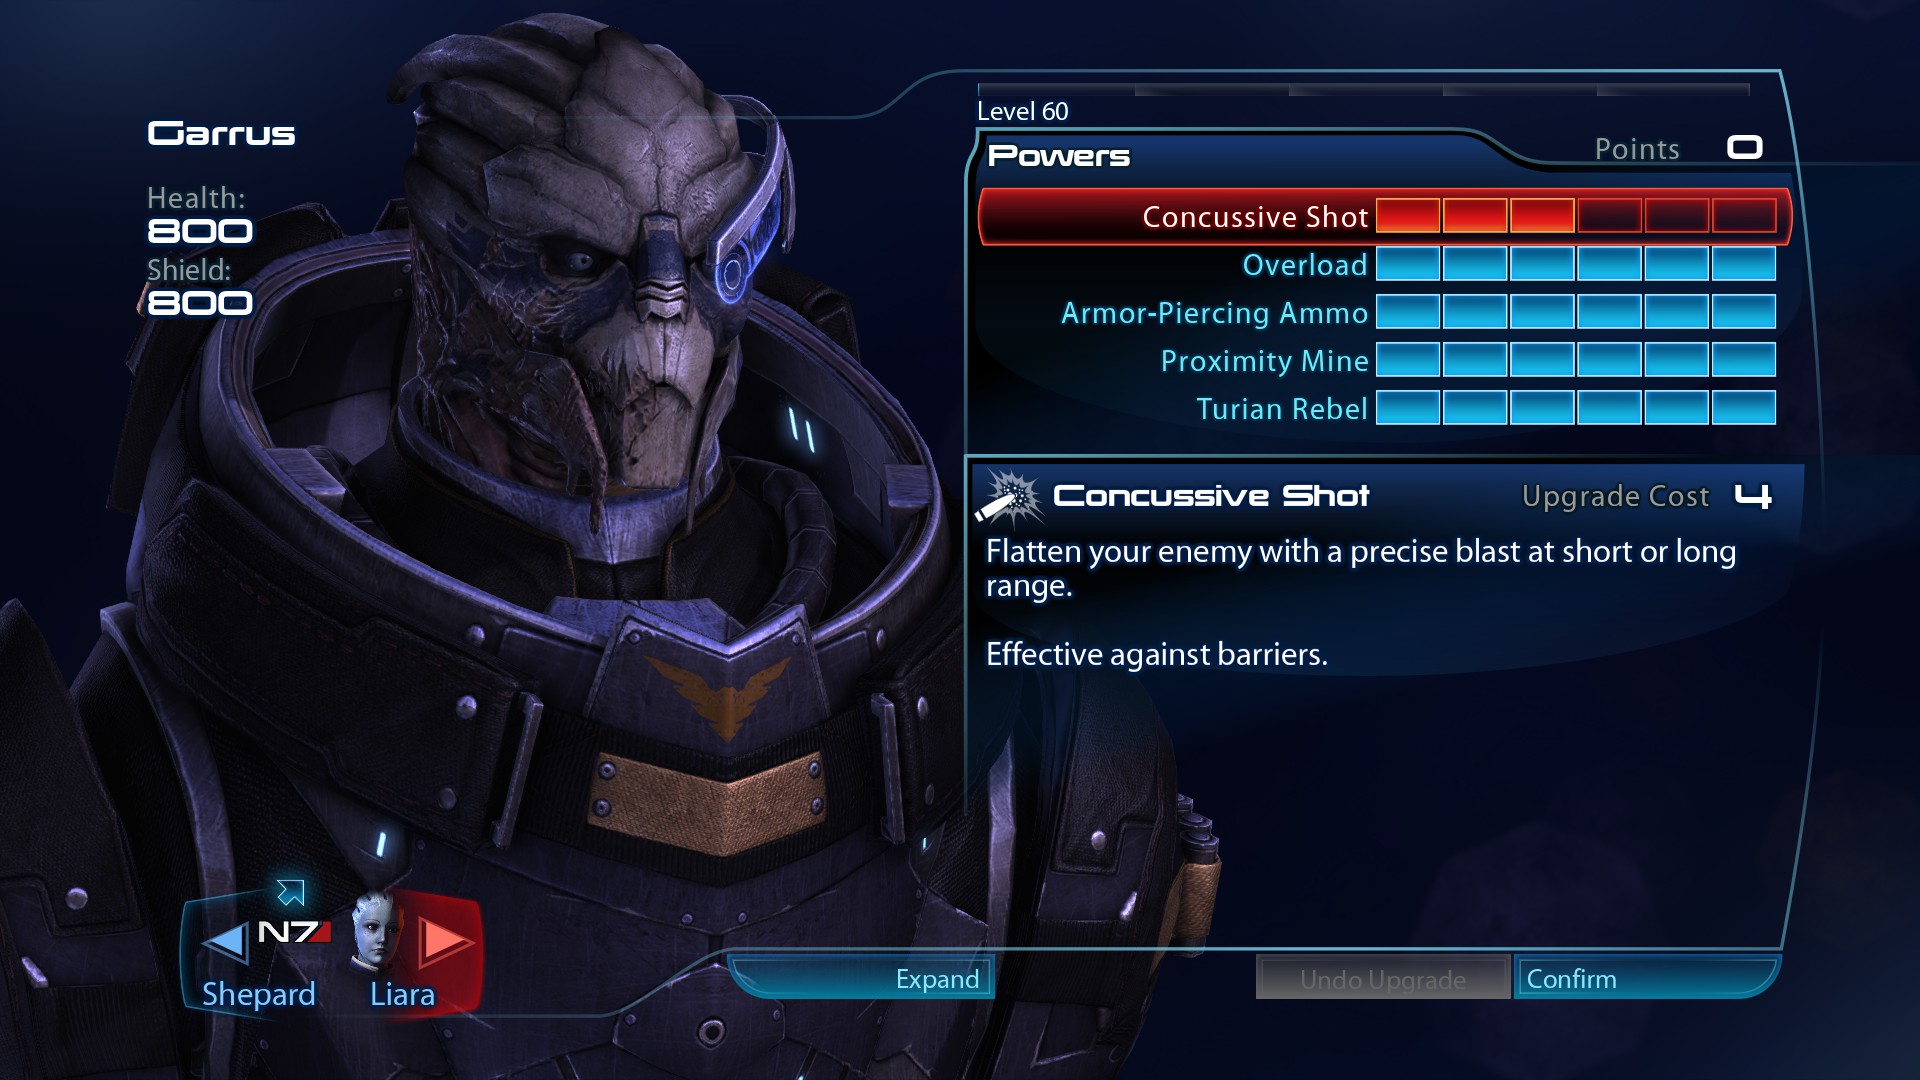
Atuendo: Weapon Damage +25%
Nivel 36: Sobrecarga 2, Armor Piercing Ammo 6 (Squad Bonus, Disparos a la cabeza, Atravesar), Turian Rebel 5 (Weapon Damage, Rifles de asalto)
Nivel 37: Sobrecarga 3
Nivel 38: Sobrecarga 4 (Chain Overload)
Nivel 41: Sobrecarga 5 (Neural Shock)
Nivel 44: Sobrecarga 6 (Chain Overload)
Nivel 55: Mina de proximidad 6 (Radius, Damage Taken, Recharge Speed)
Nivel 58: Turian Rebel 6 (Squad Bonus)
Nivel 59: Concussive Shot 2
Nivel 60: Concussive Shot 3
Garrus provides the primary source of weapon damage. The popular «Godhood» build that utilizes the N7 Typhoon, Armor Piercing Ammo, and using his passive Turian Rebel increases his weapon damage as high as possible for any squadmate. He can also set up Tech Bursts with Overload and he can use his Proximity Mine attack to apply a debuff on enemies which increases the damage they receive for 8 artículos de segunda clase. The Squad bonus from Armor Piercing Ammo is particularly useful as squadmates tend to shoot directly at enemies in cover.
Tali:
Atuendo: Power Recharge Speed +25%
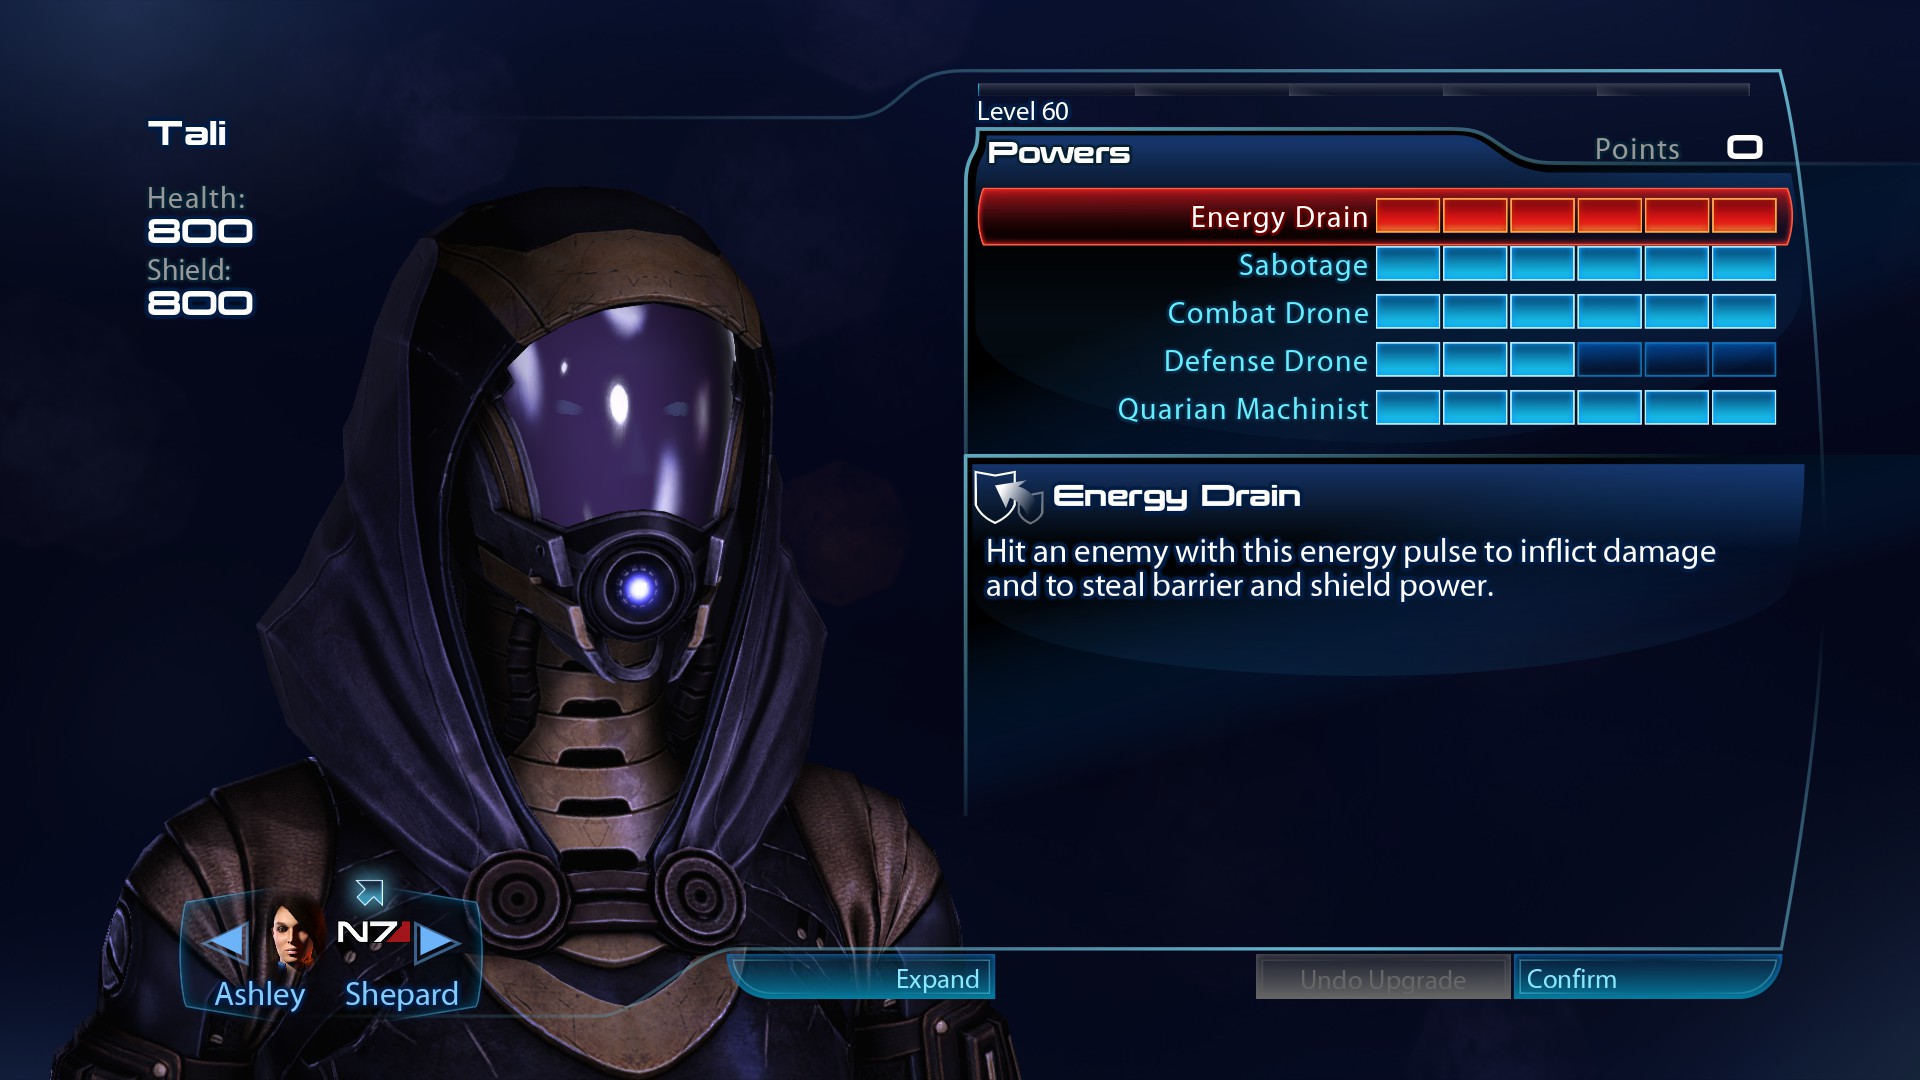
Nivel 60: Drenaje de energía 6 (Radius, Recharge Speed, Daño), Sabotaje 6 (Duration, Explosive Hack, Tech Vulnerability), Combat Drone 6 (Detonate, Choque, Cadena de relámpagos), Defense Drone 3, Quarian Machinist 6 (Recharge Speed, Tech Upgrade, Squad Bonus)
Tali replaces Laira whenever you have to face the Geth because of her unique powers. Sabotage is incredibly useful against Geth Primes, as it will temporarily cause them to attack their teammates. Evolving Sabotage with the level 6 mejora «Tech Vulnerability» increases the damage caused by Tech Bursts by 100%, allowing you to disable enemies while also increasing your DPS significantly. Energy Drain is also extremely useful as it can both prime and trigger Tech Bursts in conjunction with Shepard’s Overload power. Equip her with the Crusader Shotgun and swap to her alternate outfit to lower her power recharge time for more frequent Tech Bursts.
ashley:
Atuendo: Weapon Damage +25%
Nivel 31: Disruptor Ammo 6 (Squad Bonus, Disparos a la cabeza, Aturdir), Tirador escondido 4 (Firing Rate)
Nivel 32: Alliance Officer 1
Nivel 33: Alliance Officer 2
Nivel 34: Alliance Officer 3
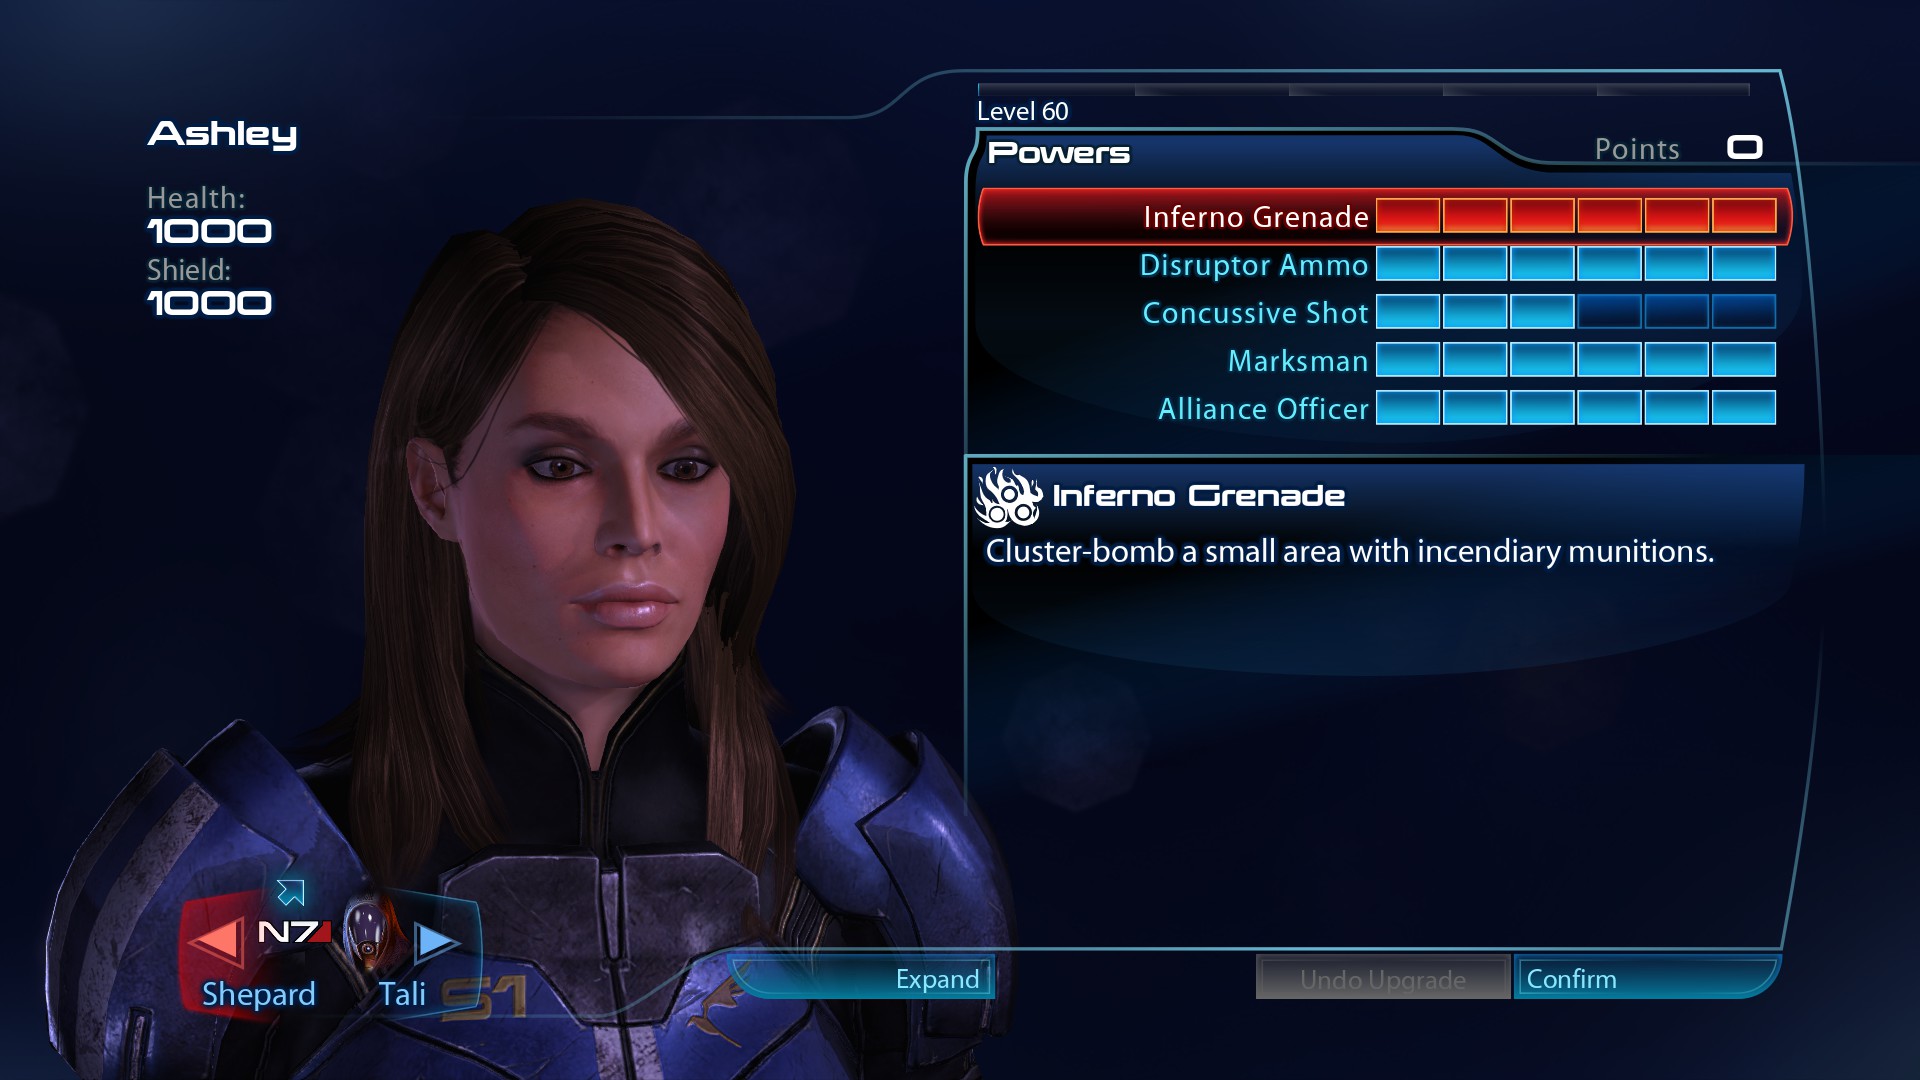
Nivel 60: Inferno Grenade 6 (Radius, Max Grenades, Radius and Shrapnel) Concussive Shot 3, Tirador escondido 6 (Duration, Accuracy and Firing Rate), Alliance Officer 6 (Weapon Damage, Power Damage, Rifles de asalto)
Ashley replaces Garrus as our primary source of weapon damage because she has Disruptor Ammo. Applying Disruptor Ammo to the whole squad allows for gunfire to have a chance of stunning Geth and priming them for Tech Bursts. Increasing her rate of fire via the use of her unique Marksman talent allows for these secondary effects of gunfire to trigger more often. Even with her outfit bonus to Weapon damage and the use of Garrus’s N7 Typhoon, her raw DPS falls short of Garrus, but the extra utility makes her well-suited as Tali’s partner on Rannoch Missions.
Recommended Quest Order
Prólogo: tierra
Marte
Citadel I
Exodus Cluster
– Intel: Remains of Reaper Destroyer
– Eden Prime
– Resistance Movement
Sigurd’s Cradle
– N7: Cerberus Lab
– Alien Medi-Gel Formula (parte 1)
Apien Crest
– Banner of the First Regiment (parte 1)
– Palavan
Ciudadela
– Alien Medi-Gel Formula (parte 2)
– Aria: Blood Pack
– Aria: Blue Suns (parte 1)
– Aria: Eclipse
– Banner of the First Regiment (parte 2)
– Barla Von (parte 1)
– Hanar Diplomat
– Leviathan I
– Prototype Components (parte 1)
Ismar Frontier
– Prototype Components (parte 2)
Petra Nebula
– Grissom Academy
– Biotic Amp Interface (parte 1)
Cometa’s nido
– Aria’ Blue Suns (parte 2)
– Pillars of Strength (parte 1)
– Intel: Weapons Upgrades Kit
Shrike Abyssal
– Prothean Obelisk (parte 1)
Caleston Rift
– Find Garneau
Ciudadela
– Aria: Blue Suns (parte 3)
– Biotic Amp Interfaces (parte 2)
– Leviathan II
– Pillars of Strength (parte 2)
– Prototype Components (parte 3)
– Prothean Obelisk (parte 2)
Pylos Nebula
– Find Ann Bryson
Ciudadela
– Leviathan III
Sigurd’s Cradle
– Leviatán
Ciudadela
– Aria T’Loak
Omega
– The Invasion of Omega
Annos Basin
– Sur’Kesh
Ninmah Cluster
– Krogan Team
– Krogan Dying Message (parte 1)
Arcturus Stream
– Intel: Intel from Battle of Arcturus
– Cerberus Abductions
– Evidencia (parte 1)
Krogan DMZ
– Turian Platoon
– Bomba
– Cerberus Automated Turret Schematics (parte 1)
– Cerberus Attack
– Improved Power Grid (parte 1)
– Barla Von (parte 2)
Ciudadela
– Barla Von (parte 3)
– Evidencia (parte 2)
– GX12 Thermal Pipe
– Improved Power Grid (parte 2)
– Krogan Dying Message (parte 2)
Krogan DMZ
– Tuchanka
Horsehead Nebula
– Cerberus Fighter Base
– Heating Unit Stabilizers (parte 1)
Aethon Cluster
– Intel: Volus Intelligence Archives
– Book of Plenix (parte 1)
Citadel II
– Batarian Codes
– Book of Plenix (parte 2)
– Cerberus automated Turret Schematics (parte 2)
– Cerberus Retribution
– Heating Unit Stabilizers (parte 2)
– Inspirational Stories
– Medi-Gel Sabotage
– Wounded Batarian
Far Rim
– Perseus Veil
Valhalla Threshold
– Prothean Data Drives (parte 1)
Minos Wasteland
– Ex-Cerberus Scientists
– Cerberus Turian Poison (parte 1)
Athena Nebula
– Hesperia-Period Statue (parte 1)
Nimbus Cluster
– Intel: Intact Reaper Weapon
– Library of Asha (parte 1)
– Ardat-Yakshi Monastery
– Intel: Gallae’s Electronic Signature
– Asari Widow (parte 1)
Ciudadela
– Asari Widow (parte 2)
– Cerberus Turian Poison (parte 2)
– Hesperia-Period Statue (parte 2)
– LIbrary of Asha (parte 2)
– Suministros médicos
– Prothean Data Drives (parte 2)
– Volus Ambassador
– Shore Leave
– Geth Challenge
– Spin Zone Challenge
– Reaper Solo Challenge
– Thermal Clip Challenge
– Charity Reaper Challenge
– Prothean Challenge
– Medi-Gel Challenge
– Cerberus Challenge
– Unusual Scores
Perseus Veil
– Geth Dreadnought
– Geth Fighter Squadron
– Reaper Code Fragment (parte 1)
– Intel: Improved Geth Resistors
– Intel: Miniaturized Armor Capacitors
– Admiral Koris
– Target Jamming Technology (parte 1)
Argos Rho
– Kakliosaur Fossil (parte 1)
Ciudadela
– Kakliosaur Fossil (Parte 2)
– Reaper Code Fragment (parte 2)
– Target Jamming Technology (parte 2)
Perseus Veil
– Rannoch
Hades Nexus
– Obelisks of Karza (parte 1)
– Prothean Sphere (parte 1)
Silean Nebula
-N7: Fuel Reactors
-Chemical Treatment (parte 1)
– Code of the Ancients (parte 1)
– Rings of Alune (parte 1)
Ciudadela
– Citadel III
– Chemical Treatment (parte 2)
– Code of the Ancients (parte 2)
– Elcor Extraction (parte 1)
– Obelisk of Karza (parte 2)
– Prothean Sphere (parte 2)
– Rings of Alune (parte 2)
Silean Nebula
– Elcor Extraction (parte 2)
Athena Nebula
– Thessia
Nubian Expanse
– Intel: Research Data from Pragia
Kepler Verge
– Communication Hub
– Cerberus Ciphers (parte 1)
Ciudadela
– Cerberus Cipher (parte 2)
– Elcor Extraction (parte 3)
– Fiesta
Cereberus Headquarters
tierra
Gameplay Showcase
Eso es todo lo que estamos compartiendo hoy para este Edición legendaria de Mass Effect guía. Esta guía fue originalmente creada y escrita por PhilosophusRex. En caso de que no actualicemos esta guía, puede encontrar la última actualización siguiendo este enlace.