- Título: Industrias de Titán
- Fecha de lanzamiento:
- Revelador:
- Editor:
La información sobre Industries of Titan sigue siendo incompleta. Por favor ayúdanos a completar los detalles del juego usando esto formulario de contacto.
A Tool Corporate course to help starting CEOs familiarize themselves with the basics of running a Corporation in Industries of Titan.
From the CEO of Tool Corporation
I enjoy this game a lot, but initially I had a bit of a hard time getting into it as I was struggling to get my economy up and running before I was attacked by rebels. By now I have almost 100 hours in the game and a fellow CEO asked for some help getting his corporation started, so I decided to make this informative course. This is not going to be a step-by-step guide on how to get a city going, though there will be some tips to help things head in the right direction.
Before we continue please talk to Tool Corporate Employee #42 to settle the 100 Credit fee for following this course.
Initial Scenario Setup
If you play the campaign mode you play a series of preset maps where you do not get to choose the conditions of the map, but you can also start a single scenario to get used to the game. In the single scenario you can set things like game length, (game and map) difficulty and rebel presence. Most of these settings are self-explanatory, but if its your first game I would just go with the standard settings.
There are also the Survival and Zen variations of the single scenario: I would avoid Survival until you have a few games under your belt and just want to see how long you can hang in there. Zen is a peaceful mode, which you could use as an introduction where there are no hostile factions. This guide will focus on the standard scenario.
The Shuttle Lands
Felicidades, you’ve landed on Titan, try not to breathe too deeply, the atmosphere isn’t too good for your health.
When the map loads you’ll get a window pop up that offers you three choices (In campaign mode you can «comprar» a fourth option), these are modifiers for the game on this particular map. These are random for every map you play and can alter the way the game plays and there are pros and cons to each one. For your first game its probably best to hit the little skip button at the bottom right of the window.
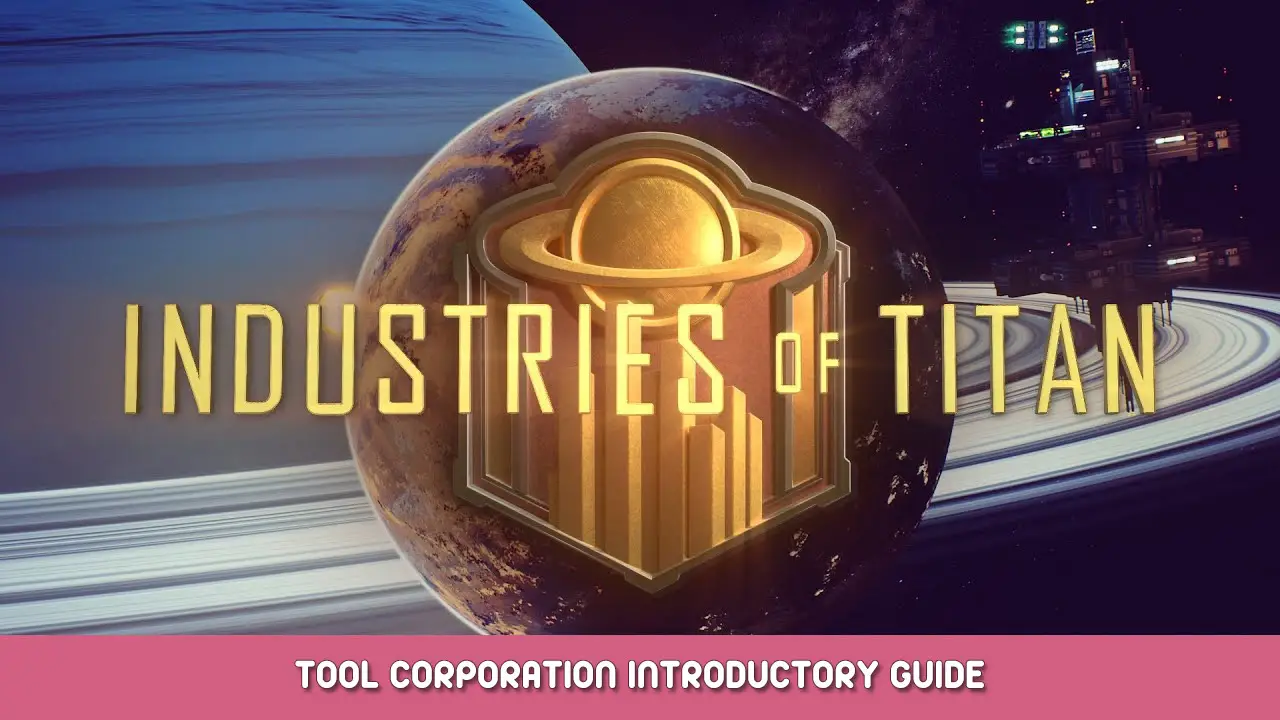
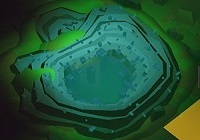
In the image above you’ll see your Headquarters (1) and a blue square around it. These eight squares are owned by your corporation to do with as you will. You’ll also notice a yellow boundary further out, that is the area you control, you can claim (by paying Influence) anything within that border that isn’t impassable terrain. Then there are the Spaceport (2) and the Council Hall (3), you’ll need Artifacts to activate those and unlock their functions. Your initial work force will be arriving at the Spaceport in the first few minutes of the game.
I also want to take this opportunity to mention some advice my old teacher gave me when I was starting out: «Read the tool tips you numpty!». The tool tips will give you a lot of additional information about almost everything you can interact with, I’m not going to repeat all of that information in this training course.
Interfaz: Corporate Controls

At the top left of the UI you’ll see the icons above, from left to right these are:
- Council Communications (F3). The number is your Influence total and if you mouse over it you’ll notice it tells you how much Influence you’re getting per minute (at normal speed). Initially you’ll have a limit of 100 Influence in storage. Clicking the button opens the Council Communications screen, where you can exchange Influence for resources or resources for Influence with the council, you are limited to 5 entradas (1 trade per ticket) en primer lugar, but they regenerate as long as they are not maxed out. This is only accessible after unlocking the Council Hall with 5 Artefactos. Hitting F3 or clicking on the Council Hall building on the map also opens this screen.
- Ciudadanos (F4). The left number on this icon is how many Citizens you have, the right number how much living space is available. Clicking the icon opens an information screen about your civilian population. This screen activates once you have civilian population.
- City Employee Management (F5). Similar to the Citizens icon the numbers show how many Employees you have and what the max capacity is. Clicking the icon opens the employment screen that allows you to alter priorities and fill available jobs.
- Ship Employee Management. This indicates how many of your Employees are crewing your ships. It is similar to the City version, but for your combat ships, it unlocks once you’ve built a ship.
- Spaceport Migrations (F6). This allows access to your spaceport, once unlocked using 3 Artefactos, where you can use Influence to import Citizens and resources (which usually also bring waste along). Arriba a 5 ships can be available at any one time, each with their own arrival and departure timers. Like the Council Communications you can also click on the Spaceport itself to open this screen.
- Asesores. Allows you to talk to your advisors, which currently is just a bit of flavour.
- Science Lab (F2). This opens the Science Lab screen (which has a button to access the tech web). If you are researching a tech it will show a progress bar at the bottom of the icon and a checkmark (como se muestra arriba) when its ready to research a new tech. You don’t need a Science Lab to start research, but you will need Artifacts to unlock access to new techs.
- Corporate Goals (F7). Opens the Corporate Goals info screen, allowing you find out how to earn victory points. Higher tier victory objectives unlock over time, but you can spend Credits to unlock them early. If you have a rival corporation present on the map you can also see what their objectives are and their progress on them, just like your own objectives they get revealed over time (or by spending Credits).
Interfaz: Recursos

On the top right of the UI are the resource display (shown above), the speed controls and the in game date/time. I’ll get to the resources in a moment. The speed controls have 4 ajustes; paused (barra espacial) and speeds 1-3 (shift+1, +2 y +3 respectivamente). Mousing over the date display will show you the Citizen Work Schedule; leisure, sleep and work. During the work period your Citizens are slaving away earning credits by clicking on ads, at the end of the day your Employees get paid. To the right of the date/time there are buttons for the music player, bug reports (Use this if you encounter a bug, the Devs will receive a copy of your save to help them fix the issue) and the main menu (this can also be accessed by pressing ESC).
On to the resource display, de izquierda a derecha;
- Créditos, showing your current total. Earned by Citizens and mainly spent on Employee wages, buying buildings in the construction menu and burrowing (more about this later in the defence section). Mousing over the icon shows you a tool tip that shows income and Employee wage expenditures, as well as an estimate of your balance at the end of the day.
- Minerales. It shows the total amount available for building and processing that is in a storage. Minerals outside a storage are not counted. There are three tiers of mineral (I, II and III), each having a different value for construction. Tier I is just 1 construction unit (CU), Tier II counts as 5 CUs and Tier III counts as 25 CUs. Used for buildings (Though the Factory and Energy Pylon only use Isotopes), internal devices and ship hulls/parts. The bar below the number shows how full the storage for Minerals is.
- Isotopes. As with Minerals it shows what you have in storage and like Minerals there are three tiers of Isotope. The CU values are different though; Tier I is 1 CU, Tier II is 3 CUs and Tier 3 es 9 CUs. Mainly used for construction, building upgrades and ship parts. As with Minerals it has a bar to indicate how full your storage for Isotopes is.
- Waste. Assorted junk coming from industrial processes, human waste and various other sources. There are containers specifically for waste, you’ll be building a lot of them in the early game. As with Minerals and Isotopes there’s a bar below the number that shows how full the waste containers are.
- Artefactos. Highly valuable items that can be hard to come by. They’re not stored in a container like Minerals, Isotopes and Waste, but are used for a number of advanced functions. They are needed to unlock the Council Hall and Spaceport special buildings, activate inert ruins, converting Citizens into Employees and unlocking access to new tech in the tech web.
Interfaz: Build Menu

At the center of the bottom of your screen you’ll see the buttons shown above. This is the construction menu. Initially only the Factory, Energy Pylon and Command Center will be unlocked. Additional buildings can be unlocked at 1000 credits apiece, except for the Shipyard, que cuesta 5000 credits to unlock.
- Producción: Contains the Factory (Has interior space for devices), Mío, Smokestack (Burns excess Waste), Air Purifier (Removes pollution and Xethane) and Industrial Fan (Pushes Pollution and Xethane in a given direction).
- Logística: Contains the Storage Facility, Roads and Transport Hub (You’ll need one of these before you can unlock Roads).
- Fuerza: Contains the Energy Plant, Fuel Turbine (Extracts Xethane to produce Fuel for the Energy Plant), Energy Pylon (Used to create power networks), Energy Depot and Fuel Silo.
- Población: Contains the Residential building, Oficina, Conversion Center, Hospital and Park.
- Militar: Contains the Command Center (Expands your control area), the Defense Turret and the Shipyard.
- Concejo: Contains the Council Obelisk (Produces Influence) and Science Lab.
Below this is a small menu that allows you to specify which tier of a resource you want to use by un-checking the box. I generally leave it on auto unless I’m short of a particular resource. To the right of this is the Energy Grid display, which shows the excess or deficit energy and fuel production. Below both those numbers is an indicator of how full the storage for energy and fuel are. You’ll notice it has a drop-down menu to select a specific energy grid, but I prefer to keep all my energy on a single grid, so I rarely use it.
Interfaz: Notas adicionales
The remaining UI elements are the minimap on the bottom left, which can be useful to see where enemy ships are coming from. Take special note of the little arrow to the left of the minimap, it indicates wind direction and strength. This can be useful when deciding which way to point your industrial fans. There are also buttons in this corner for zoom (rueda del ratón), rotating the screen (Q and E) and a Photo Mode (shift+p). You will also note the overlay buttons, I don’t use these much as it automatically switches to the relevant overlay when you go to place a new building (Por ejemplo: the Xethene overlay when placing a Fuel Turbine).
If rebel camps are active (by default they are) you’ll also see a red progress bar on the right of the screen indicating when the next rebel attack will come. This bar increases over time, but it also increases the more you build. It can drop, but rarely does (usually it is only temporary because you’re upgrading a building). You’ll want at least one defensive turret up before their first attack or they’ll wreck your buildings.
You’ll also see notifications pop up just below the rebel progress bar, like the completion of a research project or a change in weather.
Surveying and Ruins
You will find that there are ruins all over the map. Where did they come from you ask? This is not an archaeology course, all that matters is that there are useful resources inside.
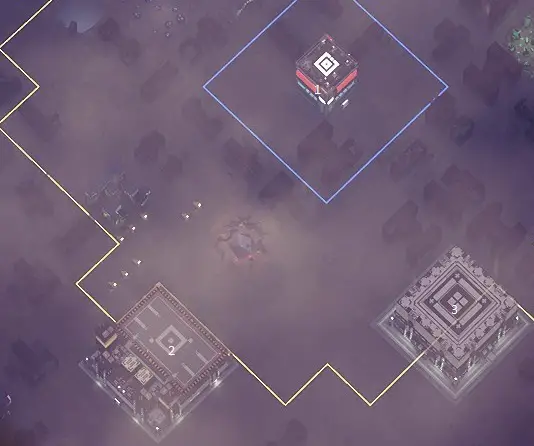
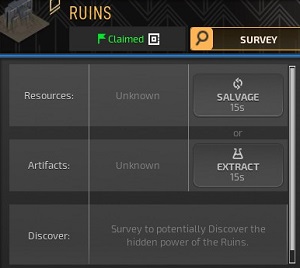
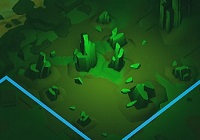
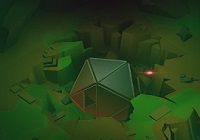
Basic ruins come in 3 niveles, Obsidian ruins in small and large varieties. To survey a building you don’t need to claim it, but it has to be within your zone of control (the yellow border). Surveying a building does not cost anything except time. The higher the level of a ruin, the longer it takes for your Employees to work on them. In the images above you’ll see an example of a ruin properties screen before and after surveying. After surveying a it, a ruin also activates a number of icons above it (showing what resources are inside) and if it is an Inert ruin the building itself will glow a reddish pink colour.
To do anything other than survey you need to claim the tile, costear 10 Influence per level for basic ruins, 40 Influence for the small Obsidian ruin and 80 Influence for the large Obsidian ruin. Basic ruins usually contain T1 resources, may contain Artifacts and can turn out to be an Inert ruin. Small Obsidian ruins contain T2 resources instead of T1 and large Obsidian ruins can contain T3 resources as well. While Obsidian ruins are costly to claim they can help jump start your economy. Salvaging or Extracting Artifacts removes a ruin, as does destroying it, leaving an empty plot.
Activating an Inert ruin costs Artifacts, in the example above it costs two Artifacts to activate and provides the same function as an Energy Pylon (though in a different pattern compared to the one you can build). Inert/Activated ruins can have multiple properties (including Xethene generation) and can be really beneficial, but they are vulnerable to attack. While they can be repaired by your Employees when damaged, they cannot burrow and once they are destroyed they’re gone forever.
There is a large ruin (2×3 parcelas) somewhere on every map that not only generates Influence when claimed and activated but also increases your max Influence by 100. It does draw a lot of energy, but I grab it if I can as there isn’t such a thing as too much Influence.
Resource Deposits
While you will initially get most of your resources from ruins there are also other sources of them dotted around the map.

Above are images of a Minerals Patch (Imagen izquierda, 20 Influence to claim) that you can assign an Employee to and a Mineral Node that needs a Mine building to exploit. The patches have a random amount of minerals available and become an empty plot once depleted. The nodes do not deplete entirely, but eventually production drops so low it isn’t worth maintaining the Mine. Mines have a connection range (which can be extended through research), so they don’t need to be adjacent to a Node to mine it. Both of these produce T1 Minerals.

As with the Minerals, Isotopes come in Patches (Imagen izquierda, 40 Influence to claim) and Nodes. The same rules apply to these, but they tend to have lower amounts available compared to the Mineral versions.
This is an Artifact Patch, they cost 60 Influence to claim, but are the only source of Artifacts besides the ones found in ruins.
A gas that is part of the atmosphere of Titan, but is most concentrated near cracks, crevasses and sinkholes, which emit the gas on a regular basis. It is essentially infinite, but your Fuel Fabs/Turbines will fluctuate in production depending on the concentration of this gas in their gathering range. Multiple consumers can drain an area of Xethene faster than it replenishes, so spread your gathering facilities around.
Basic Construction, interior Devices and resource Processing
Primero que nada, there are two buildings with internal space for devices (something often missed by starting CEOs); Your Headquarters and Factories. Early on you will need to build devices in these to get your economy started.
When you enter these buildings (double click on the building, or the button on its properties window) you’ll see an internal grid and a menu on the left of the screen containing various devices. These are all unlocked already, but they will mostly be grayed out because you don’t have enough resources in storage to build them. Devices inside buildings are cheaper and quicker to build but are generally less efficient than their individual building counterparts. Your HQ doesn’t produce pollution, but your Factories do, your HQ also has a smaller construction grid than a Factory. When you enter a building’s internal screen you’ll see the top center of your UI change from your corporation name to the name of the building you’re in and a small button slides out of the bottom of that section, allowing you to leave the internal building screen.
Several devices have access points (They look like a pair of yellow arrows), areas that your Citizens/Employees need to be able to get to. These access points do not have to be within the build grid. Most only have one, but the Habitat Pod and Conversion Capsule have two, for the Habitat Pod both need to be accessible, for the Conversion Capsule only one of the two. Devices that do not have access points don’t need to be accessible, they can be built and accessed from the other side of the room if necessary (This may change, but for now this is the case).
At the top are the Citizen devices, the Habitat Pod (2 Citizens per device), Monetization Station (1 Citizen per device) and the basic Conversion Capsule. The Conversion Capsule uses 1 Artifact to turn 1 Citizen into an Employee and Waste (which gets dumped on the floor of the building). The Conversion Capsule also increases Employee capacity by 2 per active device. puedes encajar 4 Habitat Pods, 8 Monetization Stations and a Conversion Capsule into one floor of a Factory, but keep in mind that the Factory generates Pollution.
Then you have the basic Energy devices; 3 sizes of generator and 2 sizes of battery. This group also includes interior energy relays and the energy bridge device. Devices that need to be connected to an energy grid need at least one square to be covered by an energy relay’s area and you need one energy bridge covered by a relay to connect the internal grid to an external grid.
Next are the Fuel devices; the small and large Fuel Fab and Tanks. The small fuel fab only gathers Xethene from the plot of the building it is in, the large fab from that plot and the 4 plots adjacent to it. Fuel devices do not need to be connected to anything, they don’t even need to be in the same building as the generators they fuel. You want the Fuel Fabs in an area with a high concentration of Xethene, preferably near a source (Like a crevasse or sinkhole).
Storage devices are below the Fuel devices, three sizes of storage and once they’re built you can set what kind of resource they’ll accept (they don’t accept Waste by default). Tenga en cuenta que 9 small storages hold more resources than 1 large storage (which is 3×3), but a single large storage costs fewer Minerals (assuming you have T2 or T3 Minerals). The fourth device is the Waste Receptacle, which costs the same as a small storage but with slightly more space, it only accepts Waste.
The last group is an important group of devices, as they allow you to refine resources. The Processors are essentially a hub device, the L1 version refines a T1 resource to T2 and the L2 version refines a T2 resource to T3.
To function you need to «enchufar» an input module (Mineral or Isotope), output module and at least one Employee module into the Processor (they have a plug icon similar to the access icon, this has to be covering the Processor). The Waste Module is optional, but prevents Waste getting dumped on the floor, which slows your Employees down when they have to walk over it. Multiple Employee modules speed up processing of resources, but remember to assign an Employee to each module (by clicking on the module or through the Employee Management screen).
puedes encajar 2 processors and their modules into one floor of a factory. For most of the early game I find that 2 L1 processors (one for Minerals, one for Isotopes) y 2 L2 processors are enough.
Keep in mind that while the CU value of a processed resource is higher it only takes 1 T1 unit to produce 1 unit of a T3 resource.
It is almost always more efficient to use higher tier resources to build, there is no loss. Por ejemplo: using a T2 Mineral (valer 5 CUs) to build a small storage is a 50% discount as it would cost 2 T1 Minerals to build, pero solo 1 T2 Mineral (que requiere 1 T1 Mineral to produce). The only time I tend to use T1 Minerals over higher tiers is to build Waste Receptacles, as I eventually remove all of them in favour of a Storage Depot dedicated to Waste (removing a Waste Receptacle returns 2 T1 Minerals). Unlike the other internal devices there is no building equivalent for Processors, you will need at least one Factory as a processing facility.
A side note about building on empty plots that haven’t been claimed by your corporation yet; you can just place a building on them and it will automatically claim the plot (If you have the Influence needed to buy it).
You will need an Energy Pylon covering any buildings that produce or consume power (and Energy bridges on every floor of a building with internal space) to create an energy grid. I often find I need to upgrade the Pylon to cover all of my base, though you could build multiples, if they’re close enough to each other you’ll see an arcing line indicating they’re linked (and forming a single grid). More about upgrading in the advanced building section.
Once your economy is starting to produce some Credits to cover your Employee wages and some higher tier resources you can start looking at dedicated buildings. I would start with a Fuel Turbine (near a Xethene source), an Energy Plant and a Defence Turret to defend your base. Early on I usually build a factory with loads of Batteries and Fuel Tanks to store Energy and Fuel, rather than investing in the Fuel Silo/Energy Depot. After that you can start thinking about Residential and Office buildings to increase your income, a single Office building provides enough workspace for the population of two Residential buildings. Eventually you’ll also want to build smokestacks to burn off excess Waste, otherwise your corporation will drown in Waste.
Advanced building (Actualización, combining and utility buildings)
Most buildings can upgrade from level 1 hasta el nivel 3, often improving efficiency, but in the case of the Factory it gives you an additional floor per level. Your Headquarters gains a floor per level as well as a number of other improvements (Like a higher Employee cap and extended control range). Hovering over the upgrade button will give you more information about the effects and costs of upgrading a building. Por ejemplo; the Fuel Turbine does not get an extension in its gathering range, but it does produce more Fuel per unit of Xethene it gathers. A thing to note about Energy Pylons; they not only get a much larger grid radius when upgraded, but they can also connect to other Energy Pylons further away. Upgrading buildings costs quite a few Isotopes, so think carefully before using your Isotopes for that, Minerals are a lot easier to get.
Personally I tend to upgrade my Headquarters up to level 3 lo antes posible, even if I don’t build anything inside. The extended range of control gives access to more ruins and the increased Employee cap can really help. I tend not to upgrade my Command Centers, I usually prefer just building more of them. Other buildings depend more on the situation and how many Isotopes I have access to.
If two buildings of the same type and level are adjacent to each other you also get the option of combining the two into one big building. Factories get extra space per floor, but for other buildings it isn’t necessarily worth the investment, be sure to check the tool tip when hovering over the button to combine buildings. As a combined building counts as one it requires fewer Employees to work there, but that also means it counts as a single building for Corporate Goals. Another drawback is that a combined building cannot burrow, meaning they are more vulnerable to attack.
I rarely build Air Purifiers unless I have a serious pollution problem and my Citizens are dying off faster than I can replace them, mainly because they remove Xethene as well as Pollution. But I do build Industrial Fans on a regular basis, usually to push more Xethene towards Fuel Turbines (and Pollution away from Residential/Office buildings). When planning a city I also try to take roads into account, they need quite a bit of space to connect to the buildings trucks need access to, as roads do not connect diagonally and cannot pass under impassable terrain. Keep in mind that while a busy road can cause quite a bit of pollution, they transport resources and waste a lot faster than your Employees can walk.
Building a Council Obelisk or Science Lab early can also be quite beneficial. More Influence means you can claim ruins faster, buy more resources from the Council and purchase more cargo from space ships visiting the Spaceport. While you can research at all times, faster research from the Science Lab is never a bad thing.
City defence and your fleet
Finalmente, the section you’ve all been waiting for; armas, armas, armas! Whether it’s those Xethene huffing rebels or a hostile takeover by a rival corporation, eventually someone is going to decide to shoot at you. It is best if you have some options to shoot back or your corporation will end in fire and ash. Make sure you have enough Credits in reserve for repairs and burrowing.
Initially you’ll have to take defensive measures in the form of Defence Turrets, static gun platforms that shoot at any enemy ship in range. You’re going to want to position them carefully so that they cover your other buildings, but you want to keep the turret powered down until you need them or they’ll drain your Energy supply very quickly. You will want to upgrade them to L3 as soon as possible, higher level turrets are far more effective. Your Headquarters, Command Centers and Turrets have a «Llamar a las armas» botón, which powers up your turrets and assigns an Employee to man it (do this in time, that Employee needs to get to the turret before it can start firing). Make sure you have enough energy, in some cases you may have to power down other energy consumers to prevent the turrets running out of energy and shutting down.
A second defensive measure is the burrow ability, which allows you to safely store most of your buildings safely underground. It costs credits to do this and the more buildings you have the more it costs. Buildings can only stay burrowed for a limited time and the ability goes on cooldown after it ends. You’ll also want to time it right as it takes some time for your buildings to get safely underground. Your Headquarters, Astilleros, Defence Turrets, Industrial Fans and Command Centers cannot burrow, the same applies to Activated Ruins and combined buildings.
If some of your buildings get damaged you can order an Employee to go repair it, even if it is still under attack. Repairing a building costs credits and it’s best to start early so as not to lose the building, as rebuilding an upgraded building is quite resource intensive. Also remember that when you shoot down a ship the wreck will fall from the sky and crash into buildings below it, damaging them.
Later on in the game you will be able to build your own ships in the Shipyard. At first you’ll be limited in what you can build with regards to hulls and weapons, but you can research new weapons and ship hulls in the tech web. Building a ship is similar to the building of devices in Factories, but it needs to be entirely self-sufficient and there’s only so much you can shoe-horn into a given hull. Each Shipyard can support two ships, regardless of hull size. Ships also collect Xethene, like your ground-based fuel production, and can run out of fuel if there isn’t enough in the area. If a ship runs out of energy (due to lack of fuel or the design using more energy than it can produce) it’s just target practice for any enemy ship. Damaged ships can be repaired by sending them into an unoccupied Shipyard.

I’m not going to go into the details of ship design, as designing and testing ships is part of the fun in my opinion. Keep in mind that different weapons have different range, power and firing patterns and there are defensive devices that you can unlock through the tech web. You can view the internals of your ships at any time, even during combat, which can help you tweak your designs to make them more effective. One thing I will say is spread your vital ship devices around, better to run at reduced efficiency than having your entire ship lose power in a firefight.
Citizens and Employees
Citizens are for the most part expendable, we’re unscrupulous corporate CEOs after all, but they are our source of Credits, so we want to ensure they’re making the corporation sufficient Credits before they kick the bucket. They are vulnerable to the toxic effects of Pollution, so we want to minimize the amount they have to breathe, though we can mitigate some of the effects by building a Hospital for them (Look at how generous we are!). Residential areas are affected by a variety of factors, indicated by a Livability factor (mousing over it shows you what’s affecting it). Higher levels of Livability makes Citizens want to live in nearby housing. Pollution and Xethane concentrations lower it, as well as a number of buildings, being close to the corporate HQ, Council Obelisks and Parks increase it.
Office buildings and Monetization Stations are affected by Job Desirability and distance to their residence. As with residential areas Pollution is a strong factor in this. I generally build Offices and residential blocks near each other and use a combination of Industrial Fans and Air Purifiers to keep the nearby atmosphere somewhat breathable.
Besides generating profits for your corporation you also need Citizens to convert them into Employees. Employees are equipped with their own filtration equipment, making them immune to Pollution and they don’t need sleep or leisure time. Converting them is done in Conversion Centers and Capsules at the cost of 1 Artifact per Citizen/Employee. Filling a Factory with Conversion Capsules generally costs less resources and gives more Employee capacity than a Conversion Center. Sin embargo, a Factory produces pollution and the Waste produced by the conversion process is just dumped on the floor of the building, requiring your Employees to manually clean it up. A Conversion Center doesn’t pollute and the Waste it produces goes into storage ready for transporting elsewhere.
You’ll want a decent number of Employees to move resources and Waste around, as that takes time. This is also another situation where the higher tier resources are an advantage, as bringing 200 CU of T1 Minerals to a construction site takes 200 viajes, mientras 200 CU of T3 Minerals only takes 8 viajes. Over long distances you’ll want to build Roads and Truck Depots to speed things up.
In the City Employee Management screen (F5) you can adjust priorities for just about every job your Employees do (you’ll have to change the slider above the priorities list to allow this, it’s locked by default to prevent accidental modification). You can also set dedicated Employees to certain tasks but using the little + icon next to a particular task, I often use this to ensure that Processors and Smokestacks are kept busy. The Employee display in the UI will also notify you if (and how many) Employees are idle, if this is a low number (and you have dedicated Employees) it usually means that they don’t have any resources or Waste to move. You can also manage Employee jobs in buildings from this screen, should you need to.
Technology and Research
By opening the Science Lab (F2) you can access the tech web. The tech web allows you to research techs to improve the efficiency of multiple aspects of your corporation as well as developing new ship hulls, devices and weapons. You’ll need to spend Artifacts to unlock the path to a tech, doing so will also reveal other techs near the one you are unlocking (most of the tech web is hidden at the start of the map). Sometimes you’ll reveal techs that you can’t reach without unlocking multiple paths/techs, which may still be (partly) oculto.
When clicking on a tech you get two options: Research and Scrap. What research does is obvious, but scrapping a tech means that you unlock the tech block without receiving the benefits from it. Scrapping is usually twice as fast as researching and is generally used to prevent wasting time on techs you don’t want in favour of getting to techs further down the path on the tech web. Keep in mind you cannot undo scrapping a tech, así que elige con cuidado.
The further you get from the center of the tech web (the starting point), the more Artifacts you have to spend unlock the path to a tech. Some techs have multiple ways to get to (and from) él, but overall the tech web is randomized for every map. This means that starting a new map doesn’t guarantee that you’ll have the same techs near the center, though certain techs are weighted to be close to the center (albeit not in the same position).
The more techs you have researched (or scrapped), the longer the next tech you research is going to take, but you can speed things up by building Science Labs and staffing them with Employees. Initially that won’t be necessary, but by mid game you’ll want to start building some Labs.
Waste, Contaminación, Fire and Weather
While you can get Waste from ruins and buying cargo from ships visiting the Spaceport most of your Waste will come from Residential and Processing facilities, as well as the conversion of Citizens to Employees.
In the early game you’ll have little choice but to store the Waste, but you’re eventually going to have to build Smokestacks to burn the Waste and get rid of it. I usually build a Storage Depot or two (Dedicated to Waste) near my Smokestacks to gather it in one place so the Employees assigned to feeding the Smokestacks don’t have to walk too far.
You’ll want to think carefully where you want to locate your Smokestacks (and to a lesser extent your Factories), you want them away from your Citizen population and your Fuel Turbines. You will also want to build an Industrial Fan or two to blow the worst of the Pollution away from your Citizen population, but in such a way that they don’t blow the Xethene away from your Fuel Turbines. If you can blow the Pollution towards a Rival’s or Rebel settlement, incluso mejor.
If your buildings get severely damaged they can catch fire, damaging the building even further and producing a lot of Pollution. The fire can spread from building to building, costing your corporation a lot of time (and Credits) to get it under control. As a general rule you’ll want to order your Employees to repair buildings as soon as they start getting damaged, since it can take some time for your repair guy to get to the building. When a fire does start, repair the building until the fire is put out, then cancel it so your Employee can go put out other fires. Once all the fires are put out, repair your buildings to full HP. If the fire really gets out of control you can always opt to burrow your city, smothering any buildings on fire.
The weather on a map can affect a number of things, sometimes beneficial, at other times detrimental. Sandstorms and Fog will reduce visibility and the range of weapons, rain will reduce Pollution and help put out fires, snow will help put out fires but will slow movement speed for Citizens and Employees alike. Pay attention to the notifications about weather changes or you might find your Employee didn’t get to a building in time to repair it and now half your city is on fire.
Eso es todo lo que estamos compartiendo hoy para este Industrias de Titán guía. Esta guía fue originalmente creada y escrita por Tommytools. En caso de que no actualicemos esta guía, puede encontrar la última actualización siguiendo este enlace.