- Título: Help Will Come Tomorrow
- Fecha de lanzamiento:
- Revelador:
- Editor:
Information about Help Will Come Tomorrow is still incomplete. Por favor ayúdanos a completar los detalles del juego usando esto formulario de contacto.
In this Help Will Come Tomorrow guide, we will be giving you some valuable and important tips to increase your survival until the help arrives. Due to the harsh environment that you will be facing in the game, we are hoping that this survival guide will help you.
Early Game Survival Tips (Días 1-7)
Up front, survivor traits are different, found resources are different, and injuries are different each playthrough. Expect to have to adapt a bit.
Día 1:
Clear away the snow. Build the campfire and small water filter at a minimum and build an additional structure or upgrade if resources allow. I’ve sometimes received one unit of clay from the initial clearing of snow. Check each character’s welfare (portraits on the left) and if there’s any hunger or thirst, give that person one unit of food or water respectively. If you give a character food or water, you may identify certain traits, como «Starveling,» that mean a character is more prone to hunger or thirst.
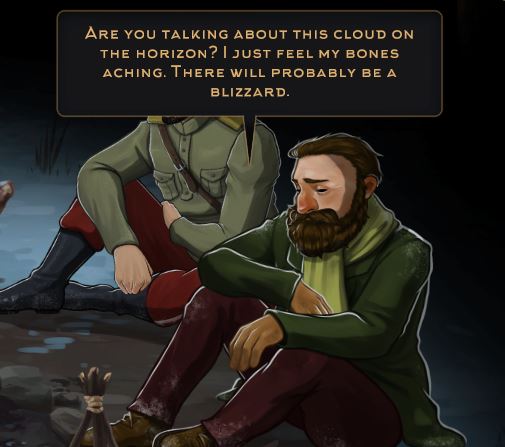
That evening, recommended conversation choices are either related to the initial violence or «character introductions.»
Día 2:
This is the first day you can send out an expedition. Do that right away. Characters with the «Observante» trait may bring in a bit more resources, but you probably won’t know who that is until you take that character on an expedition! De cualquier manera, you want to bring in some «alimento» such as bugs or moss, some pine needles, some sticks, some metal, some string and fabric.
The most important things to bring back are one unit of coal and enough clay so that you have two units total if possible.
First Expedition
Search on the locomotive or the coal car behind it in the hopes of a piece of coal–necessary for the large water filter–and possibly some canvas. The two cars behind that on the tracks often provide more string, chatarra, and canvas. Some spots south of the tracks occasionally yield clay–necessary for the cooking pot. With your remaining action points, search the forested areas near the camp.
Hopefully there are now enough resources to hand to produce the large water filter and one other structure at a minimum. I usually have enough resources to build the filter or the pot, no ambos, and one other structure. De eso, filter water (you might need to do it twice if you couldn’t get the coal for the large filter and also want to make soup) and ensure everyone has had enough food and water.
For campfire conversations, I’ll get another introduction out of the way. I’m unlikely to take a «let’s do X» at this point unless I need clay — at which point sure, I’ll hit the river.
Día 3:
If I don’t have the cooking pot by day three, I send an expedition to the river for clay, and search the forests and clearings south of it for more sticks and pine needles. I want to have the workshop up with the hardened table upgrade so I can start producing tools. The knife and shovel are the first ones I’m after. Canvas and branches can yield a multitude of sticks and rags or string at the workshop, and I’ll often break down these resources from here out.
By the day’s end, I’ll have the basic palisade up because most days I’ll want a fire at 10% for cooking soup or tea. Soy «ahorro» lower quality foods that don’t expire where possible and trying to maximize the use of mushroom soup and berries.
This evening, I hope to have all the basic introductions out of the way.
Días 4-5:
Before day five is done, I want all the basic structures built in the camp. The shelter should be able to hold two sleepers, and the quarantine point should have the capability of making bandages. A workshop with basic tools helps preserve resources, and a palisade working towards having the camouflage upgrade. By now I’ve identified who is good at building, who I typically send on an expedition, etcétera.
One of these evenings, I might be looking for a task. Sir Edward’s «Betty» conversation is an easy one that has a good reward.
Días 6-7:
I’ve shifted to building upgrades that will help me in the mid- and late game such as the metal shop and caretaker post. The camouflage upgrade keeps the camp visibility low and enables a fire nearly every night. I douse it if the renegades are adjacent to the camp’s hex. If I’ve bought down an animal or two I’ll skin them at the game flaying point to provide meat and hides.
Mid-Game Preparation (Días 8-14)
So You Survived a Week – norteow What?
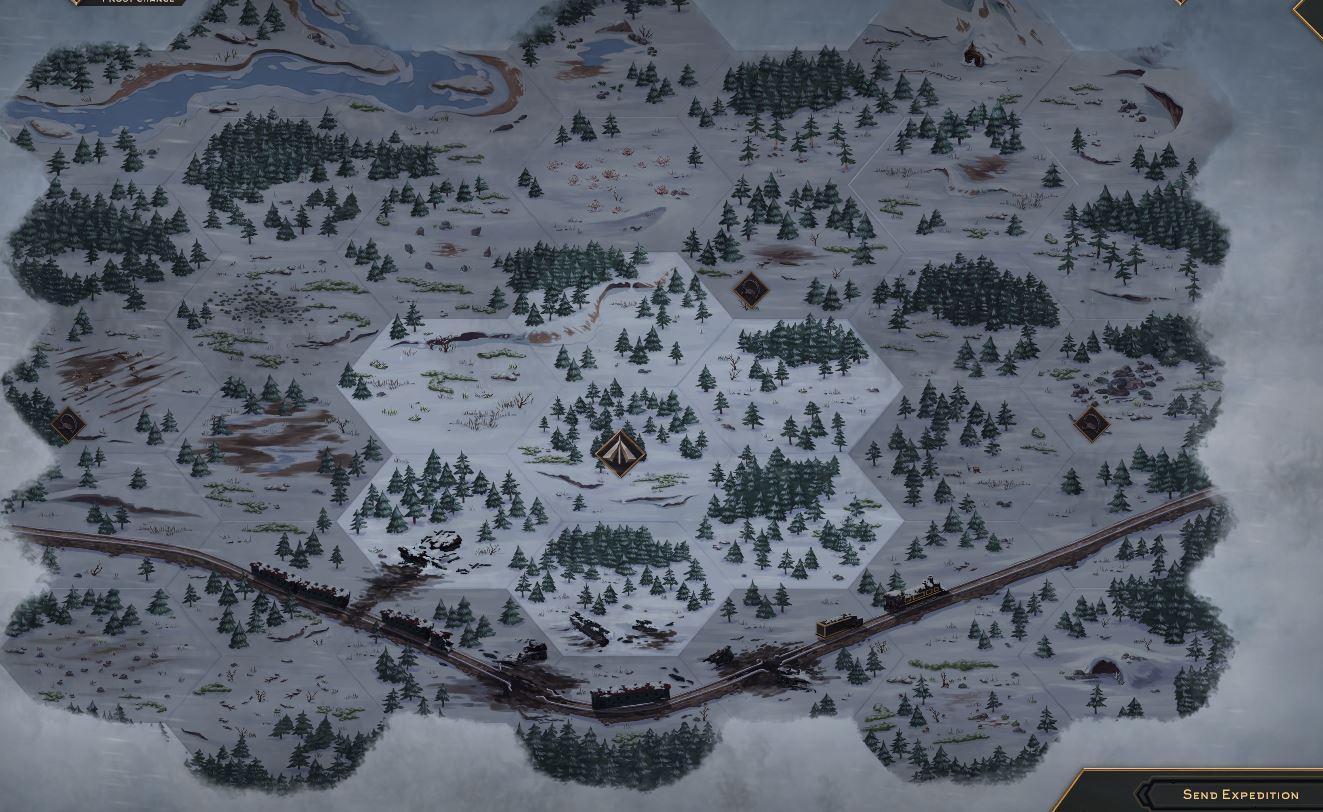
Ya, I generally know where different resources may be found now from several days’ worth of expeditions. If I’ve searched in a hex before, I can see what I’ll expect to find if I go there. Wait a day or two before revisiting an area, and if you need a thing, si dice «depleted,» you’re not likely to find it.
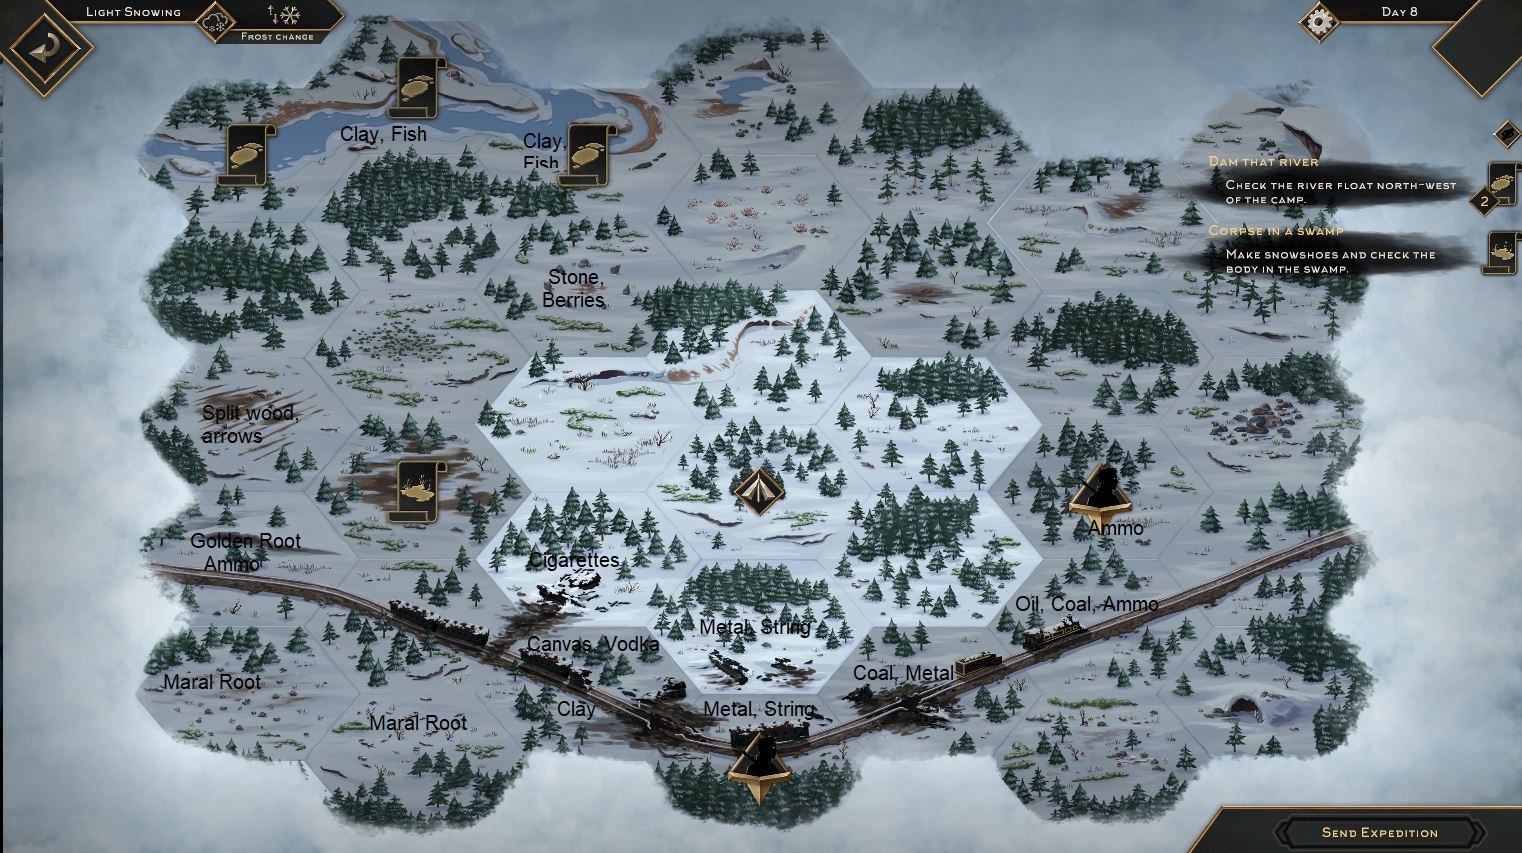
In the above map I’ve highlighted where to get a few key resources. I plan out expeditions by working around the renegades, as a search in an adjacent hex at this point will often result in an encounter and the potential for injury. Unless I’m trying to hunt an animal, I avoid those hexes, también–instead of the option to search there I’ll usually get an animal encounter event. Because several upgrades require a lot of wood or pine needles specifically, if the renegades are blocking my way to the train, I’ll often head that way.
The Hardened Table enables breaking down of Branches and Canvas into sticks, rags, and/or strings. Rather than rushing to build something inefficiently, it’s generally better to break down the resources, even if it means building the upgrade one day later. I find I often have enough pieces of metal that breaking rocks down for stones with sharp edges isn’t necessary, sin embargo.
The hardened table allows for the construction of basic tools. You should definitely have the knife and shovel by this time–take the shovel, and when you get it, the hatchet, while foraging in the woods. A bow and arrows provides the capability to hunt game, which is an excellent alternate source of food and materials in the mid game, and if you haven’t made one yet, you should go ahead and do so.
Construcción
Entonces, you’ll likely have several upgrades built by this time and are able to cook food, rest at least two survivors, and treat at least some injuries and illnesses. In the mid game, try to complete one upgrade per day minimum. If there’s a problem to hand–such as needing an Antidote to cure a survivor–address the immediate problem, pero de lo contrario, just try to upgrade at least one thing a day if you can.
If you don’t have it yet, upgrading for the metal workshop as soon as possible is important because it’s going to get colder and the basic metal workshop allows for clothing production. Upgrading to the 3rd tier «well-equipped workshop» enables the repair of broken firearms, which you’ll likely need by the late game–I don’t prioritize this upgrade until I’ve got a broken firearm from in-game events.
I’ve often neglected the «blankets» upgrade for the shelter and may not even have the «simple cover» at the quarantine point, but getting these in before the weather sets in is now a priority–especially because I haven’t started making winter clothing for the survivors yet.
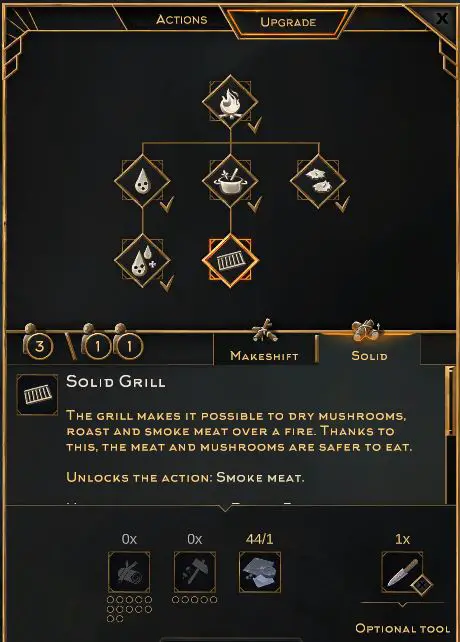
After I’m nearing the two week mark, if I haven’t made it yet, I’ll build the ‘grill’ campfire upgrade. This upgrade usually isn’t necessary until you’re hunting, but once you are, it’s a good way to preserve meat and mushrooms before they rot–a problem you increasingly face in midgame.
Elaboración
Build the metal workshop upgrade to the workshop station if you haven’t yet, which unlocks the ability to create some additional tools–the hatchet increases the amount of wood expeditions bring back, and the sack increases carrying capacity a bit.
The metal workshop also enables production of clothes. I recommend you skip the other sorts of clothes and go right to «Warm Durable Clothes» for crafting, with the goal of making one for each survivor — start with the survivors that seem to get the cold status most. I start on the first of these as soon as I’ve brought down a large game animal–a musk deer and some rags will provide enough material for one set, understanding that each set will also require 4 units of string.
You may have found a lower-quality set of clothes earlier from in-game events, you can pass this off to another survivor and give the survivor that’s frequently cold–looking at you, ana!–the warmest set first.
Spotted! (spoiler)
Around the middle of this week, between the night of days ten and twelve, a renegade will discover the camp. Elect to give chase with a healthy survivor who isn’t injured or suffering from an amputation and you’ll probably be successful.

The survivor who runs after the renegade is likely to be injured (con un «stomach wound,» requiring the «perform wound dressing» action at the quarantine point). Recibirás el «Tiempo de recuperación» logro–and the set of clothes is usually welcome.
Caza
My mid-game hunting party focuses on musk deer, which generate more meat and fur than the smaller game animals. I take two survivors, equipping one with the bow and some arrows, and giving the knife to the other. Between the deer, the event where you get a deer and a wolverine, and the incidental game animals, I rarely find myself needing snares or to fish with the harpoon.
A rifle is a must for bringing down the moose. I can prepare for this event before day 15 by searching for ammunition–I’ll usually look at the train’s engine, the tree stump where the renegades practice shooting just north of it, or the westernmost tracks.
The moose appears on Day 15 o más tarde. I will usually bring the rifle *only* if I’m going for the moose when it appears at day 15 o más tarde. Note that in addition to the rifle, you should bring two ammunition. On the first encounter, approach the animal and attempt to engage with the rifle. Most likely, you will wound it, have to give chase on the map, and engage it with the rifle a second time.
Because the moose provides a *lot* of meat and fur, it is a good way of finishing two of the four sets of clothes. You’ll also get the «King of the Taiga» logro.
Late Game General Survival Tips (Minor Spoilers)
Minor Spoilers Ahead
Save Vodka and Cigarettes
These items allow for reduction in thirst and cold (vodka) and minor morale recovery (cigarettes) and do not spoil. I balance use of these items overtime with the «descansar» y «gather strength» actions to try and nurse a freezing or miserable character back to better functionality–and higher AP.
Obtaining the Rifle or Pistol
There are several ways to obtain the «broken rifle» o «broken pistol» elementos. The easiest way to get the broken rifle is the Sir Edward Gray «Betty» búsqueda, which is available as a campfire conversation if he’s amongst your survivors. Similarmente, a broken pistol and some ammunition may be obtained from campfire conversation with Sokolov’s after introductions and the level of trust has gotten to a certain level. Rare map events and The automatic «Spotted!» can also generate one.
Confrontation is Bad
You are outnumbered, and each icon represents several thugs. Even once you are decently armed, I don’t recommend a direct confrontation with the renegades on the map under most circumstances. I have absolutely lost two survivors with firearms attempting this more than once–if your experience differs I’d like to hear about it!
Equip all Characters with Warm Durable Clothes
I cover starting this process in the «mid game» portion of the guide. Hunted game animals roam the map and yield hides, which can me used to make clothing; cadena (or canvas made into string) is another key ingredient. Lower «niveles» of clothing are generally a waste of materials–if you find lower «nivel» ropa, give those to characters less prone to getting the cold status. If you find the weather is getting ahead of you, use a mix of vodka and «descansar» o «gather strength» to keep the levels managable.
Some Foods Don’t Rot
Alimento, particularly in the «Final Showdown» guión, can be a real problem. While preserving a quantity of meat and mushrooms with the «parrilla» upgrade is a technique and helps manage food spoilage a bit, I also stockpile food items that do not expire–moss, insectos, and edible roots in particular.
I avoid mold unless I have to because it induces nausea and indigestion, often with a single serving. You can give one of a type of «foraged» food like this without causing indigestion. Another non-spoiling food item is «lard,» the fat harvested from meat–which satisfies a decent amount of hunger. Rather than using it for the «scambled eggs» alimento, I feed survivors a single raw egg, similar to moss.
Rotten Food Is Also Edible
Spoiled meals and eggs will turn into «comida podrida,» which will inflict negative statuses on a character such as «nausea» y/o «indigestion,» just like eating multiple of «foraged» food like insects. I keep a bit on hand anyway; if a character otherwise has no negative statuses he or she can eat the rot and still not lose AP if the stomach upset is the only issue.
Keep Building Durability High
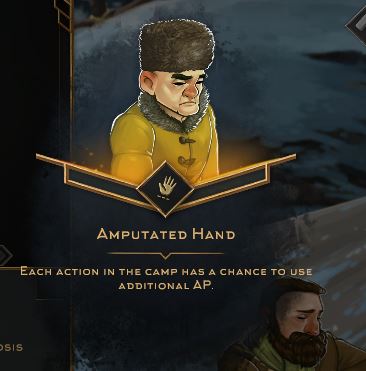
Al final del juego, certain events can damage or destroy buildings, and their durability is key to getting it through other events while minimizing the chance of the worst outcome such as very serious injury. Repair them regularly, and if you have a character with the trait that allows for repairs to be done with the occasional refunded AP or bit of materials, so much the better.
If You Have an Extra Action Point…
There is always a use for that action point. Are the buildings are in good repair? No one needs rest? Bueno, consider using the «filter water» action as the resource doesn’t spoil and you’ll need it eventually–my last action point often goes to making a bit of water to finish the day, or to set me up for tomorrow. If you don’t need water, consider making a bandage, as someone will need one and it potentially saves you a «wound dressing» action later depending upon the injury. Only if all those things are satisfied should you consider using «fraternize» at the campfire to unlock character background stories (unless you really want that acheivement).
Late Game Guide: Shatun Scenario (Major Spoilers)
Scenario Set-up
Prior to the two week mark, I like to have the Workshop with Metal Shop complete, a Quarantine Point capable of making Antidote, and the Snares upgrade on the Palisade. A rifle, some ammunition, and a dead animal that yields three pieces of meat are also useful to have.
En este escenario, the renegades get more aggressive up to the two week mark or so, and then move to the southeastern hexes on the map. It’s safe to go resource-hunting on expeditions for a few days.
Día 17 Evento
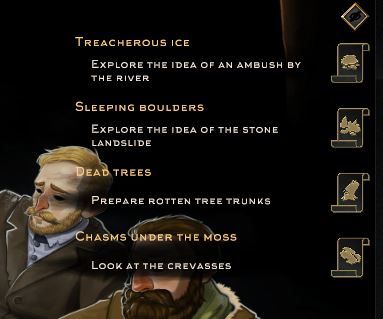
En el día 17, you have a nighttime encounter with an injured renegade, who explains that evil bears are evil. You can ask questions until he dies to not-deal-with-him. You’ll receive some items from the dead renegade. Survivor conversation reveals the Grand Plan — use Leaf Springs from the train wreckage and the Metal Shop tools at the Workshop to build three traps at spots the bear frequents.
Once the renegades are off the map, have your fire level as high as you like at night, and it’ll generally be pretty cold, so this is a welcome change.
Después de este punto, there aren’t any more prey animals for you to hunt wandering the map, aunque.
The other downside is that the «Shatun Meter» appears in the upper left, and progressively fills up during expeditions until you encounter the bear, which will kill at least one member of the expedition–I’ve lost one or both survivors, to include when one was armed with a rifle and ammo and the other had a bow and arrows.
The Sickness
Another complication is that after the Day 17 renegade encounter, one survivor comes down with a disease. The tooltip explains how to delay death with medicine, but your best bet is to create an Antidote with one each of water and Golden Root — Golden Root is obtained on the western end of the map.
Preparing the Traps
Send an expedition south to the marked train wreck spots on the map out to get five Leaf Springs — the maximum possible. It may require two separate expeditions to do successfully. A pesar de todo, there is a bug where the «iconos» for where the Leaf Springs can be found can disappear after you get the first one.
For the bear traps, in addition to the Leaf Springs, you’ll require sharp items such as sheet metal, and a piece of meat. The metal, if you don’t have it, you’ll likely pick up while looking for the Leaf Springs. The meat can be either fresh meat from a slaughtered animal or smoked meat preserved by the grill.
There’s an event while looting Leaf Springs at the train wreckage where you can choose to use the dead in lieu of animal meat. If you have no animal meat after the game disappears, puede «check snares» at the Palisade to have a chance get a small animal once a day. You have several days to get this done, so you needn’t resort to human flesh unless you expect to be pressed for time.
Emplacing the Traps
En este punto, this is where it gets challenging, because you’d normally have to wander the map looking for where to place the traps–as the meter fills up, with deadly consequences–potentially losing critical equipment if your expedition becomes bear chow. Going to the spot where an expedition is killed off doesn’t necessarily get you all the items back, cualquiera.
I lost in this scenario twice–once having lost all my traps because I was carrying them all at once, and once losing two separate expeditions wandering around looking for the correct places.
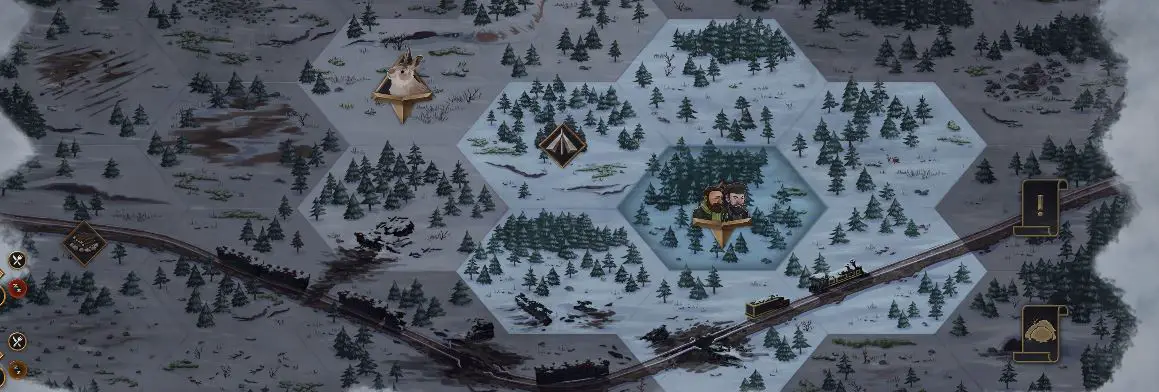
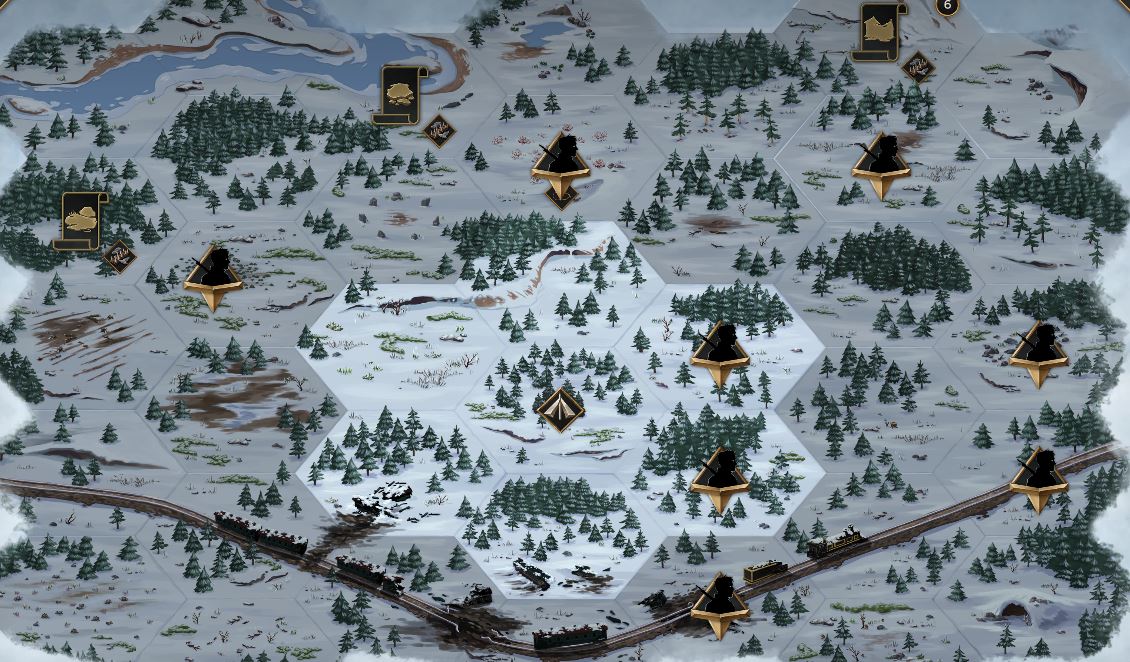
Note that hitting the right «lugar» on the map starts an event, and marks that spot on the map once the trap is placed with a diamond that has a trap icon. Above is a map with all three traps emplaced.
Send a two-person expedition with at most two traps. You can usually emplace one northeast of the camp at the nearest spot (Fell Pine), and the other at the far east of the map (Stone Embankment) in one trip. «Regreso al campamento» when the meter gets nearly full or after the two traps are set.
Have a separate expedition move west to the third spot (Felling Furrows), and if you’re low on ammo, move south to the tracks to try and obtain some before returning.
Finishing the Shatun Scenario
Después de unos días, your survivors will hear the howl of the bear, who bumbled into one of your clever traps. Send an expedition armed with the rifle and ammunition. You receive word that the bear is injured and if all goes well the meter disappears.
Desde aquí, survive another few days, keeping morale and Palisade condition high, and cure the plagued survivor with an Antidote if you haven’t yet. For the final confrontation sequence that occurs at the end of Day 25, there are -no choices to make here, it is about who and what you have to hand. I’ve read in forums that a Harpoon is important, but in my successful playthrough, it refers to what sounds like a spear or harpoon even though I didn’t have one (I had the knife and the hatchet, aunque).
Note that failing to emplace all three traps and check the one that «trabajó» results in automatic failure and horrible death no matter how well-armed and prepared you group is–I’ve died with a bow, two rifles, a pistol, and max durability on my structures.
Late Game Guide: Wind of the Damned Scenario (Major Spoilers)
You’ll have to contend with the renegades, who’ll get progressively more aggressive over the second week. In my playthrough, they liked to hang out on or adjacent to the train tiles with string and canvas, making clothing production difficult. On the few days I could have a fire, I burned a lot of AP smoking meat or preparing stuffed roasts from animals hunted north of the camp.
If you know you’re in this scenario because you chose it, before Day 17, I try to have the workshop with the ability to make clothes, the quarantine point with the surgical tools, and have a bow and arrows. To improve your situation going in, anything the makes the camp warmer for your survivors helps — building the seats, the cover and blankets for the shelter, and the upgrade to the palisade that keeps the wind out.
Try to have a bandage, a limb brace, and two units of «high-calorie fuel» such as coal by Day 17 si puedes.
Cold Enough For Ya?
En el día 17, you’ll see a survivor make reference to the weather, and another explain the phenomenon. This is your signal that you’re locked into the «Wind of the Damned» guión.
You’ll not have to be contending with the renegades anymore, so move quickly to recover the resources to build the upgrades you want.
I recommend the following upgrades to structures as soon as you can build them: quarantine point’s caretaker post and small washtub, and the shelter with blankets and the ability for two survivors to rest at once.
Mitigating Weather Effects
Warm Durable Clothes for all survivors is the single most important thing but may take you several days to achieve; hunting animals with the bow is the easiest way to do this. Because I had hunted more animals than I needed prior to Day 17, I just skinned the «oldest» corpses before they spoiled. Musk deer are particularly good, and you can supplement with rags, but save your canvas to turn into rags or string as needed.
Once I had a few sets of Warm Durable Clothes, I rotated the survivor who wore it and used the «descansar» y «gather strength» actions to increase warmth for those who didn’t have it. Remember that expeditions expose your survivors to the cold–give them the best available clothing for the duration and try to keep expeditions short and return to camp with some AP so they can rest and regain some warmth. The chance of becoming lost seems to go up a great deal quicker than it did before — I brought the torch to try and keep this under control.
For the survivors not hunting for materials, try to be repairing one structure a day to keep as many over 75% lo más posible — overnight weather events will cover snow and damage structures. A shovel will come in handy after Day 17 because it may save AP as you clear snow away from buildings — this will potentially happen several times.
Falling Down
On the night of Day 20, there’s an unavoidable event where one survivor is seriously injured by a weather-caused collapse–the lost foot will prevent leaving the camp on expeditions. This will happen regardless of the condition of your buildings.
On the following day, you’ll see that the injured survivor, in addition to the lost foot, also is bleeding and has a necrotic hand. Treat the necrotic hand first; this will require the caretaker post and small washbasin at the quarantine point and use 3 AP. If you made a bandage beforehand, you can use it to stop the bleeding. You’ll notice the injured survivor’s appearance changes and the chance of double AP loss for actions. If you have fewer than four survivors, this can really complicate sending teams out.

Finishing the Purga
On the night of Day 22, campfire dialogue reveals a concern about signaling to the other stations via large signal fires at either end of the tracks.. You can see in the graphic that it requires wood x5, structure x3, and high-calorie fuel x1.
Move the items into the inventory and use a pair of survivors for the expeditions. The game is slightly picky about what qualifies so try to make the most conventional choices. The game accepted split wood and logs, but did not accept tree bark, Por ejemplo.
For teams that are going out on expeditions, understand that loss chances are higher and chances of injury seem greater, as well I was unable to make it with a solo survivor without getting lost overnight and used two limb braces and a bandage stumbling around in the snow on a playthrough.
The above image has a «terminado» signal fire on the left and a group heading towards the other spot on the right. After emplacing one fire the expedition automatically returns to camp, but you can definitely place both in the same day.
Desde aquí, you just stay alive until the night of Day 25. While there was a message about returning to maintain the fire, sending a group back a day or two later didn’t do anything.
Late Game Guide: Final Showdown Scenario (Major Spoilers)
Background and Preparation
This is the hardest of the three scenarios in my view as it is the one that relies the most upon luck. You m
If you chose this scenario, and know what you’re heading into, a good way to prepare is to make the bow and arrows and hunt game to get meat and hides. The meat, and any mushrooms, you can smoke on the grill so it is preserved indefinitely–during this scenario you will be over a week without a fire, so enough preserved food to last your survivors until then makes this far, far easier. If you cannot manage to make enough for all survivors and all days in advance, you can supplement with foraged foods, but over time this will have a negative morale impact.
Having a firearm and some ammunition is also important in success for several of the ambushes. While you’ll want warm durable clothes for Day 17 and later, having a great deal of string and hides is usually sufficient–you can make the clothes after.
Día 16
On the night of Day 16, a party of renegades stumbles on the camp and the survivors put out the fire in a hurry. If you didn’t know before, you know now you’re in the «Final Showdown» guión. You’ll now have renegades on hexes adjacent to the camp and fueling the fire is no longer an option.
The survivors suggest a decoy fire, which is constructed out of any sort of fuel–even bark will do–at the workshop. I recommend doing this immediately–it may involve working your way around the renegades–because it enables future ambushes.

You’ll notice a «renegade» icon representing the ones that have died, to include those who have died in events (you may have one «matar» for events prior to Day 17).
Additional ideas for ambushes will come up in campfire conversation over subsequent days until you have several. I’ve had a max of five going at once. For these, icons appear on the map, and navigate a pair of survivors towards the icon. These characters should have warm durable clothes because they’re walking around outside–rotate who’s wearing what if you don’t have enough for everyone yet.
I recommend carrying a «decoy fire» item as well, because there are unmarked ambush sites. For the ambush in the woods in the northwest near the river, bring a rope, otherwise you’ll have to make two trips!
The following day after emplacing the ambush/decoy, you may see a renegade icon on your trapped ambush site. Time to go hunting. I equip two survivors as best I can, one with a rifle and some ammunition, the other with a pistol and some ammunition, and a knife if I have one. Having experimented with several of the ambush events, some ambushes that fail with the pistol succeed with the rifle.
Super important: When equipping your party, you can use the left shift key to «dividir» the stack of ammunition.
The ambush entails sending your party to the «atrapado» ambush hex. This will bring up an event. There are about ten different events, and many entail random number generated chances of success. Where you have a clear advantage–the renegade is asleep (never failed with rifle), chasing after a deer without a rifle (never failed with rifle), or an inexperienced youth (failed about 1 en 4 with rifle)–you should press the advantage.
Success means loot, such as more ammo, weapons and clothing, failure means injury or death. I typically skip stripping the bodies, but your mileage may vary. Note that I’ve seen success or failure on events regardless of the characters involved, but character traits seem to play a role. Moving on a non-ambush renegade icon almost always results in death– I’ve never had success in the «lone hunter» evento, and often my group is instantly killed.
Super important: If you die horribly, after the event, you can just quit to menu and select «continue.» Is this save-scumming? Sí. Did I do it? También si.
Around Day 20 an expedition will encounter a dying renegade who’ll provide the location of the renegades’ base, a cave in the southeast corner of the map. This adds a quest «Into the Lion’s Den.» This is worth talking about in detail because it’s easy to get right.

For the cave, tienes dos opciones. Searching for the entrance always moves you to the next choice. Looking around for guards typically spends time and moves you to the next choice. Desde aquí, you can kill a renegade «with a weapon» (presuming silently) or throw rocks. Don’t throw rocks.
You can stumble upon sleeping renegades–I’ve killed as many as two in here–which I think is based on random chance.
The Final Countdown
En el día 23, a survivor expresses concern that the next train will come any day now. Desde aquí, success seems to be based on high morale, high health, and having enough survivors. There are often plenty of renegades left on the map and it seems hopeless, but it seems like your best bet is to hole up unless you have an easy ambush.
I’ve prepared frantically and had knives for everyone, two rifles, two pistols, two bows, bandages and power tonics ready with six renegades dead, and I’ve had three renegades dead with fewer than four survivors, and had the «bien» ending under either circumstance.
Eso es todo lo que estamos compartiendo hoy para este Help Will Come Tomorrow guía. Esta guía fue originalmente creada y escrita por aristeros. En caso de que no actualicemos esta guía, puede encontrar la última actualización siguiendo este enlace.