
- Título: Magnate
- Fecha de lanzamiento:
- Revelador:
- Editor:
La información sobre el Capitán de la Industria aún está incompleta. Por favor ayúdanos a completar los detalles del juego usando esto formulario de contacto.
This is a detailed guide about why, cuando, and how to use retaining walls. It covers how to choose where the retaining walls need to be for maximum ore access. It also covers ramp design and planning.
Introducción
The placement of retaining walls can be somewhat a mystery to new players. After participating in a few threads on the subject, someone suggested I make a guide out of the information. This is that guide. I is current as of v0.4.11
One of the problems with retaining walls is not understanding exactly how far away from the mine they will need to be placed. The idea that the walls will cascade on their way down (or up) and how much space that will realistically take is not always obvious to a new player. Planning for a ramp (especially one that has switchbacks) can be a little more difficult.
Terminología
Here is a glossary of how I will use specific terms. Con un poco de suerte, this will help avoid confusion and reduce redundant wording for clarity.
- Transportes – Both belts and pipes
- Cell – The smallest square of terrain
- Sección – The smallest terrain you can select with the mining or dumping tools. A 4 cell by 4 cell square.
- Caja – A 16 cell by 16 cell square denoted by a heavy grid line on the map. A 4 section by 4 section square.
- Suelo – Any terrain no matter what type (suciedad, roca, mineral, etc.)
- Deslizar – When the ground decides it wants to occupy a lower level and accomplishes that goal
- Slippage – The aftermath of a slide.
- Terraza – A successive layer of digging or dumping
- Rostro – A near vertical piece of terrain typically being mined at the bottom.
Why Use Retaining Walls?
En general, you should use retaining walls when it is necessary to prevent slippage in certain places on your map. Some situations immediately come to mind:
- Buildings or transports are near enough to the dig (or pile) that if there is a slide, it could cause damage to them.
- The dig is below sea level and near enough to the sea that if there is a slide, one or more cells on the coast could slide and cause a flood.
- Making sure your ramp does not slide and block access.
- You want a more aesthetically pleasing view and choose to use retaining walls to accomplish that.
Some have said that retaining walls are unnecessary and that for some materials (especially rock and ore), the retaining wall construction takes up more space than letting the materials act on their own recognizance.
Let’s look at that in detail. (Please note that this is only to demonstrate how a face of terrain will behave. There is no need to build a retaining wall when leveling a mound. Those references are merely for comparison when we are digging down later.)
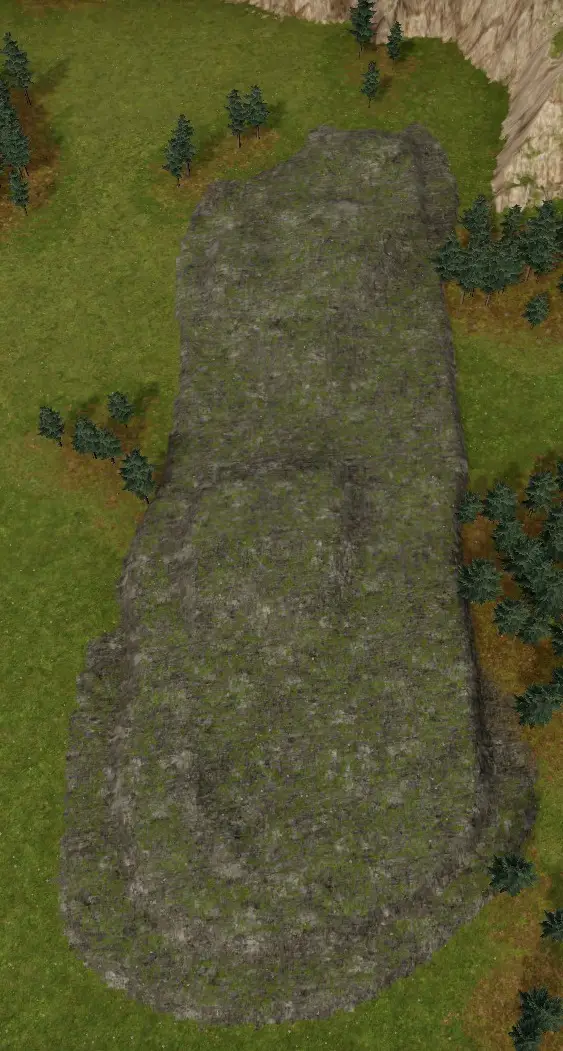
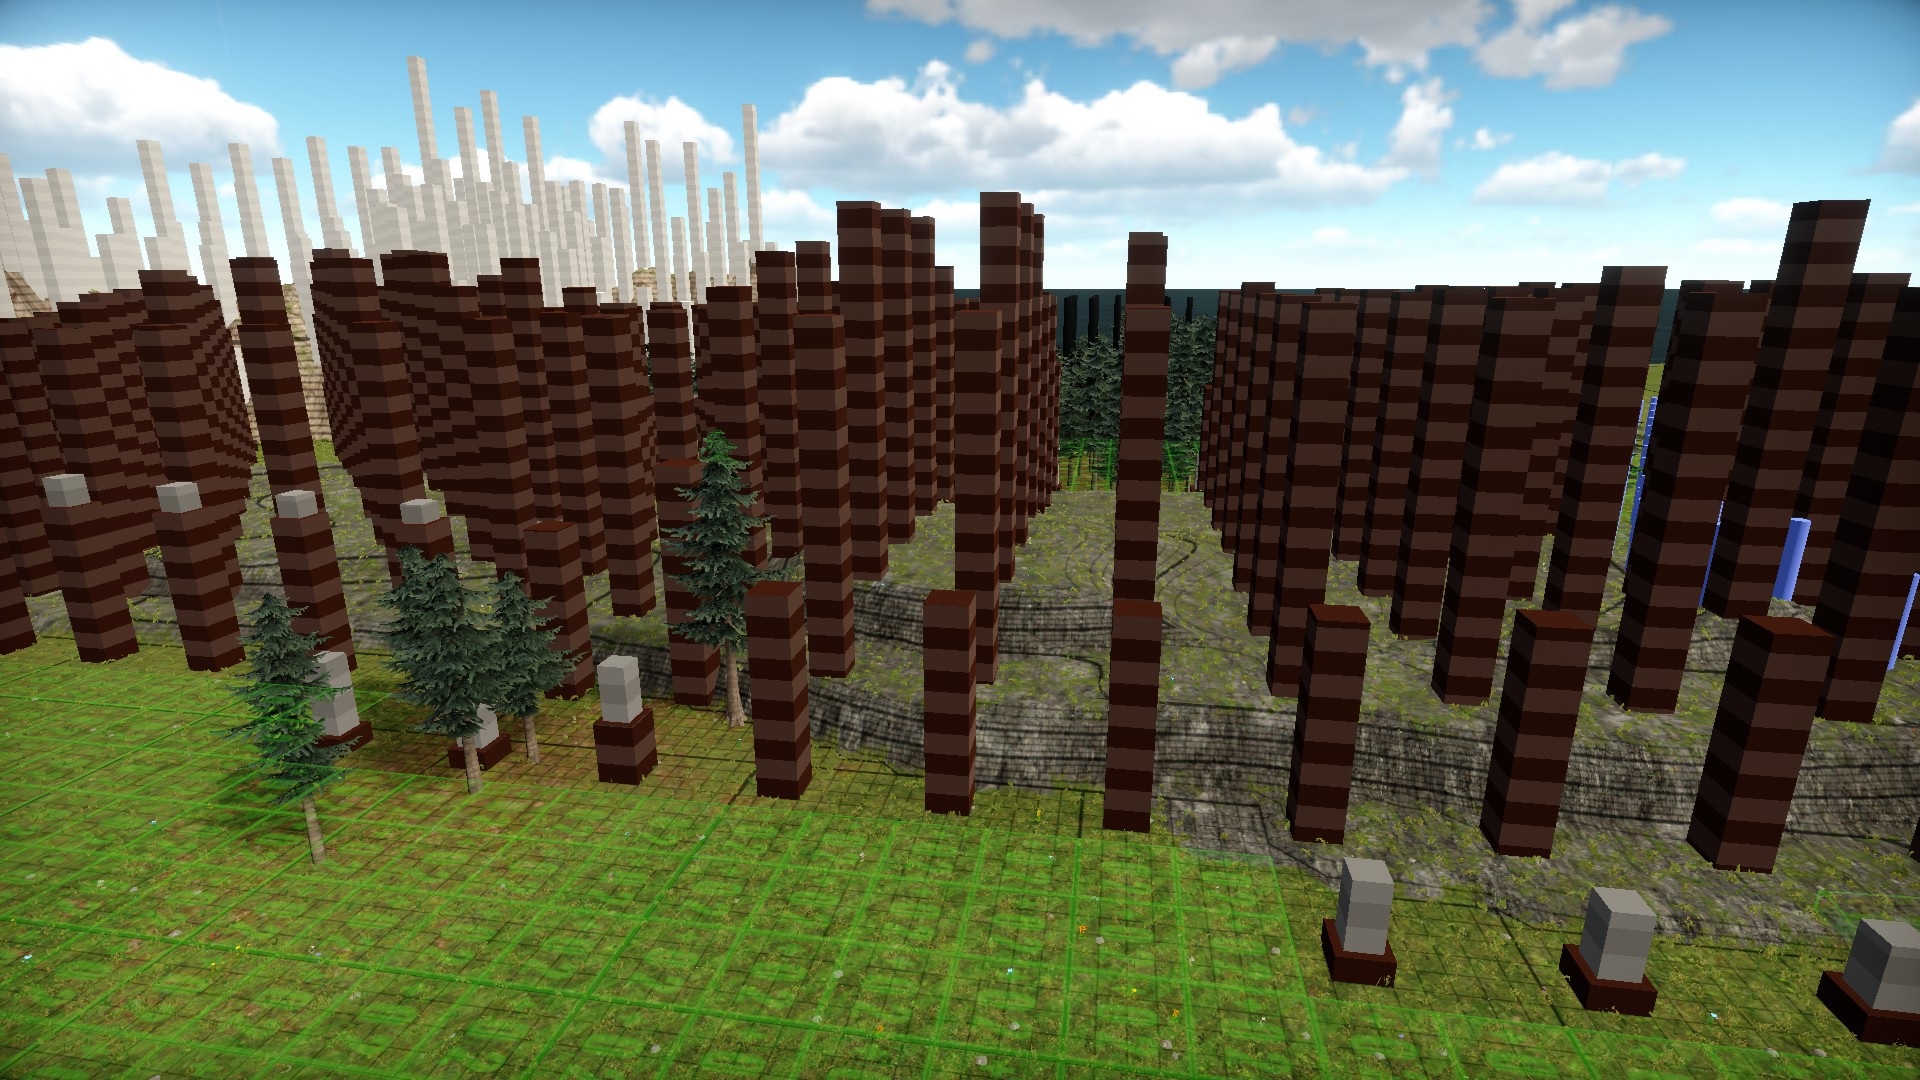
Here is an image of an iron ore mound (on The Crater) that has been mined. We can tell from the texture that the side facing the camera has been sliding as the excavators have been removing the ore.

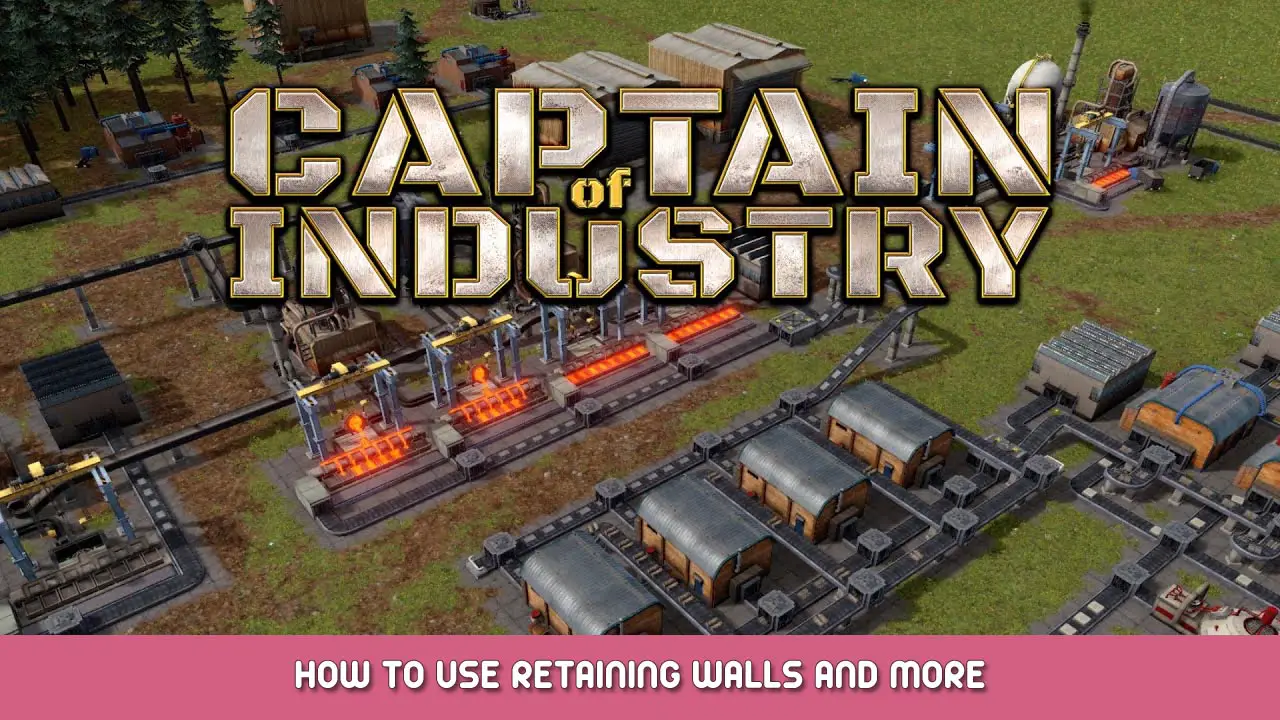
By selecting the mining or dumping tool, we can see lines that tell us how high the mound is. Each heavy line represents one level of height. (Nota: I use the dumping tool because I can easily reach it with my ‘keyboard’ hand while using my mouse.)
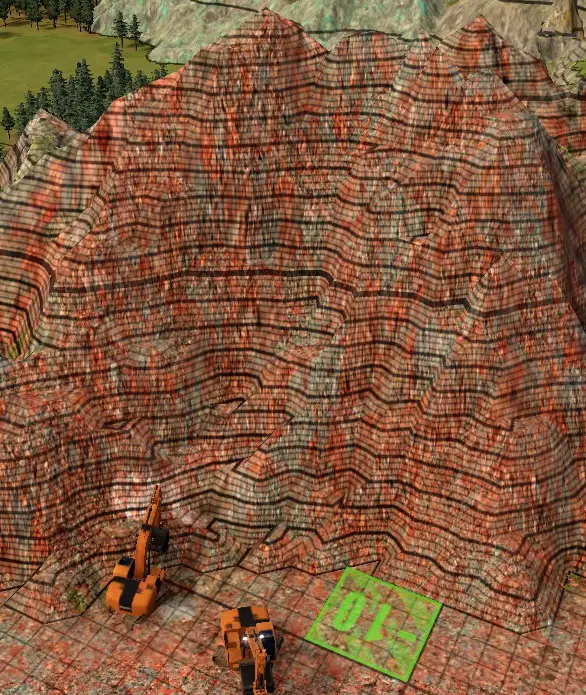
From the dumping tool, we see that the ‘ground level’ es -10. We count up 10 heavy lines to a very heavy line which would be sea level (0). Then we can count 10 more lines to the very peak (the heavy line is there but very small) for a ‘peak level’ de +10. The important things to know are:
- The peak of this mound is 20 levels above the local ground level
- There has been sliding all the way to the peak.
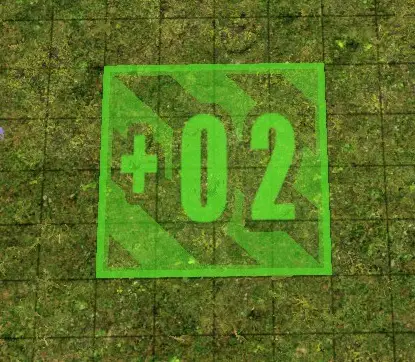
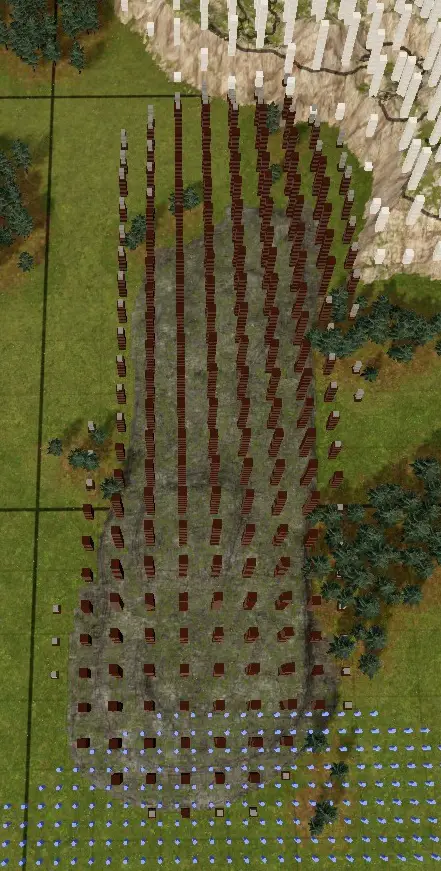
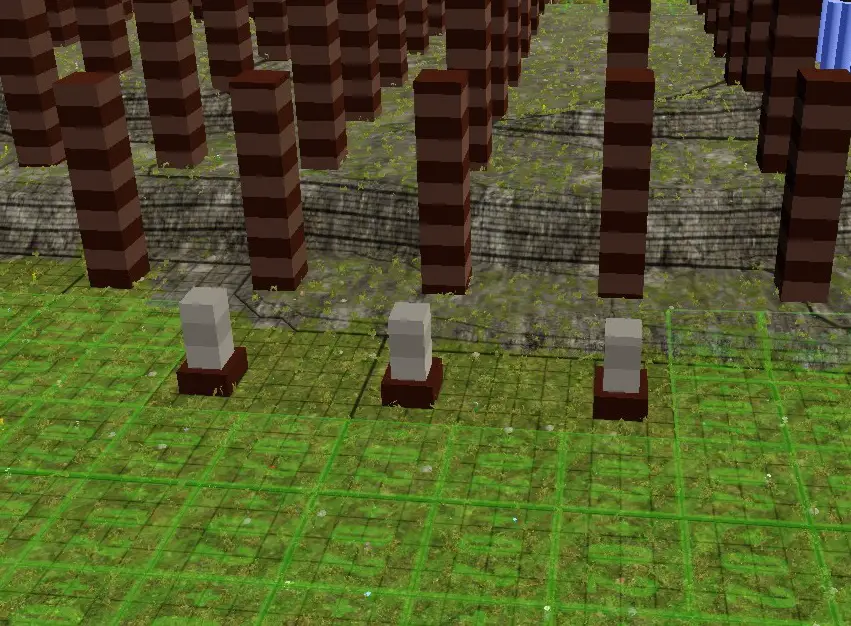
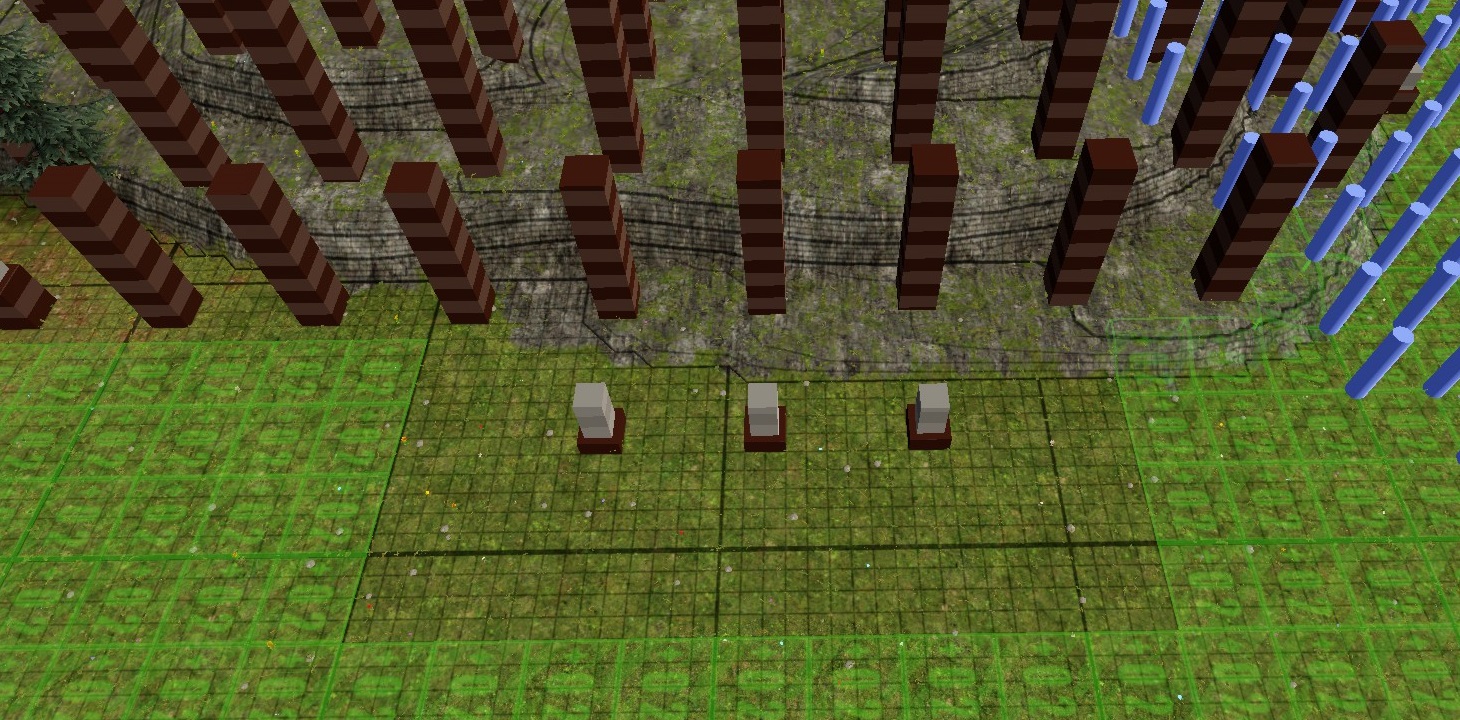
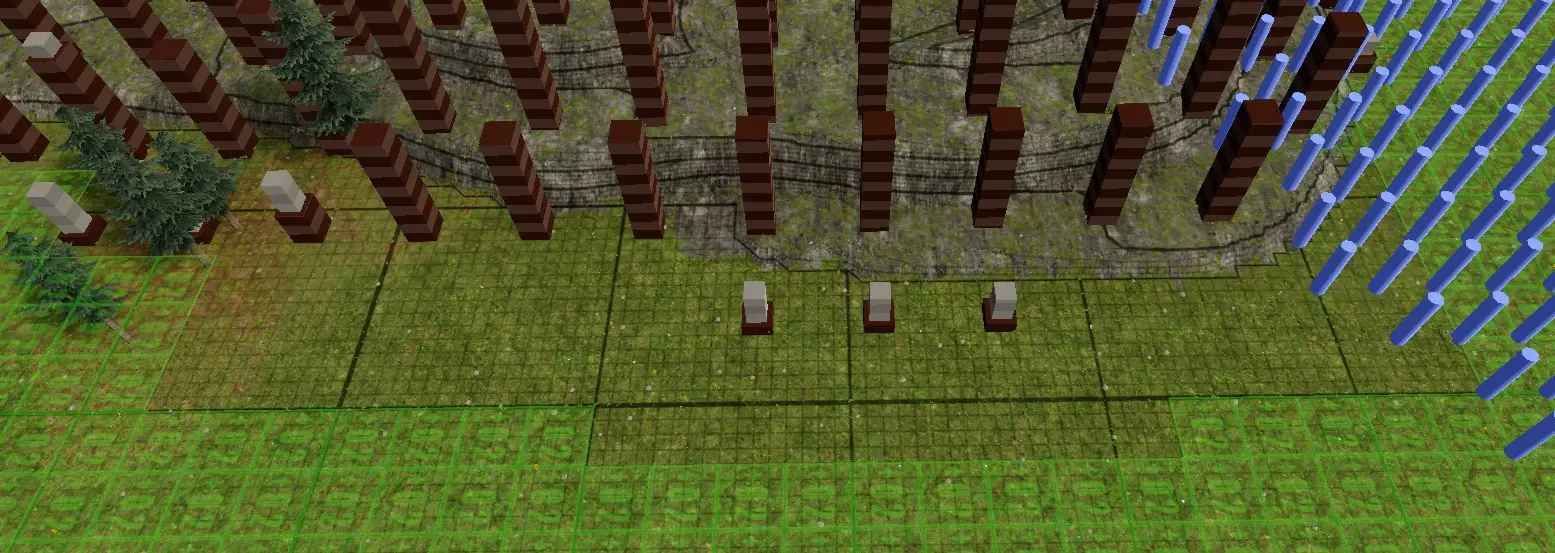
Here is a picture directly over the peak with the sections shown for measurement.
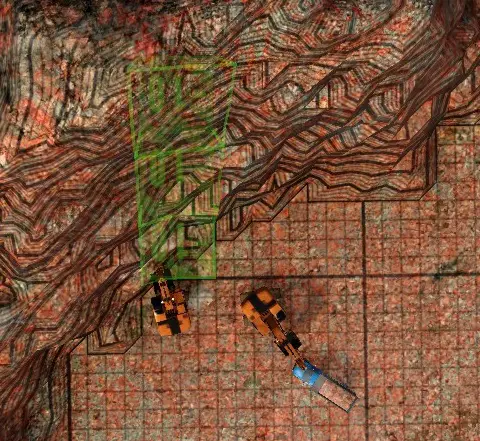
We can see that it has taken 3 sections for 20 levels of ore to have enough room to find its ‘natural’ slope. If we were to use retaining walls to accomplish that (details later) it would take us 4 sections to control that terrain. So we can conclude that (at least for iron ore) that the assertion that retaining walls take up more space than just letting things slide is correct.
Sin embargo…
En este punto, I would refer you to the Soil Test Guide by Undying29. In his guide, he demonstrated tests of dumping various materials. He demonstrates that iron ore is one of the materials that has the least slippage. It is even better than rock at holding it’s shape. Por otro lado, dirt is more than twice as bad at sliding and if you are digging (rather than clearing a mound), there will usually be some dirt at the surface of the face you are excavating.
Either you clear the dirt before digging for the desired material or you have a little more uncontrolled slippage at the top. Depending on the depth of the dirt, this could easily mean another section or two that are compromised and suddenly the retaining wall no longer takes more area than letting the material find its own slope.
In full disclosure, I must admit that I do not always use retaining walls. There are many situations where I am perfectly happy to accept some slippage of the terrain. Sin embargo, en algunos mapas, space is at a premium (Especialmente temprano) and being able to build close to the mine may be necessary.
Retaining Walls are seldom
strictlynecesario, but they do look good.
The rest of this guide will be about how to intelligently plan retaining walls when you want to get ALL of the ore. También, the information contained here will be useful as a guide to how close to the mine you can build even if you are not planning to use retaining walls.
Building The Wall
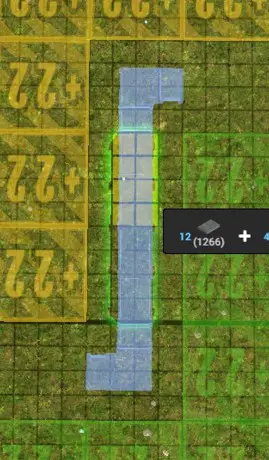
Before we step into planning, I want to cover how retaining walls need to be placed. The key is that the facing side of the wall needs to be one cell away from the edge of the section. The continuing side of the wall can go right to the edge of the section with no problems. (The images will help.)
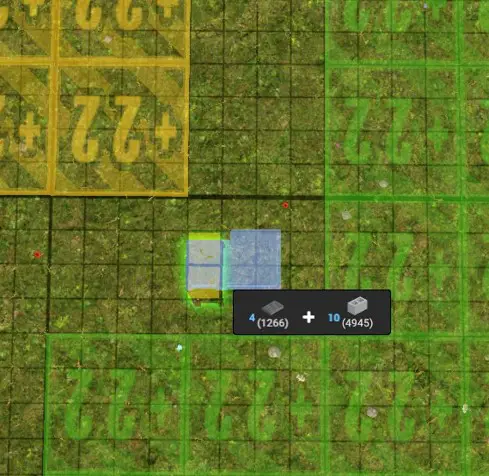
In the following image, please imagine that the yellow sections are the mine and the green sections are outside of the mine. (It is important when placing corners.) Please also ignore the upside down numbers. They really don’t matter for this. (I tried rotating the image and it looks goofy. También, I don’t want to go through making the screenshots again, so please ignore the numbers.)
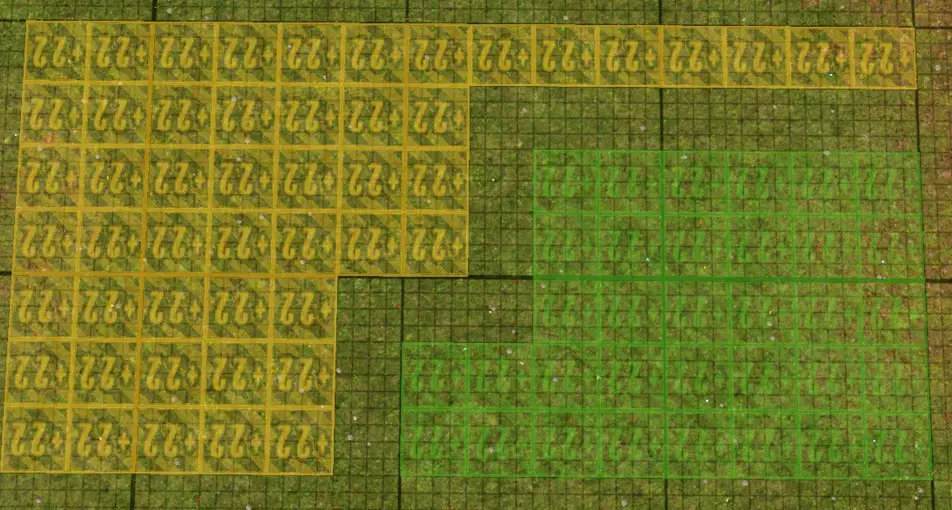
Let’s start by placing our corners. Primero, take a good look at a corner piece of retaining wall.
Notice how the corner piece has a small notch out of one of it’s corners. This needs to point to the inside of the corner being made.
The corner (a 2 cell by 2 cell item) will always go in the middle of a section (4 cell by 4 celúla).
Now lets place that corner along with two short retaining walls.
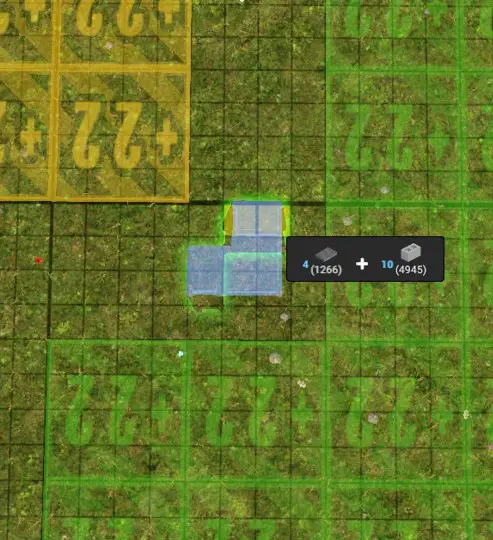
Using the copy tool, copy the entire corner construct (1 esquina, 2 short retaining walls). Rotate it and place it on another corner spot.
Now place a long retaining wall leading from one corner toward the other. I don’t think it matters which way it is oriented other than that the short side mates with the corner construct.
Now place the next long retaining wall.
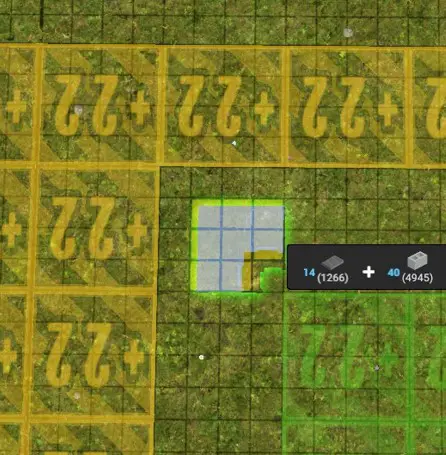
Now place the rest of the pieces for the example.
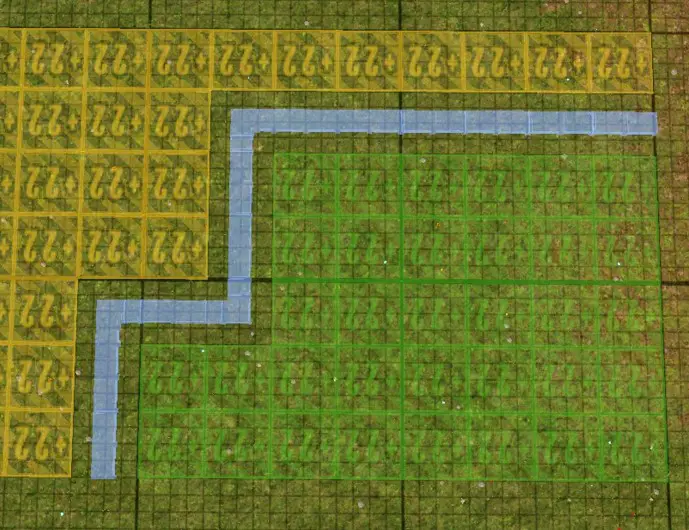
Simple as pie. (Notice I didn’t say simple as pi. That would be irrational.)
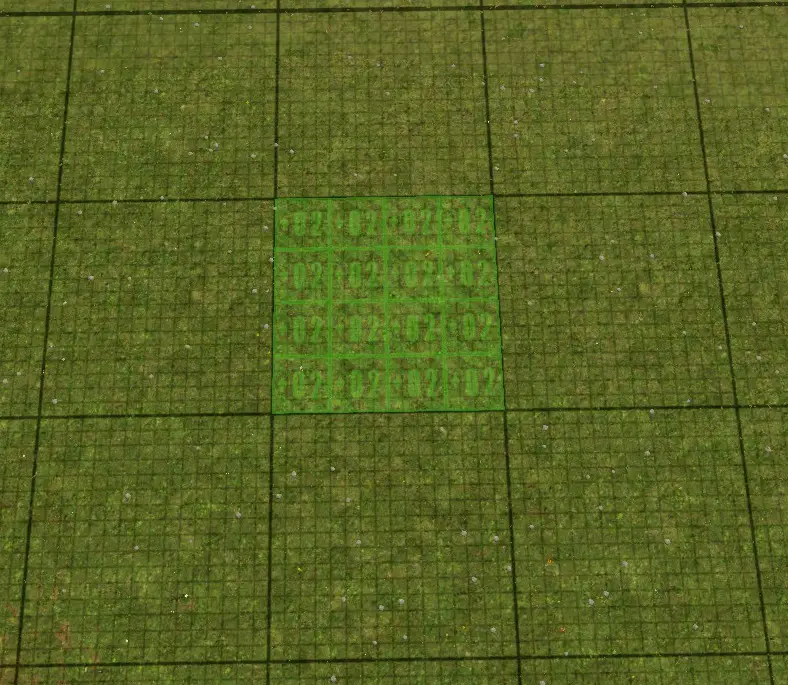
Now we have a nice, clean retaining wall that will never be molested by drunken excavator operators.
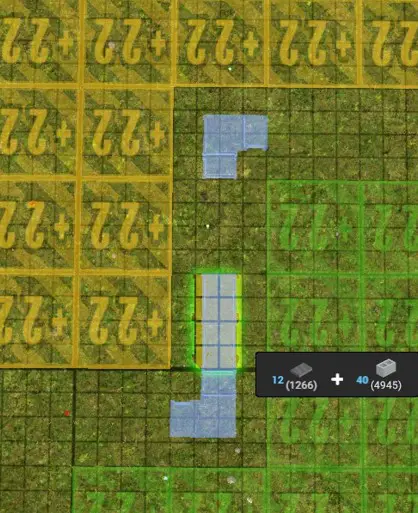
If you place things against the edge of a section and if an excavator is operating in that adjacent section, you can get some wall damage.
Now for the PLAN.
Planificación – When and How (Parte I)
The retaining walls for a mine need to be planned before anything is built nearby the mine. It is hard to place a number on ‘cercano’ until you have planned. Por lo tanto, I recommend going through this process (al menos parcialmente) Al comienzo del juego. Pause as soon as it starts and take some time to THINK about where you can build.
Our goal will be to build a series of retaining walls most of the way around a mine. These walls will have successive downward terraces every 5 levels until access of the bottom of the mine is achieved.
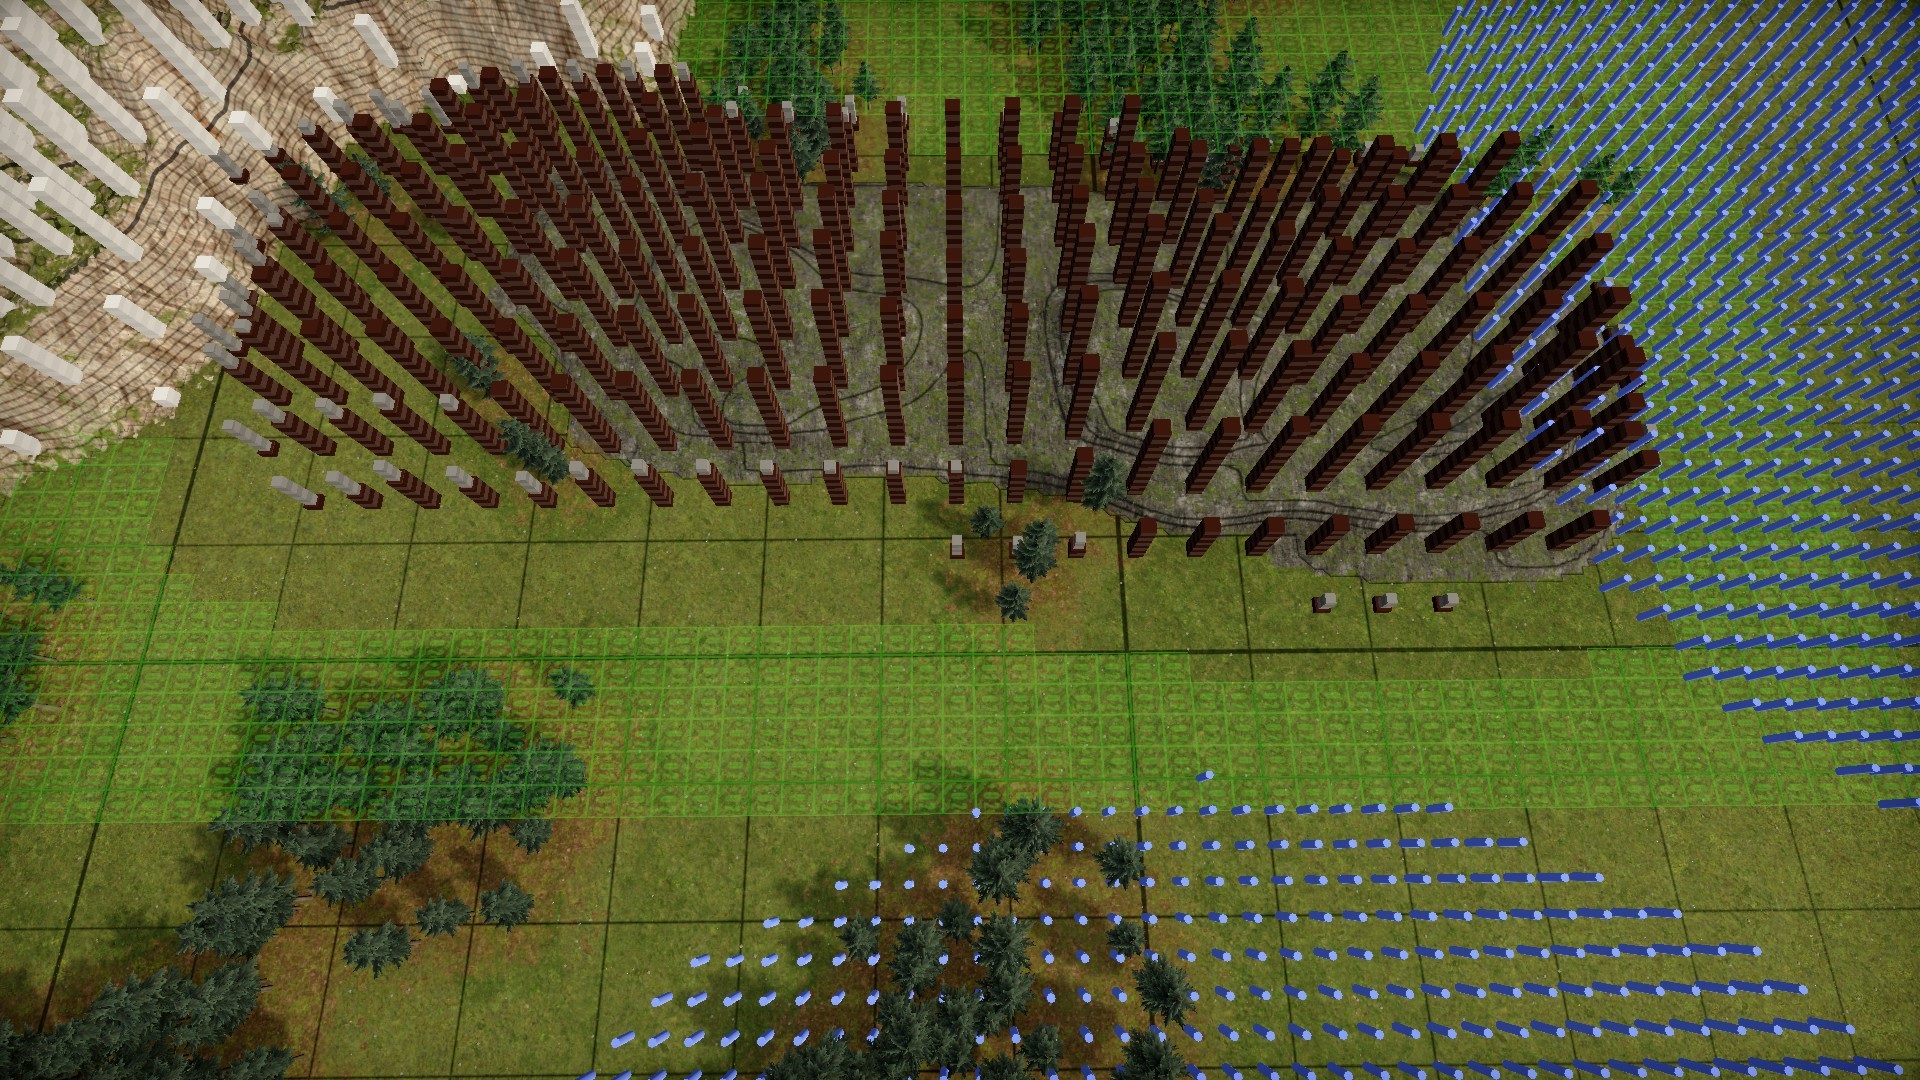
For an example, I will be using the New Haven map and the coal mine nearest to the original shipyard location. Feel free to start a new game on that map, pause it, and work along with this example.
De inmediato, we can see there is a limestone deposit behind the coal deposit and it will complicate things a bit. This will likely keep us from placing a retaining wall at the back of our coal mine.
Sin embargo, the limestone mine will likely need a retaining wall as well. There is nothing keeping us from using the same retaining walls to surround both mining areas.
We need a way to mark things and since we don’t have retaining walls researched yet, I will use the mining and dumping tools to mark terrain. The idea is that when we are done marking, our retaining wall will go just inside the marks that remain. (Confía en mí, it will make more sense after we have walked through it.)
I used to mark the sections for dumping at their own level. The developers have added a restriction to placing retaining walls such that they cannot be placed on a Section that has been marked. (There is a console command that will undo this restriction but we can get around it just fine). Instead will will mark all of the Sections surrounding the mine and remove marks during our process to show where we need to place our retaining walls.
We will start by enabling the overlay with the «l» llave.
Now we will mark sections with the dumping tool. We will mark an area that is at least six sections around the deposit. (The choice of 6 is arbitrary. We just want to be sure we have marked enough sections that when we start erasing the marks, we will still have some left to show our border. Any sections of the deposit itself (es decir. sections that have columns in them) will not need to be marked.

We have made the marked area a rectangle because with this deposit’s footprint, we may decide not to have many corners. For a deposit whose footprint is more diagonal, we might not mark the entire rectangle.
Here is a side view of the columns. For orientation, the shipyard would be forward and to the right.
These columns tell us what useful material is under the ground as well as how deep it goes. There are also columns that have grey levels on top of them representing dirt or rock that will have to be dug through to get to the useful materials (in this case coal) abajo. We are interested in the height of the ground under each column as well as the height and position of the columns themselves.
The first thing to note is that the columns are on every other section rather than on each section. What about the other sections? Each of them (inside the deposit) have coal as well. This becomes important when thinking about the sections on the outside of the deposit that are adjacent to (including corners) sections with columns in them. We do not know that they have coal in them but we do not know that they do not either. Since our goal is to get ALL of the coal, we should assume that they have coal in them as well.
Let’s start by looking at some short columns near the edge.
Each ring denotes a level of depth. These three short columns each have 4 anillos (one brown and three gray. The brown denotes coal (stuff we want) and the gray denotes either dirt or rock (stuff in our way).
A retaining wall will hold back 5 levels of material. If we need to hold back more, we will need multiple terraces of retaining walls. How many terraces will we need? One for every 5 levels of depth or part thereof. The way I do it is to count the rings and round up to the next number divisible by 5 (5, 10, 15, 20, etc.) and divide by 5.
En este caso, we only have 4 anillos. Round that up to a number divisible by 5 gives us 5. Divide by 5 gives us 1. En este caso, we only need room for one terrace of retaining wall.
Since there might be ore in the sections adjacent to the columns, we need to add 1 to our result. This means we need to reserve two sections for our retaining wall.
Now we unmark all sections that are two away from these three columns.
Now lets consider the row of columns just behind the row of three (grupo 1). The three columns directly behind the short three are 11 rings high. (Be sure and count the sliver of a dark ring at the bottom). We will come back to these in a moment.
The column just to the right of those is height 10. Notice that it is straddling a topological line showing that the ground under it is transitioning from 2 a 3. So if we decide it is height 10 en el nivel 3, it would be the same as height 9 en el nivel 2 which is our ‘ground’ nivel.
The column just to the right of that column is height 11 en el nivel 3 which equates to height 10 on our ground level.
So both of these are going to require 3 secciones (2 for height and 1 in case there is ore adjacent) of space for the retaining walls.
The three columns to the left of group 1 are all 10 high and will require the same 3 sections of space.
Let’s unmark those sections remembering to unmark diagonals as well.
Ahora, let’s go back to the ‘group 1’ columnas. Ellos son 11 rings high and therefore require 3 sections of space for height (one for ever 5 or part thereof) and one for the adjacency for a total of 4. This causes us to need to unmark 4 more sections on the diagonal.

In some extreme cases, you may need to consider columns that are further in from the edge of the deposit. en mi experiencia, unless a column is more than 10 rings higher than it’s neighbors, it can be ignored. The rationale for this is that 10 rings is 2 levels of terracing but the column is two sections away from the columns adjacent to it.
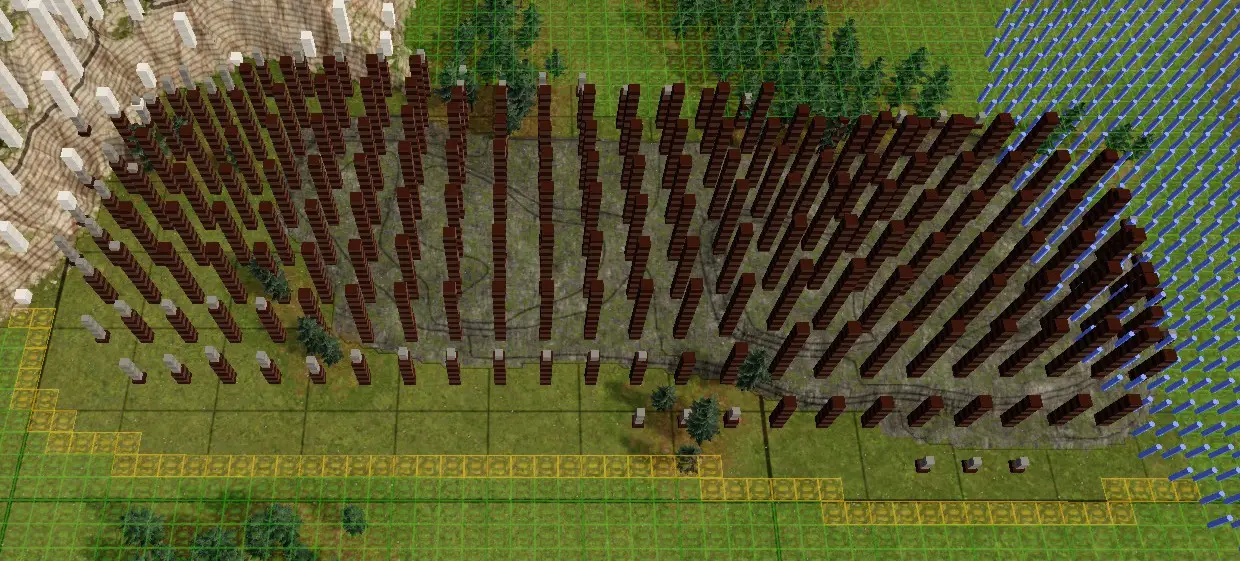
Now we should go ahead and unmark what is necessary for the rest of this side of the mine.
If you are following along in the game, pay special attention to the left corner. The column tucked in that corner is tall enough to influence the shape of the markings.
Ahora, for clarity, I will mark the actual first ring of the retaining wall on this side with the mining tool.
Planificación : When And How (Parte II)
Now we need to consider a couple of things.
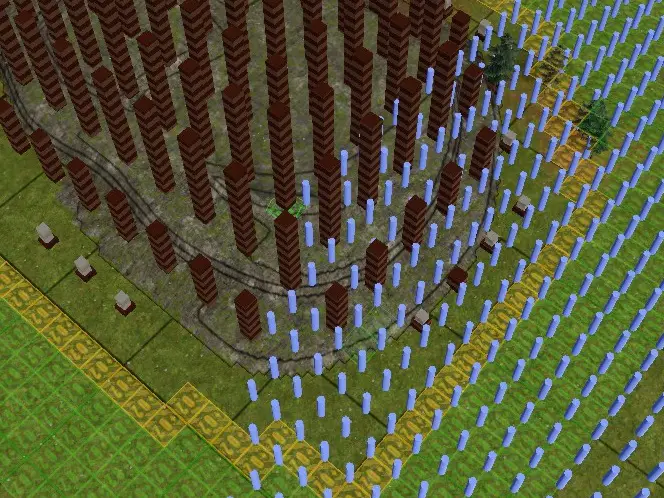
Primero, our interaction with the limestone deposit to the left. How do we want to interact with it? I suggest doing the same marking procedure and instead of curving in toward the coal, we go straight until we turn toward the bottom of the image to encompass the limestone. I’m not going to do that here but it is the same process as we have been working on.
Segundo, on the right we don’t know exactly how far we want to go with this. So lets give the same treatment to the left side of this deposit. (The point of view of the images will change.)

Now we are going to need to be able to access the mine, so we won’t be building all of that retaining wall. The most likely entrance would be at this end. Before we decide for sure, we need to talk about ramps.
Ramps : Accessing The Mine
Ramps are quite different from retaining walls. The most important thing to remember is the difference in slope.
A set of retaining wall terraces can change 5 levels for every section.
A ramp can only change 1 level for every section.
Sí, you can use switchbacks (where the ramp turns 180 grados) to make it seem smaller but effectively the length of the ramp must be 1 section for every level to the bottom of the mine.
Entonces, how deep does it go? En teoría, you can examine columns by counting the rings and deducting the height of the ground the column rests on.
In my notes, I have an entry that says that calculation was wrong but admittedly, I was possibly suffering from sleep deprivation (Great Job COI) when I wrote it. In retrospect, I think when I wrote that I forgot that ‘ground level’ era +2 and I overlooked that in the heat of the moment.
De todos modos, we will go with the theory. Also with the assumption that we will just build a wide ramp from this end and mine everything as we go.
Let’s examine the tallest column near the front of the mine.
That was for orientation. Now we zoom in.

This column has 21 anillos. It appears (from the dumping tool) to be sitting on level 6. It is not. From the prior image, you can count the topographical lines and conclude that it is on level 7. I think the dumping tool shows the lowest elevation. Switching to the mining tool gives the correct answer of 7. (Como se mencionó antes, the dumping tool is my ‘go to’ for examining things. I will have to mend my ways.)
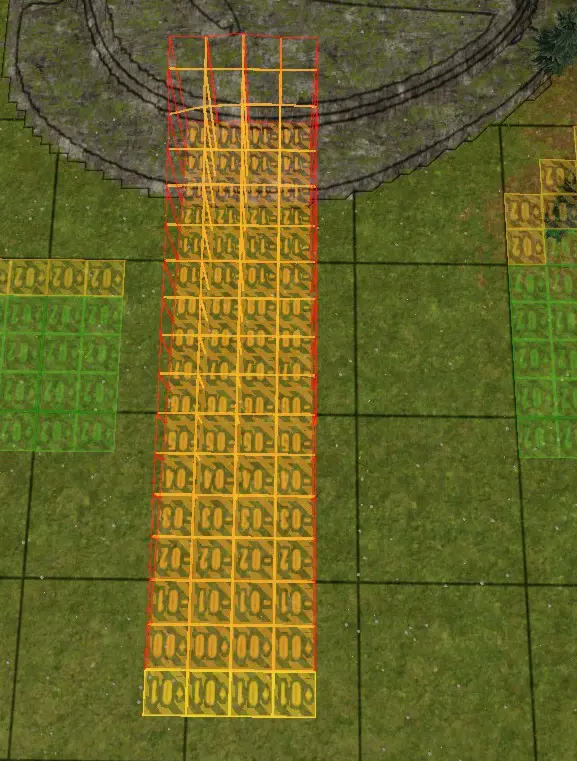
Entonces, 21 anillos – 7 ground height means that there will be ore at level -14. Nivel -14 es 16 below our local ‘ground’ level of +2. So we need a ramp that is 16 sections long to reach all of the ore under this column.
Let me draw that for you. Bien, let me pause.
After drawing a ramp (with the mining tool) I realized the the next row closer to the opening is even more of a problem. It turns out that it also has coal at level -14.
También, I am going to draw the ramp 4 sections wide. Later we will discuss how wide it really needs to be.
Now let me draw that for you. (Remember that when drawing a ramp, the number shown is the lower end of the section. We need a level section at level -14 under that column.)
Here is a zoomed out picture for perspective.
That is quite a lot of real estate used that is not part of the deposit. Recordar, our goal was to get ALL of the ore. Además, it will need it’s own retaining walls.
We have options. The other obvious possibilities are building the ramp along either side of the coal deposit. It doesn’t really change how much space we are using, just which space is being used.
I am going to demonstrate a plan that will bring a ramp down the left side of the coal mine. Please be advised that I haven’t checked each and every column to be sure of the final depth of the mine. Experience has shown that this deposit should be cleaned up at a depth of -17 o -18.
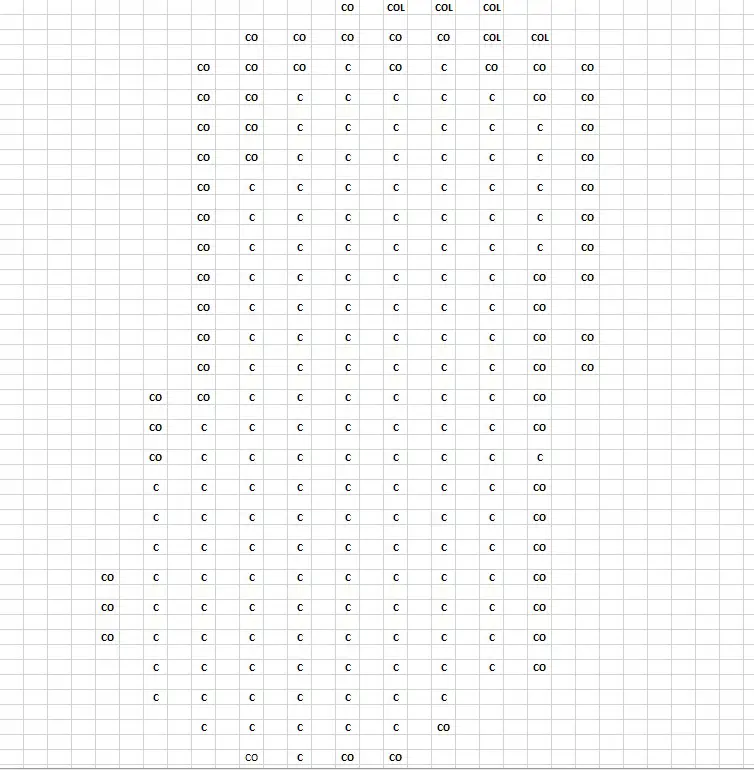
Primero, here is a diagram of the contents of the deposit. This tells what color the columns represent. C is for coal, O is for other (rock and dirt), and L is for the few sections that have limestone. Remember that the columns are only in every other section.
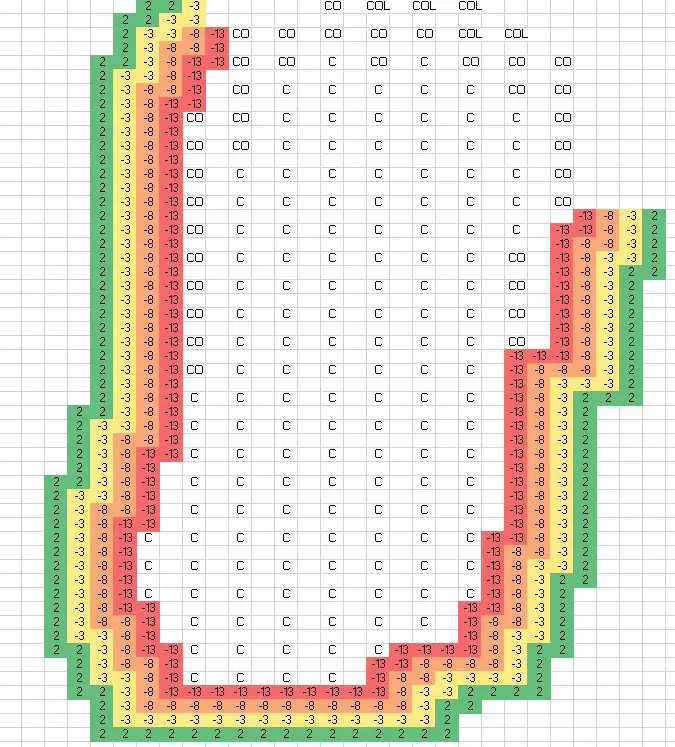
Segundo, here is the mine with most of the retaining walls placed. The number denotes the level of the top of the retaining wall.
Tercero, here is a ramp that will take us from +2 a -17 with retaining walls outlined. Notice how the ramp is very wide at the mouth and narrower at the exit because of the positions of the retaining walls.
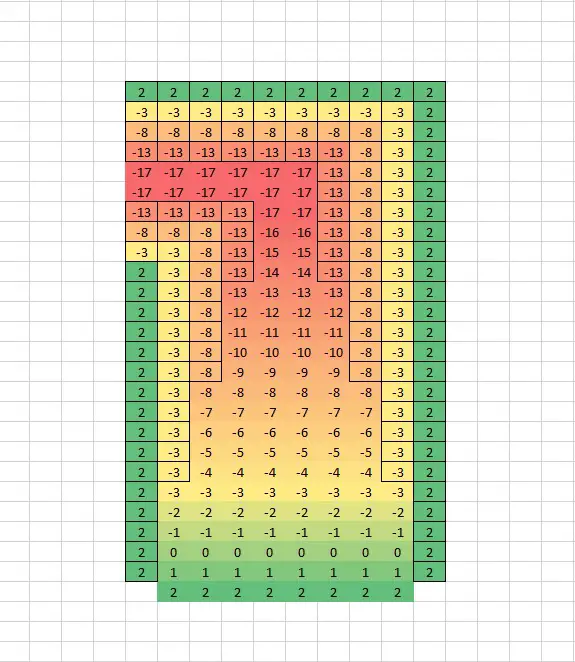
Kudos if you are now saying «Samurai! This will fail at the end because the -3, -8, y -13 walls in the upper left have no support on the left!».
You are right.
Pero…
We are going to merge this into our plan for the retaining walls around the mine to provide that support! It will only take a few minor adjustments in the retaining wall at the top of the ramp diagram.
I know there is an oil deposit near where I have placed the ramp but surprisingly, they don’t overlap.
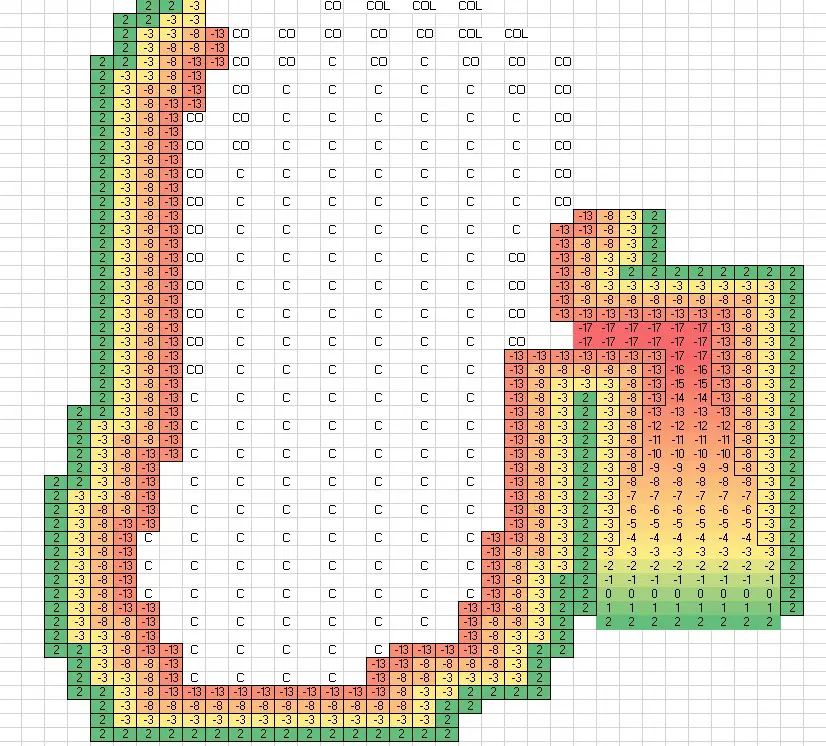
Now we have a plan that gives us access to ALL of the coal, and lets us build right up to the sections with the outer retaining walls. It can also serve double duty as the ramp to the Limestone mine adjacent to the coal mine.
Now to build it.
Ramps : Making It Happen
Here is (in broad strokes) the order in which things should be done. There will be some overlap in steps. Es decir, you will begin the next step (o dos) before you complete the step you are working on. This MUST be the case so there are no interruptions in the flow of coal.
- Build your mining tower near the mouth of the ramp but not where there will be any retaining walls.
- Start by mining the surface coal. Set your mining depth to the local ground level (+2) and start mining.
- Build your storage infrastructure near the mouth of the ramp. Build extra storage units for the coal (maybe as many as 6) so you can build up an excess and divert your excavators to mining dirt and rock occasionally.
- Place the retaining walls for level +2. You don’t have to build all of them before advancing to the next step, but NEVER mine next to a retaining wall until it has been completed.
- As your excess coal allows, start mining the ramp down to level -3 and the entire mine area down to level 3. (This includes the sections where the lower retaining walls will go.) Si todo va bien, you will have dug out a two section wide berth at level -3 all the way around the inside of the level +2 retaining wall before you have excavated all of the coal down to level -3. Don’t forget to switch your mining back to coal and rebuild your excess before you run out!These changes between are best done by altering the mining area of the control tower and focusing on either the coal available or a strip of terrain just inside the retaining wall.
- Rinse and repeat steps 4 y 5 for levels -3, -8, y -13
- Enjoy the beverage of your choice in celebration that you got ALL the coal and never had a landslide. (You didn’t have a landslide did you? Desafortunadamente, normalmente lo hago… only water for me 🙁
If something goes wrong, you can always back fill with rock (dirt tends to slide too much) and dig again.
It is VERY important that you do NOT give in to the temptation to do one side all the way and then get the other side. When I have tried that, invariably I get into a situation where I need to dig somewhere that I can’t get to without digging it too deep. Steady wins the course.
Insurrección: Arena
I wanted to pass on the following.
Don’t expect retaining walls in sand to behave entirely like good citizens. The sand is insurgent and causes uprisings.
En realidad.
I have built beautiful retaining walls to hold back sand and dug the terrain out (as normal). Más tarde (probably after a certain amount of rain), I have come back and found a small piece of retaining wall standing one level higher than it was placed.
Sí, an uprising! Caused (Creo) by the insurgence of sand!
It may be a bug, but I think it is a cute ‘feature’ that is working as designed.
has sido advertido! (JAJAJA)
A Personal Note
I hope you have found this guide helpful and useful. If you have questions, please ask in the comments. I am also open to suggestions and feedback.
I have written this guide to ‘pass it on’. A lo largo de los años, many fine gamers have been there for me with guides like this as well as youtube videos. As almost no game developers write manuals anymore, these people fill a void that helps attract more players (thus more revenue, thus more content, and better patches) to these intricate games we love.
Thank you to those who are too many to be named. Your efforts have improved my enjoyment on so many games! Gracias!
One last thing…
Desafortunadamente, the last guide I wrote ended up on a website that was literally covered with ads. No one asked my permission, yet it was there. I was actually accused of plagiarism but thankfully they credited me and the accusation was retracted. Sin embargo, in the vein of «Once Bitten, Twice Shy» I feel obligated to say the following:
This guide is being posted on the Steam Guides for Captain Of Industry and MAY NOT be posted anywhere else without the express written consent of myself or the explicit approval of the good people at Valve Corporation.
Eso es todo lo que estamos compartiendo hoy para este Magnate guía. Esta guía fue originalmente creada y escrita por SamuraiProgrammer. En caso de que no actualicemos esta guía, puede encontrar la última actualización siguiendo este enlace.