- Title: Duck Game
- Release Date:
- Developer:
- Publisher:
Information about Duck Game is still incomplete. Please help us fill the details of the game using this contact form.
Editing a save file can seem a bit tricky, especially when you want to change the furniture you own and where they’re placed in your room. This guide will explain how to unlock furniture, adjust the quantity of each item, and position them in your room using coordinates. You’ll do all of this manually, outside of the game.
It’s important to note that this guide is specifically for Windows users. If you use a different operating system, you’ll need to adjust the file locations accordingly.
Save File Location
It’s important to understand that Duck Game has two save file locations. The more commonly known one is inside your Documents folder, specifically at:
C:\Users<Username>\Documents\DuckGame\<Your SteamID>
From these files, you can make changes to in-game general settings and mod settings. However, if you try to modify your profiles from this location, it won’t have any effect. It seems these files act more like local copies and don’t impact your actual game.
The main save file location where you can modify your profiles is located at
C:\Program Files (x86)\Steam\userdata\<Your SteamID>\312530\remote
You might see multiple folders with similar names but different starting numbers. The only folder that’s important is “nq500000_Profiles.”
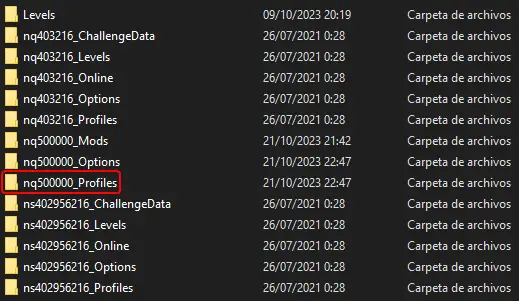
Inside this folder, you’ll find “.pro” files, which contain your main profile (named after your SteamID), any additional profiles you’ve created, and some configuration files for extra players.
Save File Contents
Inside a save file, you’ll come across various parameters that you can change. These range from things you see in the game’s library, like the number of kills, wins, trickshots, and deaths, to the total experience, money (defined as <LMB>Amount</LMB>), fans, your chosen color and flag, your mood, your name, your ID, and even your challenge stats. However, this guide will focus on two specific parameters:
- “<Fowner>“: This parameter pertains to each of the furniture items you own and the quantity you have.
- “<FurniPositions>“: This parameter deals with the placement of every piece of furniture in your room and their respective coordinates.
Please note that after making changes to your save file, you’ll need to restart your game for those changes to take effect. The game will undo any modifications if you don’t do this.
A word of caution: Be very careful when editing your save file from this point onward. If you make a typo, it could delete part of the file. This is especially true when modifying “<Fowner>” and “<FurniPositions>.” Read with caution, understand their limitations, and make a backup just in case.
Some suggestions:
- Using a text editor that shows real-time changes can be helpful, so you can see exactly what you’re modifying. In my case, I use “Sublime Text” with the game in windowed mode.
- It’s recommended to do this in offline mode to avoid a flood of cloud synchronization messages. If you’re confident in your editing skills, you can prevent accidental uploads of the incorrect save file. Always take the time to read and understand the changes you’re making.
Adding Items
How <Fowner> works:
- Each piece of furniture is represented by two critical numbers: the ID and the quantity you own.
- These numbers are surrounded by several zeroes, which serve as separators and make it easier to identify each item.
- The first number is the furniture’s ID.
- The second number, located between three zeroes on each side, indicates the quantity you possess.
The format is as follows:
<Fowner><ID>|0|0|0|<X>|0|0|0|
- <ID>: This is the furniture ID.
- <X>: It represents the quantity of that specific furniture. The quantity can range from 1 to 255. If you don’t own any of that furniture, it will be displayed as 0, indicating that you don’t own it.
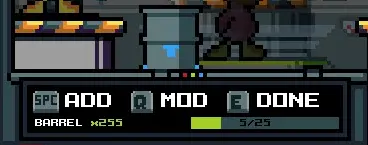
Here’s an example for one piece of furniture in this format:
<Fowner>52|0|0|0|25|0|0|0|
Furniture ID 52 (the barrel) has a quantity of 25. The zeroes in between serve as separators to distinguish between different furniture items.
Here’s an example with multiple pieces of furniture:
<Fowner>52|0|0|0|25|0|0|0|91|0|0|0|29|0|0|0|77|0|0|0|19|0|0|0|
In this string of numbers, there are three different pieces of furniture, and it’s interpreted as follows:
- “52|0|0|0|25|0|0|0|”
- Barrel (ID: 52) with a quantity of 25.
- “91|0|0|0|29|0|0|0|”
- Kettle (ID: 91) with a quantity of 29.
- “77|0|0|0|19|0|0|0|”
- Lamp (ID: 77) with a quantity of 19.
The zeroes act as separators to distinguish and organize the information for each piece of furniture.
This is the most furniture you can have, and it works with the 8-bit rule.
Some items can only be obtained once in the game, like room backgrounds, fonts, and certain toys in the Memento Collection. You can’t add more of these yourself.
Save files contain all your furniture in a single line without extra spaces. It can be tough to figure out what goes where. I personally don’t have more than 30 of any furniture, so anything over that is an ID. If it’s under 30, I check for nearby numbers and compare.
When you’re editing, be careful about these things:
- Don’t add a furniture you already have. For instance, if you have 9 of a certain furniture, don’t add more of it. The game will remove any duplicates.
- Don’t add, delete, or change any 0s outside the ID and the amount. For example, “32|0|00|0|0|2|0|0|” is incorrect; it should be “32|0|0|0|2|0|0|0|”. If you mess with this, the game will delete ALL your furniture.
- Don’t add, delete, or change any vertical bars (|). For example, “82||0|0|0|5|0|0|0” is wrong; it should be “82|0|0|0|5|0|0|0|”. If you change this, the game will delete ALL your furniture.
- Don’t go over the maximum amount of a furniture, which is above 255 or the 8-bit limit. If you do, the game will delete ALL your furniture.
- Don’t use negative numbers or any characters that aren’t numbers. If you do, the game will delete ALL your furniture.
- Don’t add any non-existent ID. While the game might not care if you use a random ID, it’s best not to add non-existent items as it will be useless or might cause errors. If you discover any hidden furniture by doing this, let me know.
Remember to stick to the format to avoid these consequences, as well as any unforeseen ones.
For additional notes:
If the game deletes all your furniture, the ones already placed won’t disappear. However, if you try to pick up any furniture, it will vanish, turning into “ghost furniture” because the game doesn’t keep track of additions or subtractions when you place or remove them.
Item Placing Basics
How <FurniPositions> works:
Each placed furniture, whether it’s a toy, a font, or a room background, has three crucial numbers associated with it: the ID, the X (horizontal) coordinate, and the Y (vertical) coordinate. Between these numbers, there are two zeroes that act as separators to help you identify each item.
The first number represents the X coordinate of the furniture, the second is the Y coordinate, and the third is the ID, located between two zeros.
The format is as follows:
<FurniPositions><X>|<Y>|0|<ID>|0|
- <X>: This represents the horizontal axis coordinate, where higher values go from left to right (ranging from 0 to 160).
- <Y>: This stands for the vertical axis coordinate, where higher values go from top to bottom (ranging from 0 to 79).
- <ID>: This is the furniture’s ID.
Two crucial points to remember:
- The game reads a furniture’s coordinates from its center.
- The order in which you place furniture matters. What you place first will appear behind what you place afterward. The same order applies when you place furniture from your save file. You can’t overlap two items in the same “cape.” The order of placement goes from left to right, with the first-written item appearing first.
You might also be aware that there are three types of toys: floor, ceiling, and wall toys. When placing toys with coordinates, the type doesn’t matter. You can place any type of toy on any coordinate. Just be mindful of the inner boundaries of your room if you don’t want things to clip through walls.
Here’s an example with one piece of furniture:
<FurniPositions>60|62|0|29|0|
The zeroes serve as separators between these values, helping you identify each piece of furniture.
- 60 is the X coordinate
- 62 is the Y coordinate
- 29 is the ID for the fancy table
In this example with multiple pieces of furniture:
<FurniPositions>40|26|0|55|0|89|26|0|55|0|40|55|0|55|0|
In this string of numbers, you have three pieces of furniture, all Donut Life with an ID of 52, placed in different locations, and it’s interpreted as follows:
- “40|26|0|55|”: The first furniture
- X = 40, Y = 26
- “89|26|0|55|”: The second furniture
- X = 89, Y = 26
- “40|55|0|55|”: The third furniture
- X = 40, Y = 55

Room backgrounds and fonts also have coordinates when placed, and their coordinates usually match with the last position of your cursor when you’re placing them. The coordinates don’t seem to affect how these items behave.
Similar to owned furniture, all placed items are within the same line in the file, regardless of their types. In this case, it’s easier to identify what corresponds to what because the only thing separated by zeroes is the furniture ID, and its coordinates are always together, with X appearing before Y.
Here are some cautions to keep in mind when editing, which are not as destructive as when editing owned furniture:
- Don’t place toys with coordinates outside the limits. For example, “300|200|0|55|0|” is incorrect. The part of the line with the unknown parameters will be automatically deleted.
- Don’t add, delete, or modify any 0s outside the ID and the amount. For example, “40|26|55|00|” is wrong, while “40|26|0|55|0|” is correct. The game will either correct the furniture parameters or delete it.
- Don’t add, delete, or modify any vertical bars (|). For instance, “20|56||0|55|0” is wrong, but “20|56|0|55|0|” is correct. The game will either correct the furniture parameters or delete it.
- Don’t use negative numbers or any characters that aren’t numbers. If you do, the game will remove ALL placed furniture.
- Don’t try adding any non-existent ID. The part of the line with the unknown parameters will be automatically deleted.
It’s essential to maintain the format to avoid these consequences or any unforeseen ones.
Placing items – Funny stuff
When it comes to placing items, there’s a category known as “Playing out of bounds.” You can get a bit quirky with coordinates, as their maximum values can extend beyond your room. They won’t go into someone else’s room, but they can reach the farthest limits of your screen and even inside the middle portal.
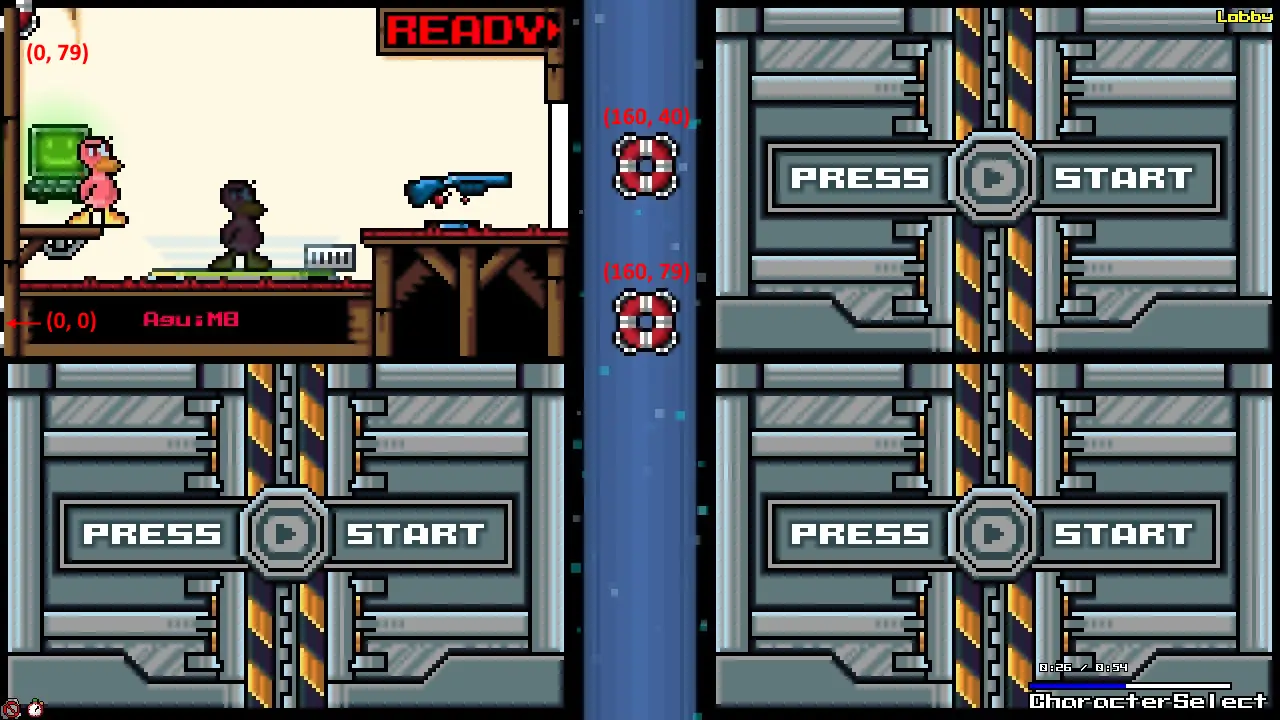
The image’s arrangement corresponds to this line:
<FurniPositions>0|79|0|55|0|0|0|0|55|0|160|40|0|55|0|160|79|0|55|0|51|23|0|105|0|</FurniPositions>
In the last item, “51|23|0|105|0|” is the room background (Normal Room), and it also has coordinates, similar to toys. The same would apply if it were a font.
Regarding the “Toy ‘limit,’ ghost, and negative furniture,” the 25 toy limit can be frustrating for those who enjoy decorating their room. However, now that you know how to edit positions in the save file, this limit no longer matters, as you can place as many as you want, even exceeding the limit.
This is also a visual demonstration that you can place barrels in the air.
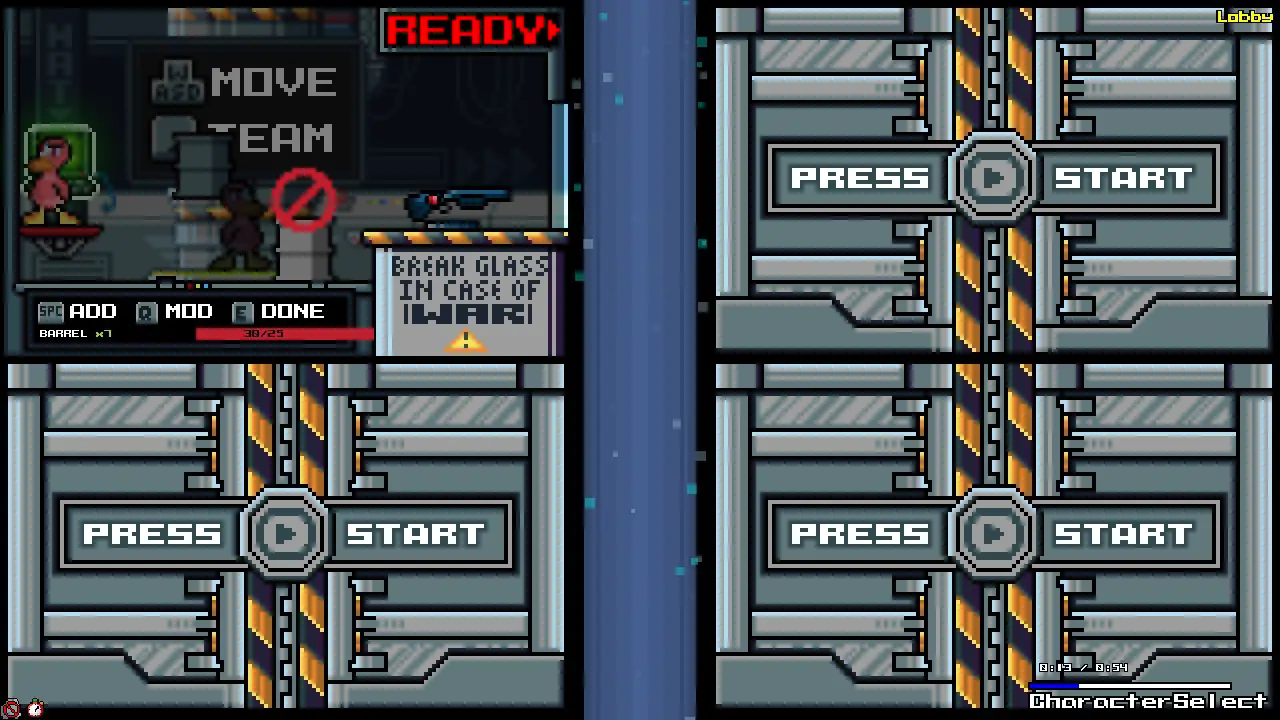
Placing toys above the limit might seem innocent at first. As I mentioned earlier, you can have placed furniture that you don’t own, which usually occurs when the game deletes all your owned furniture due to a mistake. Similarly, you can directly write them into your room to avoid losing all your stuff. As mentioned before, they will “fade into existence” when you try to grab them.
However, things get weird when you place an item more times than the amount you own of it. The furniture will still appear unlocked when editing, but it will show as if you have a negative amount left to place.
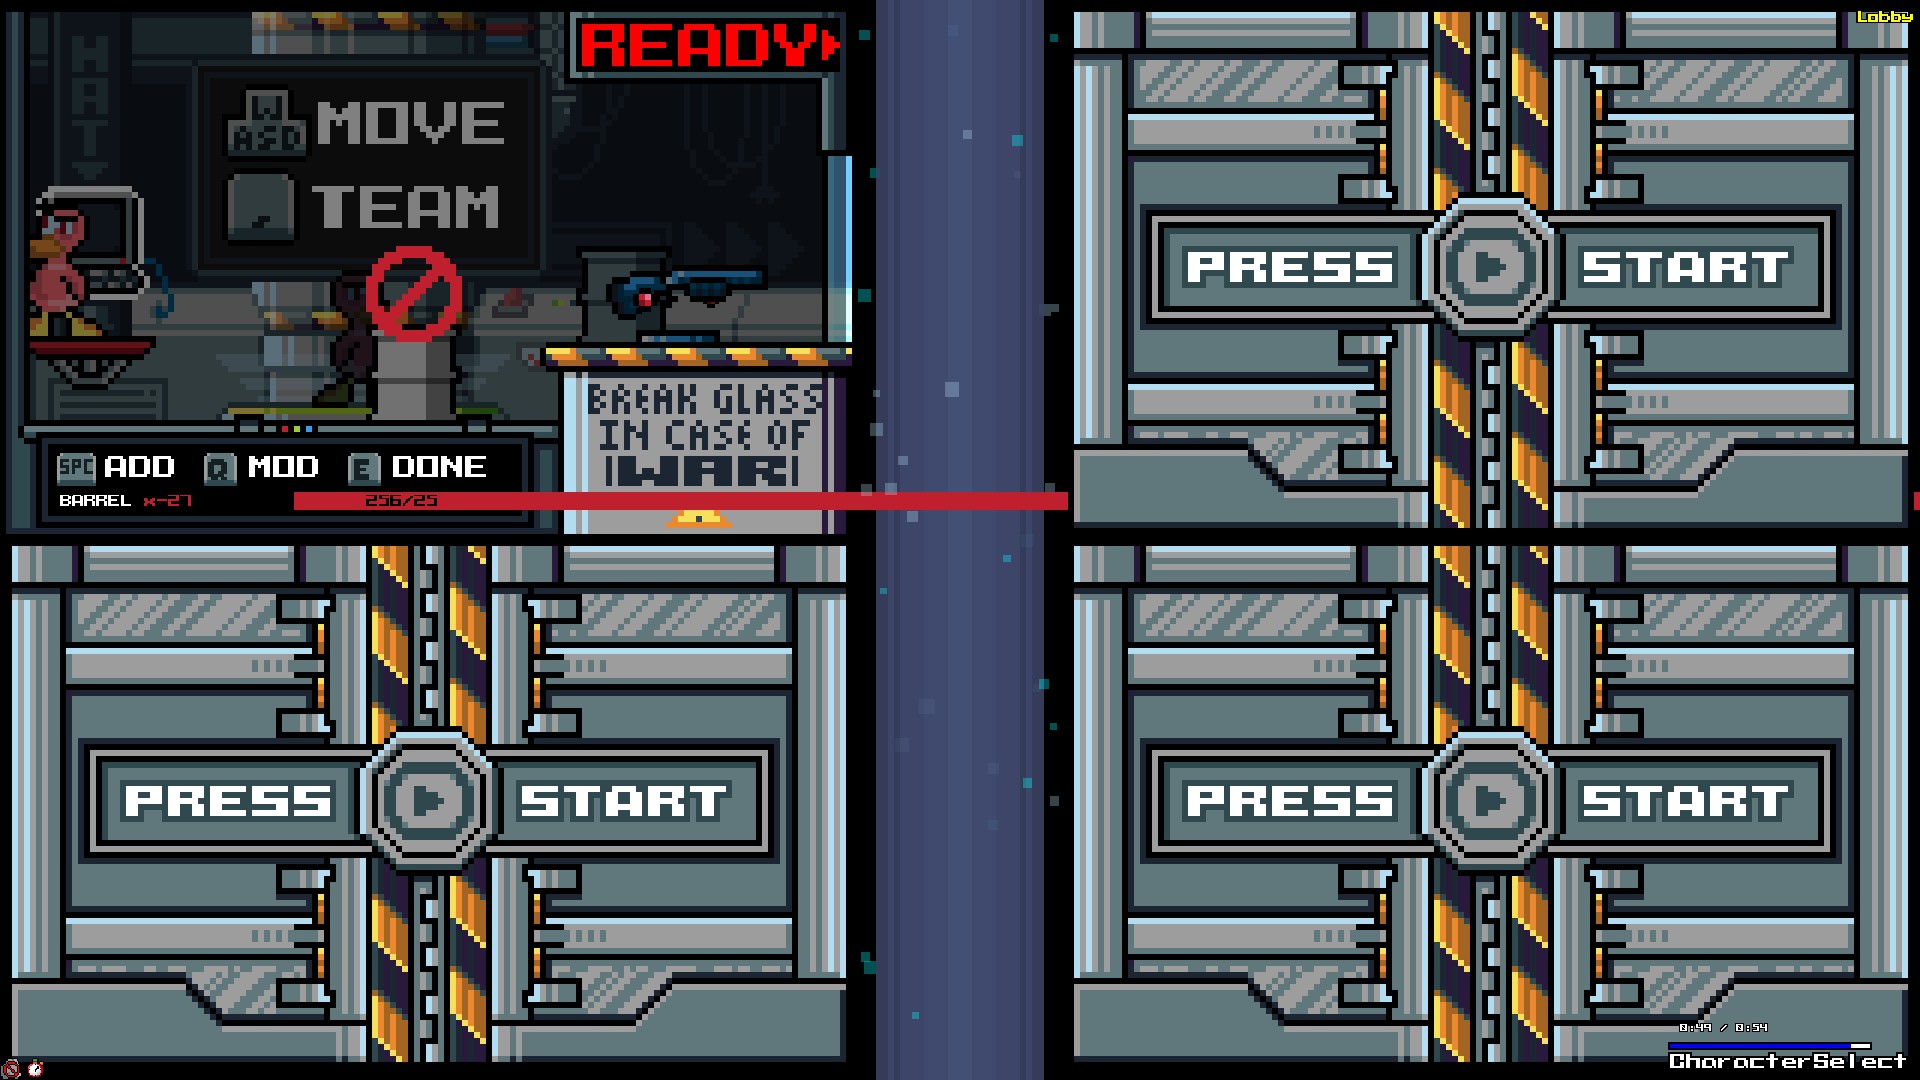
(Note how the toy limit bar extends beyond the screen.)
If you have free space in your room and attempt to place a furniture of which you have a negative amount, it will simply tell you that you don’t have any more copies of that item. When you start grabbing them, the number will increase until you have a positive amount.
An essential thing to be aware of is that, just like you can’t have more than 255 of the same furniture, you also can’t have less than -256 of it. Going below -256 triggers the same failsafe, leading to the deletion of all your owned furniture. So if you really want to place that many barrels in your room, be extremely careful.
There doesn’t appear to be a limit to the number of furniture you can place, similar to the maximum amount of an item you can obtain. I’ve tested placing 300 barrels all in the same spot, and the game ran perfectly. Going significantly above the limit doesn’t seem to affect performance much either, at least with flags all in the same spot. It’s possible that you might notice a difference with lower-spec hardware. There’s also a chance that the game stops rendering additional items beyond a certain point, but I’m not certain of that.
Forbidden items
Now, as for “Forbidden items,” just as you can place items you don’t own, you can also place and use items that are prohibited by the game itself.
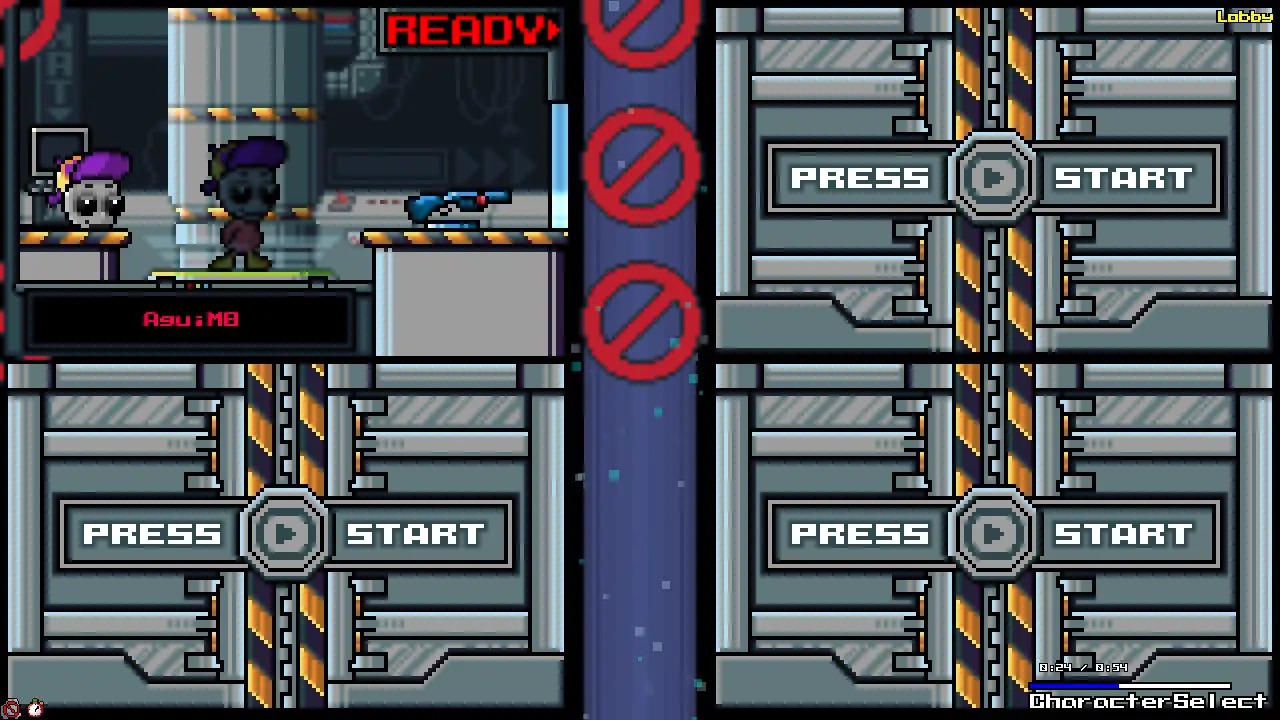
Using a specific line will grant you all those “Clear room” toys and a cursed version of the “Bios Room” background, without the keybind tutorial.
<FurniPositions>0|79|0|164|0|0|0|0|164|0|160|40|0|164|0|160|79|0|164|0|160|1|0|164|0|51|23|0|162|0|</FurniPositions>
Also, when you use these items the unintended way, their appear as “unavailable” as you supposedly “don’t have more copies of that item”

Additionally, when you use these items in unintended ways, they appear as “unavailable” since you supposedly “don’t have more copies of that item.”
The “Bios Room” shouldn’t appear as “unavailable” since it’s the default background, but this version isn’t the well-known default background; it’s a cursed one. The same situation occurs if you try it with the “Bios Font.”
Overlapping?
Remember that “*” somewhere in this guide when I mentioned that “you can’t overlap toys…”? Well, I encountered something similar when placing a lot of barrels and wastebins in the same spot. I’m not entirely sure how it works, but when I reached around 200 placed items, their sprites started glitching and overlapping. I may include a gif to demonstrate this glitch.
Furniture ID Spreadsheet
I’ve created a public spreadsheet with two pages. The first page provides a full list of furniture IDs in order, while the second page features two grids: one with the real IDs and the other with their number inside their respective collection.
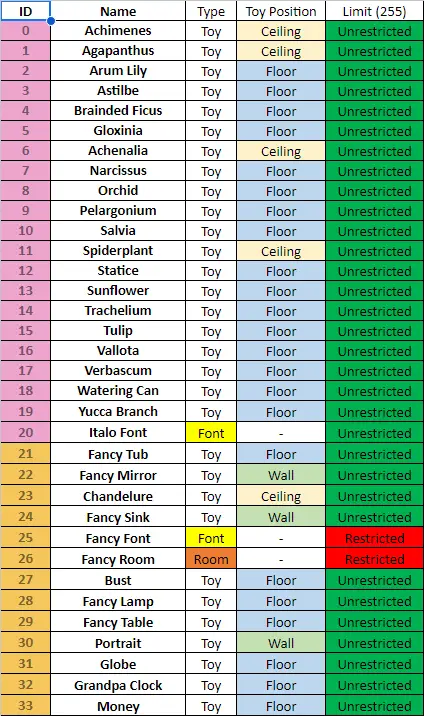
Here’s a preview of the first page:
- ID: The ID of the furniture.
- Name: The name of the furniture.
- Type: Indicates whether it’s a toy, a font, or a room background.
- Toy Position: Specifies where you can place the toy, whether on the floor, ceiling, or wall.
- Limit: Shows whether it’s possible to “legally” obtain more copies of that specific item. This serves as a reminder, but it doesn’t mean you can’t add more of them yourself.
You can access the full spreadsheet through this link.
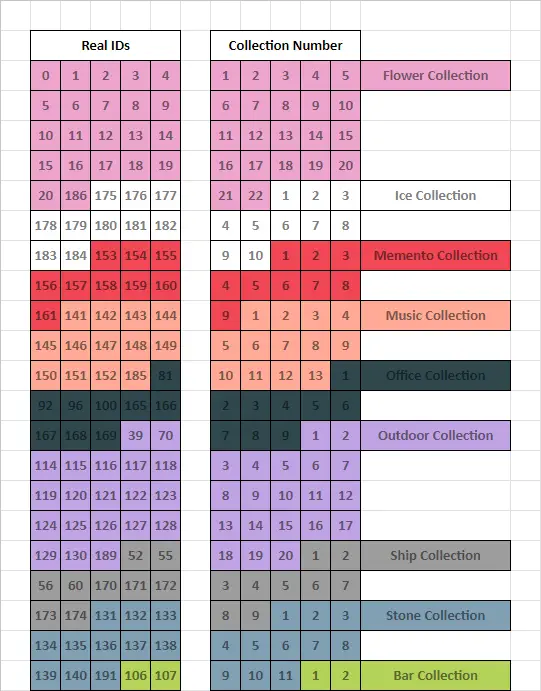
Here’s a preview of the second page in the spreadsheet, which represents what you see on the PC when selecting furniture. It starts with the flower collection since it has the first IDs, but as you can see, the numbers are quite scrambled.
- The left column shows the real ID of each furniture.
- The right column displays the number in the collection.
This layout helps you understand the actual IDs and their corresponding numbers in the collections.
In my tests, all the IDs appear to be right. If you come across an ID that’s wrong, please tell me so I can fix it quickly.
I’m a bit uncertain about whether you can get the flags only one time, so I’ve marked them as unknown, except for the default flag. This is because all the furniture in the default collection can only be obtained once.
Conclusion
I spent a long time figuring this out, and it was a bit of a struggle because I’m not great with code. Initially, these were just some notes I had, but I decided to turn them into a guide/manual for any future changes I might make to my save file, and it could be useful to you too. If someone can create a save editor based on what I’ve shared, that would be amazing.
This all started a few years ago when neither Vincent nor his “Toy Machine” would give me the items I needed to complete my collections. So, this is also a sort of message to express my frustration with him.
While I was trying to edit my save file to unlock furniture, I discovered that there are many parameters and stats that can be toggled or modified. These range from simple things like changing your number of kills or wins to unlocking hats, editing your challenge stats, and even altering your furniture. Perhaps I’ll create a complete guide explaining what each part of your save file does, but I’m not entirely sure about the functions of some of the stats, so it will take me more time of trial and error to figure them out. If you already know what each element does, your input would be greatly appreciated.
That's everything we are sharing today for this Duck Game guide. This guide was originally created and written by AguiM8. In case we fail to update this guide, you can find the latest update by following this link.