- Titel: Solasta: Crown of the Magister
- Veröffentlichungsdatum:
- Entwickler:
- Herausgeber:
Information about Solasta: Crown of the Magister is still incomplete. Bitte helfen Sie uns dabei, die Details des Spiels auszufüllen Kontaktformular.
Come and learn how to master the Dungeon Maker Tool with the official User Manual written by the Tactical Adventures crew.
The Dungeon Maker is a tool available directly inside Solasta: Crown of the Magister, which you can use to create new „User Locations“ – think custom maps or dungeons. It requires no additional downloads or anything, simply launch the game and the Dungeon Maker will be there!
Keep in mind that the tool is currently in Beta. Als solche, it is still missing quite a few features that we plan to add later on (zum Beispiel, we’re aiming to implement a quest system, merchants, more environments, und dergleichen).
Quickstart Guide
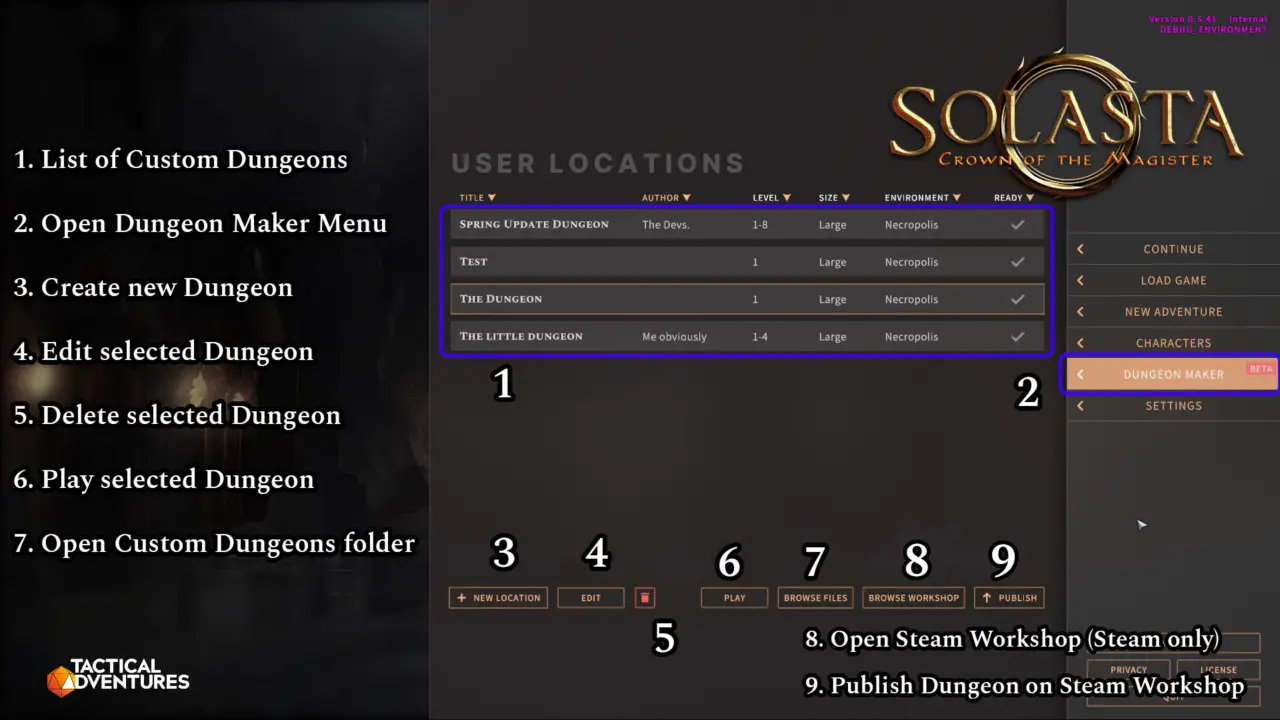
- Open the Dungeon Maker
- Klicken Sie auf „Create New Location“
- Put down the general information of your Dungeon, such as the Dungeon Title and Description
- Drag and drop rooms into the editor to create the layout of your dungeon
- Add props to decorate your dungeon
- Add gadgets to make your dungeon interesting – gadgets are everything that your party can interact with, such as doors, Monster, Schatztruhen, Fallen…
- Make sure you add at least one entrance and one exit!
- You can link multiple dungeons by making your exit point towards another dungeon.
- Save and done! Dungeon is ready play and / or share (the dungeon can be found in „Browse Files“, it’s a simple .json file)
- If you want to play other people’s dungeons, simply put their .json files next to your own (klicken „Browse files“ um es zu öffnen), or if you’re on Steam simply click Browse Workshop and find dungeons you like there.
- If you are on Steam, you can also upload your dungeon to the Steam Workshop very easily by clicking on the „Publish“ Taste
Wiedergabemenü – Dungeon Maker
General Settings
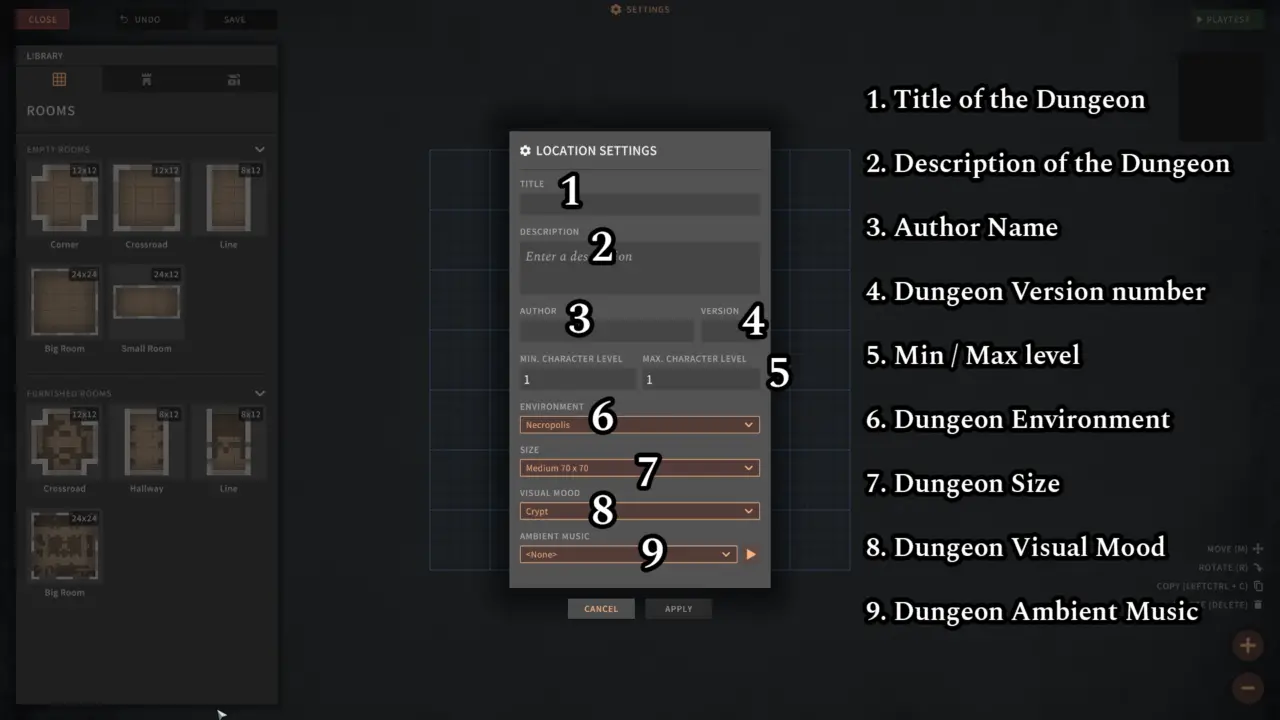
- (4) Version Number is something you should use to indicate whenever you update your dungeon. Normalerweise, it goes like this:
- 0.x means the Dungeon is still being worked on and is not ready (Beispiel: 0.1, 0.2…)
- 1.0 means the Dungeon is ready to be played
- Going from 1.0 to 1.x (wie zum Beispiel 1.1, 1.2…) usually means you fixed or tweaked something, Zum Beispiel, a wall wasn’t placed correctly or you forgot to place a monster
- Going from 1.x to 2.0 usually means you reworked and significantly changed the dungeon, Zum Beispiel, you added several new rooms or completely changed most of the encounters.
- (5) Min / Max level allows you to prevent players from going into your Dungeon with Characters that are too low / too high level. Zum Beispiel, a Dungeon with a level 2 – 4 range will not display level 1 oder Ebene 3+ characters in the character selection screen when trying to launch your Dungeon. Jedoch, once the party is inside they can absolutely keep leveling up – a character that levels up to level 4 won’t suddenly get booted from the Dungeon.
- (6) Environment will affect how the floor/walls look like, as well as the type of decorations available.
- (7) Size affects the size of the grid, you’ll be able to place more rooms if the grid is larger
- (8) Visual Mood affects the lighting/color/fog of the dungeon.
- (9) Your choice of ambient music track will play during exploration – during encounters, combat music will automatically replace it.
Rooms Menu
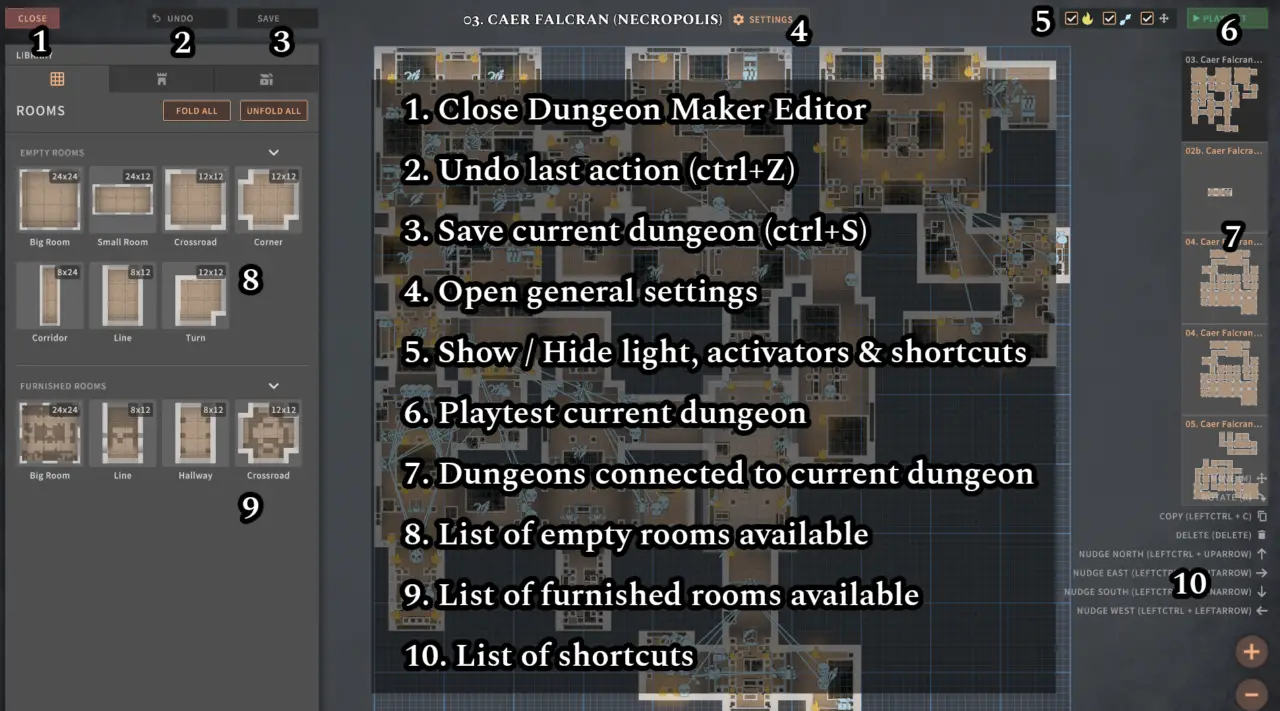
- (1) Closes the Dungeon Maker and return to the main menu – but make sure you save before that!
- (2) The Undo button will revert your last change, up to the last 10 Änderungen. Also works with ctrl+Z
- (3) The Save button, your best friend. Also works with ctrl+S
- (4) Opens the General Settings (previous screen with all the general information, such as dungeon title and description)
- (5) Zeigen / Hide the lights, activator links, and shortcuts.
- (6) Playtest your dungeon – launches your dungeon immediately with a premade party of level 1 Charaktere. Mostly used to check the layout, not the encounters. You must save your dungeon before being able to playtest it!
- (7) Your dungeon minimap and all the dungeons it is linked to via the exit gadgets.
- (8) List of Empty Rooms available, simply click on one to select it and place it onto the grid.
- (9) List of Pre-Furnished Rooms made by the developers to give new creators examples, simply click on one to select it and place it onto the grid.
- (10) List of Shortcuts, the most important being „R“ to rotate the room or prop currently selected.
Props Menu
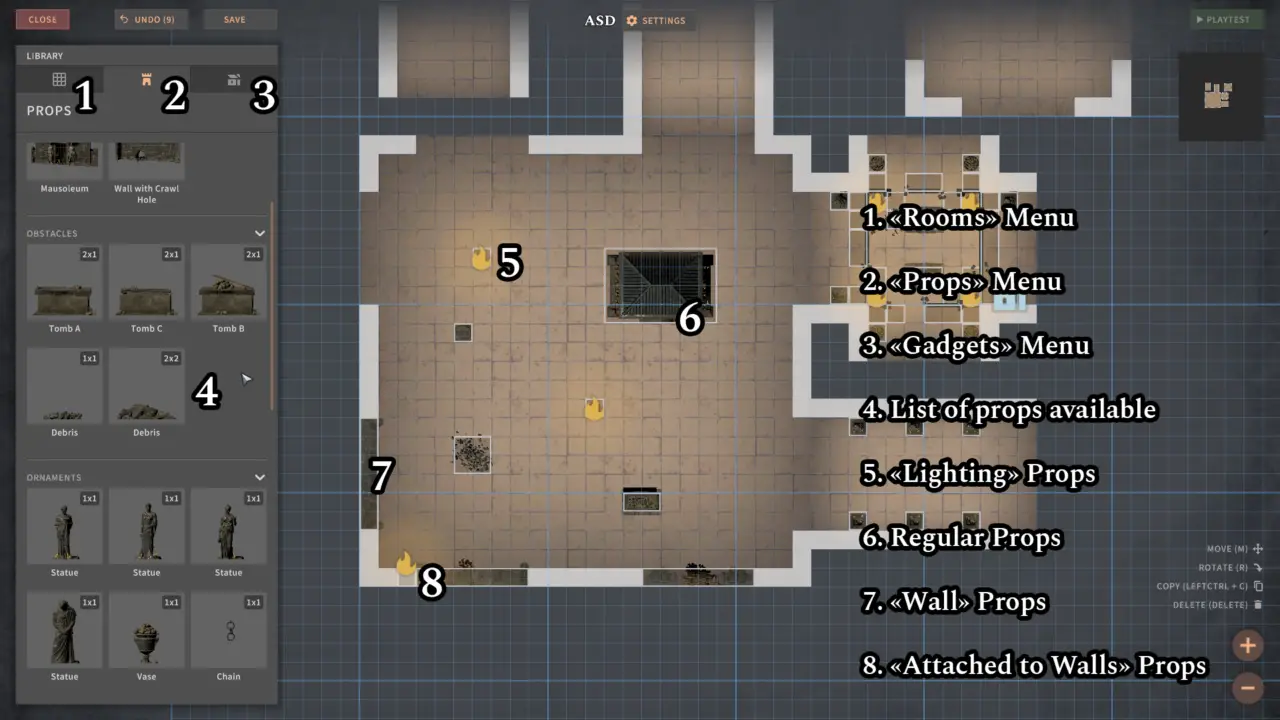
- (4) List of all available props. Props are elements that characters can’t interact with, such as statues, Wände, candelabra, und so. They can be used for lighting, blocking the passage, or simply decoration.
- (5) Lighting props are any prop that will generate light and will appear with a flame symbol on the editor. These lighting sources can’t be extinguished and will be lit by default.
- (6) Regular props are any prop that is here to decorate/block passage and can be placed anywhere as long as they are within a single room. Those props can’t be placed at the edge of a room and/or overlapping two different rooms
- (7) Wall props can only be placed at the edge of a room, usually to block unused exits. Der „Wall with a Crawl Hole“ allows the party to go through the wall (other wall props will block the party).
- (8) Attached to wall props are props that can only be placed on top of a wall – Zum Beispiel, wall sconces or chains. Take care to properly rotate these props so that they appear on the wall instead of being stuck inside it.
Gadgets Menu (1/2)
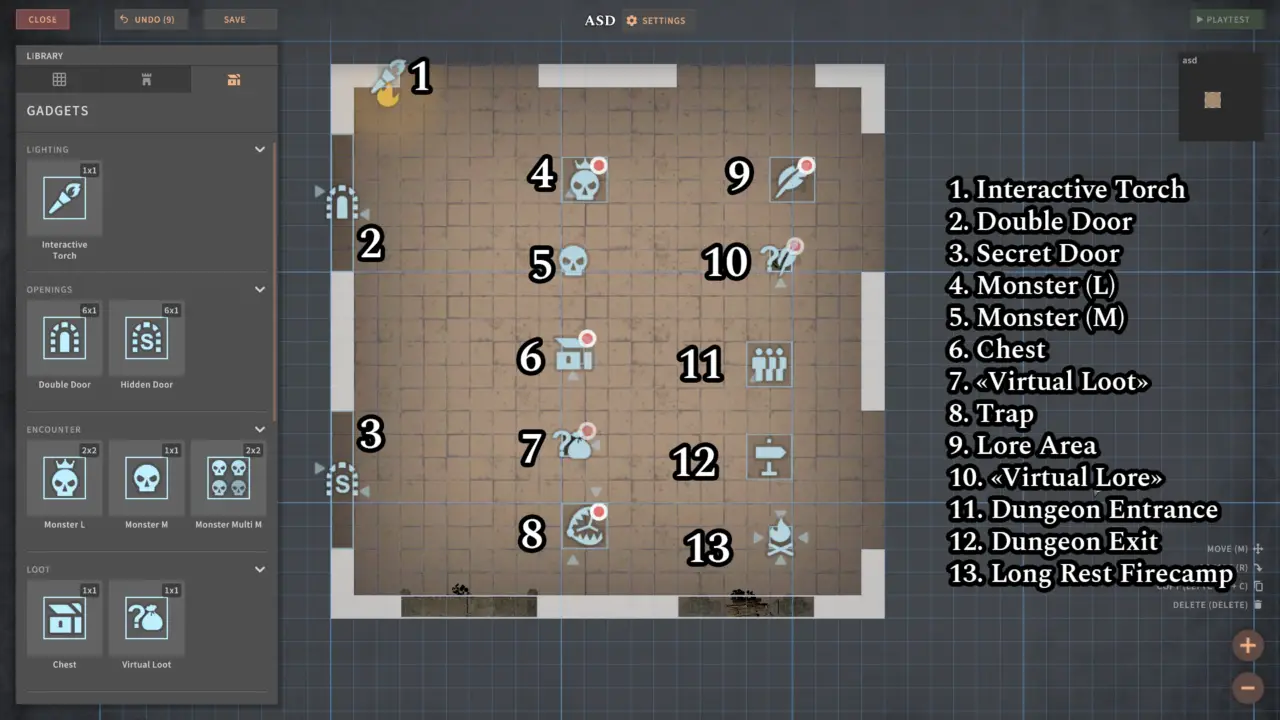
- (1) Interactive Torches are torches on the wall that you can light/extinguish yourself. You can set them to lit / unlit after placing them (unlit by default)
- (2) Double Door. You can set these to be locked (unlocked by default) and adjust the DC, oder auch „Hard Lock“ ihnen (meaning they can’t be lockpicked). Keep in mind that if the party fails to open it they won’t be able to try again – so always have alternative paths ready (or only lock doors to non-essential rooms). You can also select a „Key Item“ that will automatically unlock the door if the party has it in their inventory.
- (3) Versteckte Tür. You have to set the Perception DC for your party to notice that there is a secret passage (10 standardmäßig)
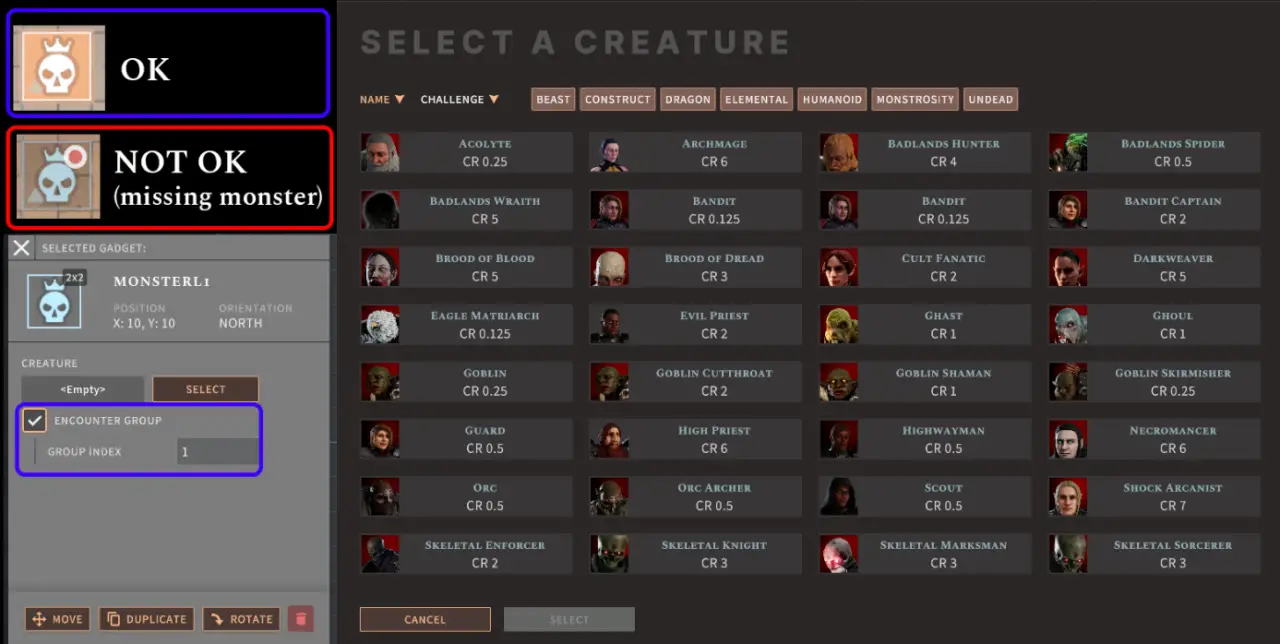
- (4) Monster (L). Einmal platziert, click on it to select from the list of large monsters available from Solasta. You can also group that monster with other monsters by clicking the „Encounter Group“ button and putting the same number for all of them. Long story short, if one monster in „Encounter Group 1“ enters combat with the party, all the other monsters in „Encounter Group 1“ will join the fight, even if they’re on the other side of the room. Monster gadget is „Auto-Spawn“ standardmäßig (meaning the monsters will appear when the party gets close enough), but that option can be removed if you want to trigger the monster spawn manually with an activator gadget (siehe unten)
- (5) Monster (M). Das Gleiche wie oben, but will show a list of medium monsters available from Solasta.
- (6) Schatzkiste. This gadget has a lot of different settings:
- Clicking „Explicit Items“ will allow you to select specific items from the entire list of item databases.
- Ansonsten, it will allow you to set a randomly generated loot based on CR levels
- You can set the chest to be locked, and set the lock DC (same with doors, you can also hard lock and/or add a key item to open the chest automatically with it)
- You can set the chest to be trapped, and set the perception and disarm DC, as well as the trap type, the saving throw DC and the additional damage dice should you want to scale up the damage of the trap.
- (7) Virtual Loot. Similar to a chest, but can only be placed on a prop (such as a statue, or a bench) – think of it like hidden loot.
- (8) Fangen. You have to select the trap type, the saving throw DC, the perception and disarm DC, as well as additional damage dice if you want to increase its damage. Note that traps currently don’t have VFX, we’ll be adding that in a future update.
- (9) Lore Area. You can type a text that will appear when a character steps on that area. The Lore Area AoE can be adjusted, and you can choose to play it only once or every time someone steps into the area. There are multiple formats available to change where / how the text appears.
- (10) Virtual Lore. Das Gleiche wie oben, but has to be placed on a prop (such as a statue, or a column). The message will appear when a character interacts with a prop.
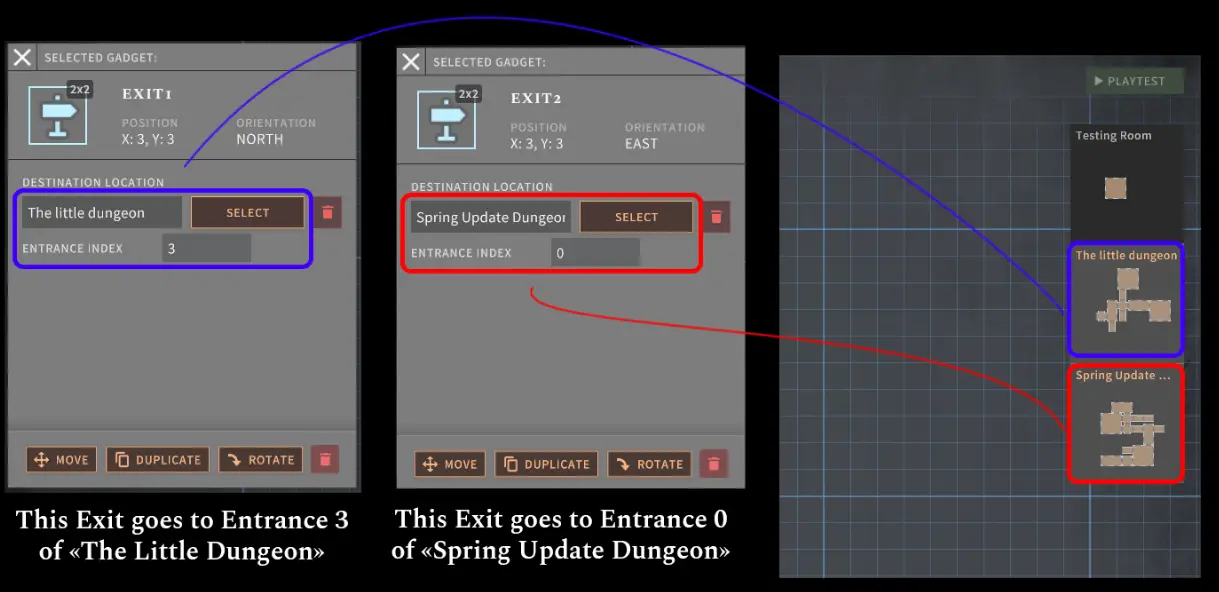
- (11) Dungeon Entrance. At least one is necessary for your Dungeon to be playable. Standardmäßig, your party will appear at Dungeon Entrance Index 0 – you can create multiple entrances with different Indexes, in order to link multiple Entrance / Exits (Ausfahrt 1 goes to Entrance 1, Ausfahrt 2 goes to Entrance 2, usw, usw)
- (12) Dungeon Exit. If the Exit doesn’t point to another Dungeon, having the party walk on it will end the run – ansonsten, it will load the next dungeon and teleport you to the linked entrance with the same number.
Gadget Menu (2/2)
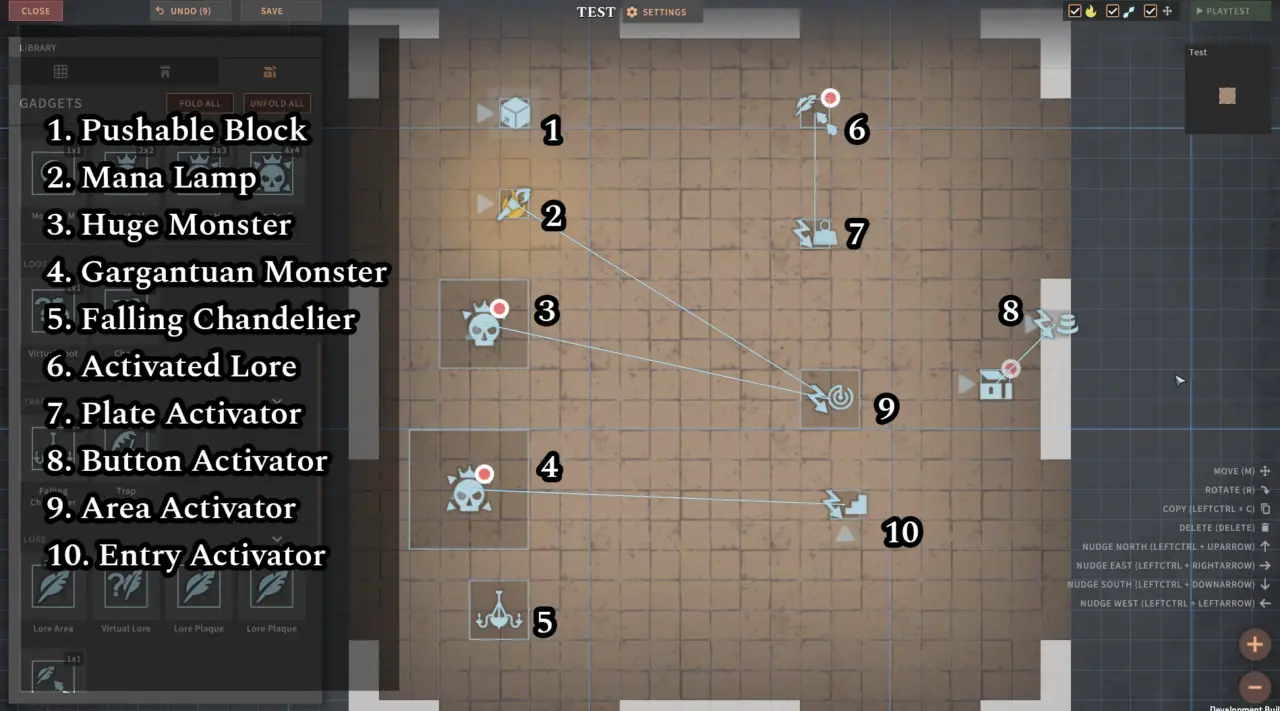
- (1) Pushable Block. Can only be pushed in the direction shown by the arrow (you can rotate it)
- (2) Mana Lamp. A simple gadget that the user can activate/deactivate by interacting with it to make light.
- (3) Huge Monster Spawner
- (4) Gargantuan Monster Spawner
- (5) Falling Chandelier. Currently missing any settings to adjust damage dealt, will be added in a future update.
- (6) Activated Lore. The lore that only activates when triggered by an Activator (siehe unten)
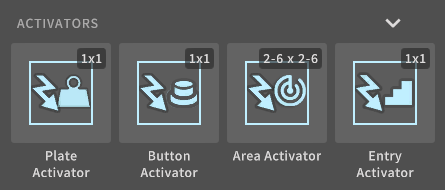
- (7) Plate Activator. Stepping on it will activate the gadget(S) that it is linked to.
- (8) Button Activator. Interacting with it will activate the gadget(S) that it is linked to.
- (9) Area Activator. Moving into the area will activate the gadget(S) that it is linked to
- (10) Entry Activator. Automatically activate the gadget(S) that it is linked to when the party enters the dungeon through the selected entrance.
Activator Guide
Activators are a whole new range of gadgets that allow you to „program“ certain behaviors. An activator is a „auslösen“ that activates another gadget (or several other gadgets). Zum Beispiel, you can place a button activator to activate (offen) a door that would otherwise be locked.

As you can link an activator to multiple gadgets, in the example above you could also link the button to an activated lore gadget to say something like „You hear a loud sound, that must have been the door!“ when you press it – both opening the door and showing the text at the same time.
The different operations available to activators are:
- Aktivieren: the target gadget(S) is opened / triggered, usw
- Deactivate: the target gadget is closed. For now this is relevant for doors only
- Activate symmetrical: the target is opened / closed in a loop when the activator is toggled. For example with Activate Symmetrical setting on a plate activator, stepping on the plate opens the door, but releasing it closes the door again.
- Aktivieren: „Einschalten“ another activator (Notiz: activators are enabled by default)
- Deaktivieren: „Turn off“ another activator – see example below
- Enable symmetrically: Turn on/off another activator.
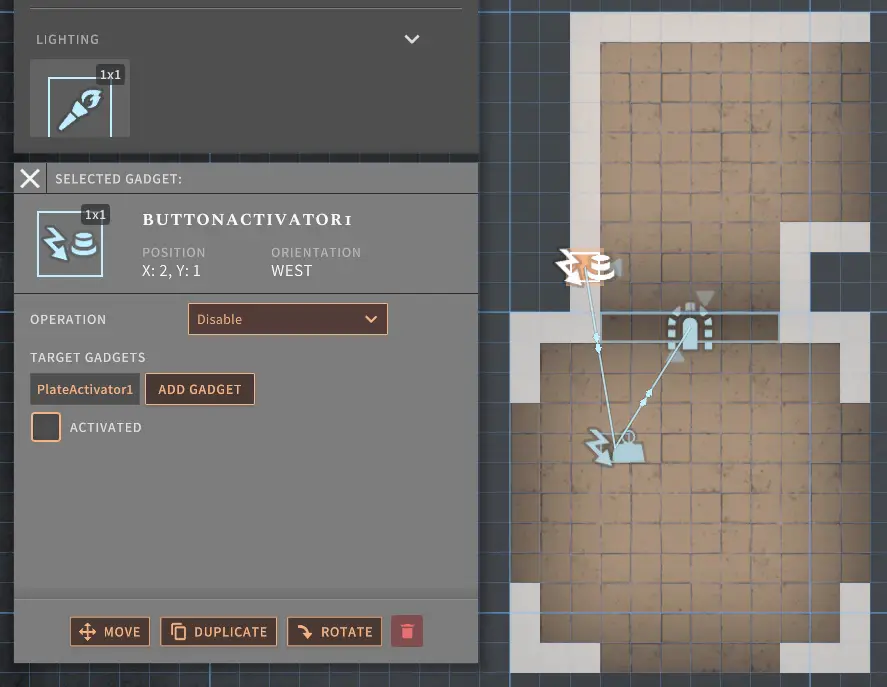
In diesem Beispiel, we have a pressure plate that opens the door when stepped on – but the door slams shut as soon as you step away from the pressure plate. This means the party is forced to leave a member behind… or does it? With the button activator on the other side of the door set to „Deaktivieren“ the plate activator, pressing it will stop the pressure plate from working. Meaning if the door was open at that moment, the door will remain open – allowing for the last party member to go through.
Monster Gadget
Entrance/Exit Gadget
Troubleshooting Guide
How do I share the dungeons I created?
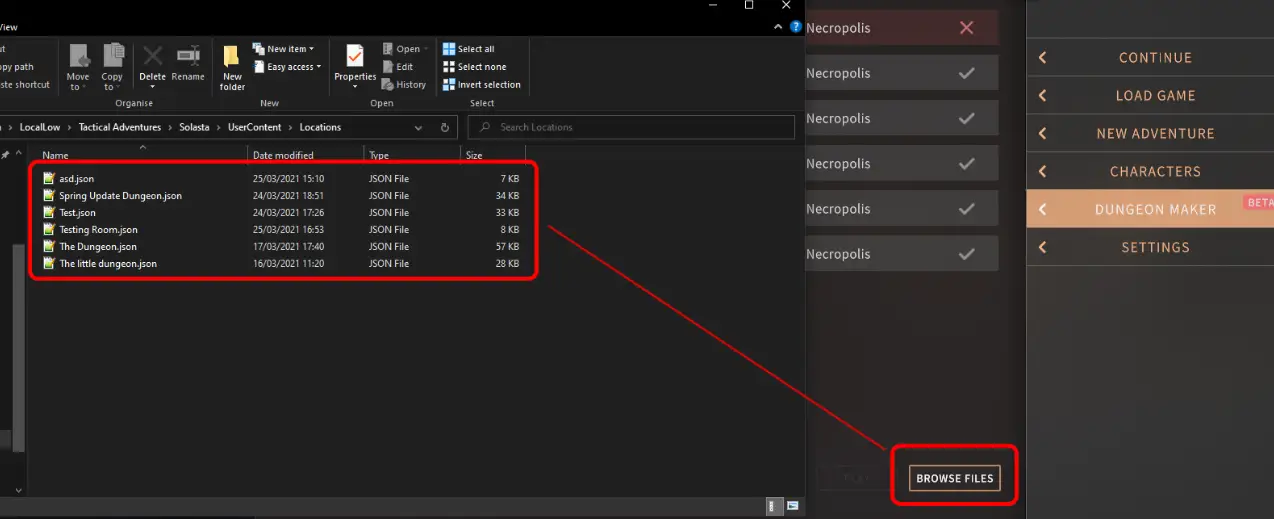
You can access your custom dungeon folder by simply clicking the im Spiel „Browse Files“ Taste in the Dungeon Maker menu. The folder can also be manually found there:
C:\User\Username\AppData\LocalLow\Tactical Adventures\Solasta\UserContent\Locations
Whenever you create a map in the Dungeon Maker, the game will create a .json file containing all the information with the same name there.
On Steam, you just need to click on „Publish“ to upload your dungeon to Steam Workshop.
Where do I share the dungeons I created?
On Steam, simply use Steam Workshop. Ansonsten, you could always drop by NexusMod where many other mods are already available (reminder: mods are community-driven, Tactical Adventures has no control over them and cannot guarantee that they work properly).
How do I play a dungeon I just downloaded?
Simply copy-paste the .json file into your custom dungeon folder, which you can either access by clicking the in-game „Browse Files“ button in the Dungeon Maker menu, or manually opening:
C:\User\Username\AppData\LocalLow\Tactical Adventures\Solasta\UserContent\Locations
The new dungeon should then appear in-game in the Dungeon Maker list. On Steam, subscribing to a Dungeon on Steam Workshop should automatically download it in the proper place.
Why can’t I play XYZ dungeon?
Make sure you check out the little (✔️) next to the dungeon in the Dungeon Maker! Often it will tell you what’s wrong. Here are the two most common reasons:
- The Dungeon is missing an entrance
- The Dungeon contains copyrighted terms from Wizards of the Coast
Das ist alles, was wir heute dafür teilen Solasta: Crown of the Magister Führung. Dieser Leitfaden wurde ursprünglich erstellt und geschrieben von Myzzrym. Für den Fall, dass wir diesen Leitfaden nicht aktualisieren können, Sie können das neueste Update finden, indem Sie diesem folgen Verknüpfung.