
- Titel: Rogue Company
- Veröffentlichungsdatum:
- Entwickler:
- Herausgeber:
Information about Rogue Company is still incomplete. Bitte helfen Sie uns dabei, die Details des Spiels auszufüllen Kontaktformular.
Rogue Company is capped to 150 FPS by default. This guide explains how to change that setting.
Setting Framerate Limit Above 150 FPS
Standardmäßig, Rogue Company has a framerate cap of 150 FPS. There is no in-game setting for this, so if you want to set it higher or lower, you’ll need to make the following changes to your config file:
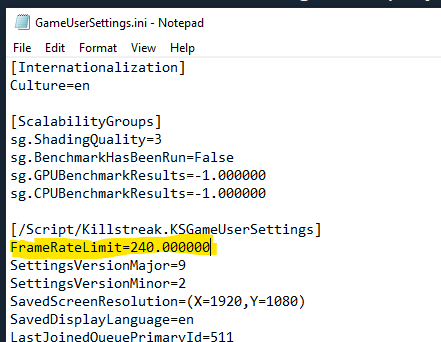
Schritt 1: Navigieren Sie zu:
C:\Users\[Benutzer]\AppData\Local\RogueCompany\Saved\Config\WindowsNoEditor
Schritt 2: Offen GameUserSettings.ini
Schritt 3: Unter „[/script/killstreak.ksgameusersettings]“, add the following line:
FrameRateLimit=240.000000
You may change 240 to whatever value you’d like. Beachten Sie, dass 0.000000 does NOT seem to uncap the framerate.
Schritt 4: Speichern und schließen. Starten Sie das Spiel.
Notiz: If you find that the file reverts, you may need to set GameUserSettings.ini to read-only. Right-click the file, Klicken Sie auf Eigenschaften, add a checkmark to „Schreibgeschützt“ und klicken Sie auf OK.
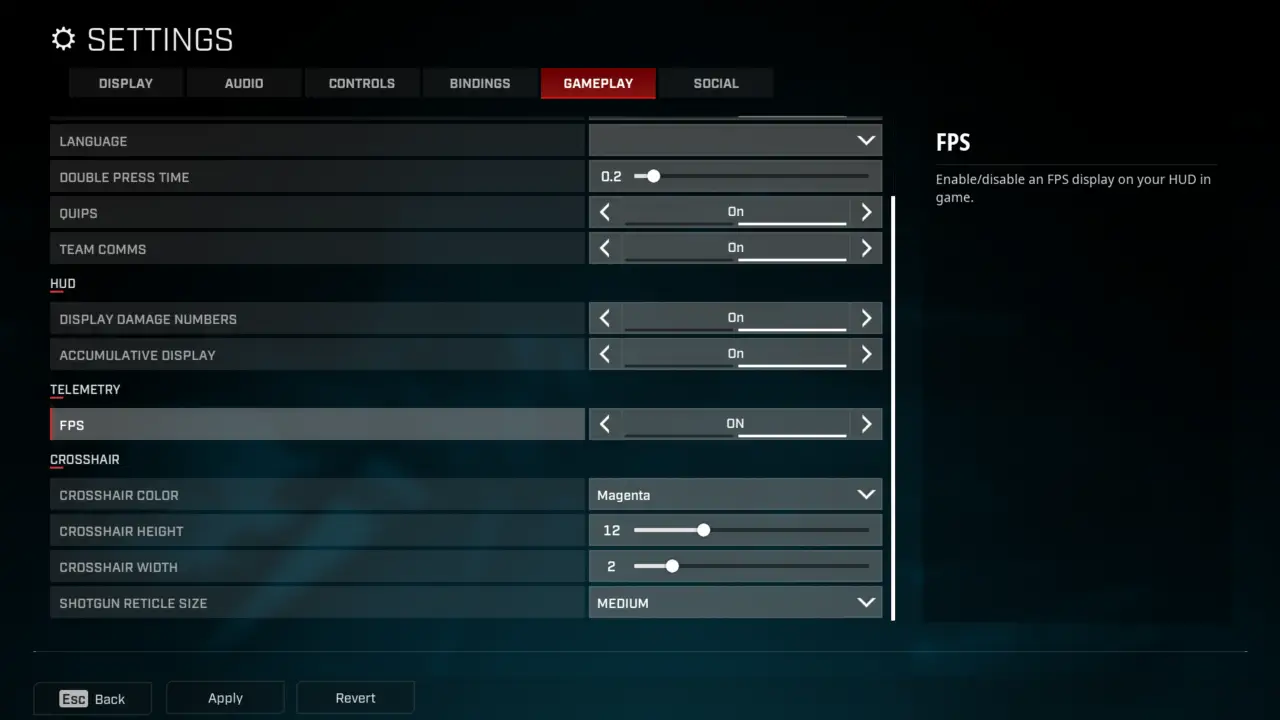
Verify Your FPS
To enable the in-game FPS monitor and verify your change, simply navigate to Settings – Gameplay and set Telemetry – FPS: AN.
Your current FPS will be displayed in the upper-left corner while in a match or in the Shooting Range.
Das ist alles, was wir heute dafür teilen Rogue Company Führung. Dieser Leitfaden wurde ursprünglich erstellt und geschrieben von plagueseason. Für den Fall, dass wir diesen Leitfaden nicht aktualisieren können, Sie können das neueste Update finden, indem Sie diesem folgen Verknüpfung.