This guide will be showing you the full game walkthrough of Illusion. Zusätzlich, you will also find the steps on how to get every ending of the game.
Prolog
For the initial three rooms, simply proceed with the tutorial as it is a linear sequence where you cannot overlook any crucial elements. Erinnern, you have the option to skip through dialogues and cutscenes by holding down the Space key to fast forward.
Kapitel 1

Proceed to leave the room and follow the given instructions. Turn right and descend. Locate the jump potion beneath the tutorial sign, heb es auf, and utilize it from the menu to traverse the gap. Dann, collect the acceleration potion positioned under the subsequent tutorial sign, promptly use it, and pass through the exit. Retrieve the intercom placed on the table and advance according to the provided guidance.
Step onto the button and switch characters using the intercom from the menu. Safely navigate through the lasers and step onto the designated tile. Return control to Parr. Proceed by stepping on the next button and switch to Theia. Cross the gap and interact with the terminal. Switch back to Parr. Traverse the laser obstacles and step on the subsequent button. Switch to Theia and depart from the room with both characters.
Upon entering the following room, step on the button and switch to Theia. Maneuver past the lasers positioned at the lower section and step on the switch located in the upper-right corner. Switch back to Parr. Engage with the terminal and subsequently step on the button again. Switch to Theia. Push the box beyond the laser barriers and onto the tile located in the rear section. Depart from the room with both characters.
Im anschließenden Raum, step onto the button and switch to Theia. Proceed through the portal. Interact with the terminal and bring the box along. Activate the skybridge using the small terminal. Push the box onto the tile situated past the lasers. Leave the room with both characters.
Upon entering the next room, step onto the button and switch to Theia. Acquire the potion placed on the table and utilize it to cross the gap. Retrieve the box and position it in the middle of the upward corridor, then push it onto the designated tile. Disregard the button and exit the room.
Pick up and use the potion to facilitate Parr’s passage to the exit as well. Head to Parr’s room and proceed to rest in bed.
Returning to Glen, collect the potion swiftly. Move quickly and cross the initial gap, swiftly maneuver around the corner, and cross the subsequent gap to obtain an achievement.
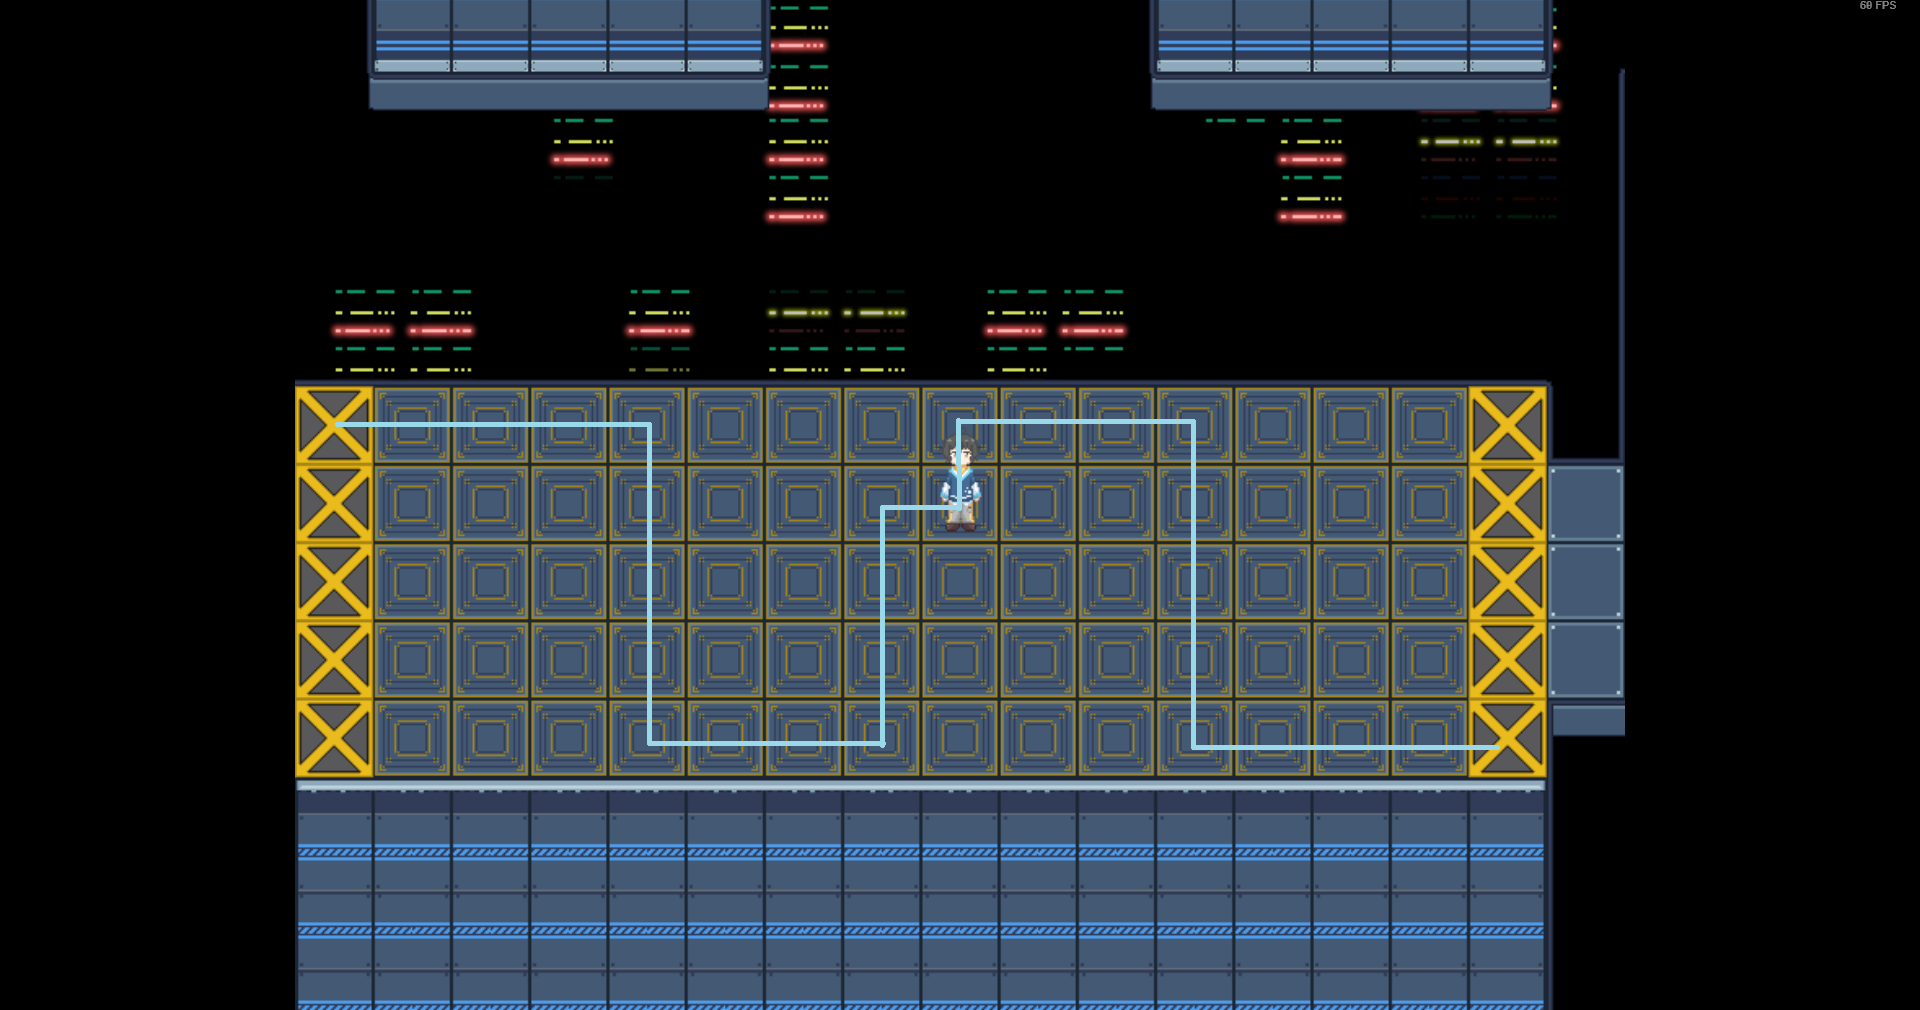
Jetzt, you will encounter a maze. Consult the terminal for a hint. The first number indicates the row from the right, while the second number indicates the tile from the bottom.
Hier ist die Lösung:
Im anschließenden Raum, there is an optional potion available for you to pick up, but it is not necessary to solve the room.
As for the room with red and blue tiles, the potion becomes essential for the first section. Ensure that the orb becomes trapped in the initial section, and the second section should be much easier to navigate.
In the portal room, push the box onto the button. Proceed through the portal and retrieve the second box. Push each box onto one of the next two buttons. Interact with the terminal and modify the placement of obstacle 1 Und 2. Dann, take aim and shoot.
Upon entering the dark room, pick up the flashlight from the table. Begin by heading to the top and step on the button. Dann, return and move towards the right to interact with the terminal.
Passwort: 352
Jetzt, return to the upper section and exit the room.
Im Nebenzimmer, make use of the potion before stepping on the button.
Proceed to Glen’s room and proceed to rest in bed.
Kapitel 2

Exit your room and rendezvous with your two friends. Follow the path for a short distance and retrieve the intercom.
In the first puzzle room, there is an option to acquire and utilize a potion, but it is not necessary to progress through the room.
Im anschließenden Raum, it is recommended not to use the potion, as navigating the maze is easier by sprinting without it.
For the following room, refrain from using the potion to attain an achievement. Pay close attention to the electrified tiles and plan your moves accordingly, and the puzzle will become relatively easy.
Proceed to enter the control room as instructed.
When controlling Parr, utilize the intercom to contact Glen whenever you encounter an obstacle that would otherwise be impassable. Select the appropriate option and exercise caution to avoid accidentally resetting the room.
Im Nebenzimmer, step on the button and cross the gap. Prepare for a slow pursuit, and remember that time stands still while in the menu, allowing you to take a break if needed. It is possible to deactivate the red and blue tiles simultaneously.
In the subsequent puzzle room, collect the potion and save it for the second part if it proves necessary. Use the intercom to deactivate both sets of colored tiles and move an obstacle upward by stepping on the button. After crossing the initial set of colored tiles, you will need to deactivate them once again.
Im folgenden Raum, the terminal provides an explanation that the active buttons will change when any button is stepped on.
Here is the solution for the room (starting at the first jump tile): Rechts, Runter, Runter, Links
Im Nebenzimmer, maneuver around the middle walls in a circular manner to stall the orb when you need to wait for the lasers to deactivate.
In the large puzzle room, it is advisable to save during the puzzle whenever you successfully push a box onto the corresponding tile.
Proceed to Glen’s room and retire to bed.
Kapitel 3
Leave your current room and approach either the first or second door. Proceed into the corridor and turn right. Once you encounter the yellow furry character, head towards the top left. Interact with the door, then retrace your steps and engage in a conversation with the yellow furry named Ivan. Utilize the key to enter the Chem Lab.
Within the large room, navigate to the top right and continue along the corridor to meet the pink furry character and obtain the Warehouse Card. Return to the big room and head down towards the left. Use the card reader next to the first door and enter the warehouse. Interact with the glowing spots and collect Three Coins and a Reagent Bottle.
Exit the warehouse and interact with the vending machine to the left, repeating the action twice to acquire the Wardrobe Key. Proceed along the path, moving upwards into the library. Retrieve the Server Room Keycard from the trash bin in the cubicle to the bottom left. Obtain the toolbox from the cubicle at the top.
Leave the library, interact with the card reader on the door to the right, and enter the server room. Move towards the right and interact with the PC. The answer can be found on a computer in the library, but you might need to experiment with the order. The computer code is: 20211029. Turn off server number 8, then proceed to repair the server.
There is a manual on the table explaining the server repair puzzle. Interact with the previously electrified server and follow the options in the order provided by the manual: Zange, Stecker, Container Packing, and Tape. Turn on the server again and return to the library. Interact with the computer in the top cubicle, retrieve the telephone number from document 2, and unlock the cabinet. Obtain the Chem Lab Keycard.
Head back to the big room and go down towards the left. Use the card reader on the second door and enter the Chem Lab. Proceed to the top right and open the Poisonous Substance in the small cabinet next to the table to achieve a goal. Retrieve the Cylinder from the left cabinet on the top and the Beaker from the blue basket on the right. Use the key to open the upper closet and put on the lab coat. Pick up the Nitric Acid from the small cabinet next to the table.
Follow the instructions on the sheet of paper located on the big black table to the left. Go to one of the wash basins in the middle of the big black tables and clean both containers. Utilize the large machine in the top right to measure the substances. Choose the first option, then choose option 1 and input 60. Select the remaining option and input 40.
Return the lab coat to the closet. Leave the Chem Lab and go back to the big room where Evan is located. Head towards the top right and interact with the first door. Use the sulphuric acid to gain access to the office.
The books and papers in the office provide hints for the computer code on the top right computer. The computer passcode is: 2422. The birthday is also needed to determine the passcode for the computer in the bottom left. The computer passcode is: 20211024.
Retrieve the encrypted file permission for the reference room, also known as the library. Return to the library and interact with the computer in the upper cubicle. Wählen „office data access“ and collect the Red Keycard from the storage cabinet on the right.
An dieser Stelle empfiehlt es sich, den Fortschritt zu speichern, as the story can branch from here.
Zweig: DON’T Help Amy
There is only one ending available in this branch, which can also be achieved by allowing the timer to run out at the end. Return to Ivan and give him the keycard. Leave the lab area and go back to the room where you initially encountered Ivan. Retrieve the Fuse that he dropped. Return to the lab area and head towards the elevator located at the back of the area, accessible from either corridor. Insert the Fuse into the voltage box to the top left of the elevator and enter it.
Zweig: Help Amy
Return to the big room where Ivan is located, read the paper on the desk, and call the provided number to obtain the safe code. The telephone number is: 34122. The safe code is: 13010. Head down towards the right, interact with the card reader next to the third door, and enter the admin’s office. Retrieve the Screwdriver from the table next to the computer.
Return to the storage room and interact with the vent. Use the Screwdriver to open the vent and enter it. Interact with the pink furry character and obtain the Sewage Keycard. Exit the lab area and continue to the right. Pass through the laser corridor and proceed further to the right until you reach a darker corridor. Enter the door at the top for an achievement.
Return to the corridor and interact with the card reader next to the door labeled „Food.“ Use the Sewage Keycard to enter the room. Pick up the doll, earning another achievement. Return to the pink furry character, Amy, and give her the doll.
Jetzt, go back to the room where you first met Ivan and interact with the card reader before engaging with the terminal. Proceed to the elevator, insert the Fuse back into the voltage box to the top left of the elevator, und betreten Sie es.
Kapitel 4
After exiting the elevator, go right and save your progress in case you make any mistakes while attempting the achievements. Proceed to the top and enter the first room. Pick up the Storageroom Key from the table. Enter the storage room, which is located right next to the previous room, and retrieve the Silent Shoes.
Return to the corridor and take out the guard. Pick up the Keycard from the guard. It is advisable to save regularly after successfully taking out a guard without being detected. Use the Keycard to enter the next room and eliminate the guard. Use the PC to deactivate the security lasers. You can find hints for the password in the room. The password for the permission is: 15272. Leave the room and continue into the area with a green tint. In the first room, there is a closet where you can hide if you are being chased.
Proceed through the second set of doors and take out the two guards. Be patient and observe their patterns before making your move. Proceed to the next corridor and turn right, taking out the guards again while being cautious of the boxes. This time there are six guards. The final guard, who stands against a wall, can be approached safely from the side. Eliminate all six guards without getting caught to achieve an objective.
Continue heading down and further to the right, taking out the two guards. Move towards the right and interact with the card reader next to the door. Enter the control room and use the computer to turn off the lasers. Proceed to the orange area. Take out the two guards in the first corridor to obtain the Hall Key. Head to the right for a reunion.
Move along the top-right path into the blue area and follow the corridor. In the big corridor, go through the middle and towards the right, escaping from the blue furry character. Gather the terminal codes from the papers and enter them in the corresponding terminals while avoiding the blue furry. Then escape to the right once again.
- Terminal 1: 2124
- Terminal 2: 4885
- Terminal 3: 4092
- Terminal 4: 8921
After reuniting with Ivan and Parr, intervene to resolve their squabble. Leave the room and head back in the direction of the orange area. In the room with the stairs, go down and left. In the first puzzle room, step on the button and switch to Parr.
Cross the gap and activate the bridge using the first terminal. Proceed and use the second terminal to reset both boxes. Push the normal box onto one of the buttons and step on the other button. Switch to Glen.
Push the blue box along the path and onto the blue tile. Leave the room with both characters. Im Nebenzimmer, pick up the potion and use it to cross the gap. Use the terminal to reset the blue box and push it onto the upper button. Go through the portal and activate the bridge at the terminal. Return through the portal, reset the box, and step onto the upper button. Switch to Glen.
Push the box through the portal and step through it. Switch to Parr. Step onto the middle button. Switch to Glen. Push the box onto the tile and return. Switch to Parr. Step onto the upper button again. Switch to Glen.
Go through the portal and use the terminal to reset both white boxes. Push each box onto the middle and bottom buttons. Leave the room with both characters. Im Nebenzimmer, interact with the terminal to the right, reset the blue box, and step on the yellow button. Switch to Glen.
Cross the gap. Switch to Parr. Step on the blue button. Switch to Glen. Push the box past the lasers. Switch to Parr. Step on the red button. Switch to Glen. Push the box further, repeating the process until the box is on the blue tile. Leave the room with both characters.
Switch to Parr and step on the button. Switch to Glen and leave the room. Remember not to leave with Parr, as it will result in being stuck. Save your progress whenever you successfully place a box onto the corresponding tile, so you can reload the save in case of any mistakes.
Kapitel 5

In the dream world, follow the path indicated by the bits of path to avoid getting caught in a loop. Move from the white area to the blue area and navigate past the lasers. Then proceed to the yellow area.
In the living room area, go left into Glen’s room. After waking up again, exit to the living room. Interact with the gifts by the tree and open them. Make sure to open the big blue gift for an achievement. Go to the front door and discover that it’s locked. Enter the bathroom to the left and interact with the washbasin multiple times until you obtain the Shelf Key.
Return to the main area and interact with the top shelf using the Key. Retrieve the Door Key and use it on the front door by interacting with it and choosing the first option. Move along the corridor and head down to leave the building.
Draußen, geh nach rechts. At the white stripes on the road, go up into the forest park. Im Park, head up and enter the small building. Interact with the glowing spot on the shelf to pick up the Hook from the side. Leave the building and head to the right from the middle. Interact with the left vent and use the Hook to obtain the House Key. Then head up and enter the house.
Interact with the washbasin to acquire another Key. Proceed through the next door using the Key. Search the place for five Shiny Crystals, which can be found in the glowing spots. They are relatively easy to locate, but be careful to dodge the shadowy figures. Remember to save between picking up the crystals, as you will be reset completely if caught.
Once you have collected all the Shiny Crystals, head to the top right to progress. Enter the villa and go upstairs. Hide from the shadowy figures in the lockers. Move upstairs and pick up the Crowbar from the toolbox. Then enter the second sliding door from the left to access a hidden room. Interact with the radio for an achievement.
Return to the entrance and open the glowing crate to obtain the Black Orb. Proceed through the door and go up. Place the Black Orb into the container on the table to obtain a Room Key. Go upstairs and to the left. Use the Room Key to open the door. Follow the path through the dream world, but after the lengthy dialogue, head further to the right to discover a password.
Remember that you can push the medium-sized cardboard boxes during the chase scene. Nach dem Aufwachen, head down to the right to patch up your bruises, and then go up to the elevator.
Final Chapter and Endings
SPEICHERN. This is another Branch in the story. You need Amy in the party for all of them. There is only one Ending when you don’t have her with you.
Zweig: DON’T Help Fire
- Choose to use the blood packs for Glen.
Zweig: Help Fire
- Choose to use the blood packs for the red furry.
Zweig: DON’T Get The Hidden First Aid Kit
- Just continue along the path without getting the hidden First Aid Kit.
Zweig: Get The Hidden First Aid Kit
- In the orange hallway, go up and through the double doors. Obtain the Keycard from the safe using the password you obtained in the dream world.
- Safe Password: 72312
- Leave the room and make your way back to the terminal. Interagiere damit, geh nach links, and then interact with the Med Kit.
- Now continue along the path as before.
Leitfaden zum Ende
Underground Sleep Forever:
- Don’t help Amy.
- Don’t help Fire.
- Don’t get the hidden First Aid Kit. ODER
- If you helped Amy, let the timer run out.
One Furry Gone:
- Help Amy.
- Don’t help Fire.
- Don’t get the hidden First Aid Kit.
Self Sacrifice:
- Help Amy.
- Help Fire.
- Don’t get the hidden First Aid Kit.
Togetherness:
- Help Amy.
- Help Fire.
- Get the hidden First Aid Kit.
Das ist alles, was wir heute dafür teilen Illusion Führung. Dieser Leitfaden wurde ursprünglich erstellt und geschrieben von Niko. Für den Fall, dass wir diesen Leitfaden nicht aktualisieren können, Sie können das neueste Update finden, indem Sie diesem folgen Verknüpfung.