- Titel: Fairune Collection
- Veröffentlichungsdatum:
- Entwickler:
- Herausgeber:
Information about Fairune Collection is still incomplete. Bitte helfen Sie uns dabei, die Details des Spiels auszufüllen Kontaktformular.
Hallo! This guide will provide basic game mechanics and a walkthrough for players who are new and might be stuck on a puzzle or are not sure what to do next on their first playthrough. It also provides the majority of game content outside of the walkthrough itself. This guide is strictly for Fairune – I will be making other guides on Fairune Origin and Fairune 2.
Einführung
Willkommen!

I’m glad to see you’re interested in Fairune! This guide covers a number of subjects that may be useful to you in your time playing the game. If you see anything that I’m missing, feel free to let me know in the comments and I’ll be happy to add it!
Seien Sie gewarnt!Anything after the section containing the walkthrough is not spoiler-free. I highly encourage you to use the walkthrough on your first playthrough of the game if you are having trouble as it is chronologically spoiler-free.
In the walkthrough section, anything marked with spoilers is optional content! These are specific secrets in the game that can make it significantly easier. Use your own judgement when deciding whether or not revealing these spoilers is right for you.
Happy Gaming!
Walkthrough-Teil 1
This section of the guide will take you through all the major steps in your progression throughout the game. It will start at the very beginning, and end just before the final boss, which is covered in the next section. This will be chronologically spoiler-free, so as long as you scroll down to where you are stuck or need advice, you should not encounter anything that spoils the rest of the game.
Grundlegende MechanikYou can view the control scheme for the entire Fairune Collection as the game starts up. Jedoch, if you are playing on keyboard, the controls are as such:
Arrow keys – Bewegung
Z – Interact/Select
X – Deselect/Exit
Jetzt, Lasst uns darauf eingehen!
KomplettlösungEarly-gameThe first step of the game is picking up the mana crystal. The codex will help guide you to it; it is two sections north of the starting location.
Once you have picked it up, follow the codex’s guidance to activate the mana tuft where you will be able to regenerate your health. Your next item is the Sword of Hope. It is located on an altar on the western side of this section of the map. Go southwest from the mana tuft to find it.
Once you have obtained it, you can now slay monsters and take damage yourself. While the use for it won’t be obvious yet, I suggest you pick up the red gem directly south of altar. It will be useful later.
Once you have picked it up, locate the screen where there are Fungus enemies that you cannot seem to reach yet. Sobald Sie es tun, notice the lever that is present on this same screen. I encourage you to look around, see if you can find the way to activate this lever. Wie du es tust, farm up a level or two.
If you haven’t yet found the way to access the lever, this is it.
Do you see the only tree in the top row that does not have a trunk? You can walk straight through these trees. This will take you on a path to the lever that you can pull to gain access to this forested area.
As you walk through, you will come upon a pair of stone monuments. Keep these in mind! They’re important for a puzzle coming up.
Remember to keep farming enemies whenever you feel like you need. This tip is prevalent throughout the entire game.
After you’ve passed the monuments, feel free to look around. Making a right turn will take you on the path you need to progress.
You will come to an area with some Treants and Fungus enemies, but seemingly no path forward. Hmmm…
Ah! If you push the rock to the right, it opens up a secret passage that takes you underground.
Jetzt, follow along this underground path until you hit a big room with a mana tuft in it. You’ll probably need to activate it here due to the amount of enemies you’ve fought to get here.
Don’t leave just yet though! There’s an easy overlooked key item that you can find by going to the top left of this room. That item is the pickaxe. Once you’ve found it, you can continue your way through the rest of this underground area.
Once back above ground, you’ll notice this dead tree that sticks out like a sore thumb. Keep it in mind!
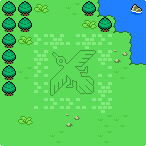
You’ll come to a clearing with the symbol of a bird on the ground. Looks a lot like those stone monuments we found earlier…
To progress through this area, we’ll be looking for a few more items to save you some time, and to open up a shortcut. Go directly east of this area until you find a large stone block. Push it into the water to create a shortcut back to those stone monuments.
Cross that bridge and go south until you find a sandy peninsula.
Here you can use your pickaxe on that broken sand to find an oil seep! Walk into it to gain the Oil item. This will be useful later, and picking it up now saves you some backtracking later on.
Now you’ll have to find two more red gems. If you want to try to figure out the puzzle and also find these for yourself, stop here and give it a go.
Ansonsten, I’ll guide you through it!
To find the other two red gems you must return to the area with the large bird symbol on the ground. Von hier, we’re going to go south and then west where you’ll be able to see a tower and another peculiar dead tree.
You might also notice the magic no-trunk trees on the left side of the screen! Walk through those to gather the second red gem.
Returning to the bird symbol, go east twice and south once. You probably noticed this earlier when we were picking up the oil. Go underground and this is the first battle arena of the game. You must kill all the Oozes in this area for the door to open and gain access to the last red gem. You may need to do some farming and come back, Nehmen Sie sich Zeit!
Now that we have all these items, we can solve the puzzle.
Remember when I mentioned those stone monuments? They’re important now. Let’s take a second look at them and see if you can’t figure it out.
See it? You’re going to have to place the three red gems at the corresponding places on the bird symbol on the ground. One at each wing and the third on the tip of the tail.
This will open up what I call the Phoenix Teleporter! This will take us to a new area, so if there’s any other exploring you want to do, do it now!
This ends what I consider to be the beginning section of the game and we’ll get into the next part in the next section.
Mid-gameWe are now in what’s called the Lava Zone. You’ll immediately notice that the Phoenix Teleporter on this side is not active. Seems to be a one way trip for now.
Go west to find a mana tuft and be sure to activate it.
Optional secret:
You have the option of obtaining a secret item here. It is the shield boost, which increases your defense by 1. Go north of the mana tuft to find it.
 You’re going to want to farm up some of the monsters to increase your level as this area starts a higher level of progression.
Your first step is going to be going west from the mana tuft, and then south. There are two paths you can follow. The bottom path will lead you to the Hatchet, an important item. The top path will lead you to a green gem! And do you notice anything else in this area?
That lava rock at the bottom of the screen is breakable!
Once broken, it will lead you to a silver key which will be useful very soon!
Once you’ve gotten both items, lets head north of the intersection. This part is one of the least telegraphed in the entire game, and might take some time to figure out.
The tree that you can access farthest north is actually a breakable tree. Not the most obvious, aber es ist, was es ist. Use the Hatchet on it to break it and gain one log. This log will be useful later. Walk through and find your second green gem!
Returning to the mana tuft, go east and then south. Here you can break another rock and press the lever, similar to the very first lever.
Walkthrough-Teil 2
Continuing south, you can pick up your third and last green gem! Let’s head back to the bird symbol on the ground and fill out this bird with each green gem the same way we did the last one so we can head back to the Grasslands.
Once you’ve done that head south and west of the Grasslands Phoenix Teleporter. You can see a dead tree at the bottom of this section that we can now break! Go ahead and break it, and obtain a second log.
Once through, push the stone block to open another shortcut, and continue south until you reach the end of this grassy peninsula where there is a Seedling. Pick it up as it will be useful for later – again this just saves some backtracking.
Sobald es erledigt ist, head back to the Grasslands Phoenix Teleporter. Go north and then west to find the third and last dead tree. Wieder, destroy this tree, gain a log, and walk through. Pick up the Warrior Statue, seems like it might weigh similarly to you…
We can now head back to the Lava Zone!
Head to the mana tuft and go north. Here you can use your silver key on the door to gain access to this temple. Einmal im Inneren, step on the button to open the next door.
This next room is a puzzle, so I’ll give you a moment to see if you can figure out what to do here…
Ah! If you put the Warrior Statue on one button, and then stand on the other you can press both buttons at the same time! Walk into the room and pick up the Fire Icon! This is one of three key items we’ll be collecting throughout the game.
Lets head back to the Phoenix Teleporter and explore north – where we opened up the path. We’ll come upon a room with a lamp, but we can’t seem to pick it up right away…
Lets use the Oil we got earlier on the lamp to fuel it, and the Fire Icon to light it! Now we can pick up the Spirit Lamp!
But what might we use it for? If you found where we use it already, Gehen Sie dorthin. Wenn nicht, maybe head back to the Grasslands and explore around a bit to find where we might want to use this item.
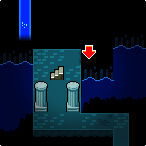
If you’re having some trouble, here’s the area! If we had come here earlier when you go down the stairs it is „too dark“ to continue on in this section.
Jedoch, if we use the lamp we can light up the area and continue on! We’ll be spending a decent amount of time in this underground section, Seien Sie also vorbereitet!
You’ll immediately come upon a new sight, this ancient temple.
Walking through there are some new monsters, also sei vorsichtig! This section may take some backtracking if you’re not used to leveling up with low health amounts, take your time and be careful!
As we continue on, we’ll come across a small wood float that can take us across a flooded section of this area. Im nächsten Abschnitt, we’ll have to use the three logs we gathered previously to make our own float! Now you see why they are useful!
Weiter geht's, you’ll come across a second temple. Walking straight in you’ll find a new mana tuft, Puh! But you also will notice there doesn’t seem to be a way to progress… Hmm…
You can actually head to right while underneath the temple! This will allow you to continue progressing. This might come in handy again…
Heading forward you’ll come to a push-block puzzle.
This can sometimes be frustrating for some, so here’s the solution. Push both blocks on the left and right upwards, and then you can push the middle one to either side and out of the way!
In the next room though, you’ll notice that we are missing a key! The Gold Key to be precise. Where in this area might we not have explored yet…?
Ah! The first temple front we saw! We continued forward, but we can probably go right at that temple the same way we did at the second.
When we do this, we’ll come to the second battle arena of the game with a bunch of Wraiths. Defeat them all and grab your Golden Key! Dann, let’s head back to the golden door and open it!
Optional Secret:
This is another optional secret that will net you the XP Boost. Getting this item means that every monster will give you 2 exp instead of 1. This alone greatly increases your leveling ability, but combined with Shield Boost is extremely powerful.
 Once we head up the stairs, we’ll find ourselves back near where we got the Seedling, just on the other side.
Head north to level up fighting the Shadows in this area, and head west to find the Water Icon!
This is the second key item of three that we need to complete the game. Glückwunsch!
Once you’ve leveled up off the shadows, lets head south and east where you’ll come upon a hole in the ground. What should we do here…?
Ah! Let’s use the Seedling we picked up earlier and plant it here, then water it using the Water Icon! Now we can climb the plant it sprouted to reach a small new section of the Grasslands. Continue heading north to find a new shortcut back to the early section of the game.
Let’s head back to where we started. We are now entering what I consider the late game, where some of the actions you must take to progress are not as obvious as the more linear early and mid parts of the game.
Spätes SpielAlso, here we are back at where we started. What is our next move? What haven’t we explored?
Falls Sie es wollen, take some time to think about it! This far into the game you may start to be able to not even has to use the guide! Aber, freilich, some of the steps are a little convoluted.
Okay, our first step is putting the icons we’ve collected in place. Here at the start of the game we can place the fire icon on the middle pedestal, and the water icon on the pedestal to the right. I’m going to divide up this next part into two sections. One for the path the Fire Icon opens, and the second for the path the Water Icon opens, as this is the logical progression.
Once you place the Fire Icon on the center pedestal, you will note a hole open up in the ground in a small cutscene. This hole is located below the two stone monuments that we talked about early on in the walkthrough. Go there first.
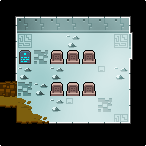
Einmal da, go underground. Follow the path, and you will end up in a white-washed high-tech looking area. The first room is one with multiple tombs, and a tablet above the entrance. Grab the tablet, and continue into the next room. The tablet is important for accessing the Endgame.
The next room houses the ID Card. This is important for opening mechanical doors that we will begin coming across in this part of the game.
Exiting this area making sure we got the tablet and the ID Card. Place the Water Icon on the rightmost pedestal. This will show another cutscene with an opening appearing below the tower. Head there now.
Einmal im Inneren, head north and use the ID Card to open the door and head up the stairs. You’ll find yourself just outside the tower now. It’s time to climb the tower!
Walkthrough-Teil 3
The tower has a total of 20 floors to go through, with most of them being straightforward. I’m going to put the optional secret here so that in case you want to try to find it yourself, I’m not making it obvious what floor it is on.
Optional Secret:
This secret will give you access to the Bit Killer item. This is a powerful item that allows you to kill the Bit Mans and Bit Golems, those invincible blue creatures found in File Rooms and the Endgame. Keep in mind however, that you must ALSO be level 25 for Bit Killer to work.
This secret is on the 14th floor.
 Boden 1 is arguably the most important floor in the entire tower. This is because you can get an important weapon upgrade here. Place your Warrior Statue on one button and press the other yourself, and the display in the center will light up. Grab your Warrior Statue again, and head to the display. Use your Sword of Hope on the display and you will recieve the Mamono Slayer! This is specifically for the Endgame section of the game, and is in general only cosmetic in nature, but it sure does look cool! Now we can start climbing the other floors.
Böden 4 Und 5 are a simple puzzle in tandem. Auf dem Boden 4 you must go up the bottom left staircase, press the lever, go back down, go up the top right staircase, and then proceed directly left through the fake wall to continue on.
Ähnlich, Böden 6 Und 7 are also puzzles in tandem. Boden 6 shows you the layout of the holes in the floor above it as the spikes match the holes. Auch, ensure you get the tablet on floor 7 by going up the staircase to floor 8, and simply walking back down to floor 7 and going to grab it.
Boden 16 is the only other floor with a puzzle, and it is solved by going directly down and then left.
Ansonsten, simply take your time and be careful going up the floors as the enemies progressively get more difficult. This may take a few tries of leveling up if you are not careful.
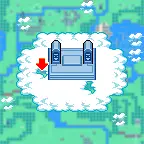
At the 20th floor open the door on the bottom of the screen with your ID Card and you’ve made it to the Cloud Temple!
The Cloud Temple has a few holes that you fall through. Do your best to avoid these, as if you do fall you will land outside the base of the tower, meaning you will have to climb all the way back up.
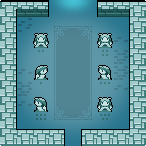
Head south and activate the mana tuft in the center of this screen. Then head west. This room has six pillars, one of which is movable. The middle top pillar can be pushed upwards to allow you to travel further north on the map. Tun Sie dies, grab the crystal key, and return to the room.
Nächste, head south to the next room. This room has a simple puzzle. Where there are marking on the ground on either side of the initial wall the wall is fake and you can walk directly through it, claiming the tablet. Schnapp es dir, then return to the mana tuft.
From the tuft, Gehe nach Süden. This section is a looping puzzle, much like ones found in some Legend of Zelda games. To do this puzzle successfully, you must follow the hints in the room before the looping puzzle.
The answer to this is to enter the puzzle, geh nach rechts, runter, links, runter, runter, links. Once you make the last left, you will exit to where you see a crystal door barring access to the Wind Icon. Use your Crystal Key that we just picked up, claim the Wind Icon, and return to the mana tuft.
Once at the mana tuft, head east. This is another puzzle area. To do this puzzle, head south and activate the lever. This shows a pattern that you must match in the room above. Sobald es erledigt ist, grab the tablet and hit the second lever. Now in this room it is showing a pattern that you must match in the room below. One done, the door in the second room will open leading to yet another tablet. Then return to the mana tuft.
Nächste, go north and then east. Be sure to watch out for the hole in the middle of the pathway, and use the Wind Icon on the ledge with the icon on the ground. This will open up a path to another tablet.


Optional Secret:
This is the final secret item in the game. It is the Rare Boost. It is the least useful for general gameplay, but is incredibly useful for doing the Rare Monster Hunter achievement.
 You can now drop down any of the holes as we are done with the tower and Cloud Temple.
Return to the starting spot and place the Wind Icon on the leftmost pedestal. This will play one last cutscene of a hole opening up in the final section of the Grasslands where you first saw the Rock Face enemies. Go there now.
Einmal im Inneren, go east to find the seventh and last tablet, then return to the main room and use your ID Card to open the door. Walk in and place each tablet in its own slot, then press the lever that appears in the top left. Once it appears, grab the Dragon Scale and head back to the starting point yet again.
Jetzt, stand on the tile that resembles the dragon scale and the Terra Mantle should open. This is the Endgame. I suggest you farm to level 24 before entering this area as the only enemies are Guardians and Bit Golems.
EndspielThis section of the game has a few puzzles, and that is mainly all that is here besides the opportunity to fight the final boss. I will briefly go over the puzzles in this area.
Linke SeiteTo cross the black gap just find where there is the invisible bridge.
To activate the fairy, match the pattern of the flowers in the room before it to the tiles.
Rechte SeiteTo open the path you must go where the Bit Golems are. Be extremely careful as they can insta-kill you. Press the lever and go back up.
To activate the fairy, you must use the Warrior Statue and match the pattern of the flowers in the room before it to the tiles.
MitteYou must activate both other fairies to access this section.
To activate the fairy, you must put the Warrior Statue down in the center of the tiles, Verlasse den Raum, and re-enter the room.
Gehen Sie nun die Treppe hinunter. This can be somewhat confusing, so here is how to challenge the boss. Make sure you are healed up if you took damage as the game does not heal you back up to full before the fight begins.
Stand in the center of the platform and use the dragon scale. It should light up blue. Now use the Mamono Slayer. You should transform into the Dragon Style Heroine and fight the boss! Viel Glück!

Bosse
There are three phases to the final boss of this game, and this section will go over each phase and what it does. Your health will not be recovered upon starting the boss encounter, and you will not be able to regenerate your health at all during the encounter, so start it prepared!
The boss of Fairune is played in Shmup style, you assume the Dragon Slayer style with the ability of flight and use the Mamono Slayer to fire massive damaging waves at the enemy.
Mega Dark

Mega Dark is the first phase of the final boss. They are generally the easiest as they will simply move left and right across the screen while shooting waves of energy at you in a somewhat slow pattern.
To beat them, simply move along with them firing your own waves and dodging theirs.
Giga Dark

Giga Dark is the second phase of the final boss. They are more difficult than Mega Dark, but still pose only a moderate difficulty. Giga Dark will remain stationary in the middle of the screen but has three attacks.
The first attack is ongoing throughout this whole phase. They will shoot orbs in a predetermined pattern across the screen. These are mostly easy to dodge, and only do minimal damage to your health, but are made more difficult to manage when combined with the other two attacks.
The second attack is done on occasion similarly to the third attack. Giga Dark will fire multiple beams out of its eyes directly down the center of the screen. This will do massive damage if you wait inside it. It is preceded by Giga Dark’s eyes lighting up the same color as the beams.
The third type of attack is done on occasion as well. Giga Dark will fire multiple beams from the orbs on its shoulders that go directly on the sides of the screen. This will not be used in tandem with the second attack type, making the center the safe area for this attack. This will also do massive damage if you wait inside it. It is preceded similarly to the second attack with the orbs lighting up the same color as the beams.
To beat Giga Dark, you must manage the orbs firing at all times and the other two attack patterns. Fire at them when possible, and ensure you are not in the line of fire when it is charging up a beam attack. A tip is that you can find a sweet spot right next to the second attack’s beams where you can still damage Giga Dark, but the center beam will not hit you. Bedauerlicherweise, you still must manage the shooting orbs which can make this difficult sometimes.
Terra Dark

Terra Dark is the third and final phase of the boss. Terra Dark can be particularly difficult due to its high base damage, lots of health, and insta-killing attack.
Terra Dark will use three attacks. The first is the base attack where green lasers fire from both sides of the Terra Case. You can carefully stay inside these lasers to continue to deal damage to Terra Dark, or wait until you have an opening if you are playing safe and slowly. Be careful as the damage from the lasers will add up quickly if you allow yourself to be damaged for too long.
The second is when the Terra Case closes around Terra Dark and a large red beam is fired from it. It is telegraphed fairly well, but will do massive damage if it hits you. Be patient and simply wait for Terra Dark to come out as you cannot deal damage to it during this phase anyway.
Terra Dark’s third and final attack is the planet attack that can insta-kill you. In your mind, separate the screen into three equal sections (this makes more sense once you’ve seen the attack once). Terra Dark will then launch planets at you from the top of the screen. Im Allgemeinen, be patient during this as if you make one wrong move you will die. It’s sometimes not worth attacking at all during this phase.
To beat Terra Dark you must deal damage to Terra Dark itself, not the Terra Case. Patience is your ally in this fight as it has the powerful insta-killing attack, and severe chip-damage potential.
Items and Secret Items Part I
________________________________________________________________
This section is not spoiler free! Wenn du damit einverstanden bist, weitermachen.
________________________________________________________________
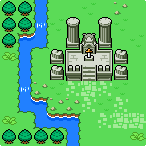
ArtikelPiece of Mana

Standort: Grasland
Codex:
A crystal formed from the water of life. Looks pure and clear.This is the first item you pick up in Fairune. You use this item to activate mana tufts that you can walk into to fully regenerate your health bar.
An important note is that creatures will never walk into the space of a mana tuft.
This is a mana tuft that has been activated with a piece of mana.
Sword of Hope

Standort: Grasland
Codex:
A shining silver blade. Has a sharp edge.This is the second item you obtain in Fairune. Einmal erhalten, you are now capable of taking damage and killing monsters.
Red Gem

Standorte: Grasland
Codex:
A mystical red stone. Slightly warm to the touch.The first of three red gems is most likely the next item you will find as it is located very close to your original spawn area. Combined, the three gems are used to complete the Phoenix teleporter.
Spitzhacke

Standort: Unterwelt
Codex:
Useful for breaking rocks and digging. Pretty handy.This tool is easily missed in the first Underworld section you will encounter. You can find it by going to the top left of the room with the mana tuft and continuing left through a small indent in the wall. It is used for obtaining the Oil and breaking some rocks in the Lava Zone.
Öl

Standort: Grasland
Codex:
Flammable. To use, put it in that item.This consumable is also easily missed before the Lava Zone and can still be gotten on the return trip to the Grasslands for use. It is found east of the Phoenix teleporter in the Grasslands after using the Pickaxe on some cracked sand to reveal the deposit. Its only use is to fuel the Spirit Lamp.
Beil

Standort: Lava Zone
Codex:
Looks shabby, but useful to hack through rubble.This tool is found in the rocky maze-like section of the Lava Zone by taking the lower of the two paths you find. It is used for destroying three dead trees (two in the Grasslands and one in the Lava Zone) to gain access to the other side and also to gain a log from each used later.
Protokoll

Standort: Grasland, Lava Zone
Codex:
A sturdy log, might float on water.Three logs can be found by destroying the three breakable dead trees in the game. One is blocking passage to the Warrior Statue, the second is blocking passage to the Seedling, and the last is blocking passage to a Green Gem in the Lava Zone. These logs are used in the watery area of the Underworld to float across a gap.
Warrior Statue

Standort: Grasland
Codex:
A solid statue of a warrior. Looks somewhat familiar?This tool can be seen well before it is accessible. You must have the Hatchet and destroy the dead tree in the way to gain access to this statue. It is used in numerous puzzles across the game including the temple with the Fire Icon, and some puzzles in the Endgame.
Green Gem

Standorte: Lava Zone
Codex:
A mystical green stone. Smells of grass.These gems are required for the second Phoenix teleporter from the Lava Zone back to the Grasslands. One is hidden behind the only accessible dead tree in the top row of the sector in the top left area of the Lava Zone. The other two are more straightforward to find.
Seedling

Standort: Grasland
Codex:
Unknown flora. Might grow if watered.This item is found similarly to the Warrior Statue – behind a dead tree. Southwest of the Grasslands Phoenix teleporter, break the dead tree and continue south until you find it on an isolated peninsula. Beware the Maneater here if you are still low leveled. It is used as a ladder after being watered using the Water Icon to climb up to the final explorable area in the Grasslands where you first encounter Rock Faces.
Silberner Schlüssel

Standort: Lava Zone
Codex:
A silver key with magical powers.This key can be somewhat difficult to find as it is hidden behind an easily overlooked breakable rock. It can be found near the green gem at the end of the rocky maze-like section by destroying a breakable rock at the bottom of the screen. It is at the end of a walkway around lava. It is used to open the door to the temple where the Fire Icon is held.
Fire Icon

Standort: Lava Zone
Codex:
Statuette made from carving a red gem. Looks fierce.This tool/key can be found in the Lava Zone temple that holds it and is locked behind the Silver Key door and a puzzle involving the Warrior Statue. It has two uses – the first is to light the Spirit Lamp after fueling it with the Oil, the second is to act as a key to the Endgame and open up a section of the Underworld. It is placed on the middle pedestal.
Spirit Lamp

Standort: Lava Zone
Codex:
A magic lamp to light the dark. Put that into that use.This tool can be found in the Lava Zone behind a block that can be removed by pressing a lever to the south of it. It first must be fueled using the Oil, then lit using the Fire Icon to pick up. Its sole use is to light up the dark room in the game, allowing you to pass.
Gold Key

Standort: Unterwelt
Codex:
A magical key made of gold. Is it real gold, Ich frage mich?This key can be found in the Underworld, guarded by Wraiths. It is found by making a right while under the first Greco-Roman temple in the watery area of the Underworld, similar to how you must progress through the area at the second one you come across. It gives access to stairs that lead up to where the Water Icon is held.
Water Icon

Standort: Grasland
Codex:
Statuette made from carving a blue gem. Looks sad.This tool/key can be found in the lake of the Grasslands after traversing underneath the lake in the Underworld section. It is guarded by many Shadows, and can be seen at the very beginning of the game but is inaccessible for quite some time. It has two uses- the first being to water the Seedling, the second is to act as a key to the Endgame and open up a section of the Underworld. It is placed on the right-hand pedestal.
Ausweis

Standort: Unterwelt
Codex:
A glossy card with somebody’s photograph. Who is that?This key is found in the Underworld after placing the _____ Icon on its pedestal and opening up the area. It is used at multiple mechanical doors during the late game such as the one to access the tower, at the top of the tower, usw.
Items and Secret Items Part II
Sage’s Tablet

Standorte: Administrators‘ Turm, Unterwelt
Codex:
Using the three Powers, we have sealed off this world, leaving for lost lands. Uncover our designs in the Ancient Codex… We rely on the chosen Maiden.There are seven total tablets to find. Two are found in the uncovered underground areas after placing their appropriate icon. The other five are found in the Administrators‘ Turm.
Detailed Descriptions:
—
Mamono Slayer

Standort: Administrators‘ Turm
Codex:
Legendary sword with super powers.Das ist das „verbessert“ sword that you can obtain on the first level of the Administrators‘ Turm. Um es zu erhalten, use the Warrior Statue to depress both buttons in the room at the same time and the display in the middle will light up. Sobald es erledigt ist, place your Sword of Hope in the slot and it will turn into the Mamono Slayer. This is used to fight the final boss. Note that this does not improve your strength or defense and is purely cosmetic.
Crystal Key

Standort: Cloud Temple/Administrators‘ Turm
Codex:
A glittering translucent key. Looks fragile.This key is obtained by pushing the middle top pillar upwards in the room to the left of the mana tuft within the Cloud Temple. It is used on the crystal door in the southern section of the Cloud Temple to obtain the Wind Icon.
Wind Icon

Standort: Cloud Temple/Administrators‘ Turm
Codex:
Statuette made from carving a green gem. Looks peaceful.This tool/key is obtained by passing the looping puzzle room and opening the crystal door with the Crystal key. It has two uses – the first is to provide a path of clouds to a Sage’s Tablet to the right of the mana tuft in the Cloud Temple, the second is to act as a key to the Endgame. It is placed on the left-hand pedestal.
Drachenschuppe

Standort: Unterwelt
Codex:
Light moves continuously on the surface of this scale.This tool is found only after obtaining all three spirit icons and placing them on their pedestals, as well as obtaining all seven Sage’s Tablets and placing them into the blank reliefs in a specific Underworld area that opens up. Einmal platziert, a lever will appear in the room that you can walk onto to reveal the dragon scale opposite the statue. This tool has two uses – the first is to act as the final key to the Endgame, the second is to allow the Heroine to activate Mamono Style/Dragon Style in the final room before the boss.
Secret ItemsShield Boost

Standort: File Room – Lava Zone
Codex:
Reduces damage received from monsters.This is the earliest secret item that you can find. It is located in the File Room directly above the section with the mana tuft in the Lava Zone – the entrance to the temple where the Fire Icon is held. You must walk behind the left-most pillar outside the front of the temple and you will enter the File Room. It increases your defense by one, making it so that monsters that are equal to your level no longer do damage to you, and monsters one level above you only do one damage instead of two.
Detailed Description:
XP Boost

Standort: File Room – Unterwelt
Codex:
Doubles EXP received.This is the second secret item that you can find. It is located in the File Room that is to the right of the stairs at the end of the watery section of the Underworld. These are the stairs that are directly after the gold door opened with the Gold Key. You walk directly right (off the cliff) from the stairs, and then up when you can no longer walk right. This increases EXP gained, so all monsters will give double the EXP. Paired with Shield Boost, it makes for very fast leveling.
Detailed Description:
Bit Killer

Standort: File Room – Administrators‘ Turm
Codex:
Enables you to defeat those blue, invincible monsters.This is the third secret item you can find. It is located on the fourteenth floor of the tower, hinted at a few floors previously. On the fourteenth floor, you can enter the concrete block from the left side in the middle and it will take you to a File Room. This allows you to kill the two monsters that are normally invincible – the Bit Man in File Rooms and the Bit Golem in the Endgame.
Detailed Description:
Rare Boost

Standort: File Room – Cloud Temple/Administrators‘ Turm
Codex:
Increases the chance of meeting rare monsters.This is the fourth and final secret item you can find. It is located next to a Sage’s Tablet after using the Wind Icon to create a path to access it. There are two holes in this cloud – the leftmost hole will not drop you down to the Grasslands and will instead take you to a File Room. This increases the chances of finding the five rare monsters in the game (besides the Bit Man and Bit Golem). It is useful for those who wish to kill all rare monsters.
Detailed Description:
Monsters and Rare Monsters
________________________________________________________________
This section is not spoiler free! Wenn du damit einverstanden bist, weitermachen.
________________________________________________________________
MonsterBlue Slime

The first enemy you will encounter in Fairune.
Standorte: Grasland
Codex:
A jelly-like creature. Blaue FarbeTREANT

This enemy is a tree-like creature that will be second encounter.
Standorte: Grasland
Codex:
A violent, moving tree.Pilz

This enemy is the first encounter you cannot immediately kill.
Standorte: Grasland
Codex:
A big mushroom. Tasty when cooked.Poison Fungus

This enemy is a variant of the original Fungus.
Standorte: Unterwelt
Codex:
A big mushroom. Do not eat.Wasp

This enemy is encountered near the first major puzzle of the game.
Standorte: Grasland
Codex:
A large bee-like insect. Has a painful sting.Dramos

This enemy is encountered near Wasps.
Standorte: Grasland
Codex:
A round, cute dragon with one eye.Ooze

This enemy is encountered earlier than it can be defeated in the Underworld.
Standorte: Unterwelt
Codex:
A gray colored liquid creature. Slimey.Red Slime

This enemy is the first enemy found in the Lava Zone.
Standorte: Lava Zone
Codex:
A red jelly-like creature. Boiling hot.Ash Dramos

This enemy is the first variant of the Dramos you are likely to encounter.
Standorte: Lava Zone
Codex:
Evolved species of Dramos that is weak to light.Skeleton

This enemy looks similar to the Heroine, just missing the skin.
Standorte: Lava Zone
Codex:
Skeleton warrior mobilized by magic.Phantom

This mysterious enemy guards an important item.
Standorte: Lava Zone
Codex:
A ghost that floats in the air.Zombie Dramos

This Dramos is first encountered in the dark room.
Standorte: Unterwelt
Codex:
Dramos turned zombie. Don’t get bitten!Giant Medusa

This enemy resembles a jellyfish.
Standorte: Unterwelt
Codex:
A humongous jelly-fish. Can move on land as well.Gespenst

This enemy might be why the Zombie Dramos are present.
Standorte: Unterwelt
Codex:
A shell of a former warlock. Now it has lost its powers.Golem

This enemy seems to be protecting something.
Standorte: Unterwelt
Codex:
A mechanical doll made in ancient times.Schatten

This enemy is found guarding a key item.
Standorte: Grasland
Codex:
A black smokey monster.Menschenfresser

This enemy resembles real-life Yellow Pitcher plants!
Standorte: Grasland
Codex:
Carnivorous plant that holds strong acid.Metallic Ooze

This enemy is found in peculiar places in the underworld.
Standorte: Unterwelt
Codex:
A creature made of liquidized metal. Matte texture.Rock Face

This enemy is often encountered just before the player would enter the tower.
Standorte: Overworld
Codex:
Large monster made of rock with a face of a human.Blauer Ritter

This enemy is the first encountered in the tower.
Standorte: Administrators‘ Turm
Codex:
A warrior garbed in blue armor. Protects the tower.Roter Ritter

This is the second variant of the knights.
Standorte: Administrators‘ Turm
Codex:
A warrior garbed in red armor. Fights all intruders.Dark Knight

This knight is at the top of the tower.
Standorte: Administrators‘ Turm
Codex:
???Mecha Dramos

This is another Dramos variant.
Standorte: Unterwelt
Codex:
A mechanical device made to look like a Dramos.Wächter

The final regular monster of the game.
Standorte: Unterwelt, Endspiel
Codex:
A mechanical soldier somebody made to protect something.Rare MonstersOrc Prince

This rare monster is found near the first mana tuft of the game.
Standorte: Grasland
Codex:
Might be another hero from another world?Gold Dramos

This rare monster is found at the Grasslands Phoenix puzzle.
Standorte: Grasland
Codex:
A gold Dramos that loves attention.Blood Ball

This rare monster is found at the Lava Zone’s mana tuft.
Standorte: Lava Zone
Codex:
A creature that lives off drinking the blood of monsters.Skull Lord

This rare monster can be found in the room full of tombs; the room just before you obtain the ID Card.
Standorte: Unterwelt
Codex:
King of the undead that commands skeletons.Gold Knight

This rare monster can be found on the bottom floor of the Administrators‘ Turm.
Standorte: Administrators‘ Turm
Codex:
Knight leader protecting the first floor of the tower.Bit Man

This rare monster can be found guarding secret items. They are unkillable without Bit Killer, and you must be level 25. They can instakill you without those requirements.
Standorte: File Rooms
Codex:
Guards rare items. Use a certain item to defeat.Bit Golem

This rare monster can only be found in the Endgame, in the section to the right. They are unkillable without Bit Killer, and you must be level 25. They can instakill you without those requirements.
Standorte: Endspiel
Codex:
Guards the sacred land. Use a certain item to defeat.
Karten
________________________________________________________________
This section is not spoiler free! Wenn du damit einverstanden bist, weitermachen.
________________________________________________________________
Überblick
This section of the guide has maps of every area in the game. These include the Grasslands, Unterwelt, Lava Zone, Administrators‘ Turm, Cloud Temple, Endspiel, and secret File Rooms.
You can refer to this section when looking for both specific monsters and/or tools/keys/items.
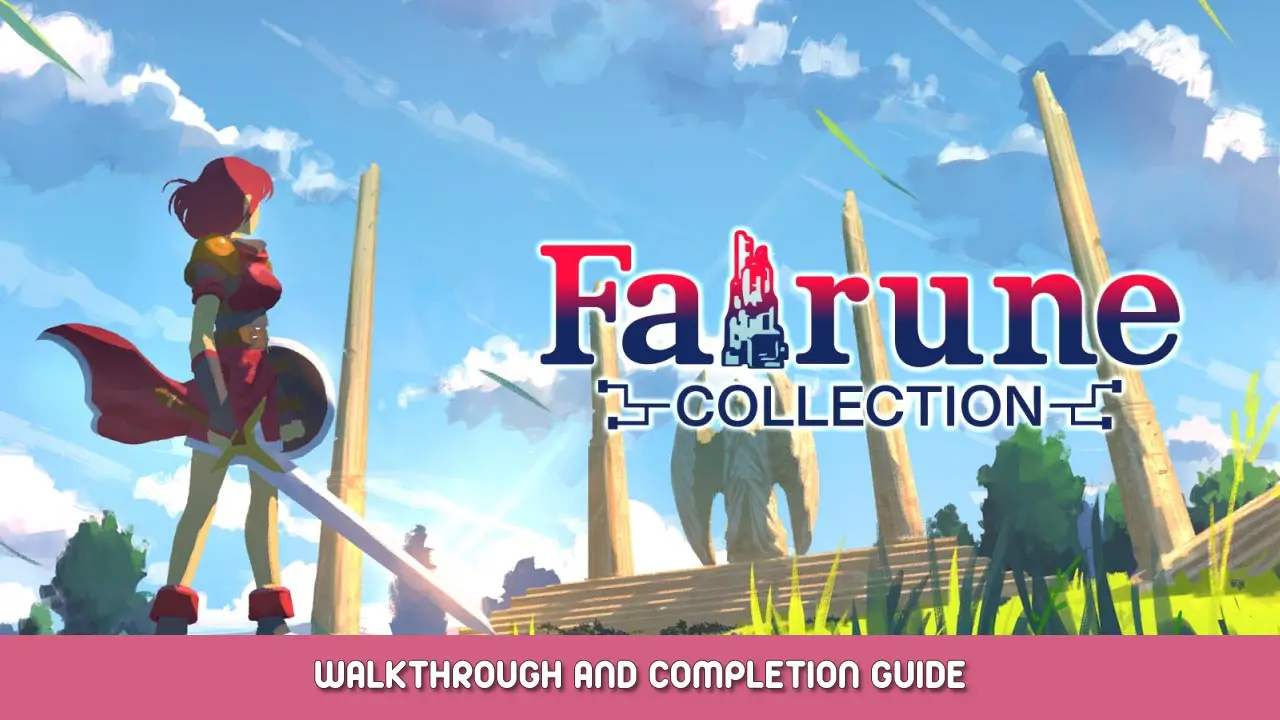
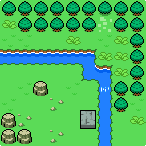
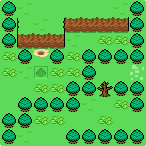
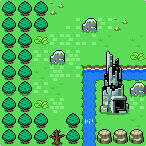
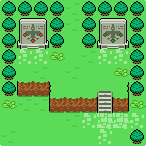
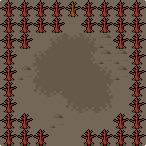
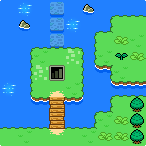
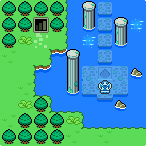
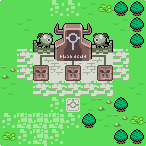
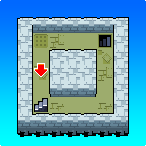
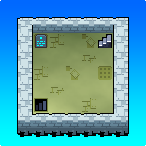
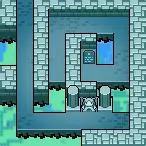
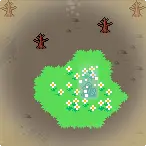
Grasland
This is the general overworld where you first spawn. Many sections are not accessible before finding other tools/keys to access them.
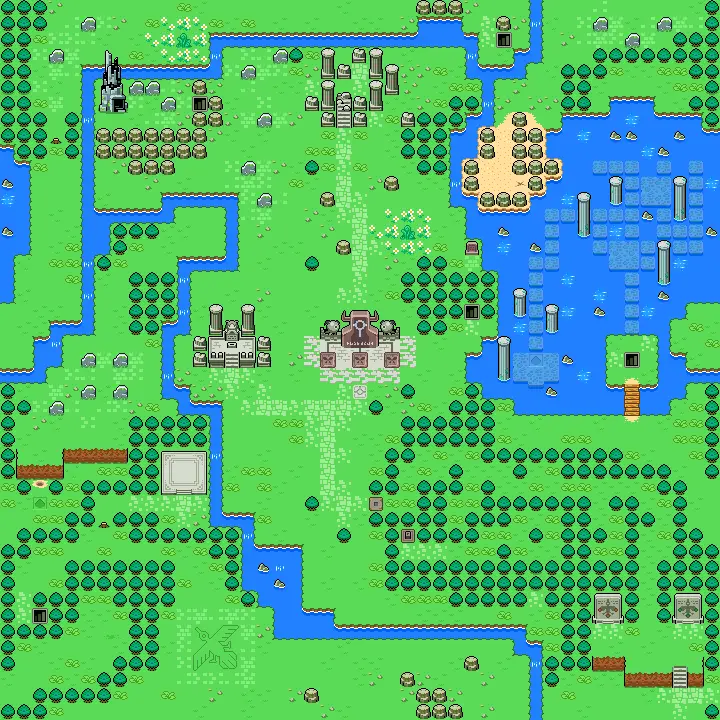
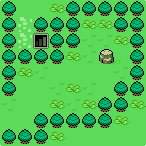
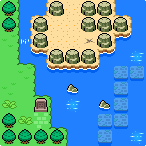
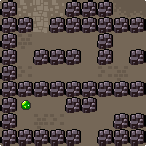
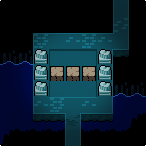
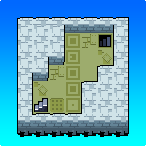
Unterwelt
This is the area geographically underneath the Grasslands. It is reflected in the watery area under the lake, and dirt areas under other sections. There are early game and late game areas in the Underworld.

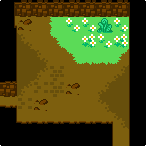
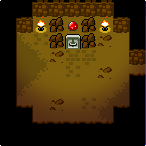
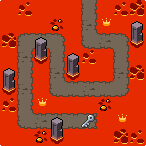
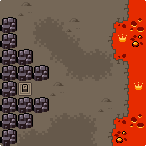
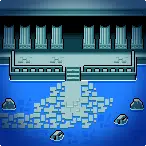
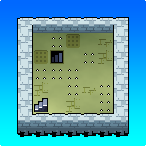
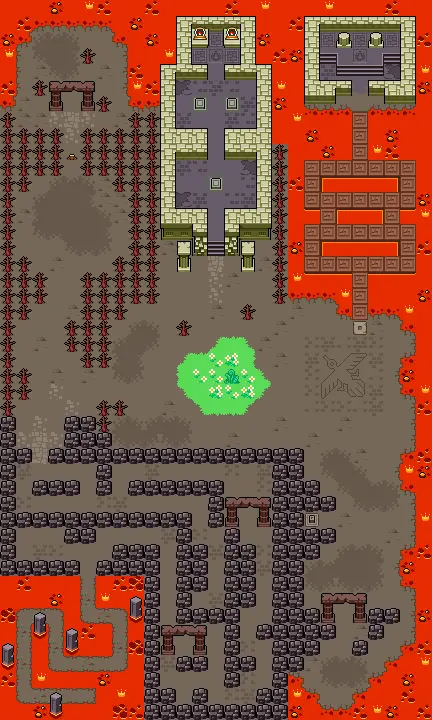
Lava Zone
This area is not geographically specific as you teleport to and from it via the Phoenix teleporters. It holds a number of key items and is much smaller than both the Grasslands and Underworld.
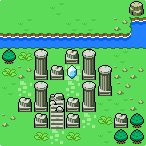
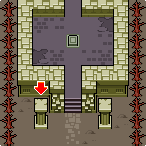
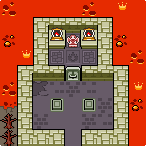
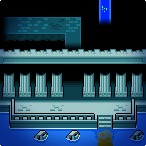
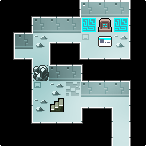
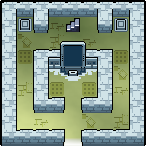
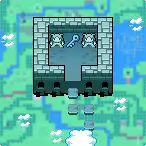
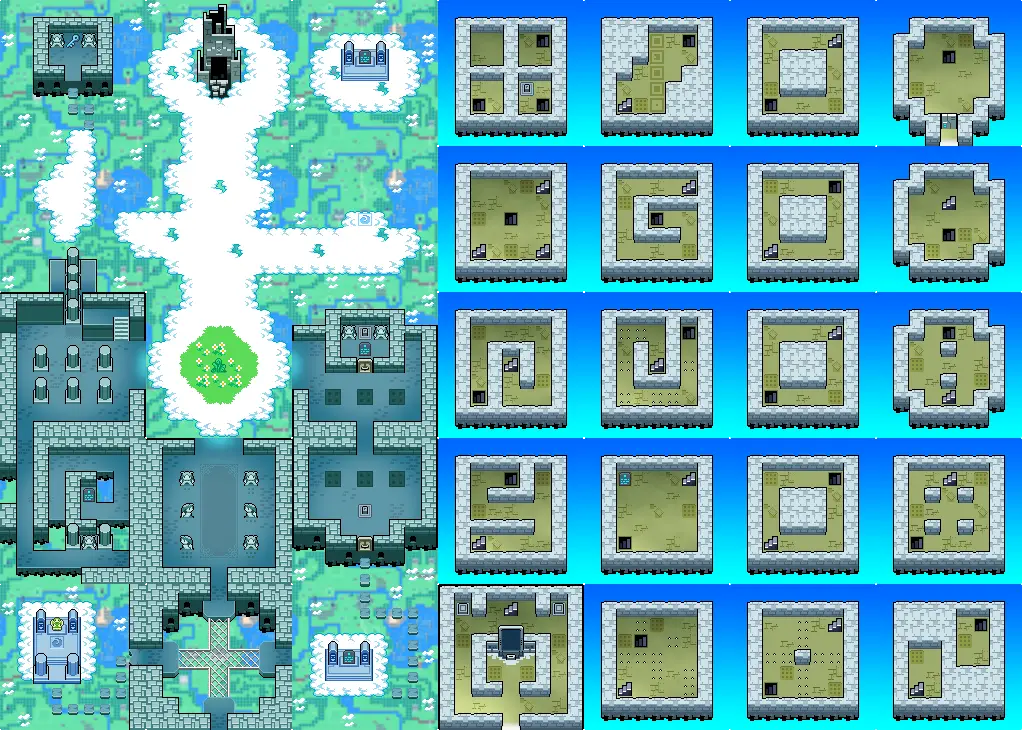
Administrators‘ Turm
This area is large and houses multiple puzzles. The Cloud Temple is the topmost section of the tower where the mana tuft is located. In diesem Bild, the Cloud Temple is on the left, and the tower itself is on the right.
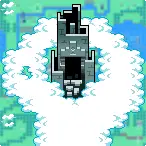
Endspiel
This is the final area of the game before facing off with the final boss. It houses a number of puzzles, and it is recommended to be at level 24 upon entering this area. You must also be wary of the Bit Golems that will instakill you if you are not level 25 and do not have Bit Killer in this area.
Photo Needed
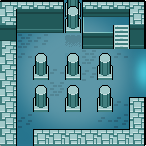
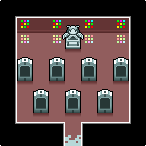
File Rooms
These are rooms that house the secret items – Shield Boost, EXP Boost, Bit Killer, and Rare Boost. They always contain Bit Mans that will instakill you if they are touched, making these rooms dangerous visits with large rewards. The secret item is always a file in the top right of the room that is unoccupied in this picture.

Erfolge
Das Ende

This achievement is awarded for completing the game for the first time. See Walkthrough.
Item Collector

This achievement is awarded for collecting all items. The four secret items do not count for this achievement. See Items.
Schatzjäger

This achievement is awarded for collecting all secret items. See Secret Items.
Monsterjäger

This achievement is awarded for defeating all types of monsters. The rare monsters do not count for this achievement. See Monsters.
Rare Enemy Hunter

This achievement is awarded for defeating all rare monsters. This includes the Bit Man and Bit Golem. See Rare Monsters.
Perfektionist

This achievement is awarded for beating the game without dying. When getting this achievement, take it slow. There are multiple times throughout the game where grinding an extra level is safer than running through, and getting the secret items can be risky because of the Bit Mans. The final boss is also difficult due to Terra Dark’s insta-killing planet attack. Nehmen Sie sich Zeit, and this one may take multiple attempts.
2hr Speedster

This achievement is awarded for beating the game within two hours. This is quite doable if you know the general progression of the game. Following the walkthrough quickly should be able to net you this achievement. Most likely not attainable on your first playthrough.
1hr Speedster

This achievement is awarded for beating the game within one hour. This can still be difficult even when you know the progression of the game. To reserve speed, do your best to not play too risky. When you die, as you may know, you are essentially sent back to the starting tile. This can cause a huge time loss in some sections of the game. You will most likely need to take some practice, and I suggest keeping a timer going, or using LiveSplit to time yourself provided you know how it works.
Das ist alles, was wir heute dafür teilen Fairune Collection Führung. Dieser Leitfaden wurde ursprünglich erstellt und geschrieben von Nevyyyn. Für den Fall, dass wir diesen Leitfaden nicht aktualisieren können, Sie können das neueste Update finden, indem Sie diesem folgen Verknüpfung.