- Titel: Draft of Darkness
- Veröffentlichungsdatum:
- Entwickler:
- Herausgeber:
Information about Draft of Darkness is still incomplete. Bitte helfen Sie uns dabei, die Details des Spiels auszufüllen Kontaktformular.
A basic guide on some of the basic components of Draft of Darkness, along with a few hints.
Beginner Party Strategy
Select Your Hero: I disliked the starting hero, so as soon as I unlocked Cara by finding her note I switched to her. Both can be powerful though. When browsing your hero ensure to look at their stats and passive.
- Stärke: Physical damage
- Intelligenz: Increases light power and mend power
- Geschicklichkeit: Critical chance and speed
- Vitalität: Increases health
Randbemerkung: Sometimes you may need to have a certain trait score to do a certain event, such as having X strength to rip open a purse you find. You won’t be able to do all events, but that is okay as you will have to do multiple playthroughs.
Laichen:
Im ersten Bereich, you should be able to find ONE companion to join you on your journey. Out of the three or four runs I’ve completed I have only encountered a nurse to join you which is perfect and essential as they can MEND or HEAL you, as well as cleanse debuffs on allies and remove buffs on enemies.
Sometimes the nurse will spawn very close to you and you can immediately recruit her to the party. This is not always a guarantee though! On some occasions, I did not find the nurse until the middle or end of the level and we should be wary of this for a few reasons.
If the nurse spawns far away from where you start:
- If possible try to avoid as many enemies encounter as you can until you recruit the party member. Some battles may be unavoidable. As you progress the battles in the area aren’t going to stay easier just because you’re missing a party member. Don’t take more of a beating than you should.
- Keep in mind if you kill enemies without the nurse, the nurse isn’t going to be able to gain that experience and will be behind.
Second recruit (third party member):
- I have noted on my runs there are two companions available to choose from on the second level (the streets). All companions I have encountered have been officers with handguns who can also equip flashlights. I have had NO EXPERIENCE with companions who can use a shotgun. Ensure to look at the passive of the allies and choose which may be the best fit for you. We will touch on passives a bit later.
- Also note if a companion happens to die, you can replace them with a new ally if available. There will be two more allies available to choose from on the third level (the hospital).
Party Variety:
This section is going to be biased, and more oriented towards beginners. I’m not saying this is the ONLY way to run your party. I am sure there is a variety of combinations. We will dive into material consumption a little later, aber erst einmal, understand that we find resources to use throughout the campaign. Different weapons consume different items and have a variety of risks and advantages.
For beginners in specific, es ist (Meiner Meinung nach) better to have a VARIETY of weapons used so that one resource isn’t eaten up too quickly. Zum Beispiel, the first time I made it to the hospital sector I was given the opportunity to recruit another nurse (giving me TWO nurses and my hero) because hAvInG tWo SuPpOrTS mUsT bE oVeRpOwErEd. Long story short nurses use CHEMICAL resources when they heal and I was consuming twice as much with two and did not have enough damage output. Perhaps it can work sometimes, but it didn’t for me. I would avoid doing so until you are much more comfortable with the game.
To Provide An Example Of Party Variety, I will simply share the party I won a playthrough with
- Cara (My Hero): Shanks and bleeds hoes (Melee no consumption)
- Nurse Nikki Minaj: Mends Hoes (Chemical Consumption)
- Officer Daddy: Shoots and Flashes (Bullets And Batteries).
This allowed my party to have an even distribution of resources.
Material Consumption
Now just because you destroy planet Earth doesn’t mean you can’t learn how to conserve your resources!
Jokes aside you’ll die if you aren’t careful with your resources. Below is the resources we have:
- Pistole ist auch
- Schrotflinte Munition
- Chemikalien: Heilt, Debuffs, Usw
- Batterien: Taschenlampen
The cards you collect will utilize these resources so please be cautious of what your card uses before casting it. For a while I was blinding enemies with my handgun because I was like this is SO overpowered, but then I realized it consumed three precious bullets on each use.
Other Materials:
- Pennies: Used to purchase cards, Materialien, items from merchants.
- Credits (Box with an eye shape on it): Used to purchase relics and a variety of other things…we’ll cover this later.
- Not sure of the name, but it’s three rows of little dots in the shape of a triangle: Gained from Anolette Dust, allows the user to heal a party member AFTER you clear the floor or remove a card from your deck back to the trunk.
- Kosten 1 to heal
- Kosten 2 to remove card
Utilizing weak versions of your attacks when necessary. CONSERVE, CONSERVE, CONSERVE. As a beginner rule of thumb try not to use resources if there is only one enemy you’re fighting. Save it for bosses, elites, and groups of enemies.
Randbemerkung: If you’re scarce on resources you can always avoid enemies if needed. But they drop nice loot (and sometimes resources). ICH, although risky actually fight every enemy on the floor if I feel comfortable enough doing so. Go at your own pace.
Shop and Gear
Geschäft:
- As mentioned earlier throughout the run you gain pennies which are used to make purchases from the shop keepers. There is a wide variety of cards, gears, and consumables to purchase.
- Make sure to purchase the credit cards as they give you credits to use at terminals, which I’ll get into later.
- I’m not going to tell you what to buy as it differs from run to run, but typically I’ll buy pills and any resources I need. Note the shopkeeper doesn’t have an infinite supply of these so be wary.
Gang:
- Gear is actually super important as you progress. I was initially a little frustrated because of the various status boosts and how many pieces of them you obtain but you’ll be glad for this later.
- Some gears provide initial status boosts, such as dodge (enabling you to dodge the next attack), along with stealth and other things.
- Some weapons have a dual wield bonus so look out for those
Weapons and Deck
Waffen:
- Messer: Uses no resource, Nahkampf. Used with knife cards, which appear red. Nahkampfangriff
- Profi: Keine Ressourcen, Can Inflict Bleed
- Con: Melee attacks may be reflected on some occasions depending on enemy status effects.
- Spritzen: Nahkampf, no resources on some attacks. Ranged may utilize some resources. Can Also Heal for resources. Cards appear green.
- Profi: Vielseitig
- Con: Can be heavy on material consumption
- Handfeuerwaffen: Fernkampf. Can also melee pistol whip for no resources. Cards appear blue?
- Vorteile: Pew pew
- Nachteile: Costs bullets
- Taschenlampen: Ranged for batteries, but some melee. Cards appear yellow?
- Vorteile: Light damage is great for certain enemies.
- Nachteile: Battery heavy. Batteries have many uses, so you may want to be careful.
- Schrotflinten: Consume shotgun bullets, otherwise no experience with them yet.
Deck:
I think to have a good first experience you should find your own play style. I will say Cara and the nurse have some of my favorite cards so far. I can’t walk you through EVERYTHING. Honorable mentions:
- Needle Stab
- Bleeding Cards
- Wiederherstellung (heal over time)
For the love of god don’t forget to immediately add your new card to your deck as soon as you get it. Get in that habit. If you don’t want to add a card to a deck, you can sell cards in your trunk.
Enemy Awareness
I’m not going to discuss most mechanics of enemies as I want you to explore them for yourself. However here are a few starting tips. Zusätzlich, I will mention a few of the tougher enemies on each floor. I may add tips to fight these „tougher“ enemies I included in the spoiler section for future reference.
Some enemies move around, Die roter Bereich surrounding the enemy is their personal bubble. If you step inside it you’ll trigger a battle.
Erster Bereich:
Enemies may move slowly and periodically with your steps. If you walk in a little circle (or square) while observing an enemy you may be able to see how it moves and get a pattern for its movement. This is particularly useful if you’re avoiding enemies because you are low on resources or are avoiding fights as you search for your first party member.
Watch out for:
- The Invisible Man (In Spoiler Section)
- Radiated Spiders
- Zombies
Second Area:
Enemies for the most part move more frequently. Be extra careful of the helper bots as I have had a few actually pursue me once they had a vision of me and they aren’t friendly. Another mechanic to keep in mind is to avoid THE BARRELS BECAUSE THEY GIVE YOU RADIATION.
Watch out for:
- The Invisible Man
- Semi-Automatic Rifle Robot
Third Area:
Jetzt, this could be a bug but I did not see the movement of any enemies at the hospital level. This makes sense though as the majority of them are zombies. This is great because it means you can’t get chased however, with them stationary it often means you MUST fight them to get to the desired area.
Watch out for:
- Crazed zombies
- Crooked zombies
Statusbeschwerden
The status ailments in this game will give you nightmares. And the amount of time they can last is actually insane. I won’t spend too much time in this section considering you can identify what each status ailment does by simply hovering over it with your mouse. With that said I will give some honorable mentions to statuses that will make your life a nightmare. Make sure to have a card that can remove debuffs. You need it in this game.
- Terrified (Found on the Third level)
- Sickly (You’ll understand when it happens to you)
- Virus 1: This one I will actually elaborate on. Be careful when fighting zombies as you have a chance to get infected when interacting with them. This status is „dauerhaft“ and at every 10 Stapel, you receive a virus card in your deck that can’t be discarded and damages you. It can also spread to allies. To combat this there is a cure that you can find later in the game. You can also remove the virus cards in your deck at rest areas after you complete a level. Keep in mind that it costs 2 per card.
Fight or Flight
To flee in this game you need to have some foresight. If you wait too late to flee it could result in your Tod. Once you attempt to flee a card will be added to your draw pile that will allow you to do so. The more cards in your deck the longer it may take to draw this card. You also receive no rewards from the battle if you flee. I have only fled twice from battles and it was far in advance.
Terminals And Relics/Trophies
These could be called something else but I call them terminals. They are machines found on each floor that give you welcoming music when approaching and you spend credits to make transactions on it. Aus meiner Erfahrung, it fills with three different relics/trophies on each run that could cost from 1-3 credits each. The higher the credits the more „selten“ a relic is however this doesn’t mean a rare relic will always be more useful to you.
3D Drucken:
- You can choose to sacrifice a consumable (such as pills) for one credit to add a blueprint to the machine. Once added it will always be available for the user to use on future runs. Note it will also cost one credit to print the item for future runs.
- You can’t add chemicals or bullets to my knowledge as a blueprint to the machine but alcohol, Pillen, and vitamins can be added. Primarily consumables.
Relics/Trophies
Just for future reference, I will always call these items relics. Essentially they are actives and/or passive giving items that appear at the top of the screen offering an assortment. These could increase your deck size, kritische Chance, radiate you for a buff. It just depends. Some relics are passive and apply to the battle overall while others must manually be assigned to a party member. You simply need to click and drag it to a party member for it to apply. You can sell relics you don’t want to the terminal I believe for one credit each. You can also sell them to the merchant but the terminal may be a better option in most cases.
Verbrauchsmaterial
There are a TON of consumables throughout the game. Some are gained from loot, secret bosses, or can be bought from the merchant. I will not go into detail about all consumables and instead will discuss the most important ones for beginners.
- Pillen: Heal ten health in exploration mode to a party member. Can be used to heal five health in battle (Only use it a battle for emergencies).
- Vitamine: Increase perm. health by 10
- Radi-Bye: Reduce radiation by 5. These have been pretty rare for me to find, but use them if you must. Radiation stacks over 40 will make your run a nightmare. Stay away from those barrels.
Ensure to loot everything you can!
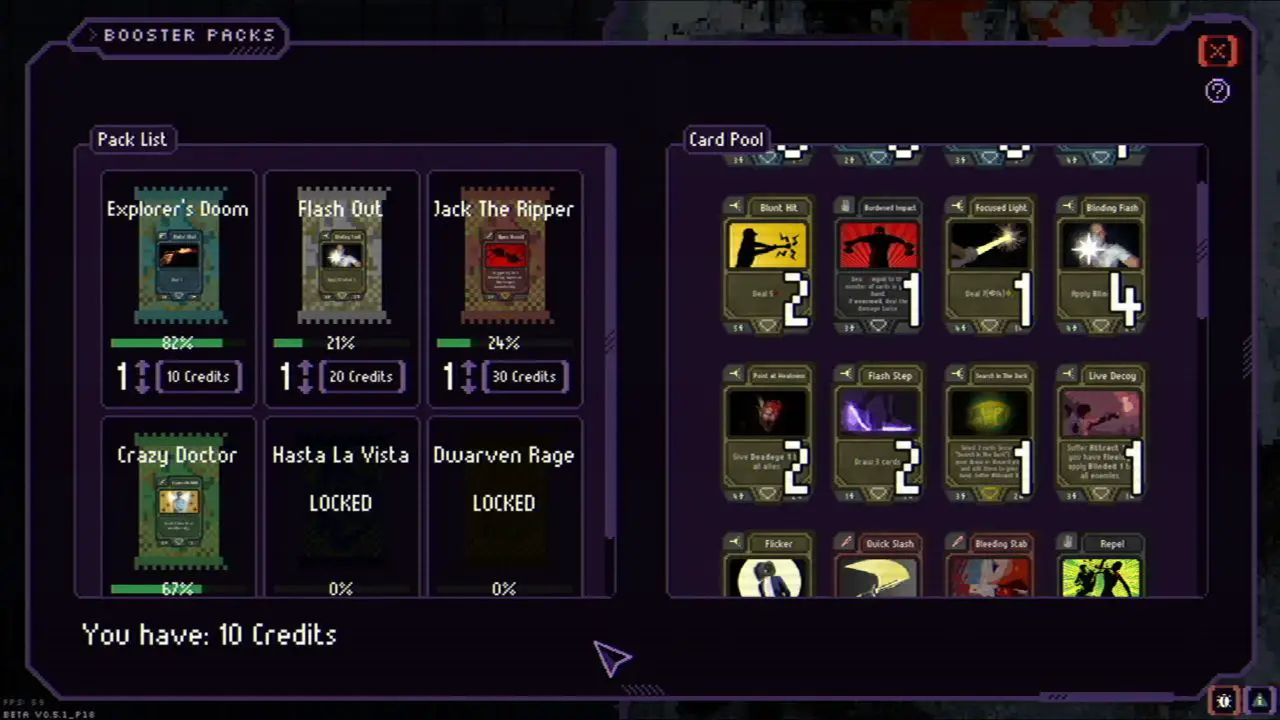
Booster Packs
Booster packs are more for when you’ve gotten the hang of things. Jedoch, they are equally as important. Once you complete a run you receive credits. I have gotten as many as 600 credits in a single run. Utilize these credits on booster packs that will add potential cards to your starter deck. This is important because it allows you to modify your hero’s starting deck before a run if you want to experiment with different builds.
The Daemon
This boss scared the FK out of me when I first encountered it. I have encountered him in both the first area and the second, but not the third (noch). You will know when he is near as you’ll hear heavy chains somewhere dragging along as the screen starts to glitch.
WARNUNG: Unless you’re a gamer god (Das bin ich nicht) I would flee if you encounter this monster on the first floor. You won’t be able to do too much damage to him.
Key Boss Factors:
- Distorts Time, limited time per move.
- Screen distortion makes it a little harder to see consumables and such.
- Has several annoying status effects.
- Delays your flee (don’t panic too much).
- He has a lot of health but he doesn’t hurt zu schlecht.
I encountered him again in the second area and was able to defeat him with three party members. My main strategy focused on Cara and my nurse stacking bleed effects until his death. A pretty long process but well worth it, he drops a consumable that resets a party member’s health to what it was at the beginning of a battle, während einer Schlacht.
Das ist alles, was wir heute dafür teilen Draft of Darkness Führung. Dieser Leitfaden wurde ursprünglich erstellt und geschrieben von MeiMeiSlays. Für den Fall, dass wir diesen Leitfaden nicht aktualisieren können, Sie können das neueste Update finden, indem Sie diesem folgen Verknüpfung.