- Titel: Dunkelster Dungeon
- Veröffentlichungsdatum:
- Entwickler:
- Herausgeber:
Information about Darkest Dungeon is still incomplete. Bitte helfen Sie uns dabei, die Details des Spiels auszufüllen Kontaktformular.
The Darkest Dungeon, home pf the epicenter of the madness and horrors corrupting the Estate and the Hamlet. It contains the 4 missions you must overcome in order to beat the game. This guide is intended to help you overcome them.
The Darkest Dungeon
This place is unlike any other region in the entire game, every DoT does a lot of damage, every stress-inducing attack causes a lot of stress, attacks hit hard, and every battle has a good chance to be your last there. Before explaining the missions themselves I’ll explain a few mechanics unique to the Darkest Dungeon:
- There are no obstacles, Fallen, or curios that require keys so don’t spend your money on them
- You cannot escape so easily from this place, if you must you will lose one random hero unless you only have one hero left, so unequip all of your trinkets before escaping if you have to.
- Reinforcements are always on even if you turned them off.
- Heroes who complete a DD quest will no longer count to your roster limit, however on Darkest and Stygian/Bloodmoon they will refuse to go back to the Darkest Dungeon, you can return them there on Radiant, but it will come at a very heavy cost of them starting with 80 stress and a 1% virtue chance. Which means everyone will only go there once.
- The maps are different than others, they are scripted which means that you can’t see them all at once but instead reveal themselves as you progress in the dungeon which makes normal scouting impossible. They are also always the same which makes planning a route easier
- There are no night-time ambushes so don’t spend your camping skills on them unless they benefit you in some way (Zuflucht, Zealous Vigil, usw.)
For the enemies, I will not provide the full details about them but I’ll leave their wiki pages if you want to see them in more detail, I’ll also leave the Wiki-Seite for the Darkest Dungeon itself if you want more details in the place.
What to take
Take every antivenom, bandage, holy water, Kräuter, usw. that you are offered except shovels, Schlüssel, and laudanum since there are no attacks that cause horror, no obstacles or curios that need keys. Do take a lot of food for healing purposes, there aren’t as many hunger checks here as there normally would be so you can use them mostly for healing.
Mit anderen Worten, take as many provisions that you can stuff in your inventory because these missions are going to make you use them a lot.
It is also important that you go into these missions as optimistically as possible to make yourself feel more confident but not too much Weil. Instead go in with this philosophy that I tend to use for the game, especially this part: “Hope for the best, prepare for the worst”
Ohne weitere Umschweife, let’s go into hell itself.
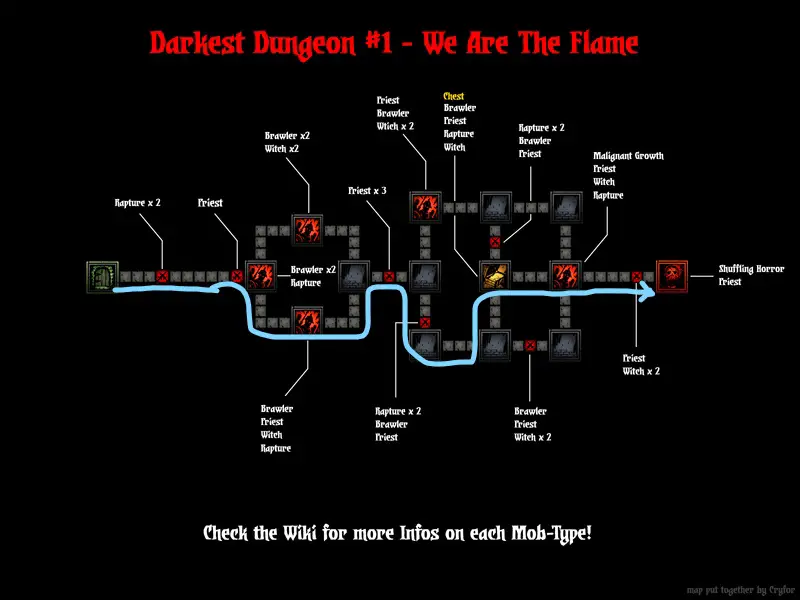
Mission 1: We are the flame
You’ll be up against 3 big problems here: Heavy bleed, heavy stress and being shuffled. Take a party that can deal with all of that as well as the enemies in this place.
Feinde
For enemies, es gibt 5 you’ll fight here excluding the boss objective, I won’t go into full details but rather give a summary of them:
- Ascended Brawlers: They function just like the normal cultist brawlers, the only difference is that their bleed hits harder.
- Ascended Witches: They function the same like normal cultist witches, the difference is that their marks stay the whole fight and stress hits much harder, they must be priority number 1 when they are present.
- Raptorous Cultists: All these guys can do is heal and guard others, the only good thing of their guard is that they don’t buff themselves when performing it, I recommend leaving them last so you can patch yourself up a bit before progressing.
- Cultists Priests: This guy is very scary for a couple of reasons. They’re quite tanky almost having 40 hp and have 2 Angriffe: one will hit your front 2 people doing 5 stress and potentially lowering their bleed resistances and another one which is much more scary because it hits one person (it can be anyone) and has a chance to do heavy bleed and 15 Stress, but what’s scary about it is that it has a 17% base crit chance, this guy should be priority number one unless there’s a witch in which case he would be number 2
- Malignant Growth: Tanky but not very scary, you’ll only run into one in this mission and all it can do is a medium bleed attack (4 PS) which can hit pretty nasty and a stun attack.
For the Shuffling Horror, the name is a hint, it has an attack that will shuffle your entire party so bring people who can put themselves back into position or don’t mind being moved around and that’s what makes this mission a little complicated because you’ll need a team that can survive everything beforehand and this. There will also be a Priest in the back, ignore him while the Horror is still alive, otherwise it will summon another one or a defensive growth and do a lot of stress to everyone and lower the torchlight by a lot (25).
Klassen
Bringen mindestens one character who can stress heal, in my opinion the Crusader is the best one here because not only can he do that, but Holy Lance and Zealous Speech will be really helpful for this mission and he’s quite tanky but because of that he will be playing support mostly.
For your medic I would recommend the Occultist because he still has a lot to use if he’s at the front and his debuffs are very helpful here, give him a +healing skill trinket so he can get bigger numbers with his heals.
Your other 2 people will have to be good damage people who aren’t affected by their positions, the Shieldbreaker and the Grave Robber function really well together especially with armor piercing against the Horror (es hat 33% prot.) Highwaymen and Bounty Hunters are also good here for additional damage against Humans, Markierungen, riposte, usw.
Recommended people: Crusader, Shieldbreaker, Okkultist, Highwayman, Grave Robber, Kopfgeldjäger.
The party I used here was the following:
- Shieldbreaker: Pierce, Puncture, Serpent Sway, Adder’s Kiss
- Graver Robber: Pick to the Face!, Lunge, Shadow Fade, Toxin Trickery
- Crusader: Schlagen, Holy Lance, Inspiring Cry, Battle Heal or Stunning Blow
- Okkultist: Wryd Reconstruction, Vulnerability Hex, Weaking Curse, Daemon’s Pull (give him Sacrificial Stab against the Horror)
Anmerkungen
Avoid any fight with 2 witches, they’ll take your party’s stress out of control, there will be one fight with that you can’t avoid but focus on them first, down below is a map with my recommended path.
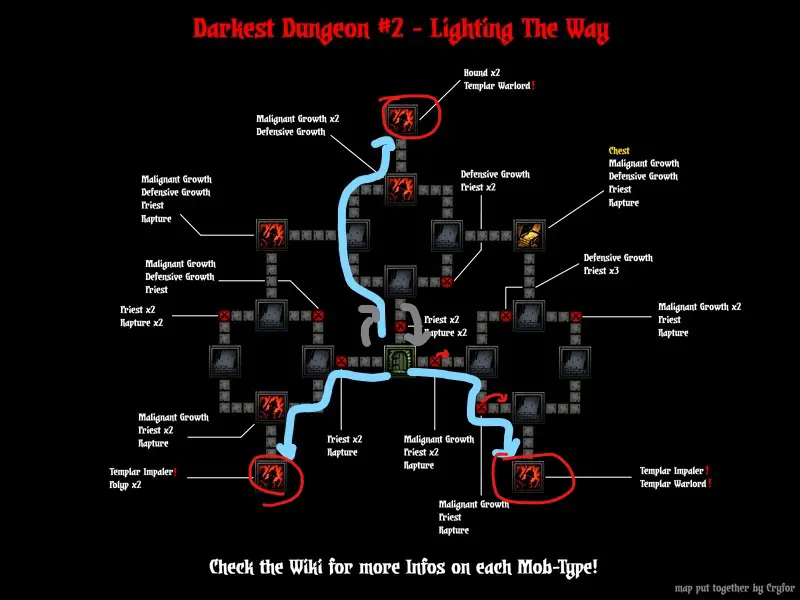
Mission 2: Lighting the Way
This is probably the toughest of the 4 because it’s nearly everything thrown together: bleeds, blights, Schwächungen, Stress, 3 mini-boss fights and a trinket handicap.
Feinde
A lot of the enemies from the first mission return here, those being:
- Cultist priest
- Raptourous cultist
- Malignant growth
There are new enemies here, those being:
- Defensive growth: Tanky like the malignant one, all it can do is guard (giving itself protection in the process), heal a lot but only to low health enemies, give an long lasting accuracy and crit buff (10% each for 4 Runden) if it’s the only enemy left it will use a full party stress attack (it can also use it if only a raptourous is left)
- Polyp: Found only in the left crown, it can blight and mark simultaneously and move heroes back, if you force it to the very front rank it will use a very weak attack to go all the way back.
- Flesh Hound: Found only in the top crown, it has a medium hitting attack with a 12% crit chance which also gives 5 stress and does more damage to marked heroes, it can drag heroes forward and potentially stunning them in doing so, if at the very back it will use a weak attack to go up front.
But the biggest threat here are the templars which I’ll go over here:
- Templar Impaler:] It has a single hard hitting attack with a chance to give 10 blight damage, a stunning and moving attack that will also move him forward, and a hard hitting attack that hits the front 2 Helden.
- Templar Warlord: It has the same attack hitting the front 2 heroes as the Impaler, an attack that hits the entire party with a chance to blight, and a single hard hitting attack that can blight and debuff.
They may sound bad, but I haven’t mention the worst thing about them, and that’s that they both share a hard hitting stress attack being Revelation (16-26 Schäden und 40 Stress) you can protect your heroes with the Talismans of the Flame you got in the previous mission, however there are only 3 so someone will go without it.
Klassen
You’ll need someone who can guard the hero that goes in without the talisman. I strongly recommend the Man-at-Arms and the Houndmaster together, but in terms of guarding the MaA is the better option.
Es gibt 2 comps that actually work pretty well for this mission and they are: The Hunting Hounds of Hell (Hellion, MaA, Houndmaster, Vestal) and Mark and Bark (Kopfgeldjäger, MaA, Okkultist, Houndmaster) I’ll explain in detail their potential:
- Hunting Hounds of Hell: The Hellion is your main damage source here, and a really good one especially if you buff her crit chance then she’ll one shot most enemies like that. The MaA can guard whoever goes without the trinket, his camping buffs „Weapons Practice“ Und „Taktik“ are an absolute must go together for a lot of durability, his other buffs like Bolster and Bellow are also really helpful, Bellow in particular can help you a lot outside of the crown battles. The Houndmaster can stress heal with Cry Havoc, guard whoever goes without the talisman, his additional damage against the various beast enemies will shine a lot. The Vestal it’s the healer, simple as that.
- Mark and Bark: This comp relies on blowing up enemies with marks. The Bounty Hunter can take on the raptourous quite easily as well as the Templars with „Planned Takedown“. MaA is for the same reasons as the other comp but Bellow shines more with the 5% crit received debuff while marked. The Occultist provides the marks and can heal, just be careful with his unpredictable single-target healing. The Houndmaster is for the same reasons as the other comp.
Mit 2 campfires and 3 rooms to reach, it is important that you plan your route as well as the order in which you’ll take on the crowns. The left crown has an Impaler and 2 Polyps, the top altar has 2 Flesh Hounds and a Warlord, and the right altar has both Templars. I strongly recommend you leave the right altar last rather than dealing with it first.
I recommend handling them clockwise (links, Spitze, Rechts).
Empfohlene Klassen: Hellion, Man-At-Arms, Houndmaster, Vestal, Okkultist, Kopfgeldjäger, Arbalest/Musketeer.
Skills for the Crown battles:
Hunting Hounds
- Hellion: Böser Hack, Ausbluten, If it Bleeds, Adrenalinschub
- Man-At-Arms: Zerquetschen, Verteidiger, Vergeltung, Bolster
- Houndmaster: Hound’s Rush, Wachhund, Cry Havoc, Lick Wounds
- Vestal: Urteil, Dazzling Light, Divine Comfort and Grace
Mark and Bark
- Kopfgeldjäger: Collect Bounty, Come Hither, Beende ihn, (Whatever you want for the 4th skill)
- Man-At-Arms: Same as Hounds
- Okkultist: Wyrd Reconstruction, Sacrificial Stab, Vulnerability Hex, (Whatever you want for the 4th skill)
- Houndmaster: Same as Hounds
Non-Crown Battles:
- Hellion: Böser Hack, Ausbluten, Barbaric YAWP!, Adrenalinschub
- Man-At-Arms: Zerquetschen, Verteidiger, Bellow, Bolster
- Houndmaster: Hound’s Rush, Wachhund, Cry Havoc, Lick Wounds
- Vestal: Urteil, Dazzling Light, Divine Comfort and Grace
Mark and Bark
- Kopfgeldjäger: Collect Bounty, Come Hither, Beende ihn, (Whatever you want for the 4th skill)
- Man-At-Arms: Same as Hounds
- Okkultist: Wyrd Reconstruction, Sacrificial Stab, Vulnerability Hex, (Whatever you want for the 4th skill)
- Houndmaster: Same as Hounds
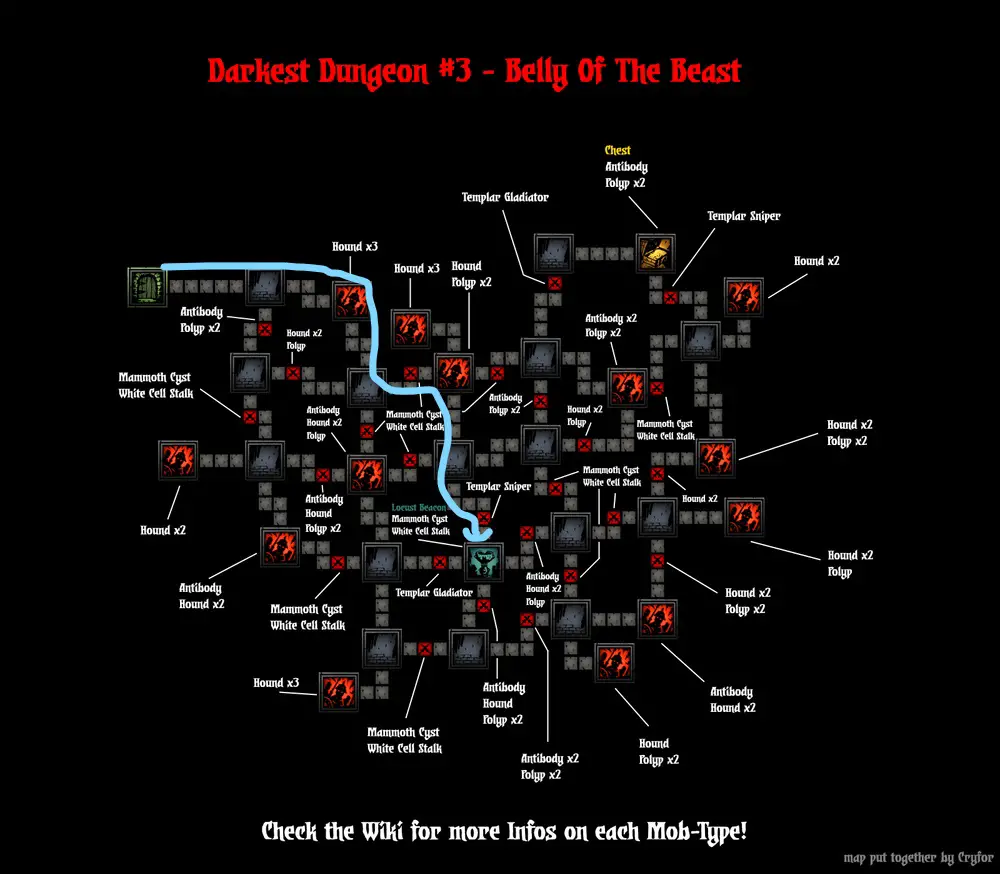
Mission 3: Bauch des Biests
The game insists that this is the hardest one of the 4 with its loading screen, a quest length of „Exhausting“ and by giving you 4 campfires, but it’ll only be the case if you have no idea where you need to go or how to handle the mission’s main gimmick.
Feinde
In terms of the enemies there really aren’t that scary aside from the gimmick ones, most of them are nearly the same ones all the time, Sein:
- Flesh Hound
- Polyp
- Antibody: All these guys have is a stunning attack, with a pretty high chance and it also does some decent damage.
You’ll also run into the templars from the previous mission but don’t freak out about these guys, they are significantly weaker than the other ones, nur haben 1 action per turn and lacking revelation, however they make it up for a lot of dodges (46 um genau zu sein). The rest of their moves are pretty much the same. The Templar Sniper is essentially the Warlord and the Gladiator is the Impaler.
The main gimmick is the Mammoth Cyst-White Cell Stalk duo that appears throughout the map and in the objective room. The Cyst has 2 turns per round and its attacks consist of a heavy stress attack with a damage debuff and a heavy blight attack (8 DoT) that does quite a lot of base damage and can crit quite nasty but the % for that is not that high, both of those attacks can target either 1 oder 2 people of any ranks. When it reaches half health it’ll begin to use a self-healing ability that also gives it a damage buff for 4 Runden, if a Cell Stalk isn’t present it’ll spend one of its actions bringing it back. The Cyst is also quite resistant to stuns and blights, but it’s susceptible to about everything else. It also takes up the front 3 Ränge
The Cell Stalk has a shuffling ability that also applies a speed debuff, but the shuffling chance is quite low, it also has a healing ability that it can use on either itself or on the Cyst while also applying a protection and speed buff, Jedoch, it has a really nasty ability which will teleport your party to a random room in the corner of the dungeon map, if there is a fight in that room that you haven’t discovered you won’t be able to retreat from it. It is also susceptible to about everything but it is a little more resistant to blight. The Cell Stalk will be at the very back rank.
The Cyst has quite a lot of hp and also some protection to chew through, but the Cell Stalk while having some moderate hp (25 um genau zu sein) it does have a lot of speed (8) and a lot of dodge (fast 40) and since this thing can teleport you, it must be your priority kill every time it shows up in the Cyst battles.
Heroes to bring
Accuracy and crits can make this mission into an absolute joke which is why a Jester spamming Battle Ballad can make this mission so easy. The Vestal to me is your best healer here because of reliability and full party heals against the damage you could potentially end up dealing with, even though the Occultist has some pretty good debuffs and damage against all of the enemies here, I wouldn’t take him as a main healer. The Leper combined with Revenge and the Jester can get you through a lot of the enemies really fast and easy. A Highwayman with the Gunslinger’s Buckle can make easy work of the Cell Stalks as well.
The party I recommend is a: Vestal, Narr, Highwayman, Leper in that order, you’ll have to change some of their combat skills depending on the battle which is why I’ll specify those skills at the end, for camping, I strongly recommend you do Reflection, Clean Guns and Tiger’s Eyes on the Highwayman since he’s on Cell killing duty.
When you’re fighting the Cysts, spend your first turn buffing everyone with Battle Ballad, Revenge and Tracking Shot, you’ll get through the battles quite well like that.
Skills for normal battles:
- Leper: Hacken, Hew, Solemnity, WIthstand.
- Highwayman: Open Vein or Wicked Slice, Pistole erschossen, Grapeshot Explosion, Duelist’s Advance.
- Narr: Inspiring Tune, Battle Ballad, Slice Off, Finale.
- Vestal:Urteil, Dazzling Light, Divine Comfort and Grace.
Skills for the templars:
- Leper: Hacken, Intimidation, Solemnity, WIthstand.
- Highwayman: Open Vein or Wicked Slice, Tracking Shot, Point-Blank Shot, Duelist’s Advance.
- Narr: Inspiring Tune, Battle Ballad, Slice Off, Finale.
- Vestal:Urteil, Dazzling Light, Divine Comfort and Grace.
Skills for the Cysts:
- Leper: Hacken, Rache, Solemnity, WIthstand.
- Highwayman: Open Vein, Tracking Shot, Pistole erschossen, Duelist’s Advance.
- Narr: Inspiring Tune, Battle Ballad, Slice Off, Finale.
- Vestal:Urteil, Dazzling Light, Divine Comfort and Grace.
Anmerkungen: The map is designed to wear you down in stats, supplies and sanity. You’ll need to buff your accuracy and speed a lot throughout the dungeon so that you are on par against the enemies, if you do get teleported, look at the map provided here to get back on track towards the Beacon and use your camps when you’re in need of a recovery or an offensive use. For the Cysts the minimum you’ll run into is 2 so be ready to face them with your buffs, I recommend you avoid them unless there is no other way around them.
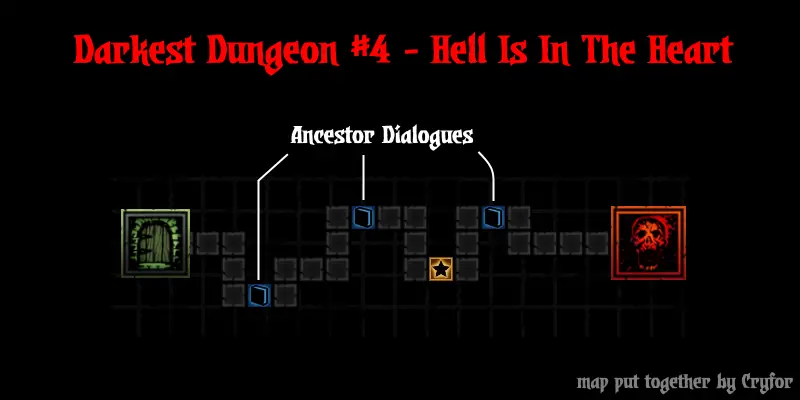
Mission 4: Hell is in the Heart
This is probably the easiest one of the four, a team that can hit all of the ranks, heal physical and stress damage, sustain themselves for some rounds and have 2 Helden.
If Reynauld and Dismas are still in your roster you can send them both along with the rest of the party to get the achievement that involves them. But because of the Never Again feature it means they kann nicht go to any other DD quest prior to this one.
The map consists of nothing but a long hallway leading up to the final boss fight, you will encounter some dialogue obstacles from the Ancestor along the way (they do not need shovels to clear, just listen to them) there’s also a secret room that I’ll show in the map below. Once you get through the hallway the final combat will begin.
The final boss consists of 4 phases which I will describe below:
Phase 1
The fight will begin with the Ancestor summoning 3 Perfect Replications, he has 5hp but is immune to all forms of damage and most of his resistances vary from susceptible to highly resistant. Throughout the battle the Ancestor will summon Reflections with 2 Fähigkeiten, one has more chance to summon a Perfect one while the other has a 50/50 for a Perfect or an Imperfect one. Wenn er’s not summoning them or at some random points, he will heal them all.
The Perfect Reflections have a bleed attack that does a little bit of stress and does more damage to marked, and a heavy stress attack that can crit. It is also quite fast in speed.
The Imperfect Reflections have a lot less health and speed compared to the Perfect ones, they have a stun and mark attack and the same heavy stress attack as the Perfect, but it does less stress.
You might be wondering how to damage the real Ancestor here, well you do so by killing Imperfect Reflections, each one killed does 1hp damage to him.
To get through this phase easily make use of marks and stuns to control the amount of attacks you receive as well as to get through the Reflections fast so that the Ancestor is more likely to summon more.
Once you get through 5 Imperfect Reflections the second phase of the battle begins.
Phase 2
The real Ancestor will get rid of all of the Reflections and fill in the positions with Absolute Nothingness while growing in size, this time you can directly damage him in any way, most of his resistances lower to the around average level (most of them are at around 70%) with the exception being his move resistance at 0% and this will come in handy but I’ll mention why later.
The Absolute Nothingness functions like the Prophet’s pews in the sense that they’re just there to separate the Ancestor from you, they have 999hp and dodge and they’re immune to everything, but if you don’t want to pass your turn or move a hero you can have them attack the Nothingness.
The Ancestor himself has around 250hp and 3 Angriffe:
- An AoE attack that will target 2 random ranks, doing some bleed and stress.
- A full party attack that does some small bleed and stress.
- A heavy stress attack that can shuffle and debuff speed, crits, and damage all at once.
All of these attacks shuffle him around the Nothingness (except for the shuffling attack) which allows heroes who can only hit the front rows to still be able to hit him, attacks that can pull him can also work to your advantage because of the 0% resistance he has to it. This phase is more of a durability test against your party more than anything. Once you lower his health to 0 the next phase begins.
Phase 3
The Ancestor will transform into the Gestating Heart and all it can do it that phase is a full party blight attack, attacking it in any way will heal the hero but has a chance to blight them at the same time, the blight damage and the amount of healing varies on difficulty.
The final phase will begin in one of 2 Wege:
- After the Heart uses the full party attack 3 mal
- If the party manages to kill the Heart before it uses its attack 3 mal
This is a recovery phase more than anything before the final stretch begins, you choose whether to tear away at the heart or prepare yourself for the last phase. You can also stun-control the Heart to give yourself more time to prepare or recover.
Phase 4
The Heart of Darkness will appear once phase 3 endet. It has the same hp as the Ancestor in phase 2 and has mediocre resistances to everything but stun and debuffs. Es hat 4 Angriffe: A heavy hitting bleed attack that also does some medium stress and focuses low bleed resistance heroes, a heavy hitting blight and stun attack that also does some stress and focuses heroes with low blight and stun resistances, and a heavy stress attack that focuses stressed out heroes.
Jedoch. The Heart has the hardest hitting attack in the entire game: Come Unto Your Maker which is an insta-deathblow to whoever is hit by it, there are a few things about this attack though:
- It will be used once when the Heart reaches 2/3 of its hp and there are 4 oder 3 heroes remaining in your party.
- It will be used again when it reaches 1/3 of its hp and there are only 3 heroes left (if you got here with 3 heroes then it’ll use it once, if you got here with 1 oder 2 heroes it won’t use it at all).
- Du get to pick who dies and who lives in this attack, so pick carefully, and this is why I mentioned having 2 heroes that can sustain themselves enough to finish the heart themselves.
If you attacked the Gestating Heart or if you managed to kill it, the Heart of Darkness will actually spawn with less health, um 1/4 Zu 1/3 weniger.
Außerhalb davon, the Heart isn’t that deadly, once it uses up its insta-kills it’s relatively easy to finish it off. There are some hero combos that can do so themselves like a Crusader and Leper, Crusader and Highwayman. Hellion and Flagellant, Occultist and Bounty Hunter, usw. So long as one can heal and one can attack you should do fine after that.
Empfohlene Partei: (if you want Reynauld and Dismas‘ Erfolge)
- Hellion: Böser Hack, If it Bleeds, Eisenschwan, Adrenalinschub
- Crusader: Schlagen, Stunning Blow, Battle Heal, Inspiring Cry
- Highwayman: Tracking Shot, Pistole erschossen, Wicked Slice, Open Vein
- Okkultist: Weakening Curse, Vulnerability Hex, Daemon’s Pull, Wyrd Reconstruction
There are really a lot of combination of heroes you can use against the Heart, just as long as they can they can keep themselves together with what I mentioned it should be fine.
Anmerkungen: You can survive both insta-kills if you manage to one-shot the Heart before it hits 2/3 of its health, but doing so is very hard to pull of because you’ll need to buff a hero with enough damage and crit for them to hoffentlich do enough damage to kill the Heart in one strike.
Sieg
Du hast es geschafft. Sie haben das Spiel geschlagen. I hope this guide is or was helpful for you to plan your attacks on the Darkest Dungeon, if you have some suggestions or questions you want to give feel free to leave them in the comments.
That’s about all, I wish you the best of luck in that hellish pit.
Das ist alles, was wir heute dafür teilen Dunkelster Dungeon Führung. Dieser Leitfaden wurde ursprünglich erstellt und geschrieben von Average Cat. Für den Fall, dass wir diesen Leitfaden nicht aktualisieren können, Sie können das neueste Update finden, indem Sie diesem folgen Verknüpfung.