
- عنوان: This Merchant Life
- تاريخ الافراج عنه:
- المطور:
- الناشر:
Information about This Merchant Life is still incomplete. الرجاء مساعدتنا في ملء تفاصيل اللعبة باستخدام هذا نموذج الاتصال.
A guide outlining what I’ve learned after some 15 hours of playtime. Including tips and advice about trading, المهام, and combat (not in detail, combat is a nightmare even after 15 ساعات). Hopefully this can help new players get a better grasp of the systems and what they need to do in the game.
Starting Perks
Top picks:
- Seer, for a leg up early game
- Stable hand, to race around the map and not be constantly paying out for damages
- باحث, more XP is just great.
Soldier:
- Bonus to combat, reduced mercenary costs, and bigger combat mission rewards.
This one isn’t great and I wouldn’t bother with it, while you can make money if you used this right your main income should be trading.
Sailor:
- +10 cart capacity, more deployment time in combat and lower cart damage penalties.
The extra capacity is nice but the other bonuses are a bit random, this isn’t a bad pick but there are better. Note it is lower cart damage penalties, your cart still gets just as damaged it just effects you less.
Stable hand:
- Bonus to travel speed, 50% off horse upgrades and lower cart damage.
This is a good one, speed is vital in this game so a flat bonus and 50% off horse upgrades is great and less cart damage will save you money. If you plan to do a pure trading game and take advantage of events this is perfect for you.
باحث:
- +50% xp, better chance to flee and some extra capacity.
This is good, levelling can be a pretty slow grind so handy to have, some extra capacity is handy but the flee chance isn’t great.
Smith:
- 25% lower building cost, more items from crafting and some extra capacity.
It’s a bit lower than Scholar on the list, لكن 25% off houses is good, just not game changing, where as levelling quicker is.
Seer:
- Extra 36 hours in market events and instantly know correct location for search missions.
This is likely the best perk if not second, extra market event time is invaluable especially early game when that’s how you’re making any kind of profit. Search missions sometimes don’t give enough time to check everywhere so this helps alot with that.
I think this is the best early game perk, helping you get the money you need quickly, it’s less useful late game when you’ve got a faster cart and the perk to make events last longer too.
Trading
Trading is the heart of the game, and what you need to be doing constantly.
Things to keep in mind:
- There is no in-game log of what you paid for your goods.
- Each town has its own pricing.
- Towns near each other generally have similar prices, big profits are usually taking goods further away.
- As you sell and buy goods prices change, keep an eye on this.
- Mid to late game ‘Buy all’ is your worst enemy, as prices increase as you buy more of the good, meaning you may get 10 at a great price, but then 30 at a bad price and 20 at a terrible price.
Suggested Trade routes:
These require you to open up the whole map in the unlock screen.
- Mountains to the plains for iron
- plains to the desert for ale
- Desert to everywhere else for exotic goods
Missions
As you travel between settlements, missions are an amazing way to either top up your income, or make a useless journey profitable (a journey where you won’t be selling goods on that trip).
Summary: Take combat missions whenever possible and delivery missions if you’re going that way anyway (peasants or letters).
Donation missions
- These are okay for building reputation but don’t produce a big profit.
Combat missions
- These are best once you’ve got a decent amount of guards. Even late game most of the fights are easy auto-resolve. I would advise before moving to any settlement you check if there is a combat mission on the way (preferably green, amber can work too). I found Archon and Randos usually have missions between them which can go up to a few thousand for killing a few wolves.
Delivery missions
- These can be good if you’re heading in a direction, but usually don’t pay enough to go out of your way for them.
Delivery and return
- عادة, peasants or a sword, not worth it as you likely won’t make money trading while doing this. In the early game when you don’t have many places to go it’s okay, but still not amazing.
Challenge missions: Pay okay but often require so much inventory space and have a high-risk level, overall not worth it unless you have a lot of guards.
Search missions: Early game when you’re asked to go to Atton, Woodford, and Serenity are fine but late game they often don’t give you enough time to do the mission and get back so don’t bother.
القتال
Top tip: Auto resolve, just do it. The combat is weird, random, and generally painful, save yourself the pain and auto-resolve.
Battles
First up, I’m sorry you had to be here, I don’t want to be here either; it’s horrible cruel torture but we have to get through this otherwise we can lose some trade goods, or if we run out of health (top right of the main screen) we get a game over. There are times in the main quest you are forced to interact with this system so here is some advice.
Just know that even after 10+ hours of playing the game, with high-level heroes and good quality guards I still lose sometimes from a series of bad rolls, so don’t expect much from combat.
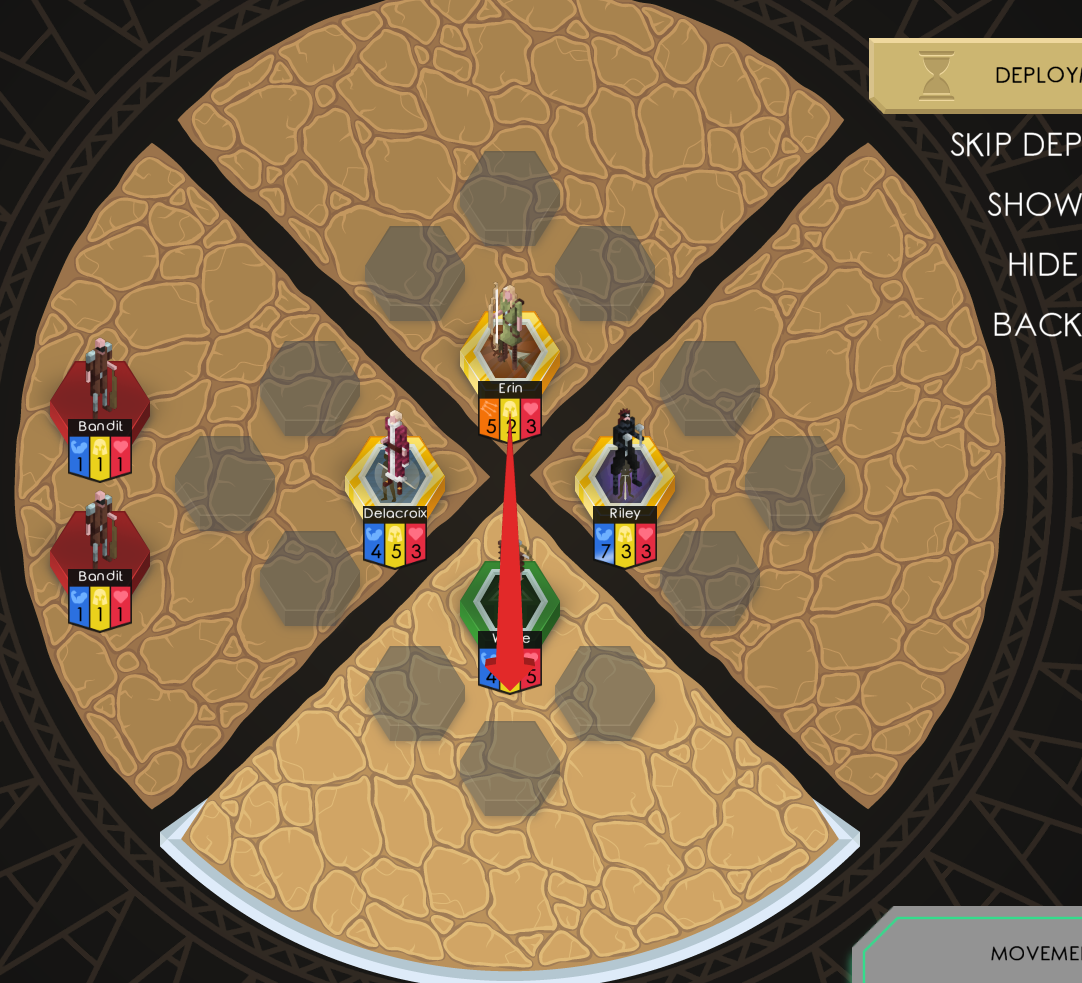
Deployment
You start at the deployment screen, showing your troops in a box on the left (one tab for regular troops, one for heroes) and the combat area displayed in the center.
First look at the combat area, the white and red icons with swords show where the enemy will pop up. If the enemy goes around uncontested in their segment you lose, so be sure to put your troops in the same segments as the red squares.
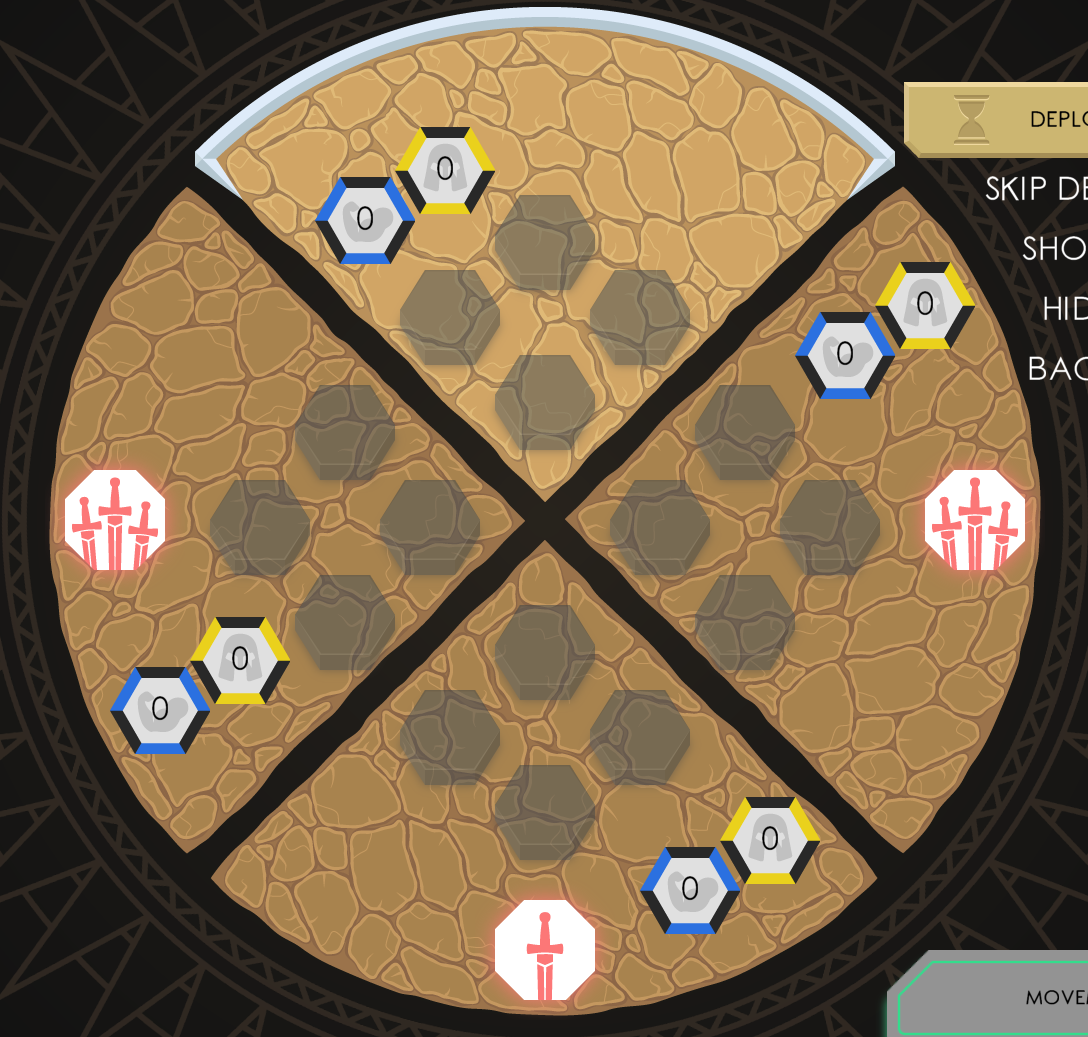
As seen in this image enemies will be spawning in the East, South, and West but not the North. The icon changes on how many enemies will be spawning, note south is 1 sword while East and West are 3 swords. So I will put troops in East, West, and South.
The other key bit of info is deployment time, the box in the top right corner. Each troop has time to deploy, and this icon shows the total time you’ve got to spend on them.

In this image, I’ve got 11 deployment times, so I can deploy 4 troops with 2 deployment times and 1 مع 3 or any other combination up to 11. Keep in mind each turn you get back a deployment icon.
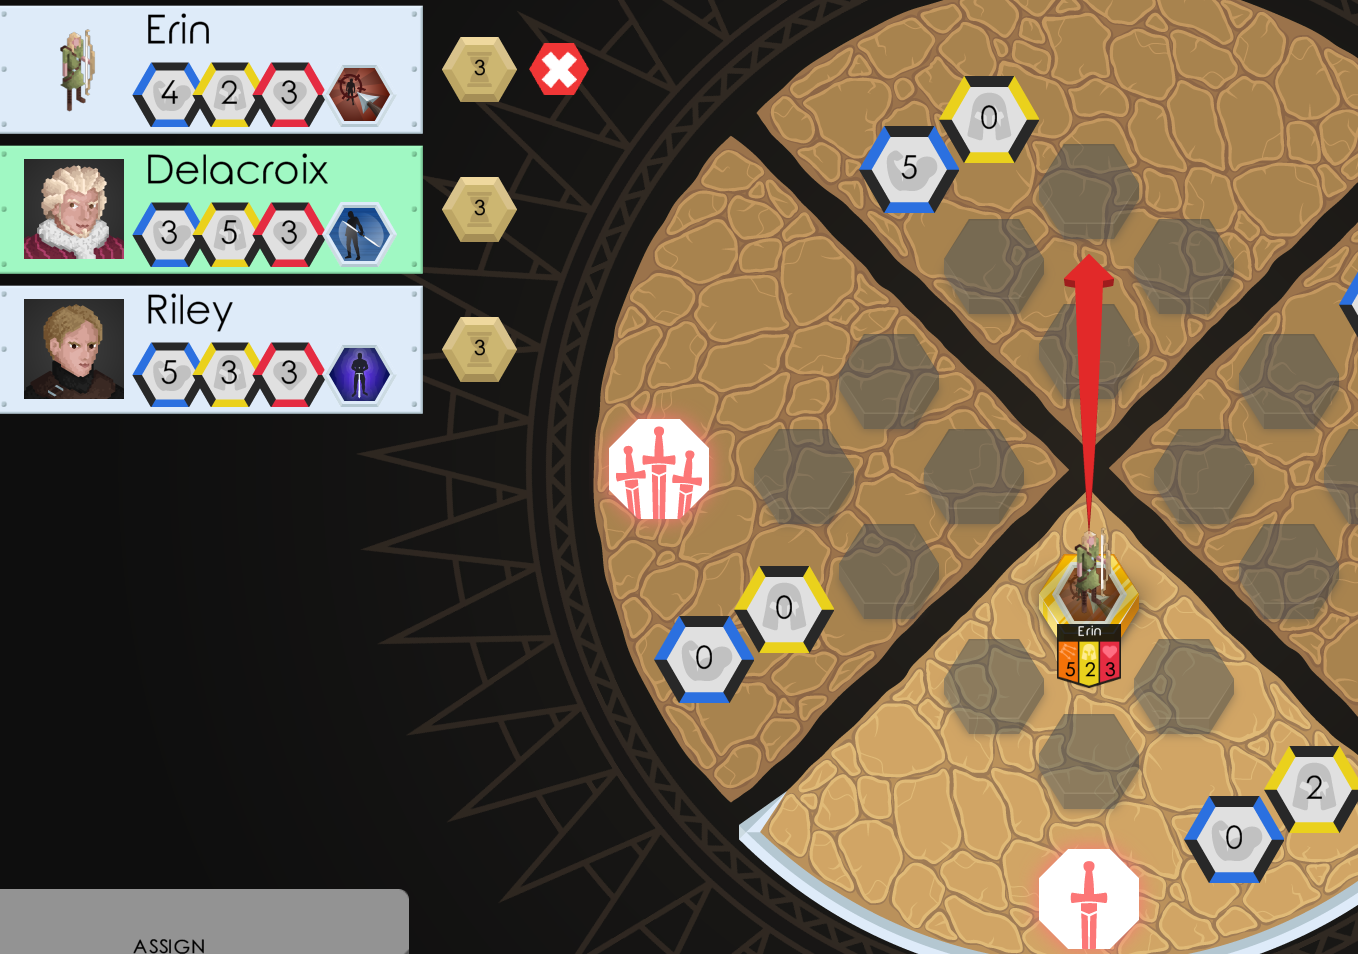
Extra thing to consider; Archers shoot across spaces. So an Archer in the north will attack units in the south (as depicted by a big arrow that blocks out other stuff on the screen). So first put down a melee troop in each enemy segment to ensure they don’t win immediately then maybe an archer in an empty segment opposite to help fight.
The last thing on deployment, if you put a troop in the wrong space, such as the archer in the image below, you can select the red X beside their unit card in the top left to cancel their deployment.
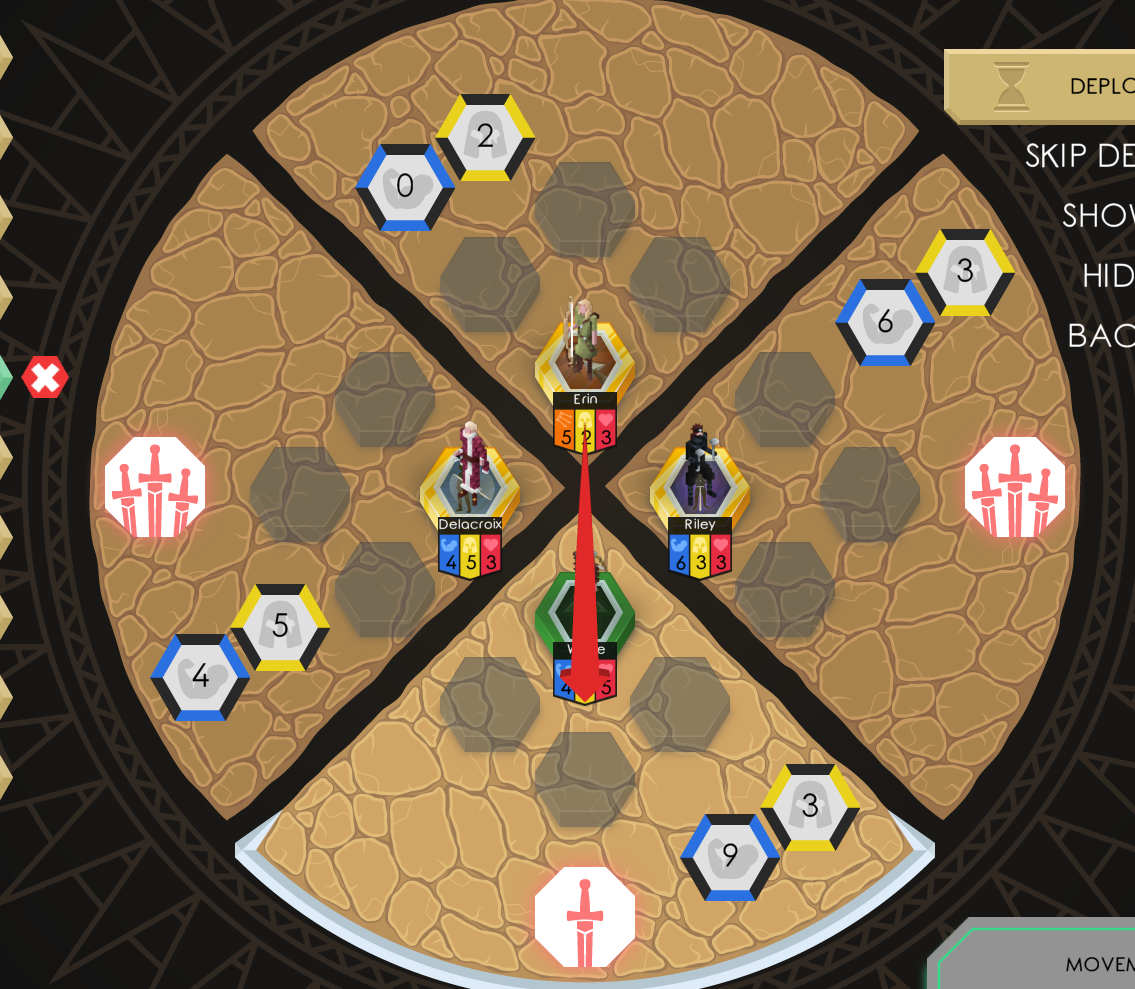
For completeness, here is an example of how I’ve deployed for this fight. Prioritize using heroes over regular troops as they are a lot better, and make sure every enemy segment has a unit in. As you can see I’ve put the archer hero in an unoccupied segment.
Movement Phase
Select a unit (single click) then click any of the arrows on their figure to move them accordingly. I specify single click as I’ve accidentally moved units the wrong way double-clicking. يكلف 1 deployment to move a unit, so plan this carefully.
Use this phase to move troops from an empty segment into one with enemies in. You can’t move anything after deployment though so not sure why it’s not skipped initially.
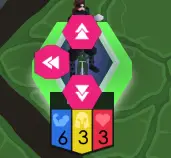
This is what it looks like for someone in the East, note there is no icon to move East as they are already there.
القتال
Once you have deployed your troops, select next, dice are rolled and attacks happen. Why are the dice rolled, what do they mean, and how many attacks? No idea really, but high green numbers are good and high red numbers are bad. After one turn of combat with the previous set up here are the results:
Still, an enemy remaining, so I may move one of the other melee characters into the square to help (wait for the movement phase).
The Band
Try to check in on them occasionally, make them practice until you’ve got a few points in the skills, largely ignore inspiration as a skill, the other two are better. Make them practice regularly, then occasionally make them perform.
You have to select ‘travel with caravan’ for them to move, and they will only move one town over with you unless you select it again. When they run out of energy they will rest until you come back and tell them to do something.
Each town has a band popularity feature, the more they perform there, and the better the performance is the higher the meter gets.
هذا كل ما نشاركه اليوم من أجل هذا This Merchant Life مرشد. تم إنشاء هذا الدليل وكتابته في الأصل بواسطة Cyber Submarine. في حالة فشلنا في تحديث هذا الدليل, يمكنك العثور على آخر تحديث باتباع هذا وصلة.