
Quick guide on setting up a rover/robot that tracks and follows the player without scripts. Only works on planets (في الوقت الراهن…) Will most likely be made obsolete by the A.I. تحديث.
Intro and Acknowledgements
أولا وقبل كل شيء, I am standing on the shoulders of giants here. Engineers like BlackArmor and Splitsie are two big names that got me thinking outside the box in this game. Heck, the gyro tracking system takes heavy inspiration from BlackArmor’s early (pre-turret controller) player tracking light designs.
I can’t remember why I designed the first player tracking rover. I think it was an exercise in design, to see what I could do without a programmable block. To those of you who comprehend C#, I salute you. I tried to understand object-oriented programming, and all I got was a headache.
I will be posting PTR-4, and its smaller (some may say “cuter”) cousin, the PTR-3 to the workshop. While it may be tempting to just go get the workshop blueprints, I would encourage you to build your own first. Now before you go and say “but I’m not smart enough” أو “I’m not good at stuff like this” use this guide as an opportunity to learn. Trust me when I say I failed a ton when designing these rovers, and the early designs were not aesthetic in the slightest.
Quick Primer on Gyros
To be honest, gyros probably deserve their own guide. في الحقيقة, I am sure better guides and tutorials have been made already. So here is a quick one to get you somewhat up to speed.
A gyro is a device that applies a torque, or a rotational force to a grid. Most of the time gyros are used with player input to control the orientation of dynamic (movable) grids. When the gyro override is enabled the gyro will attempt to spin the grid it is connected to, and ignore player inputs. The spin rate and axis of rotation are determined in the gyro settings. For player tracking, the gyros are overridden.
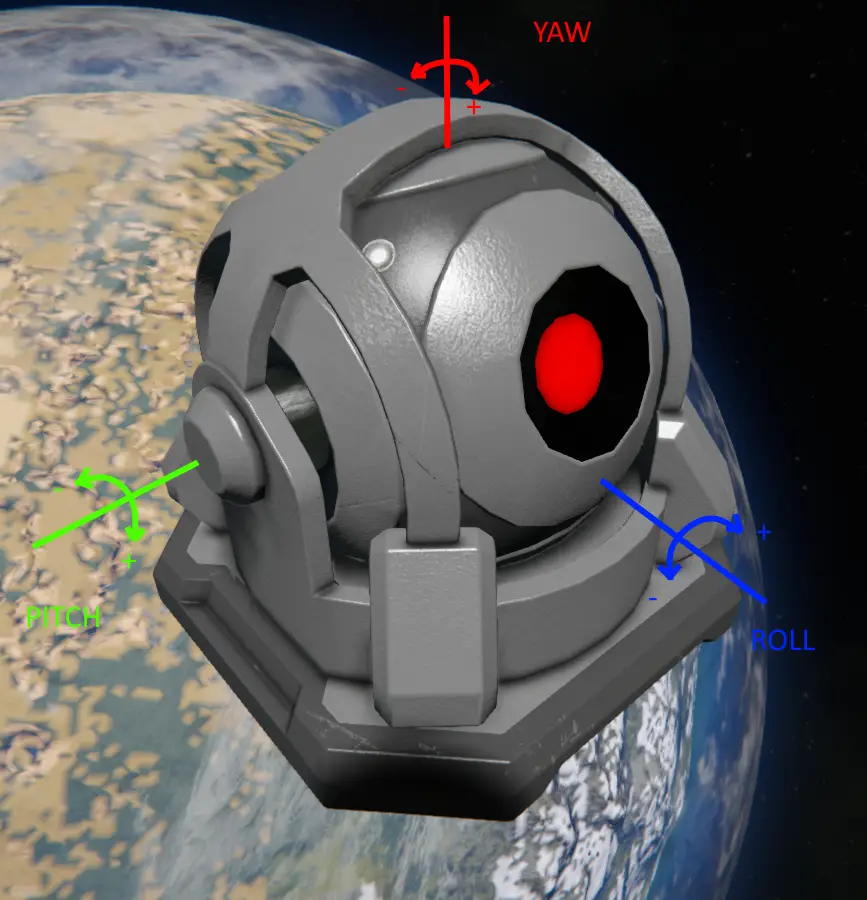
In the above image you can see the axes (“aksees”) of rotation on the gyro, and the direction of rotation given a positive (+) or negative (-) override value. Note that one side of the small grid gyro has one divot/dot (shown,) and the other side has two. This detail is crucial for proper gyro placement and tweaking of the settings.
The PTR-4 Basic Rover/Robot Chassis
The PTR-4 is the fourth generation of my PTR (or Peter) series of rovers, and the 5th variant in my development of script-free “robots.” I designed the PTR-4 layout to be open, و (أملاً) easy to understand. أقل, you can see the layout of the rover, and all of its components.
Some tips for building: I would recommend placing a block with a control panel first. This can be a sensor, or the reactor. You just need a way to access the control panel for the grid. This way you can rename the blocks as you place them, specifically the sensors and gyros (see layout image for my naming scheme.) I recommend building without symmetry enabled to make renaming easier. Trust me when I say it is easier to rename as you build rather than trying to figure out which block is which after you finish building.

Complete Parts List:
- Wheel Suspension 1×1 غادر (x2)
- Wheel Suspension 1×1 Right (x2)
- Light Armor Block (x4)
- Sensor (x3)
- Remote Control (x1)
- Gyroscope (x2)
- Timer Block (x1)
- Small Reactor (x1)
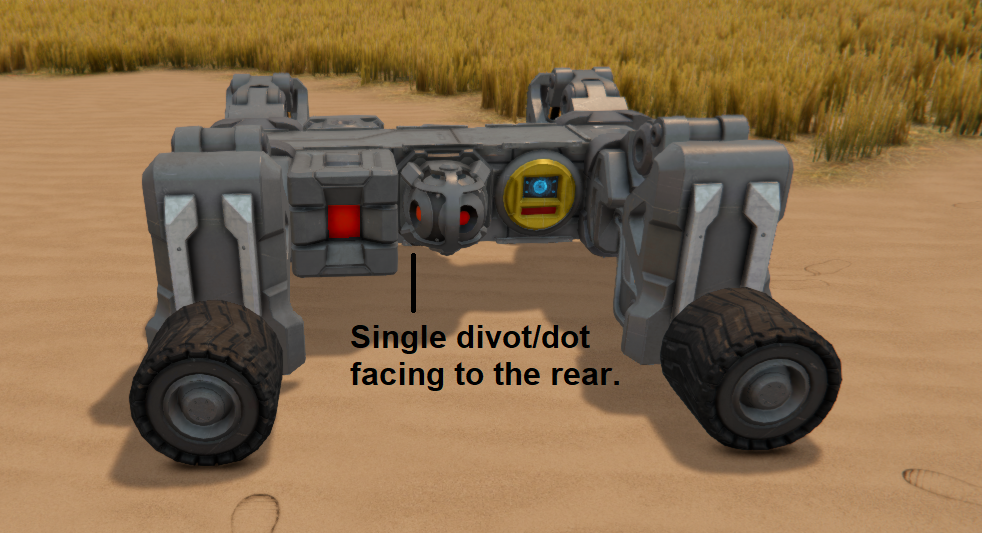
Note that in some instances block placement is important. If you are following this guide and copying the PTR-4 (or messing around with the workshop blueprints) there are a couple crucial details to consider. The first detail is the gyro. When I designed my first player tracking rover I made it so that both gyros had the single divot/dot facing the rear of the rover. This essentially makes the gyros mirrored, allowing for both gyros to have the same settings. The second detail is sensor orientation. While not as crucial, the sensors should be oriented so that the indicator strip is on the bottom, and the control panel at the top.
Grid Control Panel Setup
And now for what is probably the messiest part of building a player tracking rover: setting up the grid in the control panel. I really hope you renamed the components as you built them, specifically the sensors and gyros.
Wheel Settings
- قوة: 60
- قوة: 100
- Friction: 25
- Speed Limit: tunable (I use 40 kph)
- Propulsion Override: 10% (.1) – Right wheels may need negative override.
I like to group my wheels a few ways. First I make a group with all the wheels, this is useful for editing settings on all wheels at once. Next I make a group for the left wheels, then the right wheels. For some reason the right wheels may need a negative override. This will be covered in the tuning/debug section of this guide. After your wheels are set up make sure to toggle them off in the control panel until you are ready to test your rover. When testing your rover I recommend a low speed limit so you can catch any rovers trying to make a run for it.
Gyro Setup
Gyro setup is actually pretty simple. First make sure that both gyros are powered off. Next check the override box in the gyro control panel. If you are copying this guide, both gyros should have a pitch override of +18 RPM. This means that the gyro will attempt to spin the grid 18 rpm (it shouldn’t ever spin that fast though.)
Sensor Setup
All sensors should be set so that they only detect players/characters, and set to detect owner only. All other detection options should be set to “off.”
Front
- Detection Slot (left) Remote Control – Park on/off
- Detection Loss Slot (يمين) Timer Block – Trigger Now
- Left Extent: 2
- Right Extent: 2
- Bottom Extent: 2
- Top Extent: 2
- Back Extent: 5
- Front Extent: 4
غادر
- Detection Slot (left) Gyro L – Toggle on
- Detection Loss Slot (يمين) Gyro L – Toggle off
- Left Extent: 50
- Right Extent: 50
- Bottom Extent: 2
- Top Extent: 2
- Back Extent: .5
- Front Extent: 50
Right
- Detection Slot (left) Gyro R – Toggle on
- Detection Loss Slot (يمين) Gyro R – Toggle off
- Left Extent: 50
- Right Extent: 50
- Bottom Extent: 2
- Top Extent: 2
- Back Extent: .5
- Front Extent: 50
ملحوظة: If you’re like me, the bleeping of the sensors gets annoying after a while. Don’t forget to turn off the audible detection setting for the sensors in the control panel.
Timer Block Setup
The timer block is needed as a workaround. One of the quirks of sensors is that you cannot have the same “block action” trigger for both the detection (left slot,) and detection loss (right slot.) The game will move that action to the last slot you tried to set it in. Since the remote control block only has the parking on/off toggle, and not explicit on and off commands, we need the timer so that the front sensor can toggle the brakes when it detects the player, and when it no longer detects the player. To set up the timer, set the parking on/off toggle for the remote control block in the timer action bar. The time delay value does not matter for this build since the front sensor is set to “trigger now.”
Tuning and Debugging Your Rover/Robot
I’ll be honest, I am still actively experimenting with these myself. This section covers some issues that you may encounter while building your own rovers, as well as some tuning tips (mostly gyros and wheel settings.)
The wheels are spinning, but the rover is hopping, or tries to turn.
If you see this behavior after setting up your rover, check the wheel override direction. For some reason the last few PTRs I have built need a negative override on the right side wheels. If your rover starts backing away from you, you’ll need to flip all overrides on your wheels.
The rover won’t go, or won’t stop when the front sensor detects the player.
This issue is mainly due to the fact that the parking brake is toggled, and not explicitly turned on or off. If you run into this issue just access the rover’s control panel and change the parking on/off state in the remote control block.
The rover is circling the engineer and never stopping.
This is usually caused by an insufficient override value on the gyroscope. The rover is constantly turning, but the turning rate is not enough for the rover to ever “encounter” the engineer. لإصلاح هذا, increase the gyro override in small increments (~.5 – 1 RPM) until the rover no longer “orbits” the engineer.
The rover is turning erratically when trying to follow the engineer.
This can be caused by a few issues.
The first issue is that the gyro override is set too high. Try decreasing the override value by small increments until the tracking smooths out a bit. Be careful not to lower it too much though, as this can cause the “orbiting” behavior discussed earlier.
If your gyro settings look okay, but the tracking is still erratic, you can try lowering the friction of the wheels. Lowering the friction lowers the torque threshold for the gyros, and they will be able to turn the rover smoother. Be careful though, lowering wheel friction will impede the rover’s ability to stop. The rover will also need more time to get up to speed due to lower traction.
The rover stops at the engineer, but turns left and right constantly.
Similar to the erratic tracking section above, but there is one more thing you can try tuning. Increasing the back extent on the left and right sensors creates an overlap “corridor.” If the engineer is detected in this corridor both gyros will be active, and the rover will stabilize quicker. The width of this corridor will also affect the rover’s tracking accuracy (I am still actively experimenting with this method for tuning the rovers.)
The rover only follows the builder, and not the intended player.
To have a rover you made follow another player, set them as the grid owner. You will need to go into the control panel, select all modules in the control panel (ctrl+A for PC,) and transfer ownership to the intended player.
The rover is sliding all over, and not tracking the engineer.
Like with any rover (piloted or autonomous,) the wheel friction setting must be tuned for the surface the rover will be moving on. I find for most rock and dirt surfaces that 25% works fine. If your rover will be moving mostly on “slicker” surfaces like ice, or armor blocks, a higher friction setting will be needed.
The rover keeps running into the engineer, or not stopping fast enough.
This can be fixed in a couple ways.
You can increase the wheel friction so that when the brakes are applied the rover stops quicker. Be careful not to increase the friction too much as it can affect the rover’s tracking response.
You can also increase the front offset of the front sensor so the rover detects the engineer sooner, and has more distance to stop. The trade-off for this method is that the rover will take longer to start since the engineer will be in the “قف” zone longer.
هذا كل ما نشاركه اليوم من أجل هذا Space Engineers مرشد. تم إنشاء هذا الدليل وكتابته في الأصل بواسطة Djah00. في حالة فشلنا في تحديث هذا الدليل, يمكنك العثور على آخر تحديث باتباع هذا وصلة.