- عنوان: Skullborn
- تاريخ الافراج عنه:
- المطور:
- الناشر:
Information about Skullborn is still incomplete. الرجاء مساعدتنا في ملء تفاصيل اللعبة باستخدام هذا نموذج الاتصال.
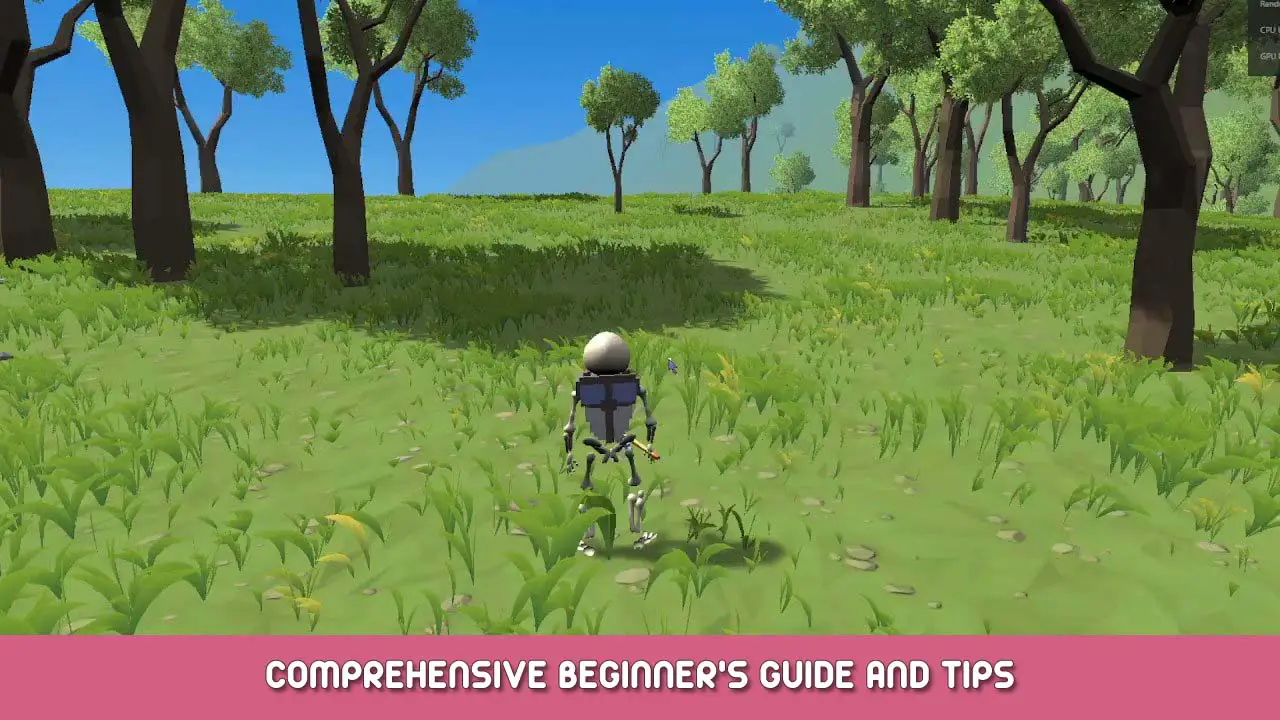
This is a guide written to help understand the game in all of its aspects.
Premise
Skullborn is still in early access, so things can change drastically and quickly, as the developer is still working daily on the game and releasing updates regularly.
This guide has been written based on my personal experience and my own knowledge of the game.
For further info or help with technical issue, join the discord community! (See home screen in the game to get there).
Tutorial
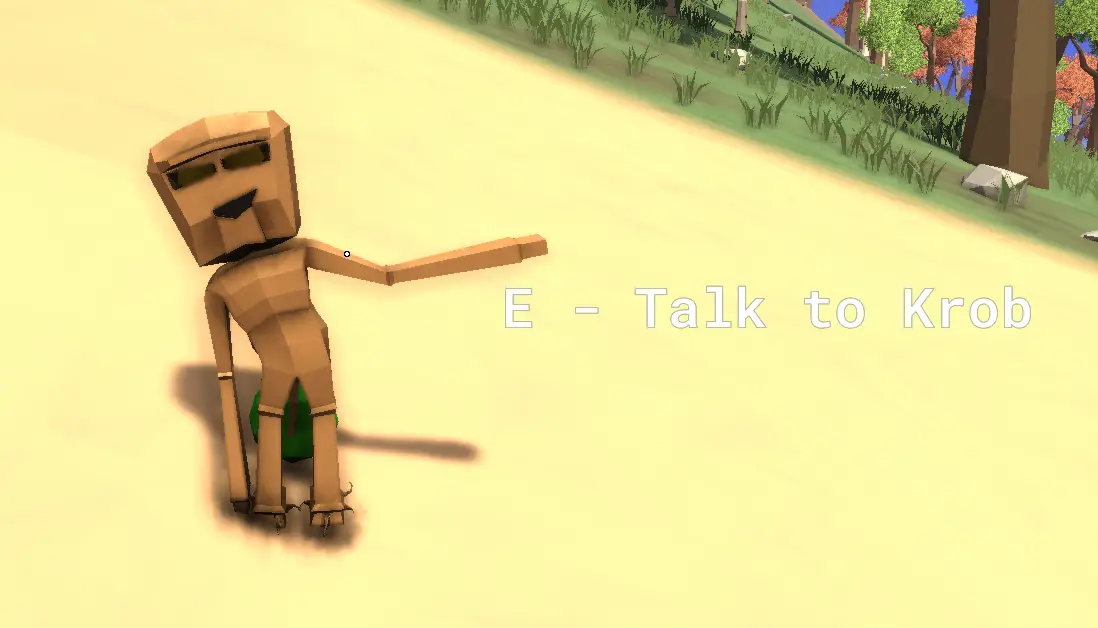
The game doesn’t currently have a “tutorial” in the classic way players expect, but they will meet Krob, an NPC that will teach them how to move your first steps in this new world.
Krob is also useful as a FAQ and to guide you towards better materials or to find closest dungeons!
Basics
Movement and actions in Skullborn are fairly standard.
It’s possible to configure movement which by default is the usual WASD for foward, left, backwards, يمين. Moving the mouse will also move the camera, left click of the mouse is usually for attacking and right click doesn’t do anything yet (unless you are in build mode) .
It is possible to roll forward by pressing shift.
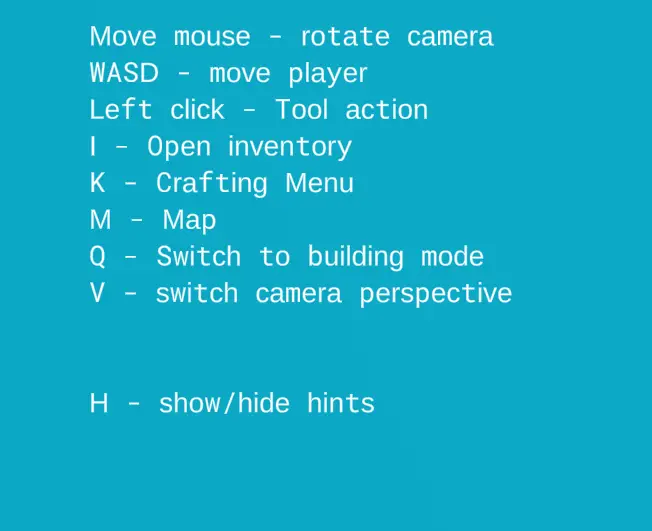
There are some shortcuts displayed in the top right corner that help remind you what buttons to press for various things like changing camera view (V) from 3rd to 1st person.
(أنا) opens the inventory, which is a basic grid, which allows you to see the equipment and materials you currently carry. At the start you will have nothing in here.
(ك) opens the crafting tab, from the same window as the inventory (so you can switch between them easily just with a mouse click) we will talk about crafting in a dedicated section.
(م) (not listed) opens the map, which is also another tab of the “inventory” نافذة. This shows your current location, nearby crystals and buildings placed by players.
The game uses X,Y coordinates to help you navigate and find your building site again, or simply to try meet with people you know.
إذا ضغطت (س) you enter building mode, which changes a bit what all buttons and mouse actions do, so this will also be discussed in a dedicated section.
Other actions can be enabled in the Settings menu, في “Other section. These include a “Photo Mode” و أ “Trailer Mode” which allow players to take breathtaking screenshots and create “events” that can be recorded (more on this in their respective chapters)
Biomes
in Skullborn you will find the following biomes, currently:
- summer desert
- spring forest
- autumn forest
- winter forest
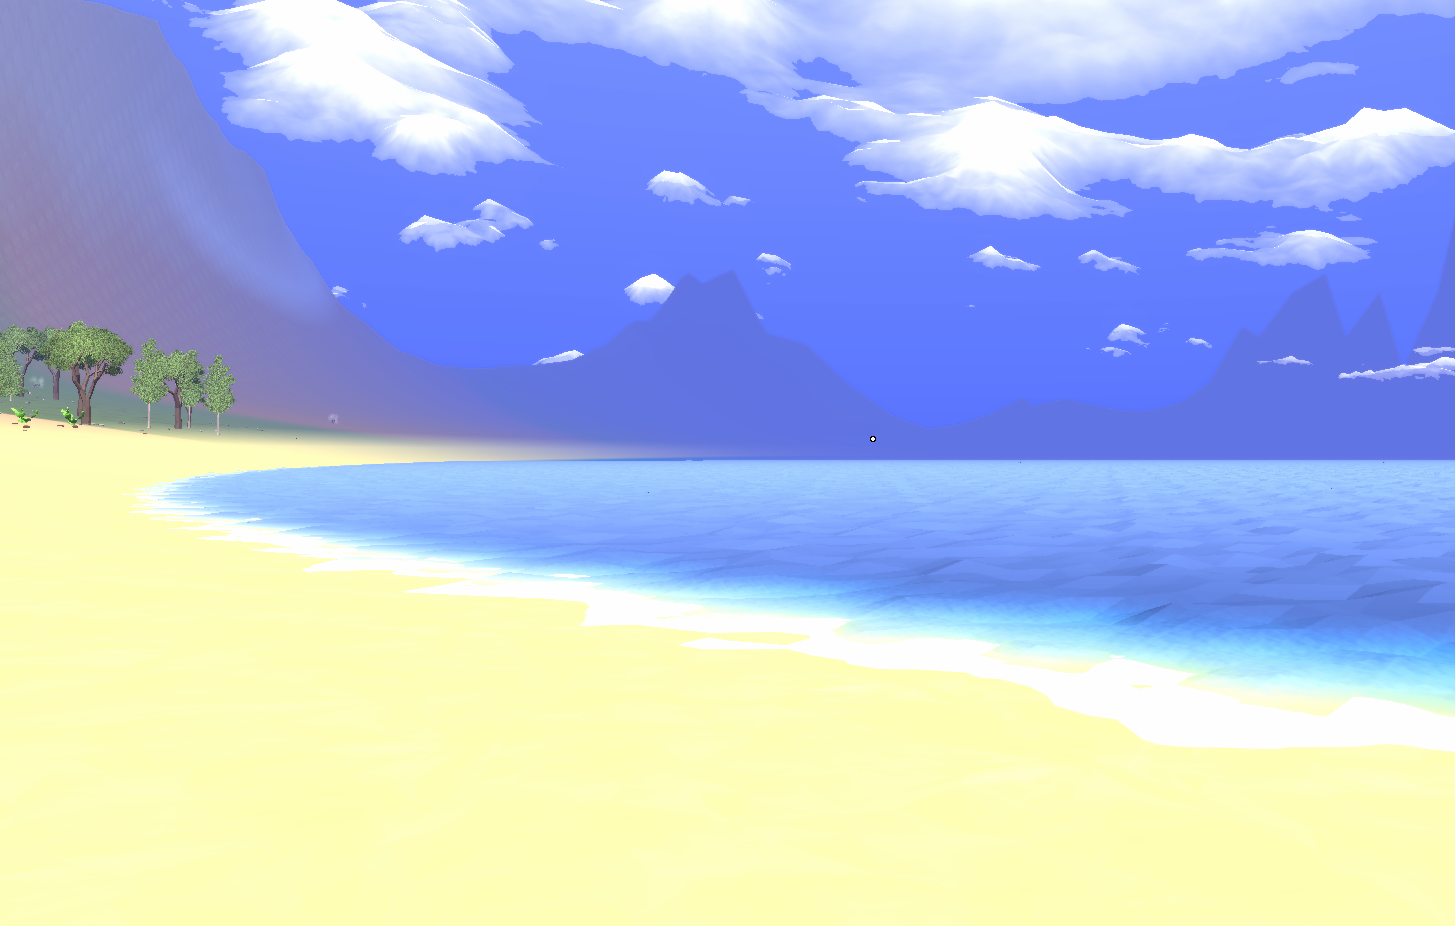
- sea/shores
- marshes
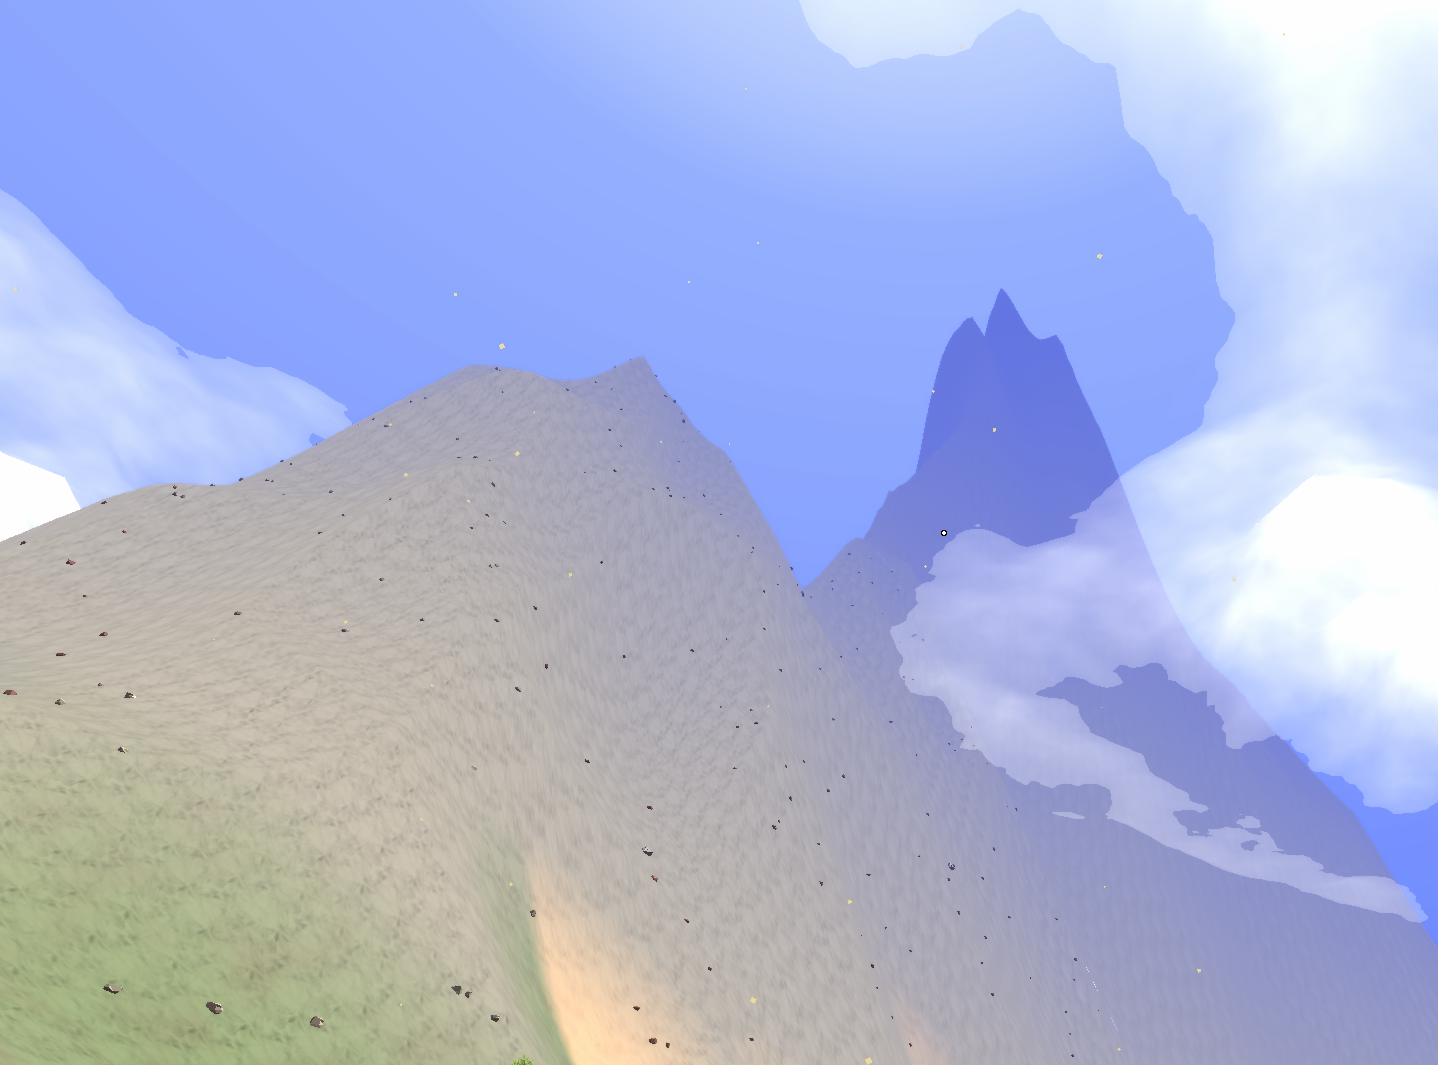
- mountains
In the Summer Desert you will find rocks and cacti.
In the Spring Forest you will find rocks and trees.
In the Autumn Forest you will find different types of trees and pumpkins.
In the Winter Forest you will find more trees.
In the Marsh you will find rocks and mushroom.
On the shores you might find some rocks but there’s nothing at sea. Non interactable crabs show up now and then though!
الأشجار, cactus and rocks will return to the biome where you found them, مؤخراً. Some trees will regrow quicker than others!
Mountains and Hills are generated independently from the biomes, and there doesn’t seem to be a particular rule other than the closer to the shore the less likely to find a mountain.
Biomes can host elementals of various types roaming around, but there is currently no particular connection between a type of biome and a type of elemental.
There doesn’t seem to be any connection between biomes and villages or crystals either, making it possible for any combination to happen.
It is unlikely to find crystals and villages on the shores or at sea, but a few rogue crystals have been spotted a few blocks away from the shores.
Gathering Materials
Skullborn requires the player to collect Chonxels (materials in different shapes) from the environment. There is different type of chonxels, which I’m going to separate in 2 categories:
ready to use materials
raw materials
Some chonxels can be gathered and used immediately. This category currently includes:
- حجر
- wood
- redwood
- cactus
- mushroom
- orange pumpkin
- green pumpkin
- yellow pumpkin
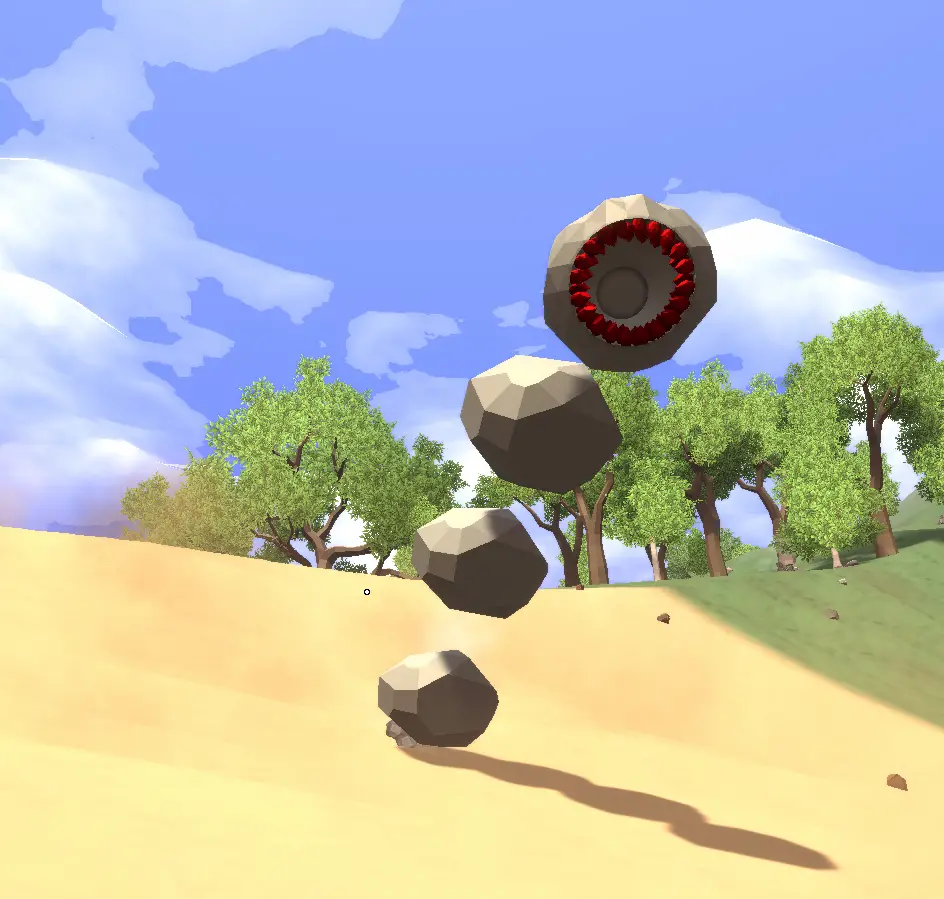
Stone can be collected by destroying rocks found on the ground.
Wood and RedWood can be collected by breaking trees. Each tree will first turn into a log and then into several wood cubes.
Cactus plants can be destroyed and will each give you a handful of cactus slopes (which is half a cube, more on material shapes later)
Mushroom will immediately give you a handful of mushroom cylinders.
Pumpkins will give you chonxels depending on the color of the pumpkin.
Raw materials currently consist of metal ores:
- copper
- حديد
- platinum
- mithril
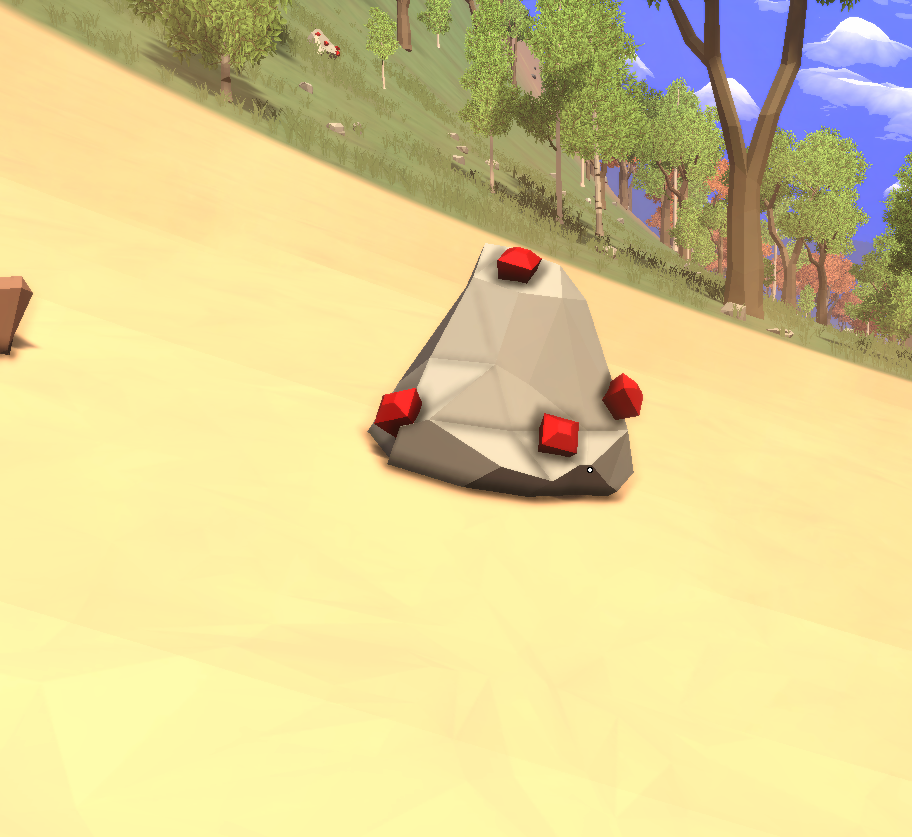
They are dropped by killing elementals or by “mining” veins, and rather than being specific to a biome, they seem to be placed depending on their proximity to the initial player spawning area.
Since there is several player spawning areas every now and then, as you travel you will come across more areas where other metals and materials can be gathered.
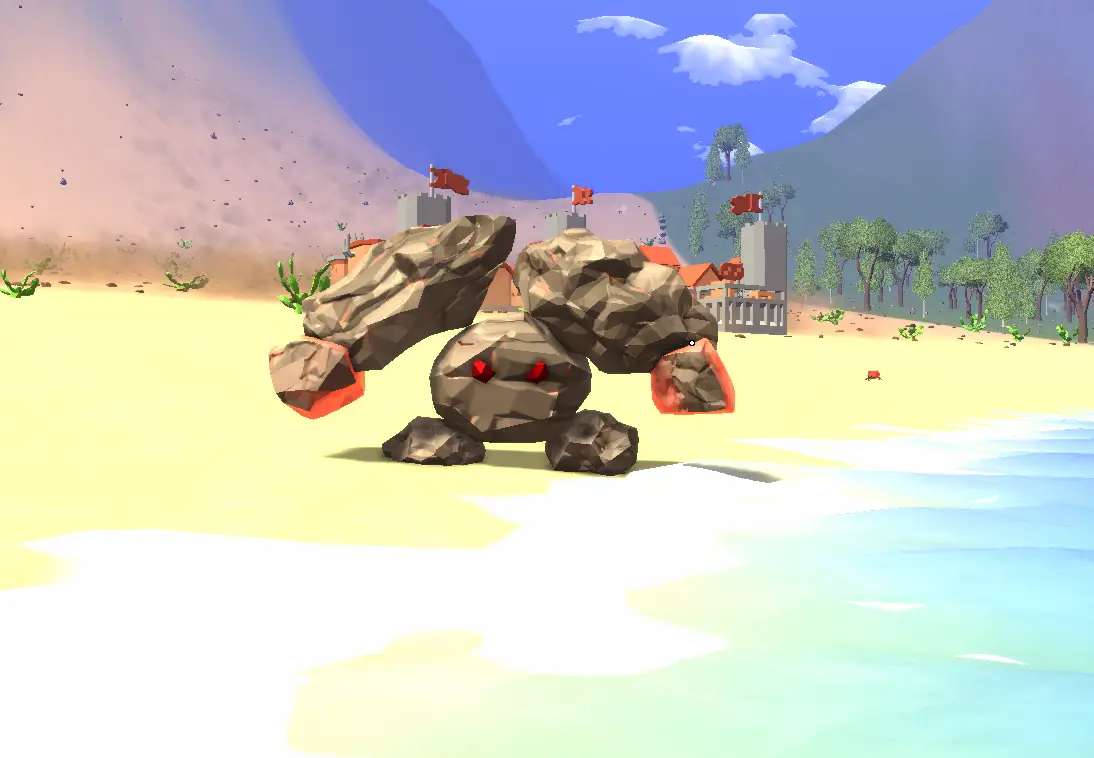
Copper can be found on orange colored elementals.
Iron can be found nearby in red colored elementals.
Further away you will find silver elementals that drop platinum ores.
Even further away you will meet the blue elementals that give you mithril ore.
Similar to how they spawn, elementals can be “summoned” by activating a crystal in a similar area (more on this in the crystals section)
All these ores you gather will also need a Furnace to be placed nearby an activated crystal to be turned into the final metal chonxel with the shape of choice. (More on this in the smelting section)
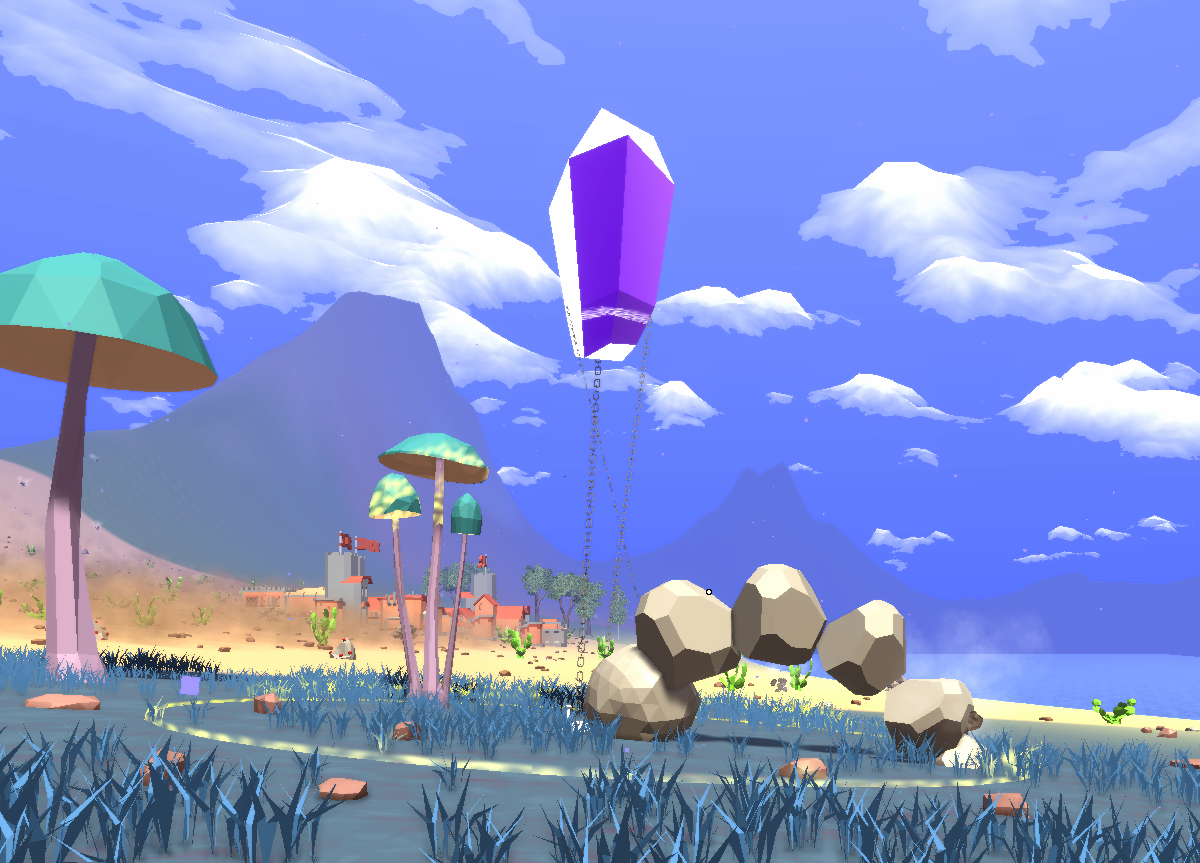
Crystals
These magical artifacts are scattered throughout the map and currently serve multiple purposes:
- activate to sync to a player
- provide power to furnaces
- set the player home point
- protect the area from other players
- create an area where a group of players can collaborate
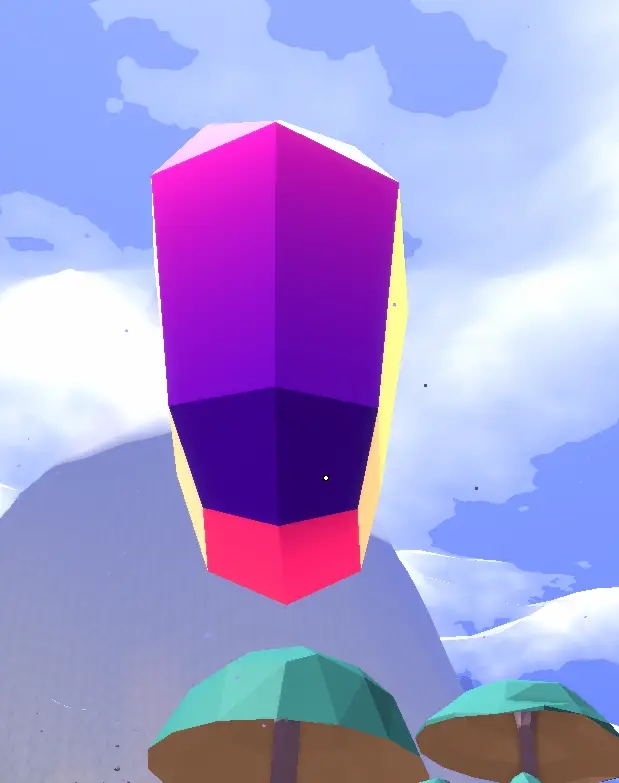
In their natural state, a Crystal will be floating and will have a purple color with orange reflections.
By going closer to a crystal you will find out whether it has already been synced to a player or of it’s free to be activated.
Once activated, you will have 2 percentages displayed on screen and a yellow/blue circle under the crystal.
Blue circle = player in proximity. This increases the % of sync of the player with the crystal. This needs to be 100% to complete activation for the player.
Yellow circle = player too far. The crystal cannot sync to the player.
Elementals will keep attacking the crystal until the sync reaches 100%. هناك 2 type of elementals that spawn: one is the usual “chubby” elemental, while another “skinny” elemental shows up during this type of events. Spawned elementals during the even should be of the same type of the area that you are in. Beware of other elementals roaming the area as they might join the fight making things more difficult!
The other % displayed is the “life” of the crystal. If it reaches zero, you failed to sync the crystal.
It’s not possible anymore for a player to build or place blueprints in the proximity of a crystal unless the crystal is harmonised with that player. This means other players cannot add or remove blocks to your constructions nearby a crystal.
This allows to build walled areas or “أبواب” you can open and close (by removing blocks) but that other players won’t be able to access.
It is possible to grant access to other players you trust, رغم ذلك, effectively creating an area where you and your friends can collaborate!
Crystal require energy to stay active. This is accumulated while killing mobs. Currently each mob will give you 10 energy when killed.
When a crystal is freshly activated, it will be at 100% charge and will stay active for at least 30 ساعات.
To reacharge the crystal, you will need to interact with it and open the energy window. From here you can press the ADD button to add a percentage of energy for 1 energy from your currency count that is visualised in the same window. If you keep the Add button pressed, it will keep trying to load energy until its full!
If a crystal reaches 0%, the buildings in the area will be faded out and other players might be able to harmonise with it. If you return to the crystal you will be able to reclaim it by directly adding more energy to it!
صياغة
So now you should have some ores and an active crystal. What do to next?
Let’s explain further the crafting system!
Crafting in Skullborn is done in a few ways:
- create buildings in the world (see build mode section)
- create blueprints for buildings you placed in the world (see build mode section)
- unlock standard blueprints to craft equipment
- customise and create your own equipment
- recreate equipment from your own blueprints
The levelling system in Skullborn is a system that allows you to automatically unlock standard crafting blueprints of better quality materials. When you start the game you will be able to only use stone and wood but as you level up you will then unlock copper, حديد, platinum and finally mithril!
As you start the game, to be able to craft the first items you will need to collect some stone and wood, which you can get simply by hitting rocks and trees with your bare hands. Krob will also assist you in the process, so don’t forget to talk to him!
Once you collected some wood and stone you should have enough materials to craft your first equipment or tools:
- slingshot and stone axe in the weapons section
- stone helmet and stone chest in the armor section
- furnace and portal in the place-ables section
- item chest
Ideally you want to place a Furnace nearby the crystal (to power it up) and then place some ores in it. After a while you will get metal chonxels in the furnace smelting area that can be used for weapons, armor or building as you please. Remember to level up to be able to unlock better armor and weapons!
My reccomendation would be to make a stone axe and activate a crystal nearby the shore. This will spawn copper elementals that are easy to kill and give you plenty of ores to get you started.
The stone and copper area will also have easier dungeons to facilitate getting experience for your first levels (more on this in the dungeon section).
Place a furnace once the crystal is activated and when you move your mouse over the Furnace you will get an action to use the furnace by pressing (و) (this key can be changed in the Settings before you login).
This opens the Furnace window with your inventory. Drag and drop the ores you want to smelt into metal blocks. It’s possible to split ores so if you want to save some to use with different molds, feel free to do so, but initially normal blocks is all you want to be able to craft better stuff.
Smelting takes some time and seems to take longer for more advanced metals. You should soon have a nice stack of copper chonxels ready to be used though!
You should try make everything you can before moving on to higher level elementals.
Instead of making the item with the default look, it’s possible to “customise” the item. It will still require the same amount of chonxels to get the item started, but the game will then enter the equipment editor, which will allow you to use all the chonxels in your inventory and create something bespoke! You can also change the name of the item so pick your name carefully as these names will create “blueprints” from which you will be able to recreate the same piece of armor or weapon that you made before.
Note that the base armor or equipment you customise stays the same, so if you are crafting a mithril cannon it will be as strong even if you start using copper, iron or platinum in it, allowing you to create interesting designs. This is further helped by the various shapes and positioning of the blocks that can be achieved by rotating the block on it’s XYZ axis by pressing the corresponding key on the keyboard while placing the block in equipment editing mode.
You can also use the mouse to look around with the camera and place items anywhere, while to move up and down you will need to use shift and ctrl keys.
It’s possible to upgrade the furnace to create metal chonxels of different shapes.
The default shape is cube, but you can get slopes from the Globlins in town for 25 shards each.
To upgrade the furnace you will need to interact with it and drag the mold onto the central part of the furnace interface.
القتال
Currently in Skullborn there are 3 fighting styles:
- melee (unarmed, axes)
- ranged (slingshot, pistol)
- special ranged (cannon)
They all have pros and cons which I will try explain.
This is the default fighting style without a weapon. You also activate melee mode when switching from a ranged weapon to an axe.
Melee fighting is simple, when you left click with your mouse, your character attacks whatever is in proximity in front of you. If you have an axe equipped, if you keep the mouse pressed it will automatically attack.
إيجابيات:
- easier to hit rocks on the ground
- camera doesn’t focus on your mouse/crosshair
سلبيات:
- mobs and cacti can hurt you when attacking them
- more difficult to defend crystals
This is my favourite mode as it allows you to attack and defend without moving from the crystals.
When you equip a slingshot, a pistol or a cannon, the camera view slightly changes to give you a better view of what you are aiming at.
Slingshots are weak and will have the bullet drop on the ground following “الفيزياء”.
When you use a slingshot, it will be equipped in your left hand, leaving the right hand free to hold and pull the sling when you are ready to fire. Pressing the left button will pull it and releasing will shoot a pebble. شخصيا, I would skip this weapon.
Pistols are strong but require bullets to be crafted and equipped in the appropriate slot.
Cannons have been reworked to use energy to shoot. If you hold the shot by keeping the mouse pressed, you can create a larger beam that will do more damage to your target.
إيجابيات:
- easier to farm materials other than rocks
- infinite range with cannons (currently)
سلبيات:
- pistols and cannons are noisy, check your volume!
- slingshots are weak and slow
Defeating mobs will give you 10 energy each. This is being used to energise and re-activate crystals when they run out of energy. See the Crystals section for more info.
Building
Once you enter build mode, you will see a green cube (or other shapes depending on your default chonxel) starts previewing where you are placing your selected material in the “world”.
You will also have different keys suggestions in the top right corner.
You can change the chonxel type you are using by pressing and keep pressing (ر)(this key can be changed in the Settings before you login) to display on screen a “wheel” from which you can mouse over the item you want to select (no need to click!)
If the chonxel you want to use is not present on the wheel, you can enter the inventory from build mode by pressing (أنا) و, where usually there’s a your character with the equipment, you will see the same wheel. Drag and drop the material/shape you need into the wheel and close the inventory.
Now pressing (ر) again will show you the new material/shape in place of the previous one.
If you are trying to place a block with a shape other than cube, you might also want to change orientation of the chonxel. You can also achieve this like in crafting mode by pressing (X) (ي) (Z) for each respective axis. Each time you press the chonxel will turn once in that direction.
Other keybinds are (و) for free cursor mode, this allows you to switch off the camera following the mouse movements, (ك) to open the crafting menu and (س) to switch back to weapon mode.
Once you are happy with the chonxel and want to place it, you can left click and place the block.
ملحوظة: while building in the world, you can get back your chonxels if you made a mistake and delete them. This also means if you buy a house that is already built and want to rebuild it, you get all those materials from the house to use!
To make it easier to build, it’s possible to drag an area and place multiple chonxels at once. If you don’t have enough, the preview will go from green to red and you can downsize until it becomes green again.
ملحوظة: this animation is a bit glitchy so it disappears, but the selection is still valid so be careful not to place more chonxels than you wanted.
It’s also possible to right click and drag to delete multiple chonxels, so be careful again not to delete more than you wanted!
Once you have finished building your perfect home, if you want to save it for future uses you can create a blueprint. Exit build mode and enter the crafting tab to find the “Blueprints” قسم.
To start creating a blueprint press the button in the window. This will close the window and ask you for a name of the blueprint. Once confirmed,it will enter an editor similar to build mode, but this time any chonxels that already exist in the world can be left clicked to be added to the blueprint or right clicked to remove. Usually a whole group of chonxels is highlighted to be added at once when connected, but some could be missed, so be careful to have selected all the chonxels you need before hitting “enter” to complete the blueprint.
ملحوظة: you don’t need to create blueprints if you are building in a “منزل” you bought or on a crystal. Those are saved automatically. For this reason, it’s not possible to create blueprints while on a house or crystal ground. Once you have a blueprint created (you will get a confirmation message in the chat) you will find it in the Blueprints section of the crafting tab with a list of items necessary to recreate it. If you have enough materials, everything will be white, but if you see red numbers then you need to collect more of that material to make it.
Selecting a blueprint to be placed in the world again will give you another green preview which allows you to overlay your building to the world as precise as you want, and controls over moving the preview (press 9 for precision mode) or even rotating it on the usual X,ي,Z axis (press 0 – zero – for rotating mode).
My suggestion is to create blueprints of “floors” that can be built on top of eachother in a modular way, so that when you want to build a base at a new crystal you just harmonised, you can place these as a barrier around it in no time, and build as tall as you want without having to have an insane amount of chonxels in your inventory.
It’s possible to purchase mini crystals from Globlins to allow you to protect an area that you like and be able to use furnaces as you would on a normal crystal!
When a player is harmonised with a crystal, or when a player purchases a house, the area becomes editable only by the player himself.
This means it’s possible to have rooms or entire buildings with access limited only to that player by placing doors or stoppers that prevent access and removing them when needed.
Houses and Crystals buildings are added to specific blueprints, so it’s always possible to replicate an existing building without having to create a blueprint for it.
Once you are harmonised with a crystal, it’s possible to create a group and allow other players to contribute and use all the furnaces and portals available on the crystal ground!
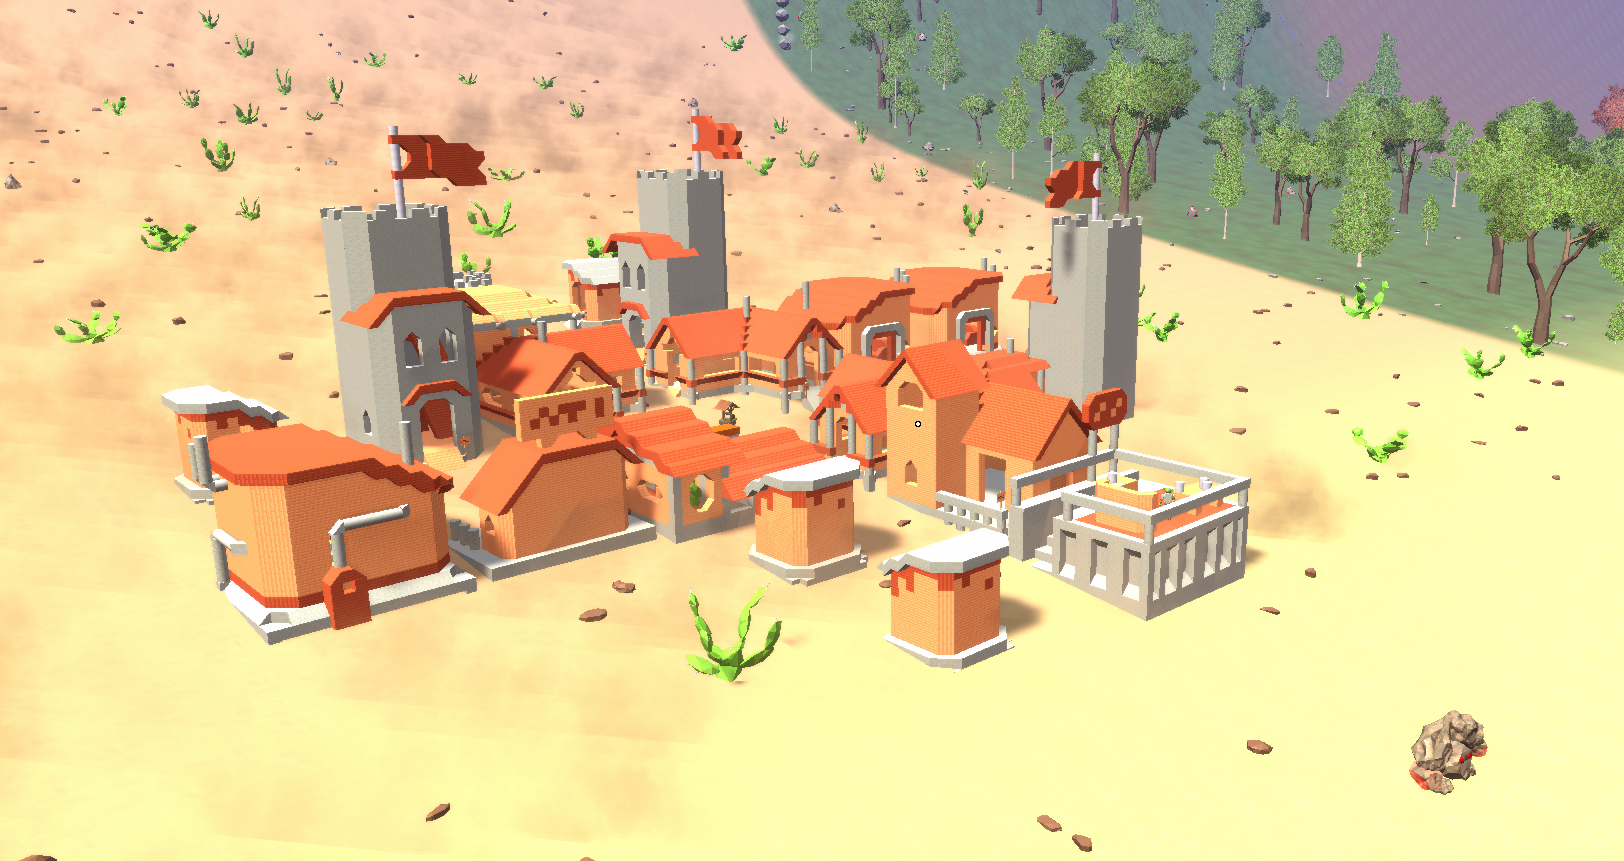
Villages
Now and then you will encounter villages, which are areas with groups of buildings that cannot be removed by the players (unless they purchased a house).
Villages are made up of 2 different type of buildings:
- منازل
- Shops
Houses can be purchased for 50 shards by players. Current mechanics of the game allow multiple players from owning the same house, but the last player to login will be considered the current owner of that house. This allows for playtesting purposes to interact with the houses without limitations.
Shops host Globlins that will buy materials off you for shards that can be used to purchase houses.
Currently they will not buy old equipment from you, رغم ذلك.
At the center of every village you will find 2 interesting tools
- The Lost and Found box
- The Well of Destruction
The box allows you to recover items, furnaces, portals etc… that were left on crystals that you “lost” to another player.
The well is a way to get rid of things in your inventory that you don’t need or want. Since Globlins are happy to buy most of your stuff, be sure to check with them first!
Once a player purchases a house, they can do whatever they want with it. You can delete the entire thing and rebuild from the ground if you wanted to, or simply alter the look to make it more personalised.
Other players can still purchase the same lot though, but this doesn’t mean that they will be able to break into your house. بدلاً من, they will see their own version of that house as if it was a separate thing entirely.
The houses that make up the village were designed by playtesters in an event which awarded special deer antlers to those that contributed. If you see a player donning deer antlers, thank them for doing such a great job!
Portals and Homes
Portals are a good way to
mess with the game and glitch into the quantum realmtravel long distances and meet with friends.
The only 2 ways to travel long distances are portals and setting a home at a crystal or a house in a village.
Setting a home requires either an active crystal or a purchased house. Simply mouse over the crystal or the house sign to set the home point.
Each time you want to teleport back home, you simply need to open the Map and click on the “fast travel” زر, which then allows you to select which location you want to teleport to.
Each portal can be paired with another portal and one other portal only. This means you might need multiple portals if you are planning to visit multiple locations.
I suggest setting up a new portal before you go on a big adventure, so that if you arrive in a place you want to visit again you can craft another portal and connect them!
When you setup a new portal you can access the control panel by pointing your cursor and activating the portal (و) (this key can be changed in the Settings before you login). This opens a window that allows you to pair the portal with another or take note of the portal code.
Once you have taken note of the code, create the destination portal and do the same, but this time you click on the button to pair the portal and insert the code. If you are successful, a transparent blue animation appears inside the frame of the portal.
Now that the portal is active, walk through it to be teleported to the other paired portal.
Portals don’t have a frame, which means you can decorate them to make them look more interesting.
Dungeons
هناك 3 types of dungeons:
- baby dungeons
- normal dungeons
- hard dungeons
Each dungeon in the game was designed by the play testers with a specific tool similar to the one used to make villagers houses.
I’m not going to list the available dungeons, but what you need to know that is in common for all of them and what the various types mean.
Entrances to dungeons can be found anywhere around villages as they follow the same algorithm to be procedurally added to the map.
This means that in theory each village has a dungeon entrance nearby!
You can distinguish the entrances for looking like small buildings, sometimes more or less decorated, with a specific door you can interact with to enter the dungeon. Some entrances are as tall as a skyscraper though!
Throughout the dungeon you will find, depending on the creators will, several monsters to defeat, but they all fall in the following 3 types:
- Chomper
- Chonk Elemental
- The Wrock (boss)
أيضًا, depending in the area you found the dungeon in, the mobs will be made of and will drop the same metal ( copper, حديد, platinum or mithril).
In each dungeon there will be a treasure chest to find (most will probably be placed in the boss room) and to exit the dungeon you simply need to go back to the entrance and interact with the door again!
Remember to find and open the chest before leaving as that will reward you with a lot of experience the first time you open it in that location!
Baby Dungeons were created to be simpler to complete as lower level players need to be able to level up without having to be too experienced with the game yet. They can be found up to the copper area.
Normal dungeons can be found starting from the Iron areas and provide a bigger challenge to players, either in terms of lenght of the dungeons, number of enemies or simply just for how tricky they can be.
Hard Dungeons are real challenges that might make you want to smash your keyboard to bits!
Photo Mode
press P to enter photo mode and P again to exit.
This will enable photo mode, where the camera can be moved independently from where your character is, allowing you to take screenshots like no other game before!
Press O in photo mode to enable a depth of field effect.
This will blur anything at a certain distance, allowing to create a depth effect to your screenshots and let people focus on the main subject of the photo.
Press Left Shift + H to hide UI.
This will remove certain elements from the screen, keeping the image clean from disturbance.
يضعط [ to take a screen shot.
Images will be automatically saved in a specific location.
Press Left Shift + ` to open the folder where screenshots are saved!
This folder is different from the steam screenshots folder, but currently cannot be changed.
Trailer Mode
More details coming soon..This needs enabled in the Other section of the settings.
You can enter trailer mode by pressing “=”.
There’s a summary of the actions in game.
More details coming soon..
هذا كل ما نشاركه اليوم من أجل هذا Skullborn مرشد. تم إنشاء هذا الدليل وكتابته في الأصل بواسطة Krob. في حالة فشلنا في تحديث هذا الدليل, يمكنك العثور على آخر تحديث باتباع هذا وصلة.