- عنوان: PlanetSide 2
- تاريخ الافراج عنه:
- المطور:
- الناشر:
Information about PlanetSide 2 لا يزال غير مكتمل. الرجاء مساعدتنا في ملء تفاصيل اللعبة باستخدام هذا نموذج الاتصال.
‘Armour’ means armoured ground vehicles that are invulnerable to small arms fire i.e. ANTs, Sunderers, Lightnings and Main Battle Tanks (MBTs). With the exception of ANTs and Sunderers, which are support vehicles, armour in PlanetSide 2 has four main jobs: to destroy enemy ground vehicles, to destroy enemy aircraft, to destroy enemy constructions and to shell enemy infantry. This guide will go through driver, gunner and vehicle loadouts, directional armour, some tactics and finally some manoeuvres.
Driver & Gunner Loadouts
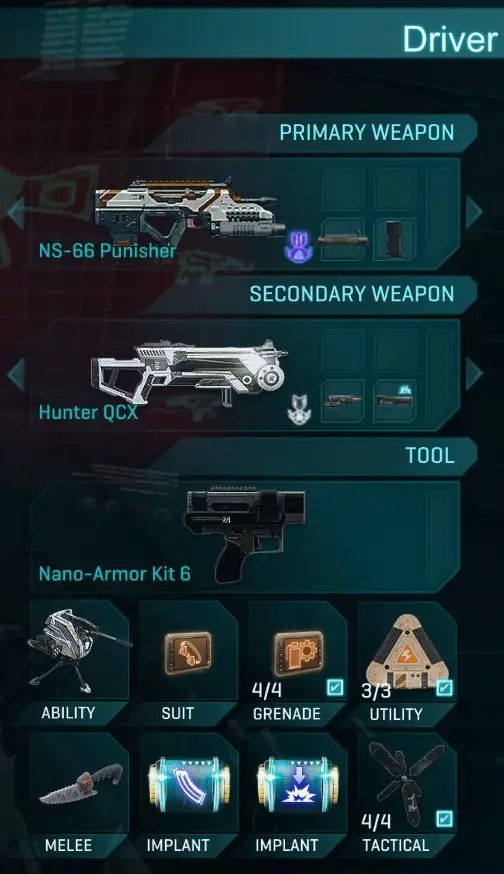

Primary
NS-66 Punisher w/ Adaptive Class Underbarrel* – useful for personal defence and for boosting your vehicle’s maximum health just before or after engaging an enemy vehicle. The Adaptive Class Underbarrel is essential, but other attachments are personal preference.
Anti-Material Rifle w/ Straight-Pull Bolt – useful for fighting ground vehicles in a pinch and for fighting aircraft and distant ground vehicles whenever your vehicle’s weapons cannot easily hit them. The Straight-Pull Bolt is essential, but other attachments are personal preference.
any weapon w/ Underbarrel Grenade Launcher – useful for personal defence and for fighting ground vehicles in a pinch. The Underbarrel Grenade Launcher is essential, but other attachments are personal preference.
Secondary
Hunter QCX w/ Explosive Bolts* – useful for fighting ground vehicles in a pinch. The Explosive Bolts are essential, but other attachments are personal preference.
بندقية – useful for personal defence. Requires ASP.
Sidearm – useful for personal defence.
Tool
Nano-Armour Kit* – it is paramount you upgrade this to level 6 as soon as possible.
Ability
Spitfire Auto-Turret* – useful for alerting you to infantry to your rear or C4 fairies above you so long as you have deployed it.
AV MANA Turret – useful for fighting ground vehicles in a pinch and for fighting aircraft and distant ground vehicles whenever your vehicle’s weapons cannot easily hit them. Especially effective with multiple users.
Suit
Grenade Bandolier* – increases grenade carry capacity.
Demolitions Pouch – increases C4 carry capacity. Sometimes useful for disembarked gunners.
Mine Carrier – increases mine carry capacity. Sometimes useful for disembarked gunners.
Grenade
Nano-Repair Grenade* – repairs 500 vehicle health over 10 seconds in an area. Can be stuck to vehicles. Useful for performing quick repairs by sticking one to your vehicle as soon as you disembark and then immediately using your Nano-Armour Kit, sticking one to your vehicle to repair whilst moving, sticking one to your vehicle just before you enter an engagement to get repairs mid-fight or for repairing grouped-up vehicles simultaneously.
Utility
Tank Mines* – useful for setting traps at chokepoints, hilltops and enemy ground vehicle terminals. Keep in mind that enemy vehicles damaged but not outright destroyed by tank mines are still forced to either stop and waste time repairing or enter an engagement at low health, so even single tank mine traps can be useful with some planning.
C4 – useful for fighting ground vehicles in a pinch. Watch out for C4 being delivered from the backseat of enemy Harassers as well as kamikaze vehicles strapped with C4.
Driver Implants
Ammo Printer* – restocks one tick of ammunition for all your weapons and the vehicle you own every 60 ثواني.
Sweeper HUD* – displays target range on your crosshair and automatically spots enemy explosives that are within 35 metres.
Ransack – restocks one tick of ammunition and repairs 10% max vehicle health for your vehicle whenever you kill a vehicle within 50 metres. Good alternative to Ammo Printer, especially if you have a vehicle with an ammo dispenser supporting you so resupply is not an issue.
Gunner Implants
Assassin* – automatically spots enemies you damage and clears spot checks on you for 1 second whenever you make a headshot kill or a kill from greater than 50 metres (spot clears do not work if you are a in vehicle).
Target Focus* – displays the target’s health bar while spotted, increases crosshair IFF detection range, and increases hold-breath duration by 300%.
Counter-Intelligence – automatically spots targets who damage you and notifies you on the HUD when you are spotted by an enemy so long as you are not in a vehicle.
Tactical
Caltrops* – useful for blocking roads.
Hardlight Canopy – useful for providing cover against aircraft fire, C4 fairies and uphill fights.
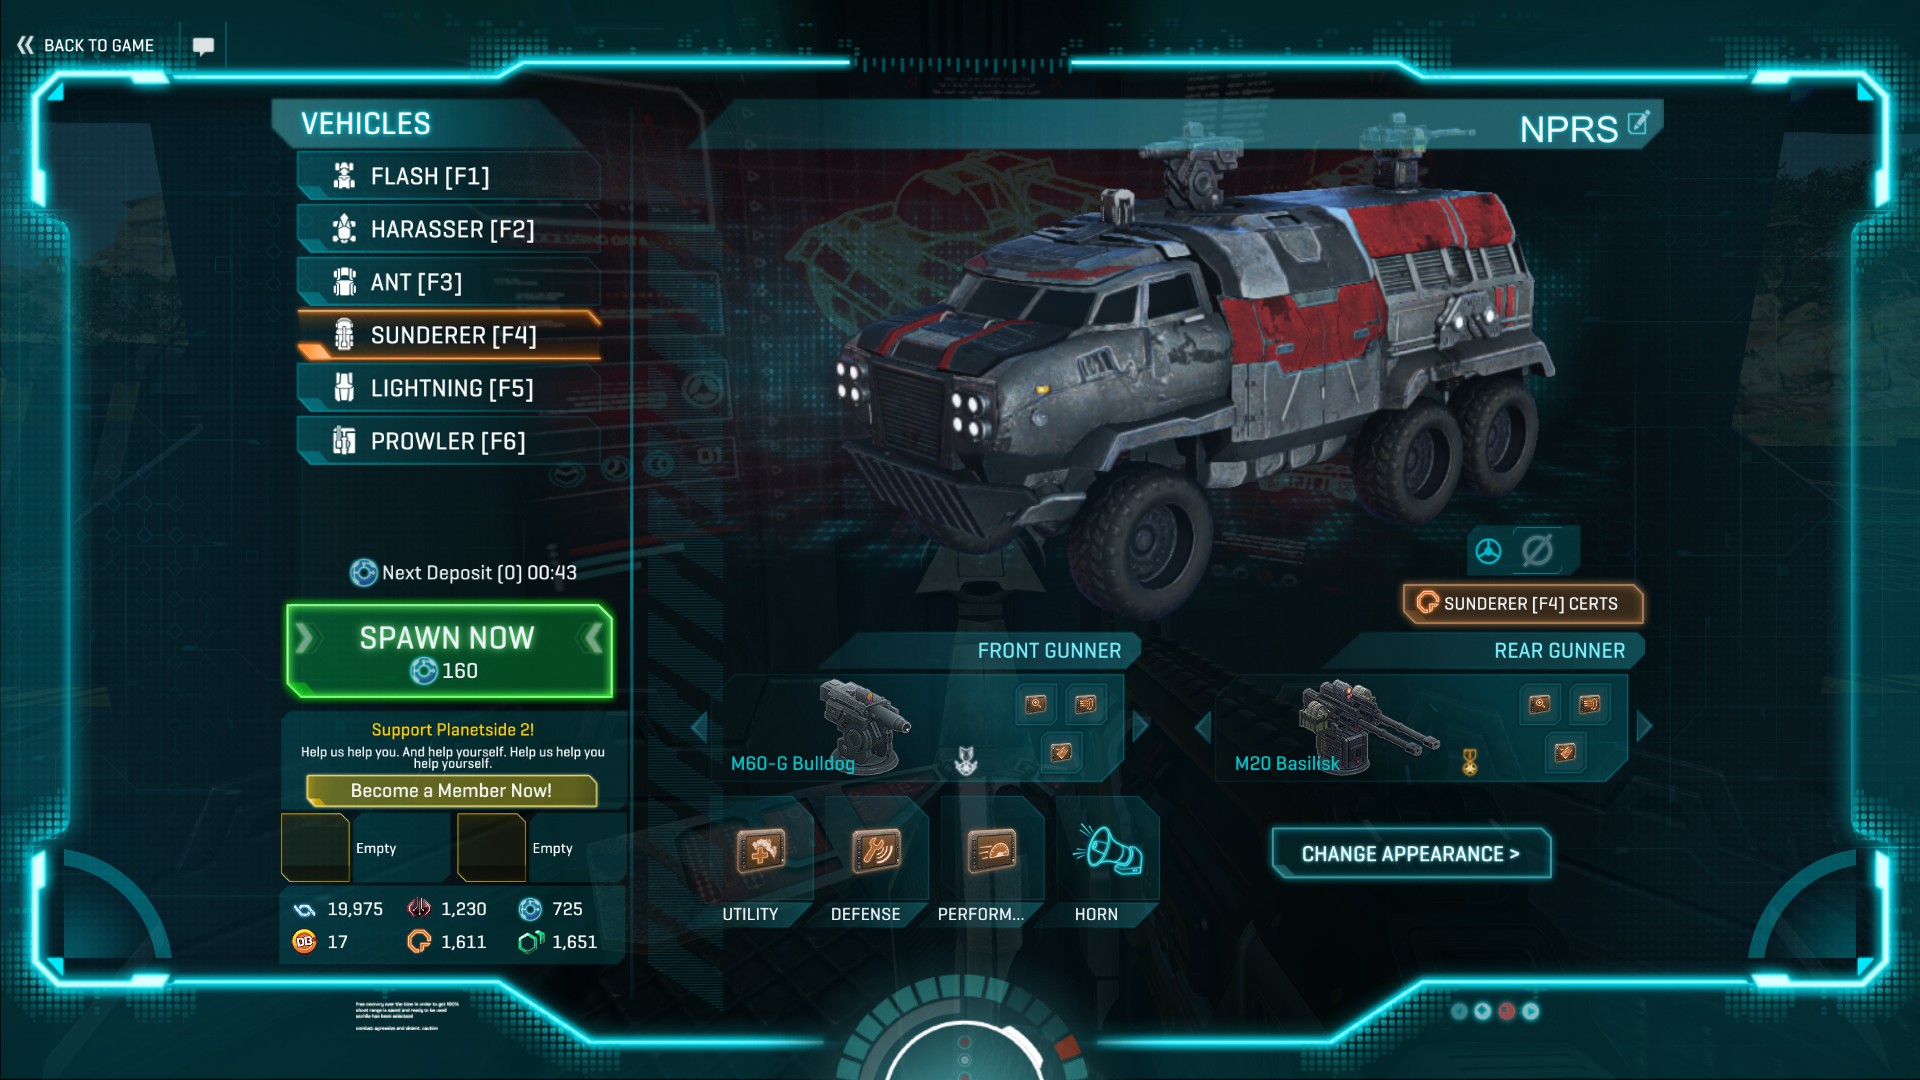
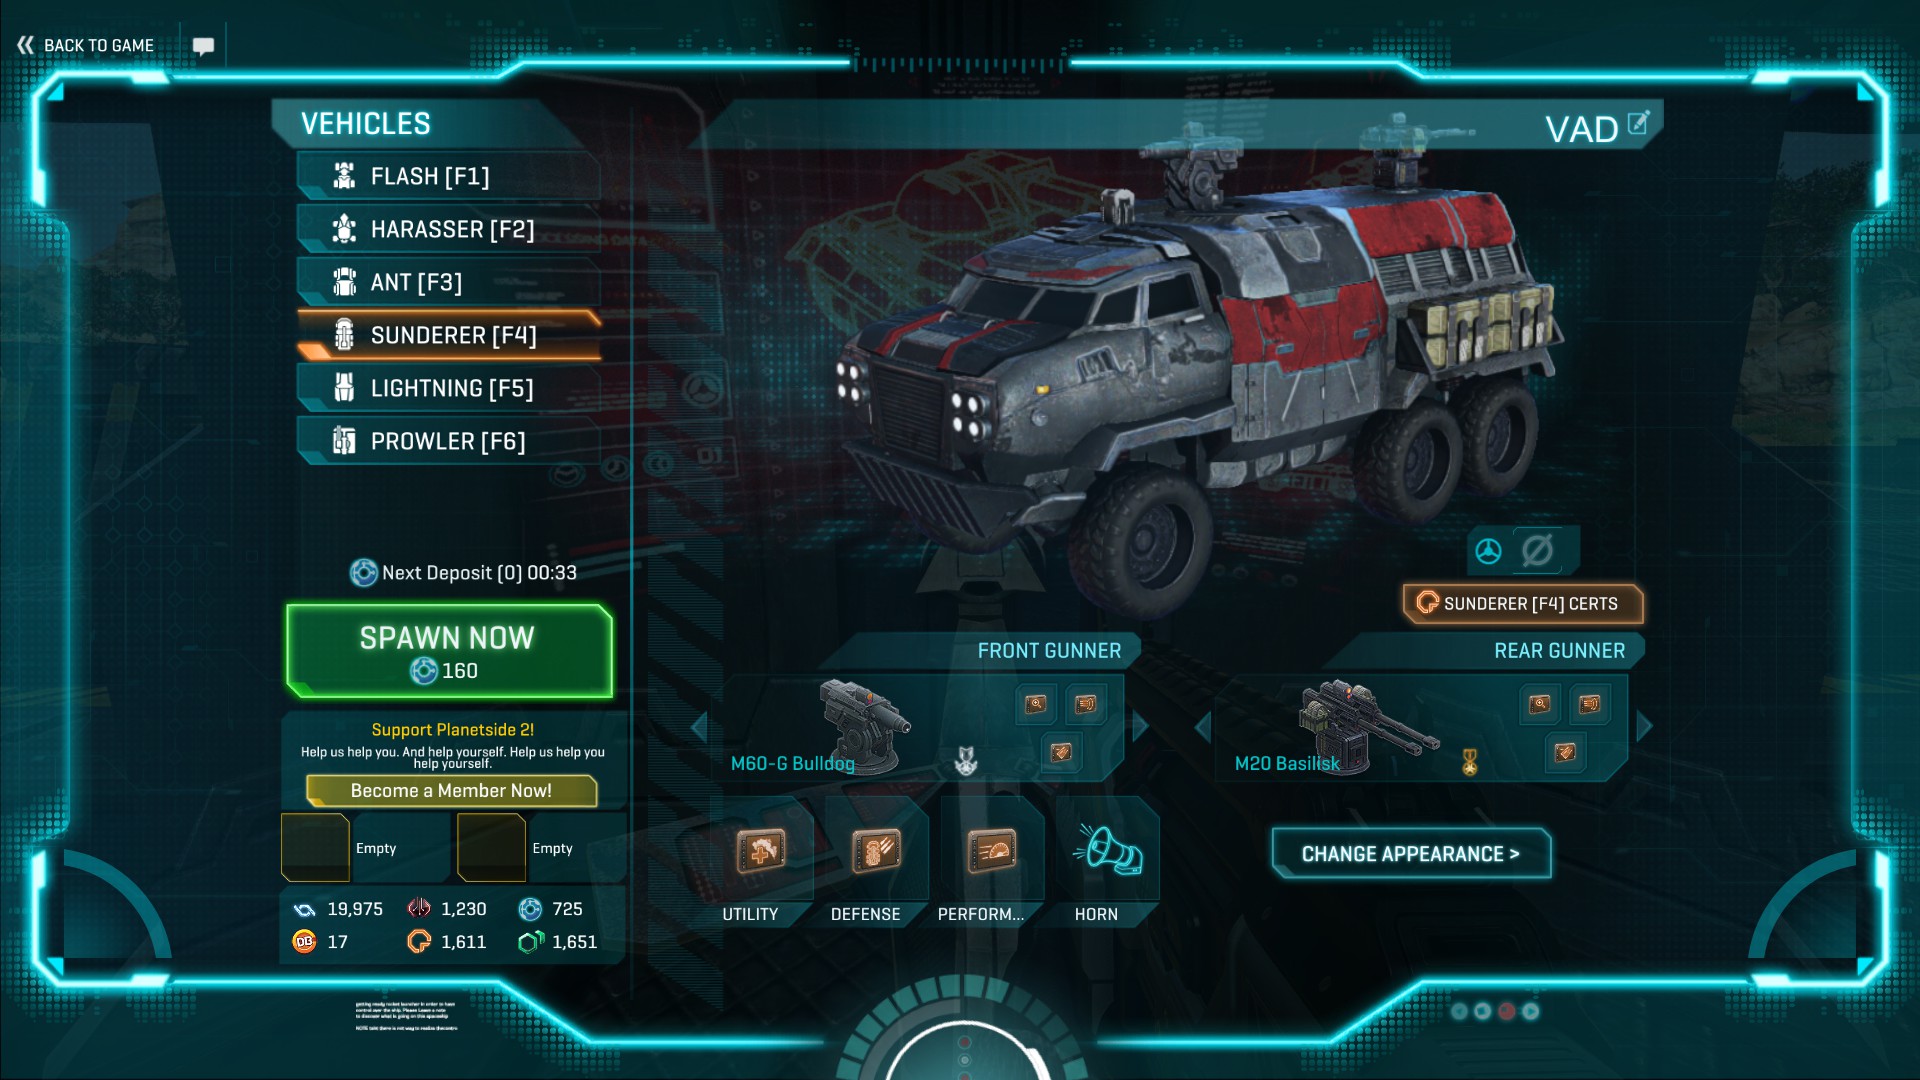
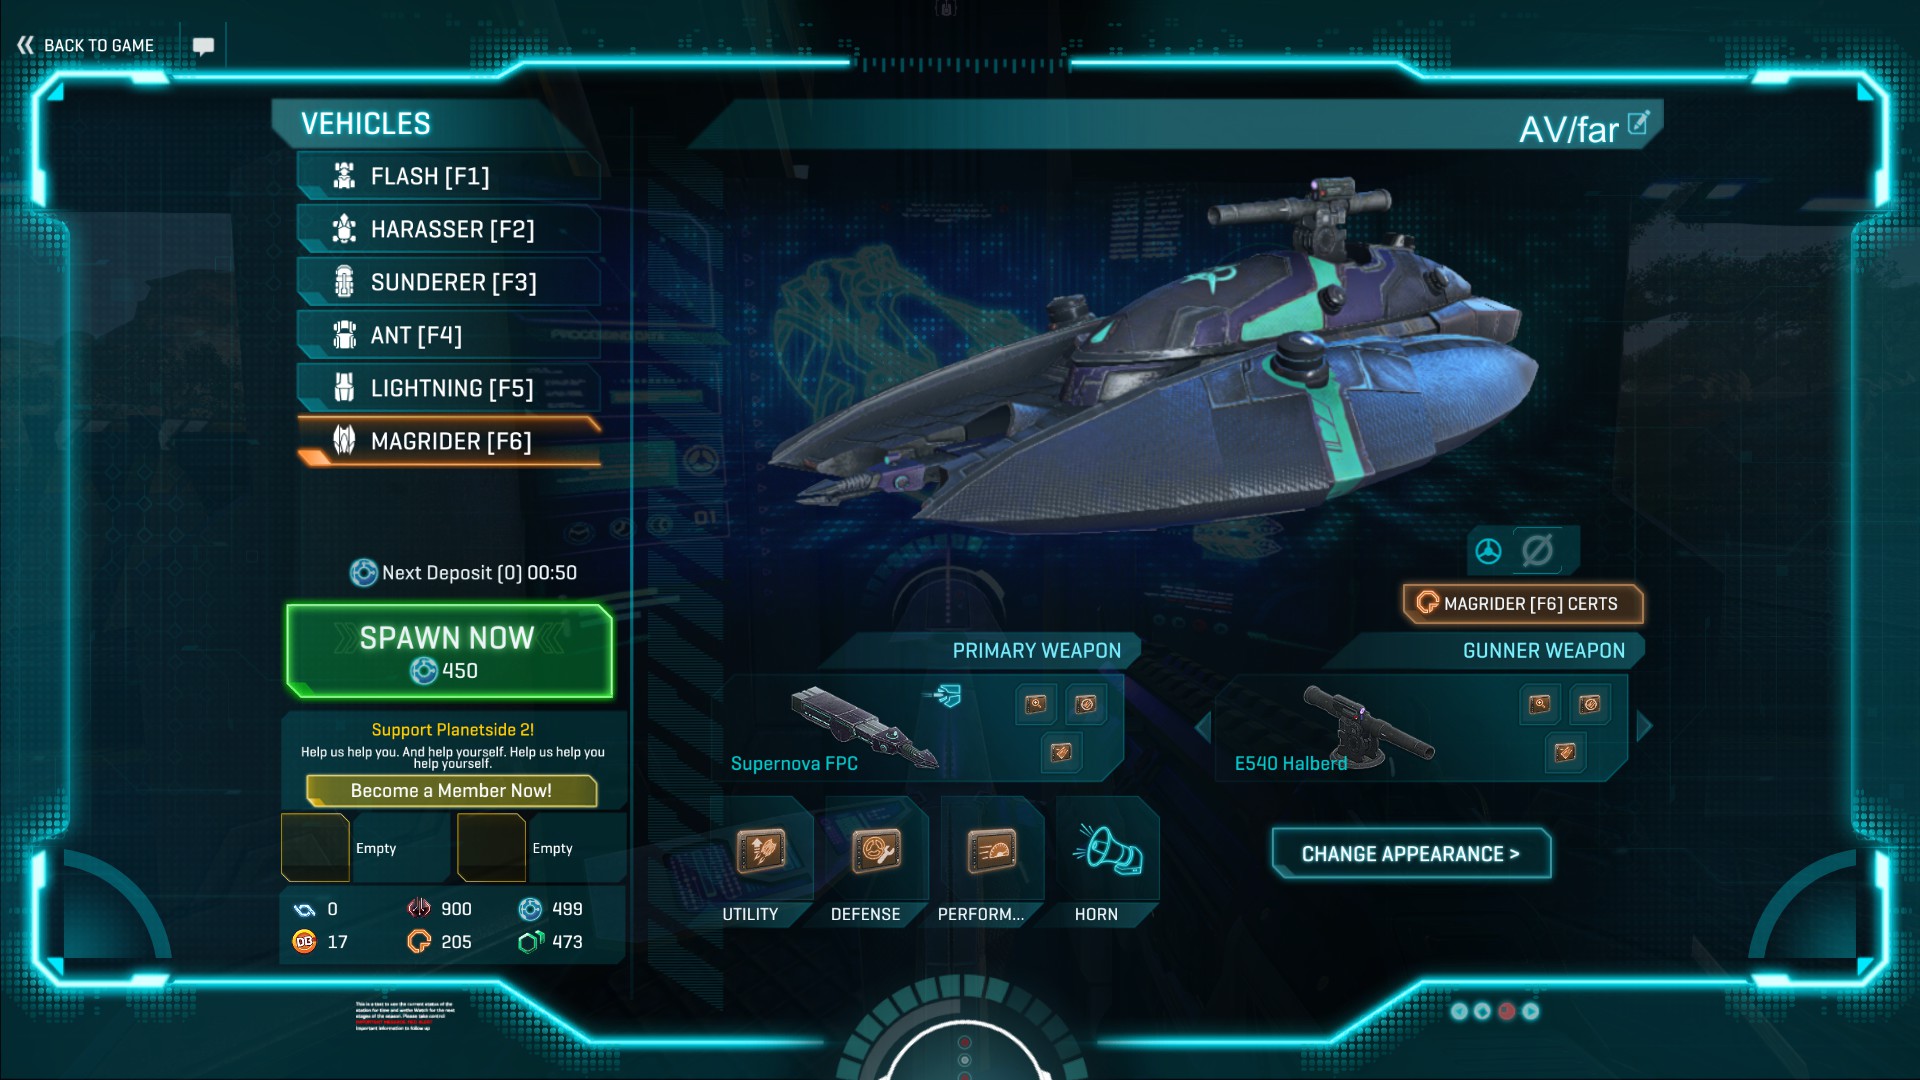
Vehicle Loadouts (Sunderers/Lightnings)
The pictures below contain my recommended Sunderer, anti-vehicle and anti-aircraft loadouts.
Non-Tank Weapons
M40 Fury – CQC grenade launcher that is effective against infantry and ground vehicles, but is outclassed by the Bulldog.
M60-G Bulldog – CQC grenade launcher that is effective against infantry and ground vehicles and outclasses the Fury.
Unique Abilities
S-AMS – auto-granted ability that allows the Sunderer to deploy to open up two equipment terminals and become a spawn point for infantry.
Gate Shield Diffuser – prevents collision damage and allows the Sunderer to pass through enemy vehicle gates for 15 ثواني. Can be activated every 45 seconds once fully upgraded.
Unique Defences
Blockade Armour – increases the Sunderer’s health by 1000 and reduces damage from C4 by 40% once fully upgraded. Useful for battle buses.
Deployment Shield – generates a shield for the Sunderer when deployed that will absorb a certain amount of damage, but will regenerate over time when out of combat. Useful for logistics.
Nanite Proximity Repair System – allows the Sunderer to passively repair friendly vehicles within 30 metres. Useful for supporting armour.
Stealth Cloaking Module – cloaks the Sunderer when deployed and out of combat. Also has all the benefits of max rank Vehicle Stealth. Useful for logistics.
Vehicle Ammo Dispenser – allows the Sunderer to passively resupply friendly vehicles within 30 metres once fully upgraded. Useful for supporting armour.
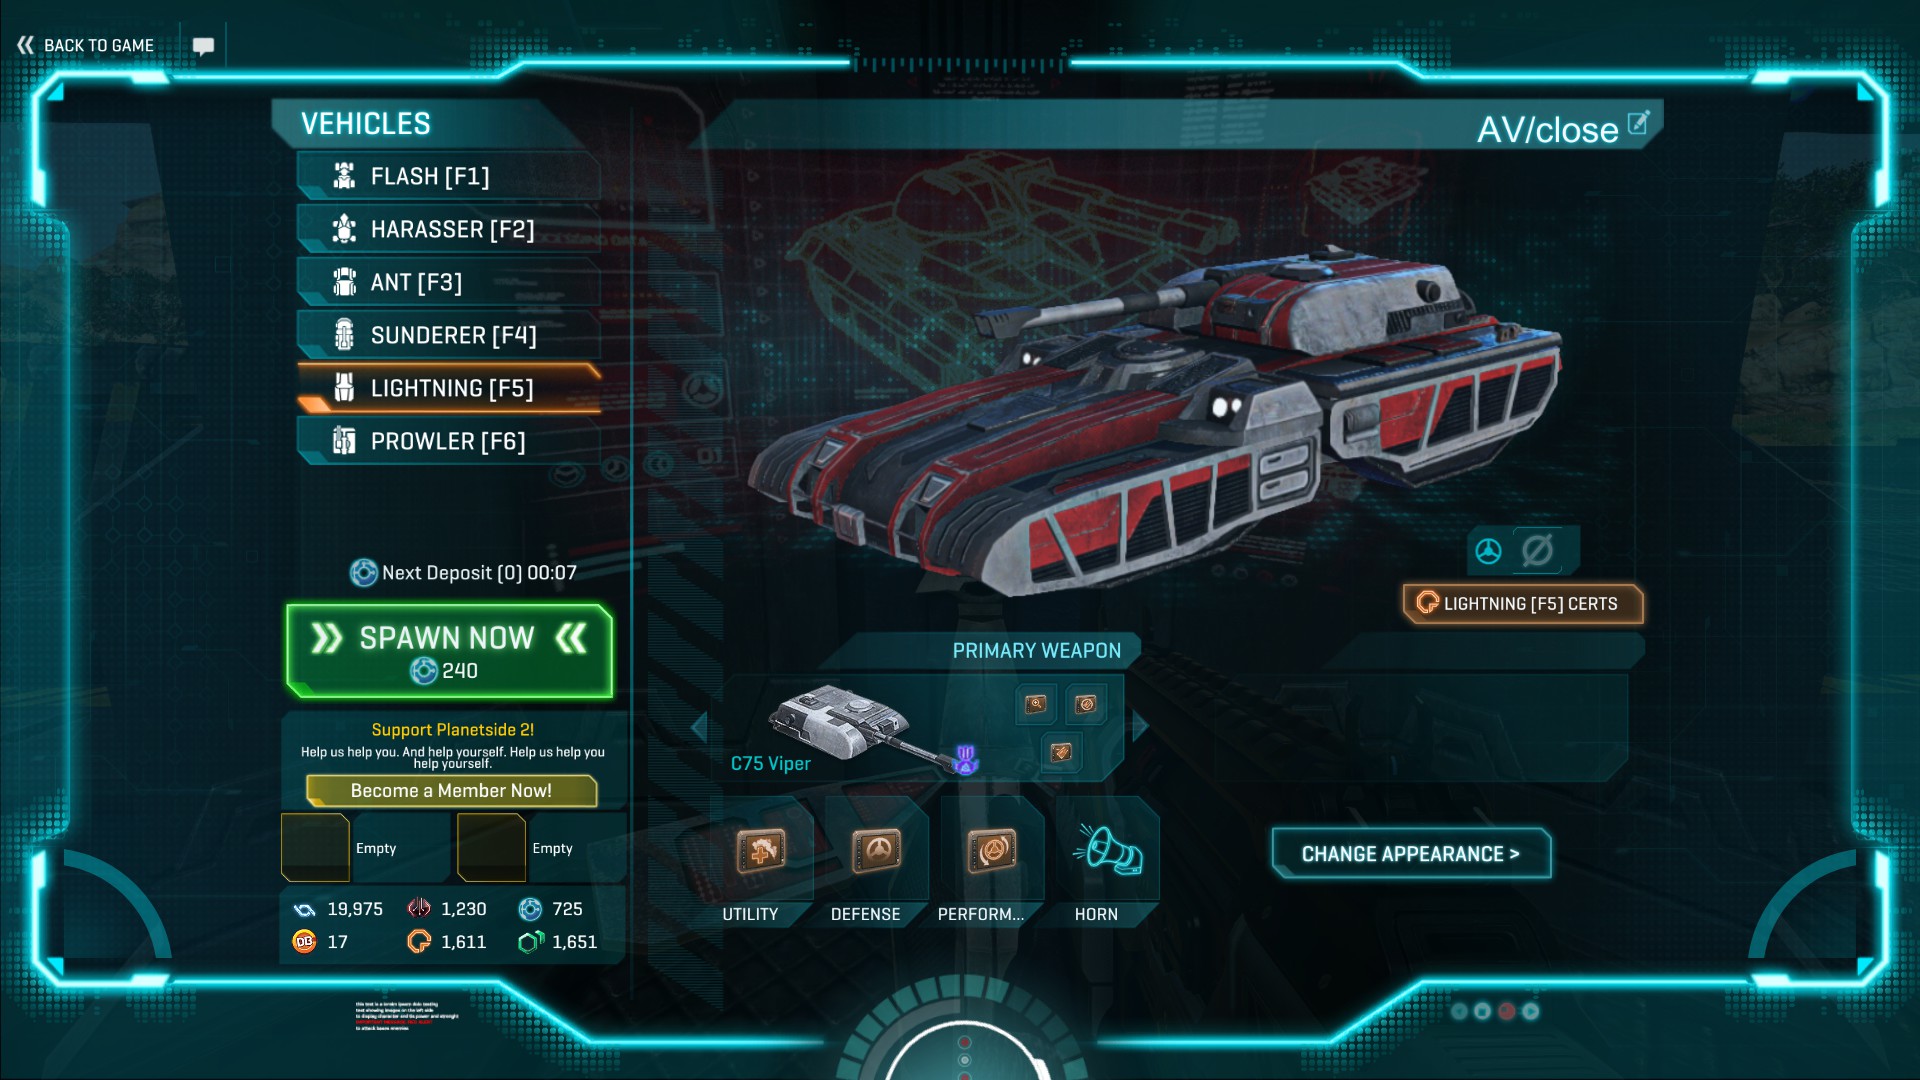
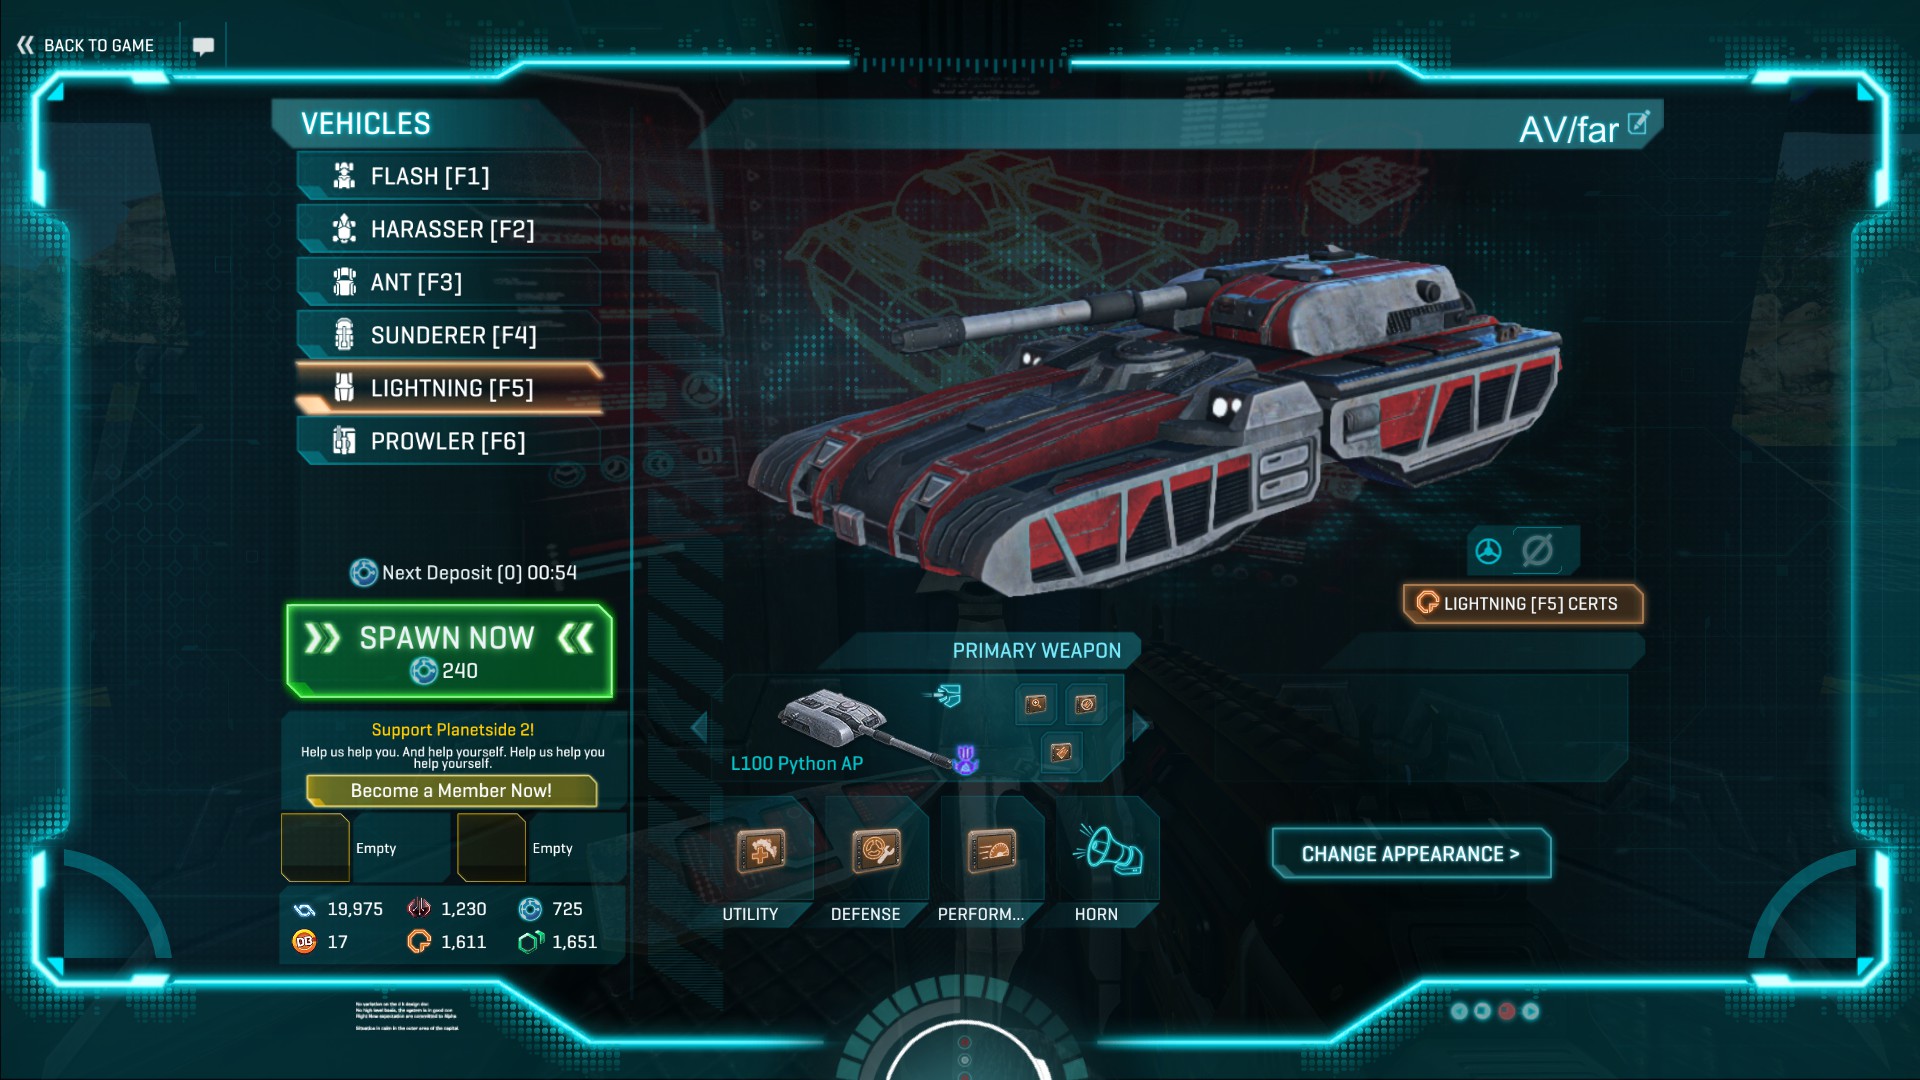
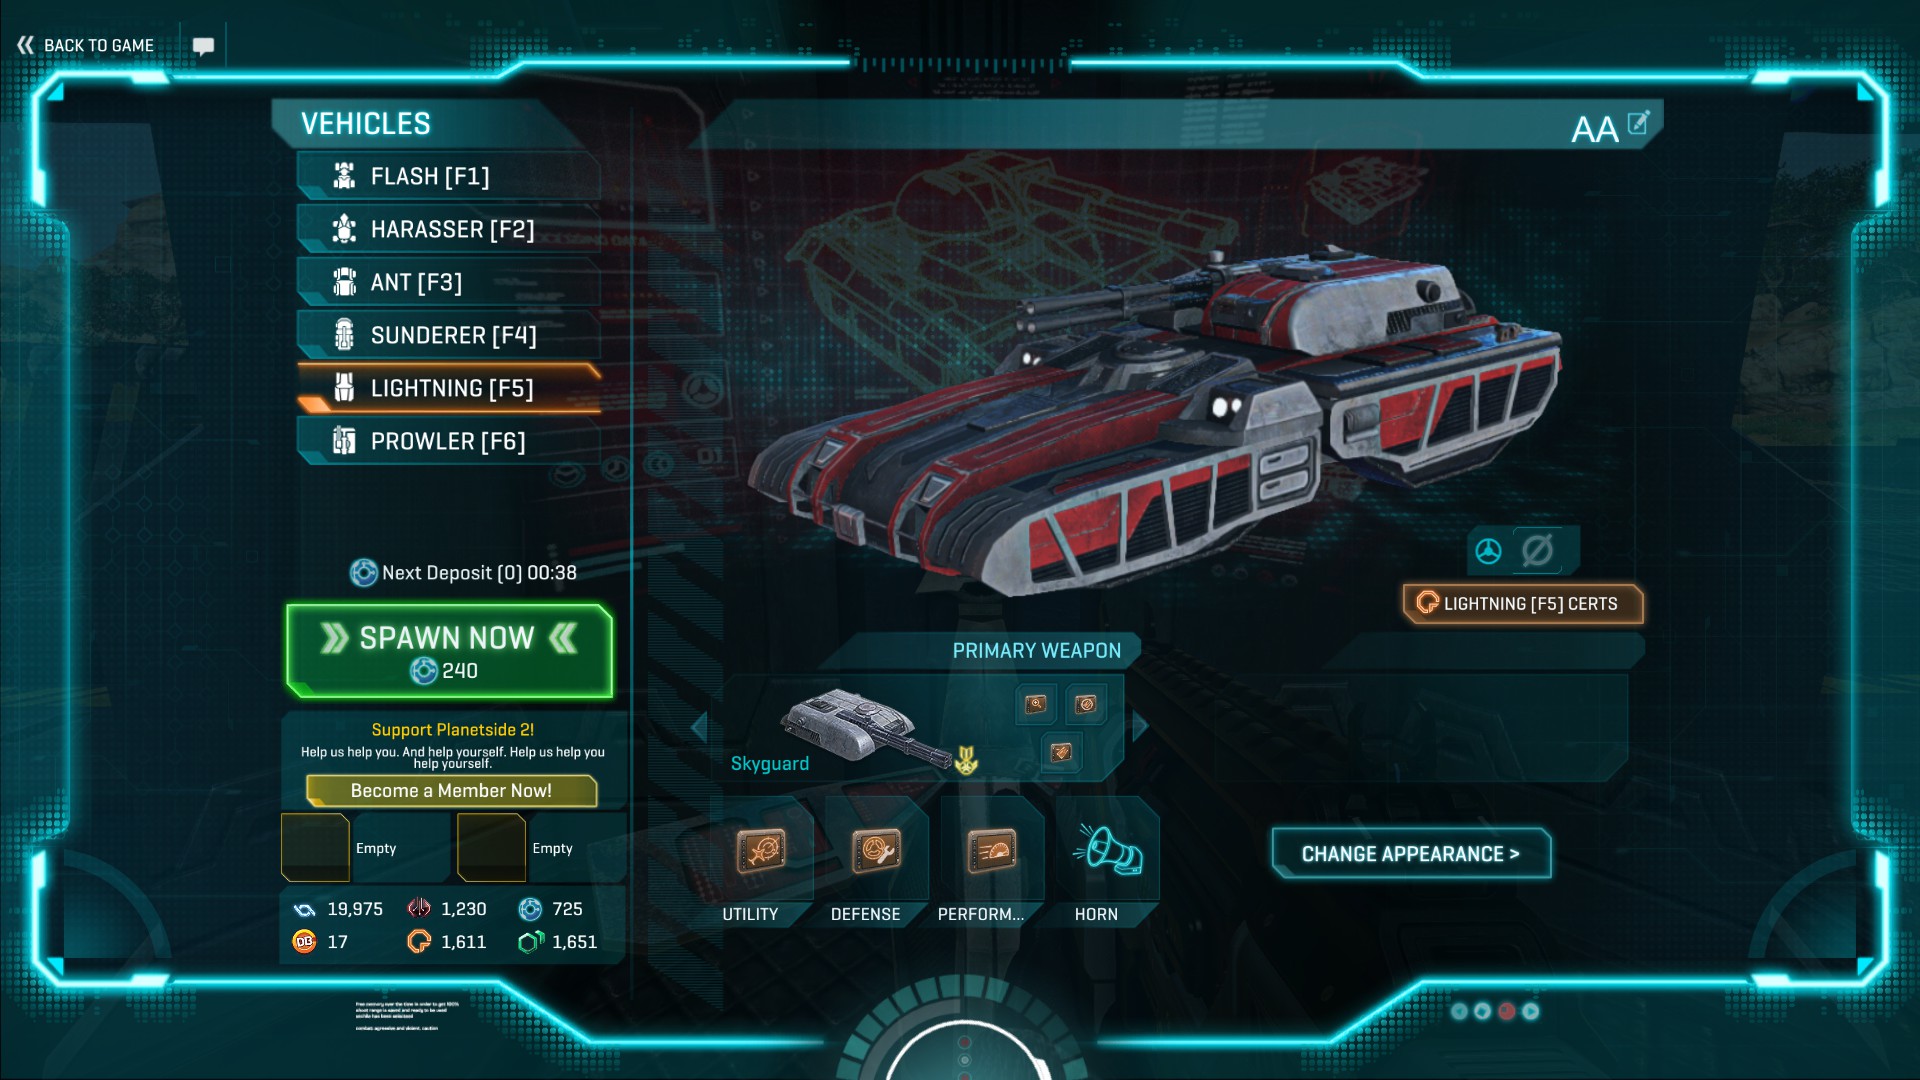
أسلحة فريدة (WIP)
C75 Viper –
L100 Python –
Skyguard –
Larion LPPC –
JGX11 –
L2-100 Kingsnake –
Perihelion L-VXC –
Unique Abilities
Engagement Radar – allows the HUD to highlight and track enemy aircraft that do not have max Vehicle Stealth at a range of up to 600 metres once fully upgraded. Useful for fighting aircraft only.
Vehicle Loadouts (MBTs)
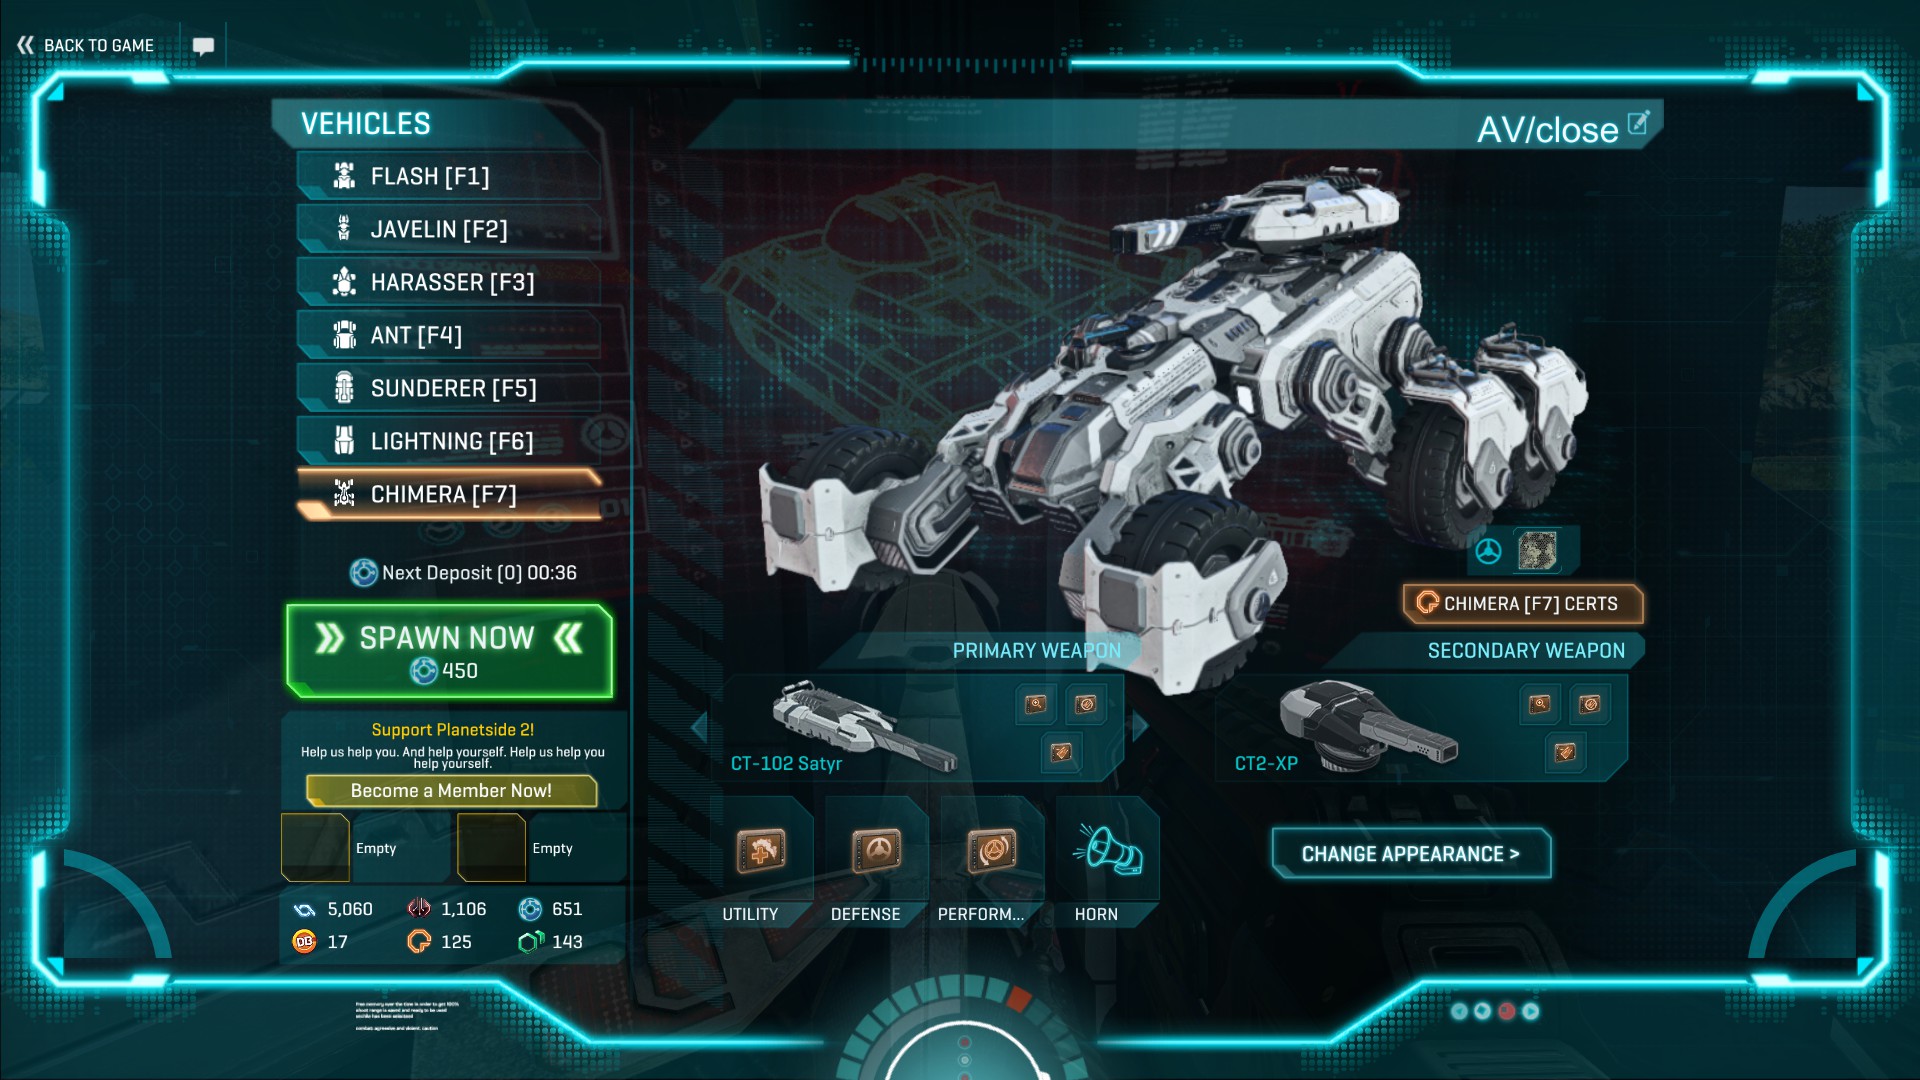
Faction-Specific Weapons (WIP)CT-102 Satyr–
CT-135–
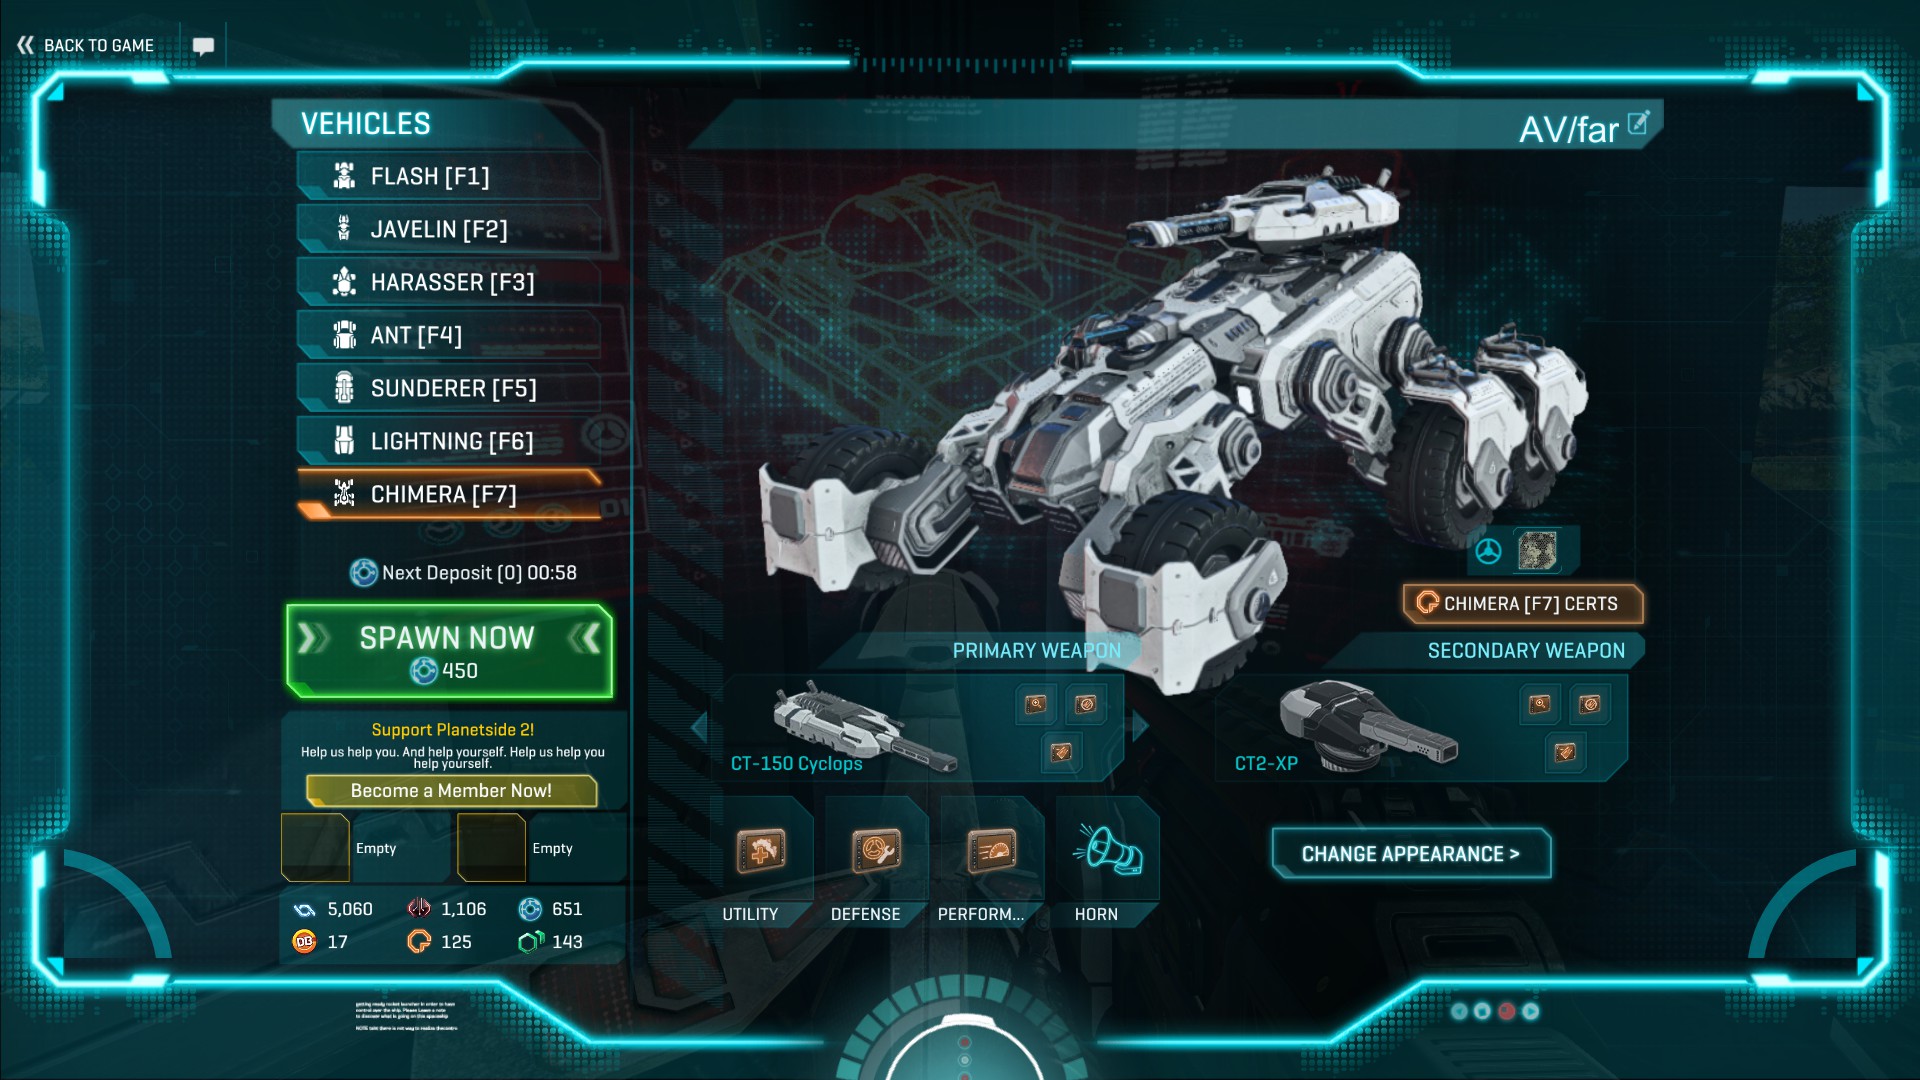
CT-150 Cyclops–
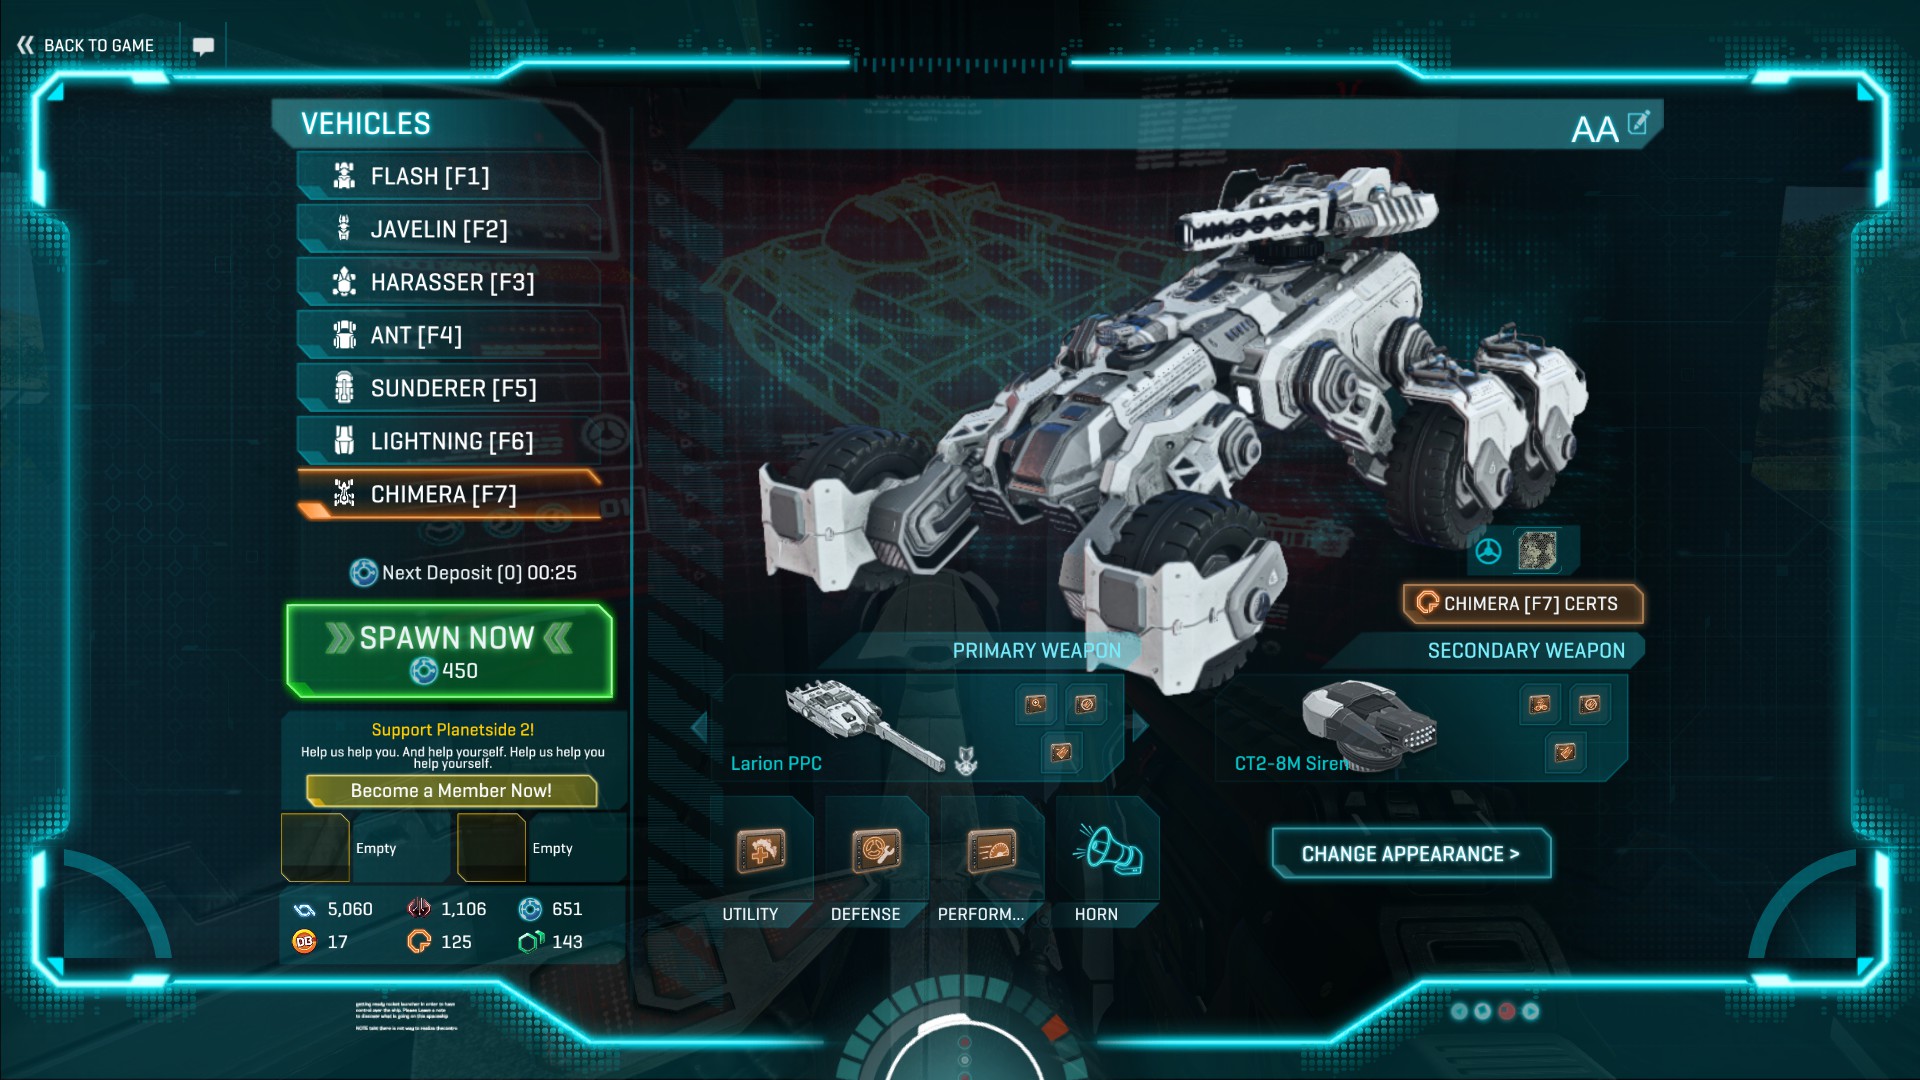
Larion PPC–
CT2-20 HCG–
CT2-XP–
CT2-8M Siren–
Faction-Specific Weapons (WIP)
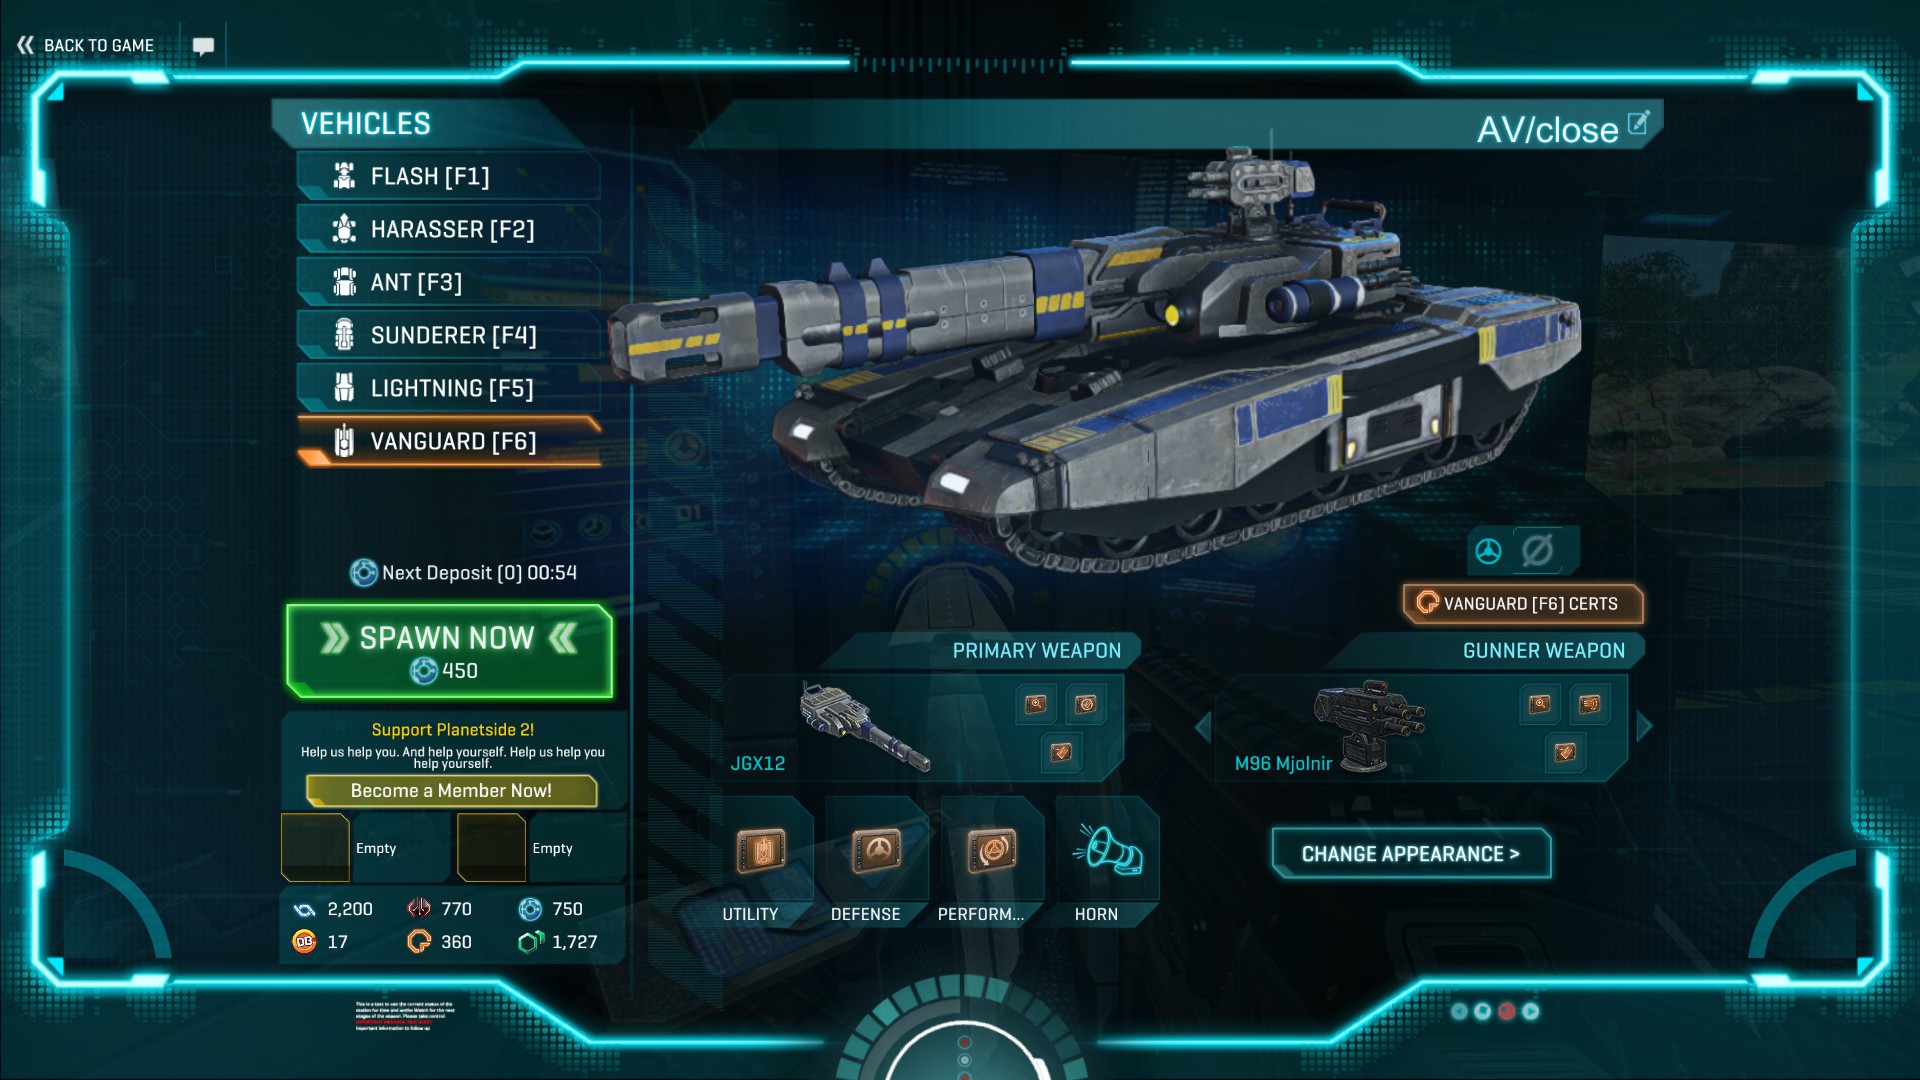
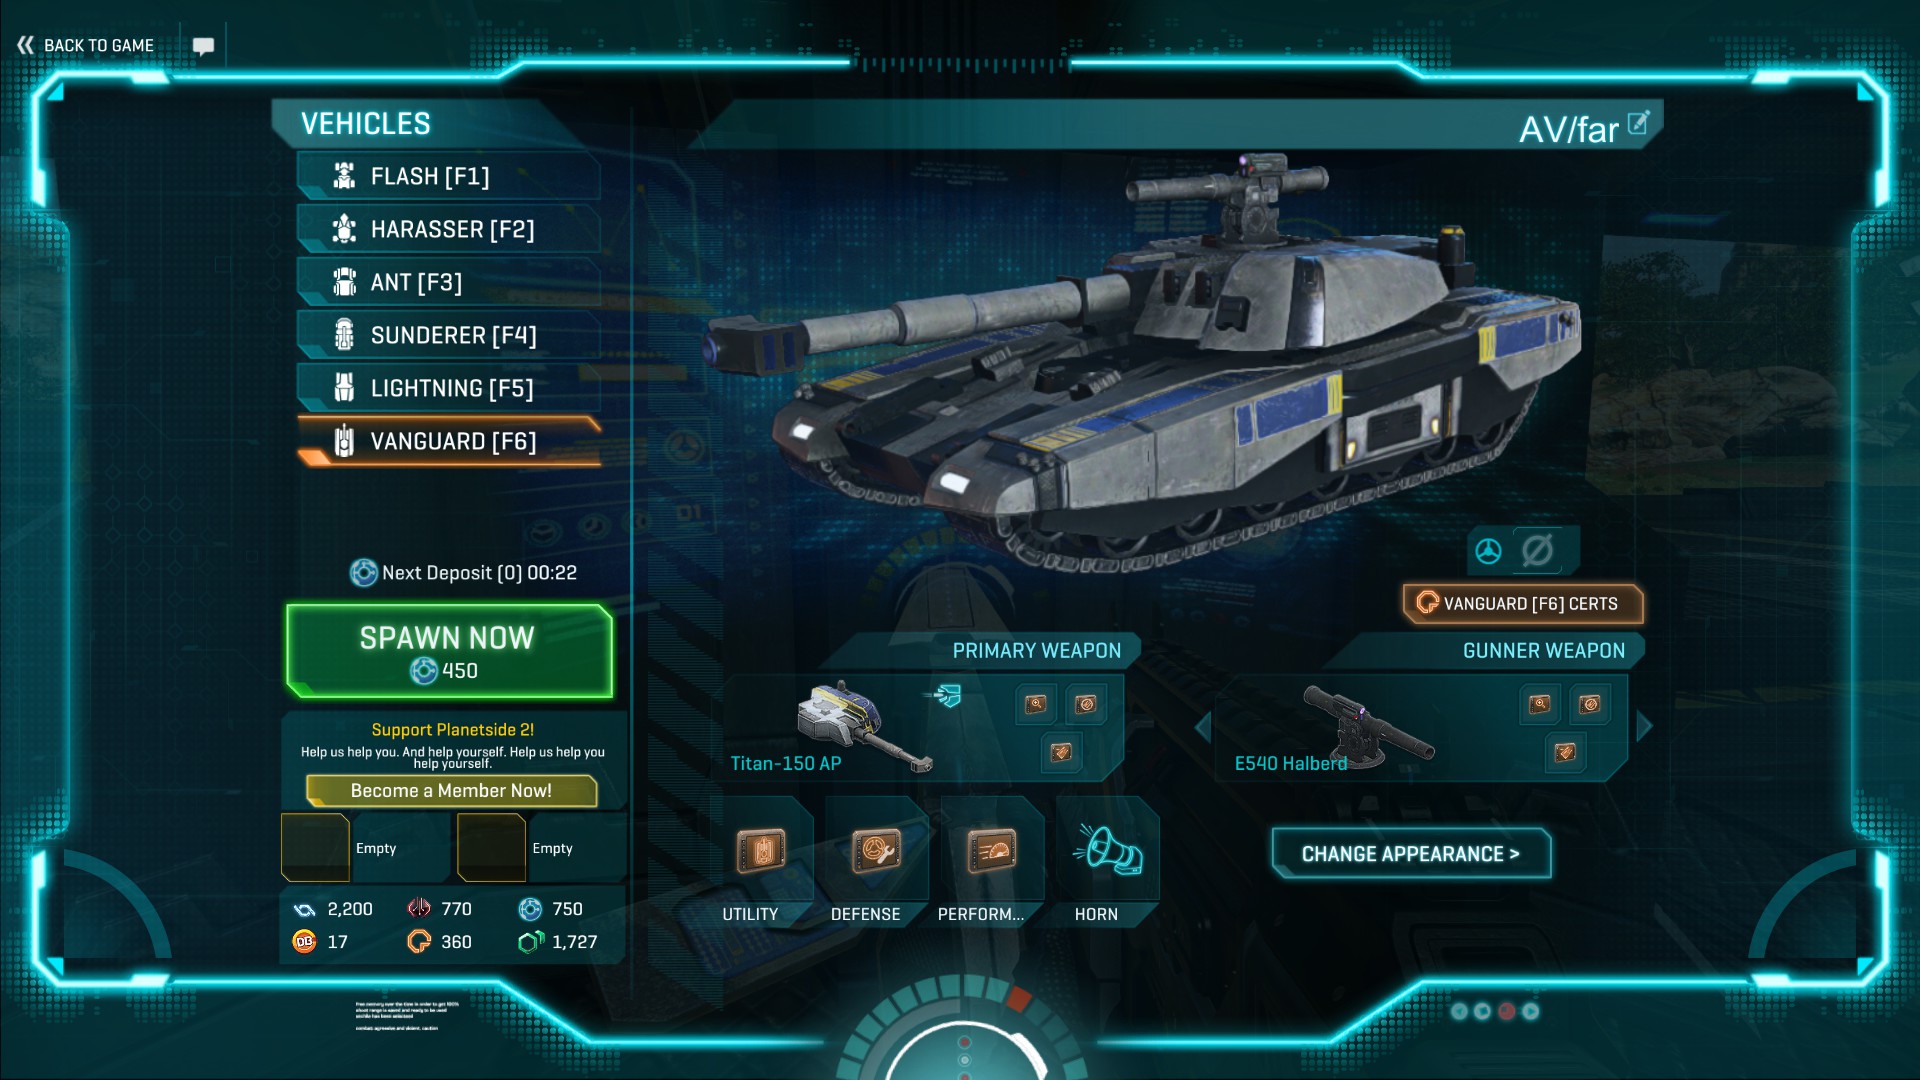
Titan-150 –
JGX12 –
C85 Canister –
N30 Trawler –
M96 Mjolnir –
Enforcer ML85 –
Unique Abilities
Forward Vanguard Shield – reduces incoming damage to the front and top of the Vanguard by 67% and the sides of the Vanguard by 33% ل 8 seconds. Does not reduce damage to the rear. Can be activated every 40 seconds once fully upgraded. Useful for pushing chokepoints and punishing overextended enemy vehicles.
Unique Defences
Nimitz Reactor – replaces 20% of the Vanguard’s health with a shield that regenerates 100 per second when out of combat for 6 ثواني. The shield cannot be repaired. Use Nanite Auto Repair System instead of this.
Faction-Specific Weapons (WIP)
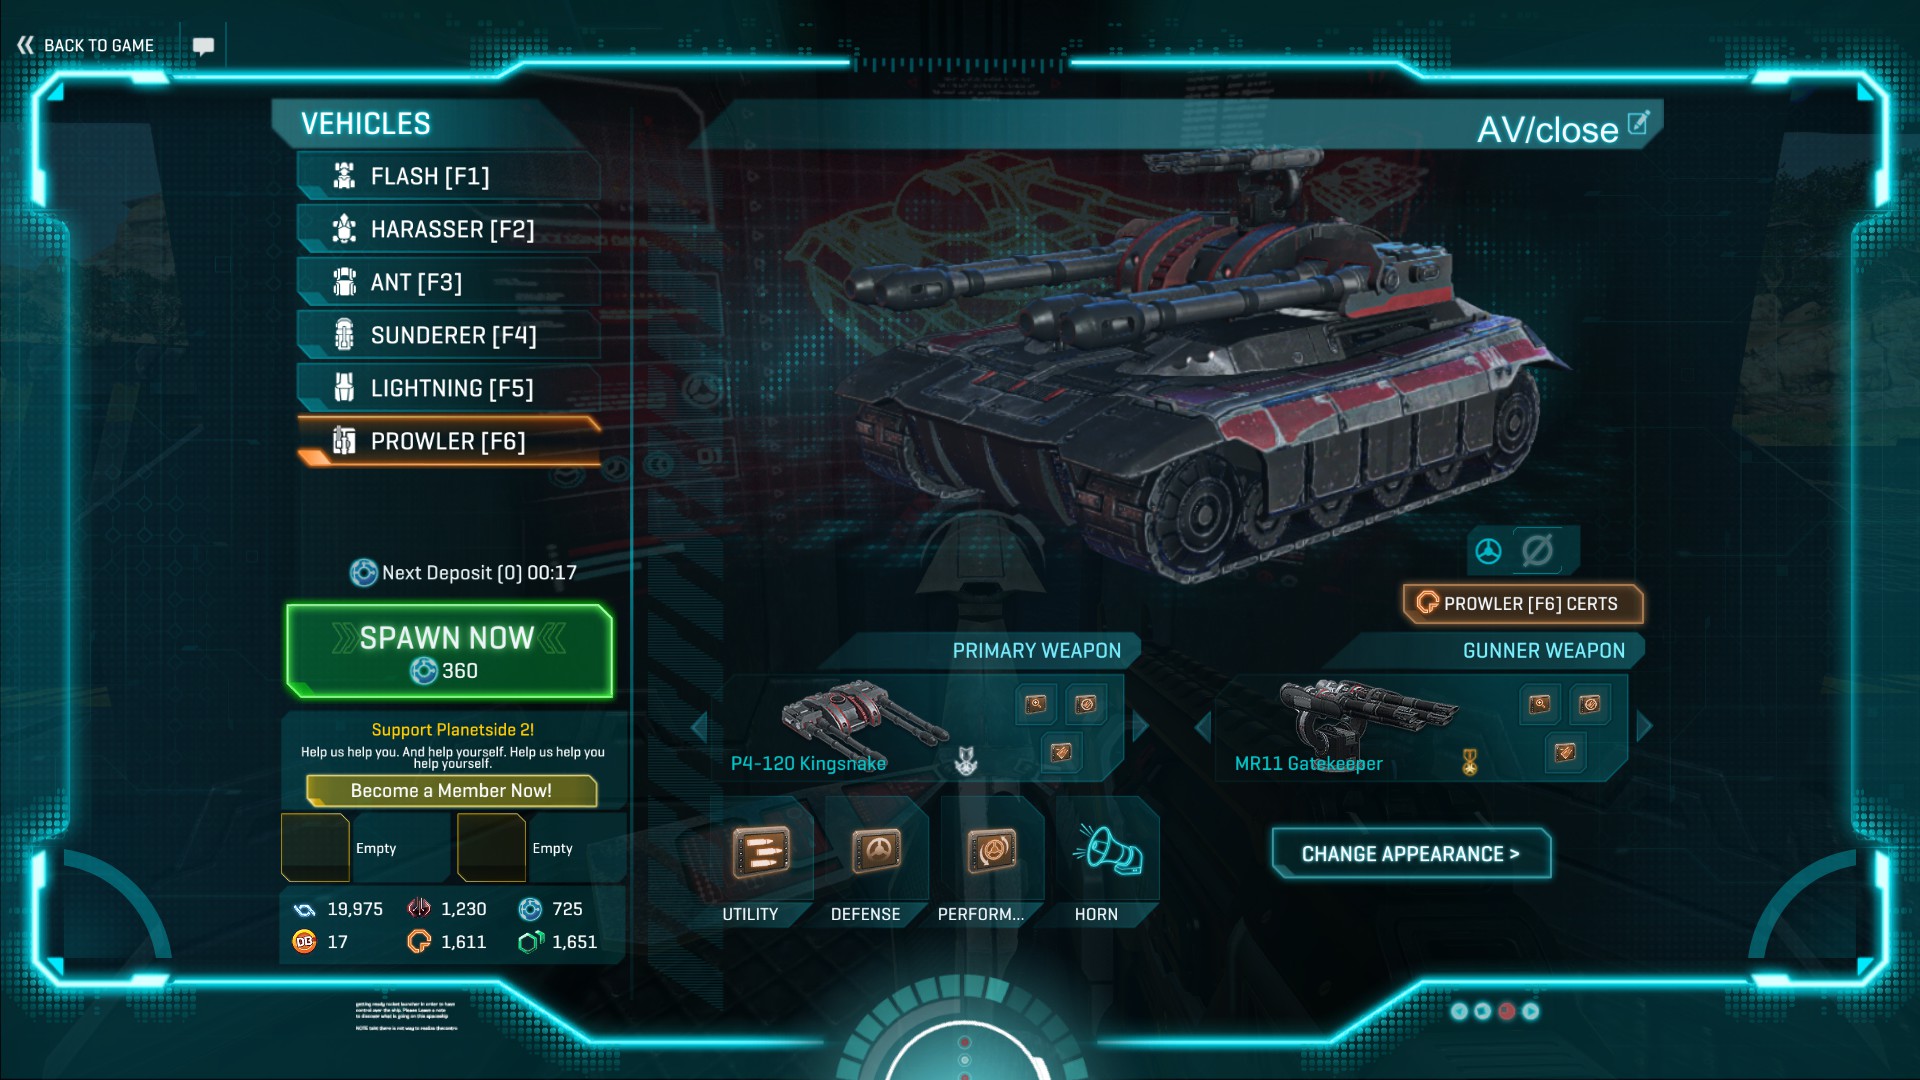
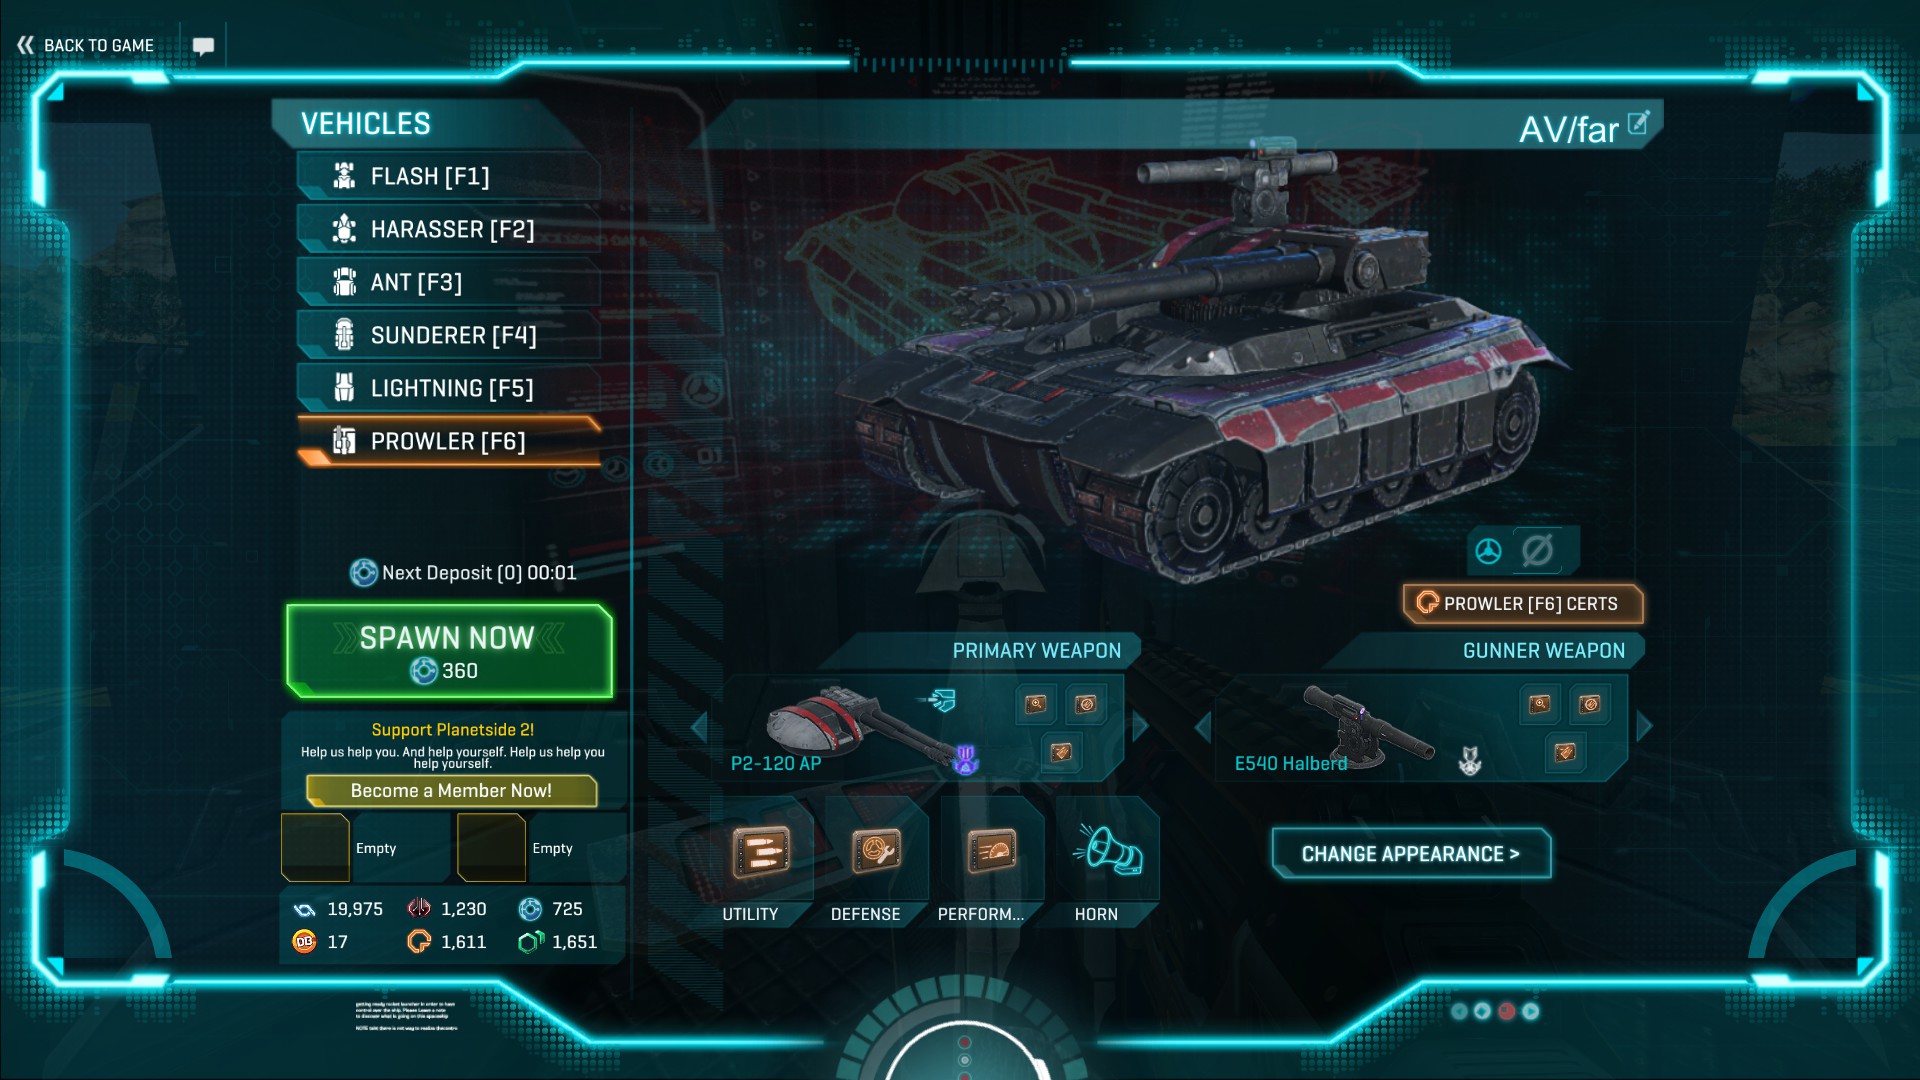
P2-120 –
P4-120 Kingsnake –
P525 Marauder –
M18 Palisade –
G30 Vulcan –
MR11 Gatekeeper –
Unique Abilities
Anchored Mode – auto-granted ability that allows the Prowler to deploy to increase cannon muzzle velocity by 50%. Useful for engaging distant ground vehicles and aircraft.
Barrage – increases reload speed by 30% ل 15 ثواني. Can be activated every 35 seconds once fully upgraded. Useful for annihilating enemy vehicles that you have outflanked and punishing overextended enemy vehicles.
Unique Defences
Rampart Projector – increases front armour by 20% and generates a hardlight rampart at the front of the Prowler when deployed. Damage to the rampart also damages the Prowler, which can make you an easy target. Useful mainly for supporting infantry by blocking enemy small arms fire.
Faction-Specific Weapons (WIP)
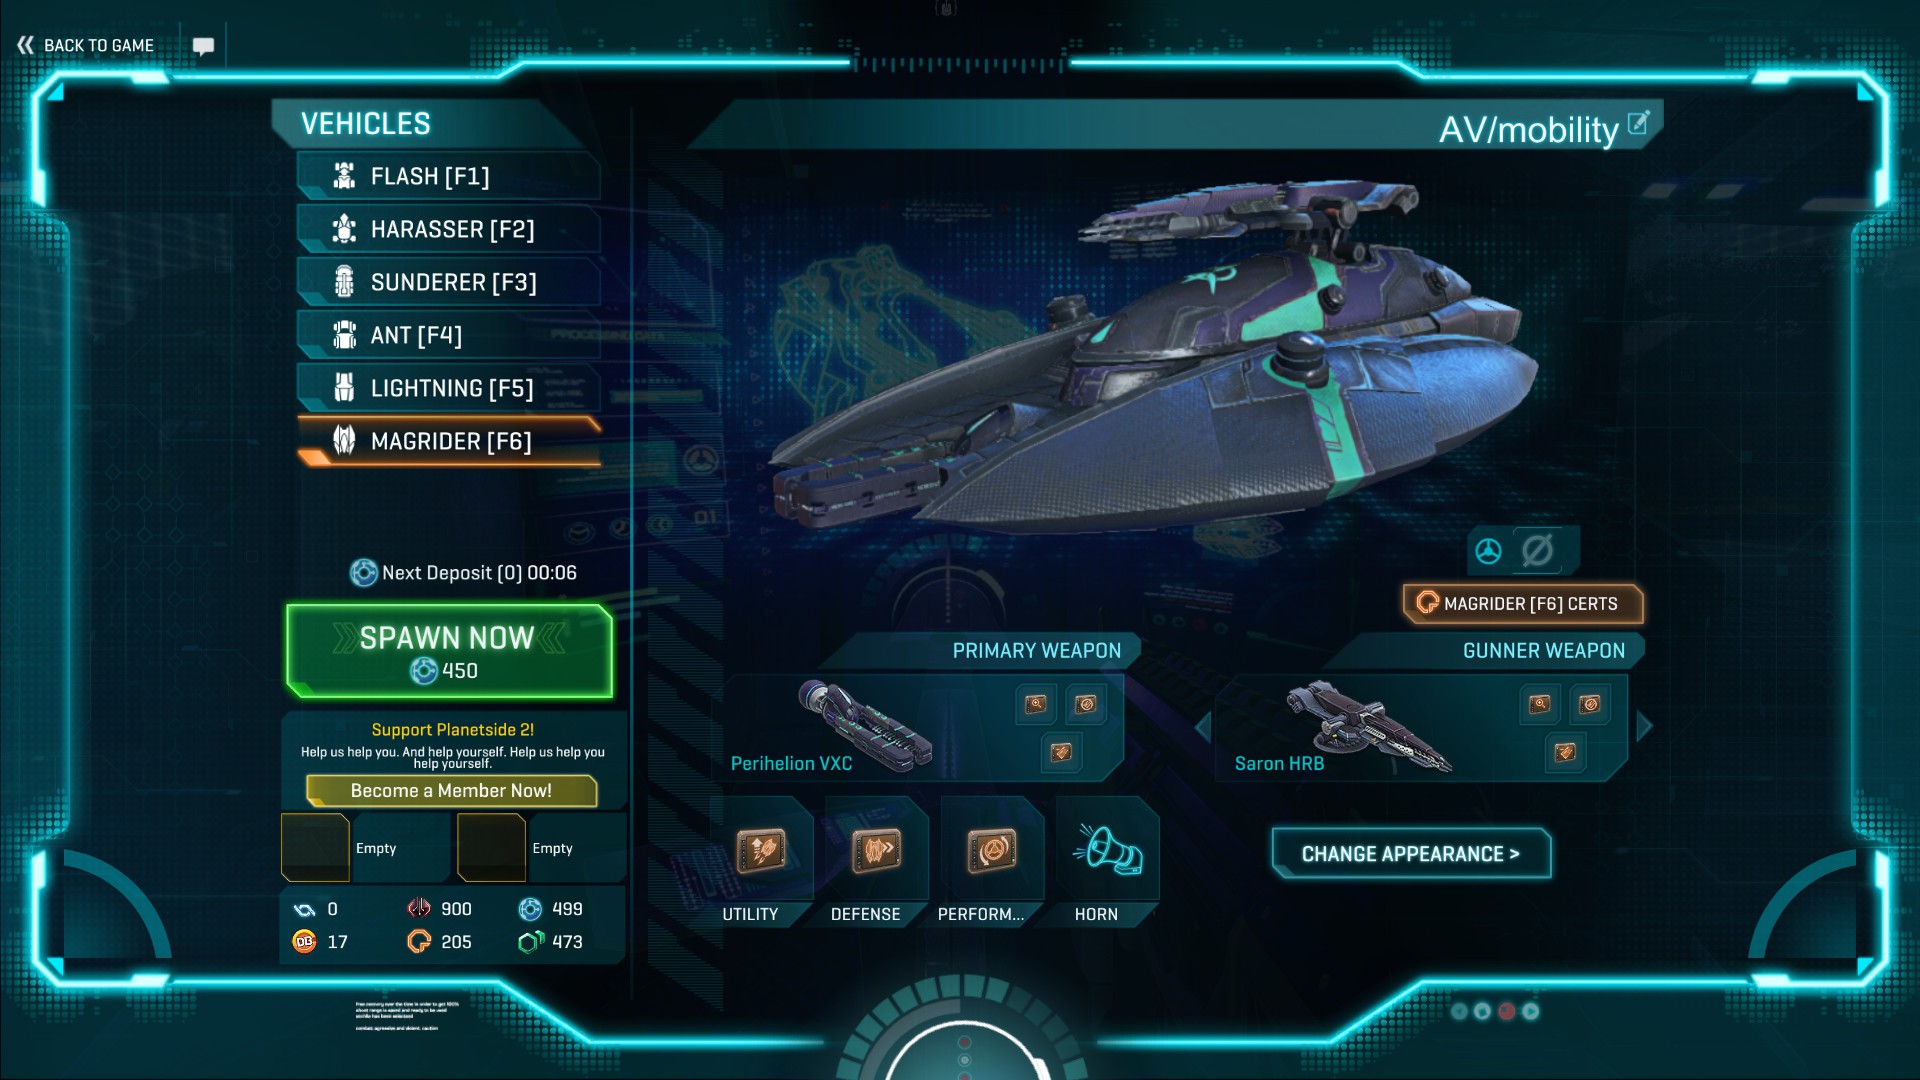
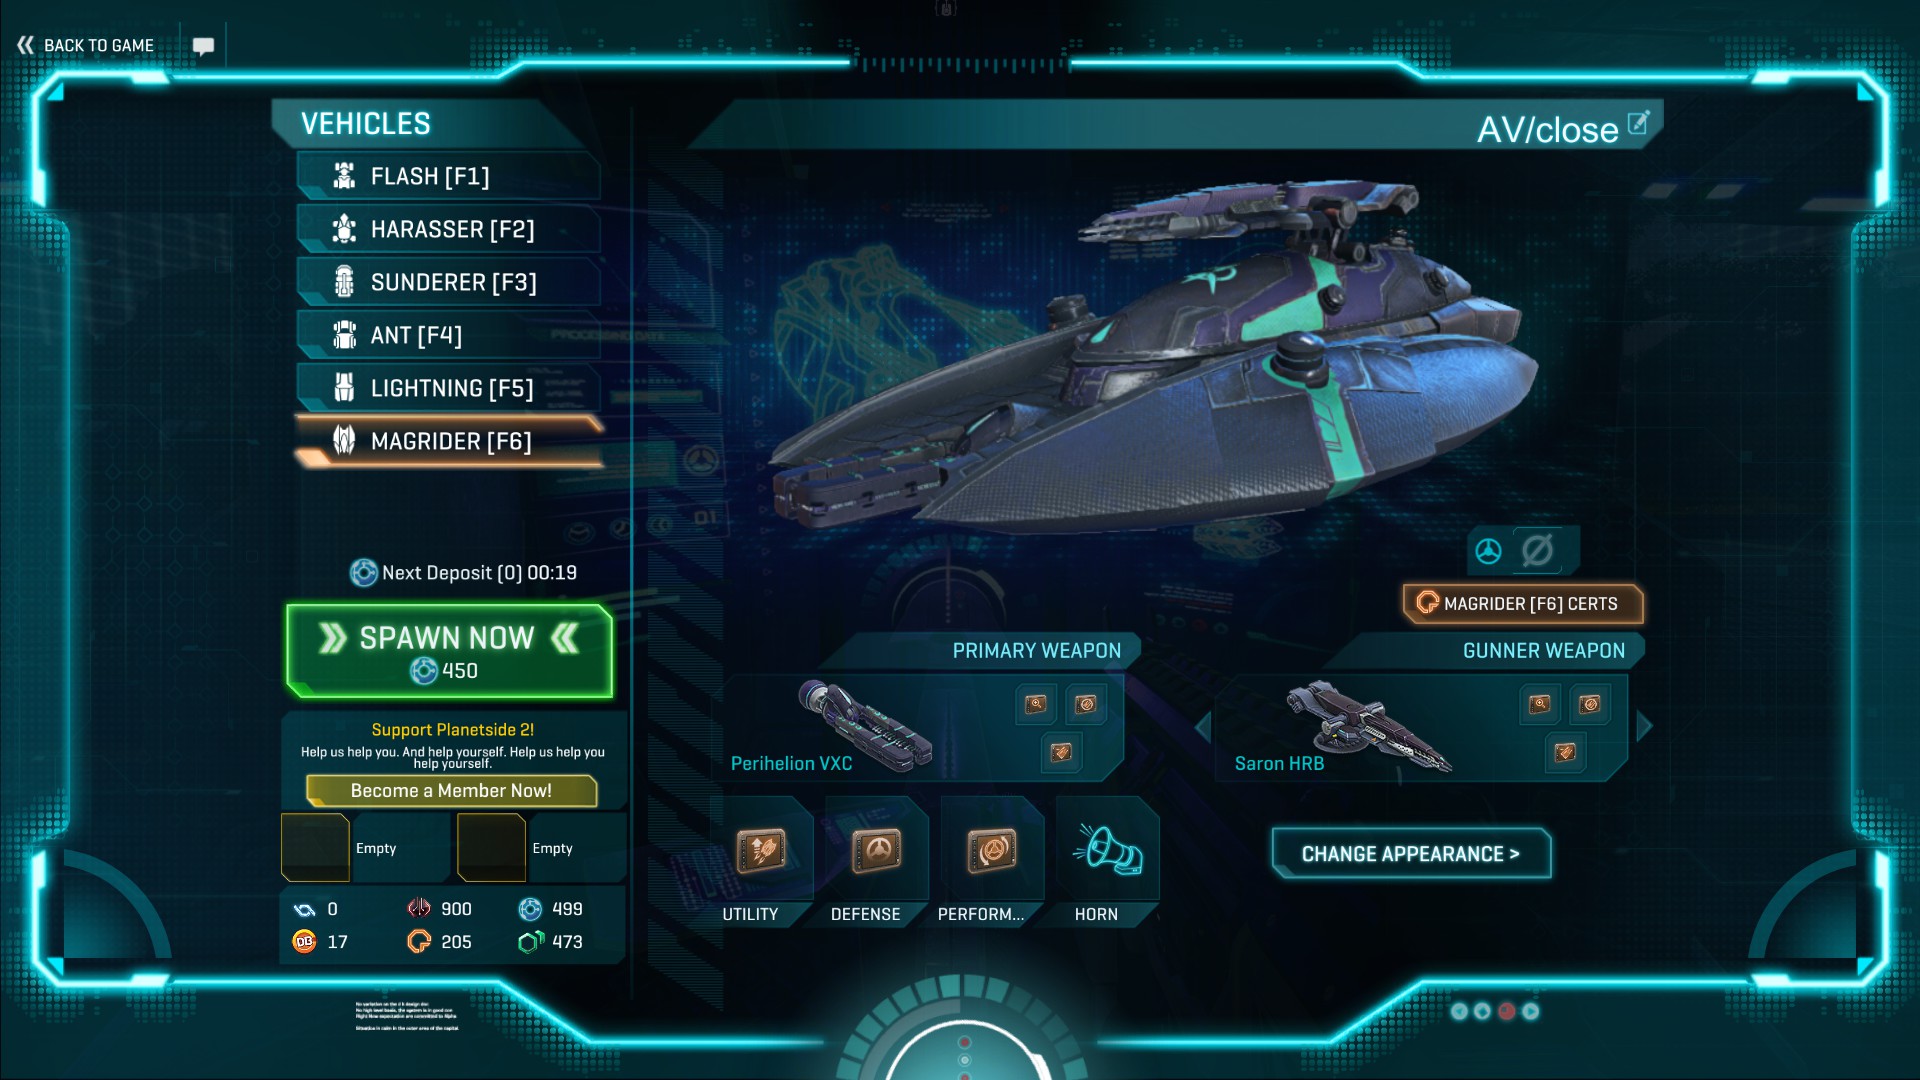
Supernova –
Perihelion VXC –
Proton II PPA –
V42 Pariah –
Aphelion VEX-4 –
Saron HRB –
Unique Abilites
Magburner – auto-granted ability that acts as a turbo boost for the Magrider. Useful for flanking or retreating quickly and Magrider jumps.
Recharge – instantly restores the Magburner energy to full and breaks lock-on attempts in the process. Can be activated every 25 seconds once fully upgraded. Useful for increasing general manoeuvrability.
Unique Defences
Multi-Directional Exhaust – allows horizontal mobility while thrusters are active and increases Magburner recharge speed by 30% once fully upgraded. Useful for increasing general manoeuvrability and makes the Magrider incredibly unpredictable and difficult to hit in the hands of an experienced driver.
Vehicle Loadout (Universal)
أسلحة
M12 Kobalt – anti-infantry machine gun that is highly accurate but cannot damage armour.
M20 Basilisk – heavy machine gun that is effective against all targets.
E540 Halberd – mounted rocket launcher that is pinpoint accurate and exceptionally effective against all targets, but hard to use. Not available to the Sunderer (thankfully).
G30 Walker – anti-aircraft machine gun that is harder to use than the Ranger, but has higher DPS, longer range and decent anti-infantry capability.
G40-F Ranger – anti-aircraft flak cannon that is easier to use than the Walker, but has lower DPS, shorter range and poor anti-infantry capability.
القدرات
Fire Suppression System – extinguishes fires and repairs 15% vehicle health over 5 ثواني. Can be activated every 45 seconds once fully upgraded. Useful for fighting everything.
Smoke Screen – generates a smoke screen around the vehicle which obscures enemy vision and prevents automatic minimap detection and lock-on attempts for 8 ثواني. Can be activated every 30 seconds once fully upgraded. Useful for fighting Heavy Assaults with lock-on rocket launchers, Defectors with D7 Hummingbirds and Javelins with JVN-MM N.E.S.T. launchers.
الدفاعات
Flanker Armour – reduces damage taken from C4, Rocket Launchers, Rocklet Rifles, Launchers and A2G Warheads by 20% once fully upgraded. Allows MBTs to survive two bricks of C4. Useful mainly for farming infantry. Not available to the Sunderer.
Mine Guard – just use Sweeper HUD.
Nanite Auto Repair System – repairs 8.33% vehicle health every 5 seconds when out of combat for at least 8 ثواني. Useful for getting repairs whilst repositioning in an area where stopping to repair is too risky.
Proximity Radar – reveals the movement of enemy infantry within 50 metres on the minimap once fully upgraded for all vehicle occupants. Useful mainly for farming infantry.
Vehicle Stealth – increases lock-on time by 2 seconds and also completely prevents auto-detection by nearby enemies once fully upgraded. Useful for flanking enemy vehicles.
Chassis
Racer High Speed Chassis – increases a vehicle’s speed and acceleration. Useful for covering open terrain quickly and climbing hills.
Rival Combat Chassis – increases a vehicle’s braking power, reverse speed, and rotate/strafe/turn speed. Useful for navigating obstructive terrain quickly and presenting your tank’s front armour quickly in CQC.
Directional Armour
All tanks have directional armour:
– Shots to the front or top do 0% extra damage;
– Shots to the sides do 15% extra damage;
– Shots to the rear do 50% extra damage.
كما, flanking enemy tanks to do increased damage to them is an incredibly important tactic in armour gameplay. Keep in mind that directional armour is not dependant on where your shot lands, but where you fired your shot from relative to the position of the target vehicle.
Read more about flanking in the Tactics section below.
Tactics
Pulling
Always make sure the vehicle pad is clear of enemy vehicles and unavoidable tank mines before pulling any vehicles. Hexes away from the front lines are usually better for this. Pay attention to the map situation and call-outs from teammates to judge whether a vehicle terminal is safe to pull from. Always pop any armoury discounts you have access to before pulling any vehicles in order to conserve Nanites.
Third-Person Camera
You can enter third-person camera mode by pressing ‘T’ by default. Being in third-person camera mode allows you to have a wider field of view, look around corners without exposing your vehicle and rotate your turret faster if you have one. كما, you should always be in third-person camera mode whenever driving vehicles except when taking precise shots.
Map Awareness
Map awareness is essential to your decision making when it comes to picking engagements and how to go about them. Favourable terrain, low enemy numbers and exposed enemy flanks are desirable factors in any potential engagement. Remember that the minimap/map is not always accurate as enemy vehicles may avoid being q-spotted and use counters to auto/sensor/radar detection e.g. Vehicle Stealth. قال ذلك, you can use your judgement and situational awareness to fill in the gaps e.g. ground vehicles are usually following roads or trying to reach favourable positions like hills. لذا, you must strike a balance between checking the minimap/map and checking what is right in front of you. Always q-spot and call out enemies for teammates.
Baiting
You can exploit an enemy’s lack of map and situational awareness by luring them into an area where friendlies outgun or outnumber them. This is called baiting. Inexperienced armour players often fail to realise they are being baited when pursuing an enemy vehicle, even when the bait is unintentional. You must learn to not fall into this trap to become an effective vehicle player. Once you are more experienced, you can attempt to bait enemy vehicles yourself. Coordinating with teammates to set up traps is easier than attempting to bait enemy vehicles into pubbies.
Flanking
Flanking allows you to eliminate enemies before they have time to react. This applies to every play style in PlanetSide 2, but is most important to armour players because tanks have directional armour that are weak to flanking shots. Always use map and situational awareness to plan ahead before flanking. As previously mentioned, favourable terrain, low enemy numbers and exposed enemy flanks are desirable factors in any potential engagement, and they go hand-in-hand; it is not worth attempting to flank an enemy vehicle if it leaves you stuck in unfavourable terrain or horrendously outnumbered. Sometimes it is better to just take an engagement head-on, other times it is worth moving through multiple hexes to execute a flank. Flanking is easier with Vehicle Stealth. Remember that flanking is the most effective way of dealing with Forward Vanguard Shields.
Peeking
Whenever possible, you should fire from partial cover and then move to reload in complete cover. This is called peeking. Most non-flanking tank vs tank engagements are decided by whichever tank can peek the most efficiently in order to limit exposure to damage. Prowlers and Vanguards can peek by driving forwards out of cover and then backwards into cover or vice versa. Chimeras and Lightnings should prioritise peeking by driving backwards out of cover and then forwards into cover rather than vice versa because their turrets are located at the rear of the vehicle (but take care to avoid exposing your flank to increased directional damage). Magriders can only peek side to side seeing as they have fixed turrets. Remember that you can always feign a peek to bait enemy tank shots, allowing you to follow up with a free peek with no risk of taking damage.
King of the Hill
Whenever possible, try to seize the high ground. This will grant you a greater view to target enemies from and a difficult position for enemy vehicles to assault as they will have to slow down in the open in order to climb it. بالإضافة إلى ذلك, in any situation where two vehicles are on either side of a hill, whichever vehicle crests the hill first is usually at a disadvantage as it renders them defenceless for a brief moment while their turret is angled upwards and unable to target the enemy vehicle. كما, you should always let enemy vehicles be the ones to crest hills in standoff engagements.
Top Gun
The top gun on the Vanguard, Prowler and Magrider does not receive damage, so you can coordinate with a gunner to peak with the top gun with no risk of taking damage. This can be useful in situations where you are outgunned or outnumbered and need to deal as much chip damage as possible to incoming enemy vehicles before they are upon you.
Cannon Clipping
WIP.
Repairing Often
Repair often. The more vehicle health you enter an engagement with, the more likely you are to survive. Remember that smoke plumes can also give away your vehicle’s position, so it is sometimes worth stopping to repair just enough to stop your vehicle from smoking before continuing a retreat.
Maneuvers
Last-Input Movements
Your vehicle remembers the last movement instruction you gave it upon disembarking. على سبيل المثال, if you hold S to reverse and then press E to disembark, the vehicle will continue reversing a little ways at full speed before coming to a standstill. The same is true for driving forwards, driving rightwards, driving leftwards and rotating. The main use for this is to reposition your vehicle whilst repairing it; you can use a series of last-input reverse instructions whilst repairing when disembarked to effectively retreat your vehicle whilst repairing it. Take care to avoid accidentally causing your vehicle to ‘run away’ from you into enemy fire by unintentionally giving it the wrong last-input instruction.
Pendulum Turn
WIP (still doing in-game experiments with tracked vehicles at the moment).
Lightning Drift
Going at full speed along a flat surface or down a hill in a Rival Combat Chassis Lightning and then turning allows you to drift. This is useful for conserving momentum and looks badass.
Lightning J-Turn
Reversing down a hill and then turning in a Rival Combat Chassis Lightning allows you to J-turn down the hill. This is useful for retreating very quickly downhill and looks badass.
Chimera J-Turn
From a standstill, you can reverse and turn in a Rival Combat Chassis Chimera to almost J-turn on the spot. This allows you to present your front armour faster in CQC engagements and somewhat makes up for the Chimera’s inability to rotate on the spot due to being wheeled rather than tracked.
Magrider Jump
WIP (trying to find a video for this at the moment).
هذا كل ما نشاركه اليوم من أجل هذا PlanetSide 2 مرشد. تم إنشاء هذا الدليل وكتابته في الأصل بواسطة FreshBunnyPoo. في حالة فشلنا في تحديث هذا الدليل, يمكنك العثور على آخر تحديث باتباع هذا وصلة.