- عنوان: Kingdoms and Castles
- تاريخ الافراج عنه:
- المطور:
- الناشر:
Information about Kingdoms and Castles is still incomplete. الرجاء مساعدتنا في ملء تفاصيل اللعبة باستخدام هذا نموذج الاتصال.
A detailed guide on how to push for the largest population while ensuring high happiness in Hard mode.
مقدمة
Greetings fellow Kings, Queens, and Peasants!
This guide is meant for those who enjoy architecting and building big cities, ruling over vast numbers of happy peasants, watching the population counter tick ever higher, and maximizing every pixel of land! I’m here to show you how to build your very own Mega-City! Our goal is to reach a minimum of 10,000 peasants, and they must be happy (we wouldn’t want any revolts on our hands) و صحيح (dead ones don’t count)!
I’m assuming that you have the fundamentals down and understand the basics of how this game works. Some of the core concepts will be reiterated in the following sections of this guide, but you should probably practice getting a basic town to at least 1k population first before attempting a Mega-City.
Fundamentally, Kingdoms and Castles is about proper city layout to manage supply chains and maximize population happiness and health. Larger city sizes simply increase the challenge of meeting those goals. Viking and Dragon incursions add barriers to expansion and growth. But with the information and examples that I’ve put forth in this guide, I hope you’ll be successful in building your Mega-City!
ملحوظة: This guide was written in early September 2022, so new content, functional adjustments, and bug fixes might change some elements of this guide.
Selecting a Map
You’re going to want a single solid Land mass (Islands are a whole different type of challenge) for as much real estate as possible. Map size should be Large, and turn off Rivers entirely.
Generate some maps until you find one to your liking. You’re looking for large uninterrupted tracts of land. Oddly-shaped peninsulas, lakes, large bays, and inlets aren’t too desirable as they generally lead to space inefficiency, but you can’t avoid having some.
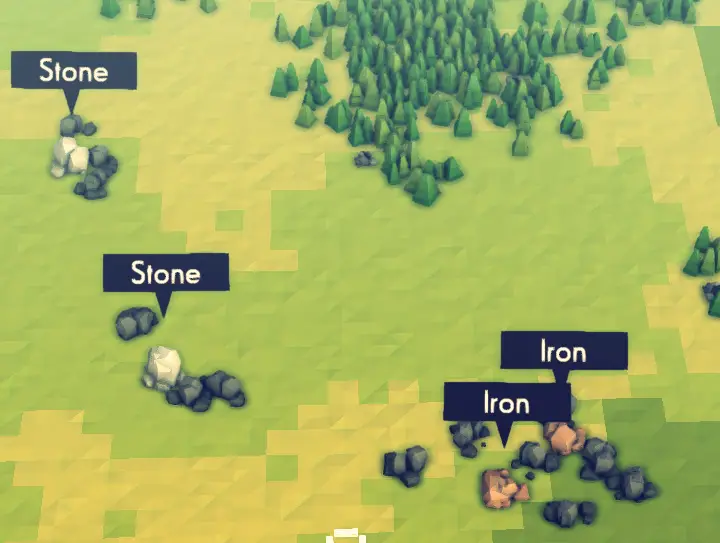
In terms of resource locations, you want the center area of your biggest “solid rectangle” of land to have forest, fertile areas, حجر, and iron within reasonably close proximity. This is where we will be starting out, so plan accordingly.
This is what I ended up choosing:

If there’s a lot of forest covering that center area, click on various parts of the forest to check for land type – trees can always be cleared away, and they might be hiding fertile/very fertile land suitable for growing crops, or swaths of barren land ideal for concentrating your housing. Don’t plan to clear away too many trees, you’ll need enough forest remaining for at least 4-5 Forester buildings to ensure a steady supply of wood.
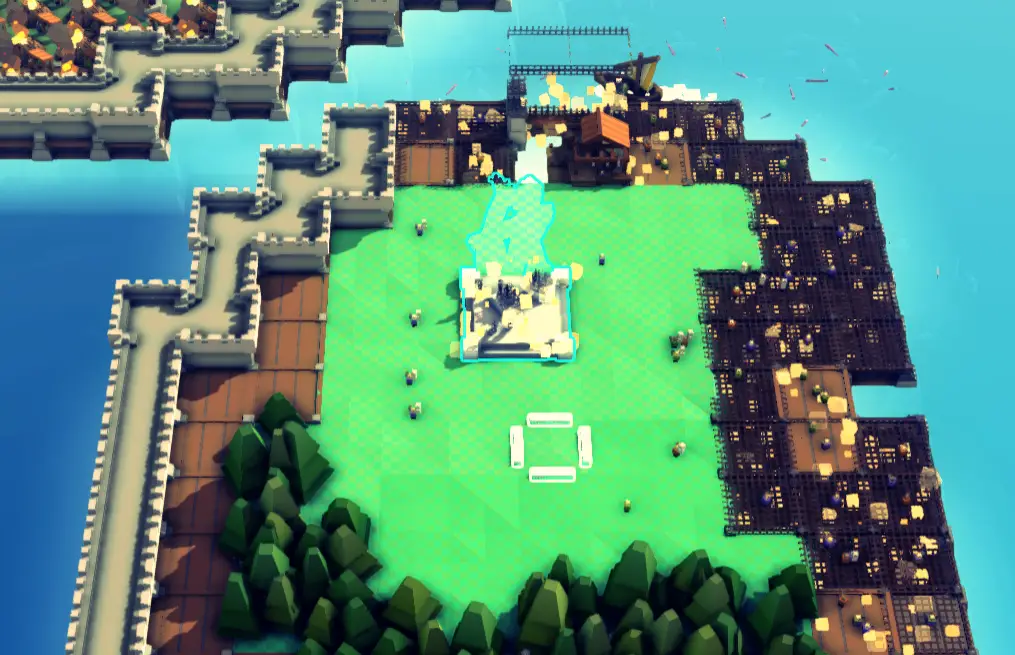
My starting area:
Starter Town
The goal of our initial phase is to have a fortified, fully self-supporting town in the middle of our biggest landmass with a rough population of about 1000 peasants.
We start out in the middle for several reasons:
• The center is more easily defended, we have land to build walls/turrets, and it takes time for Vikings to reach us.
• Resources are more easily reached, we want a reasonably compact starter town that has everything walled in.
• Having your fortified starting point in the middle makes expanding to the coasts much easier.
Follow the standard steps for getting started, but do try and keep your initial Hovels in your planned housing district and place food storage units on the side of your fields closest to said housing district. Don’t worry about the specific layout of your starter town – aside from the Keep, we will eventually redo ALL of it!
Population
You will never have enough idle peasants in the first few hundred population. Ensuring that you have enough housing for a constant influx of immigrants is crucial, don’t ever let all beds be taken up! Choose what non-housing buildings to lay down carefully. Each one “consumes” idle peasants in order to run effectively, and at times when you need more hands for construction work you’ll have to use the job priority system to dictate which buildings get shut down while the workers do construction.
This means you should never build more than you strictly require. Keep granaries and produce storage from going empty, but try not to build more fields and orchards than you need. بصورة مماثلة, go with worker-efficient happiness boosters for your housing district, and turn off archer towers and ballista towers when no invasion is imminent.
When you have to prioritize jobs, make sure food production stays fully staffed, gathering jobs (forester, quarry workers) can be lower priority since you will likely have periods of time waiting for resources to come in, and periods of time spent building using those resources. Try not to drain too many workers from happiness buildings, your overall happiness level determines what percentage of visitors stay with you, and growing your population is crucial.
Money
Early on, money is also a major bottleneck. Not only is it needed for many of the better happiness structures, but it’s vital for defenses against the ever-increasing Viking horde. Once you’ve got a couple Cottages up, build a Treasury (place it adjacent to the Keep for maximum defenses), set Taxes to 20%, and let money trickle in.
There’s a careful balancing act between investment into defenses and investment into Manors. If you build too many Manors before sufficient defenses, then the next Viking raid may empty your coffers and demolish your population Happiness. But building too many defenses early on drains your meager tax income and prevents building Manors for better tax income and population growth. My recommendation is to go for 2-3 Manors, then buckle down and set up defenses in preparation for the next attack. Based on how well you did against the Vikings, plan to invest in housing or defenses accordingly. As you grow and your defenses solidify, you can worry less about preserving this balance and go all-in on expanding population.
At some point, your food infrastructure is steady and you’re entirely focused on growing population and defenses. When this happens and you have a population in the low hundreds (several manors), set taxes to 30% to boost income at the cost of Happiness. 20% tax rate = -7 Happiness per household, 30% tax rate = -12 Happiness per household. Once your population is much higher and income is flowing steadily, drop it back to 20%.
Remember that more population = more tax money = more Vikings = more defenses needed.
Defenses
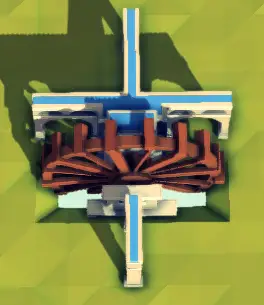
In the very early stages, you won’t have enough money or resources for walls. Select locations inside your town that maximizes coverage and build a mix of ballistae and archer towers. Don’t bother with mobile troops just yet. Be sure to build a tower of 2×1 Castle Blocks, since your maximum tower height is limited by the height of an adjacent tower. Both archer towers and ballistae reach maximum range at a height of 10 blocks (note that Stone Gates are already 2 blocks high and require Castle Blocks to be built on top of them in order to contain turrets). The dotted blue line indicates maximum range.
Once you have a solid population and sufficient tax income, zone out the rest of the space you’ll need for housing and food and start building walls. You want to enclose your entire housing district and food production. Forests and Stone/Metal can lay outside the walls, just be sure to keep the stockpiles inside the walls and have Stone Gates at appropriate points. You can also build as many fishing huts far from your town as you want – Vikings tend to ignore them and beeline for your main population center.
Even after you encircle your starting town with walls, keep ballistae sprinkled about on the inside with perhaps a higher concentration over your fields and orchards (Dragons seem to prioritize targeting food production). Ballistae should still reach a fair bit over the walls in order to help quickly take down Ogres in addition to Dragons. Archer Towers can be relocated to the walls, concentrating them where Vikings are expected to stream towards.
Once your walls are up, build an Archer School and start a small army of Archers. Archers are preferable to melee infantry because they can sit on walls and rain arrows down on attacking Vikings and Dragons. They essentially act as mobile Archer Towers, you can relocate them to the wall sections that have incoming Vikings. Unlike towers, they can’t be turned off, so ensure that your tax income is sufficient to support them.
My Starter Town:
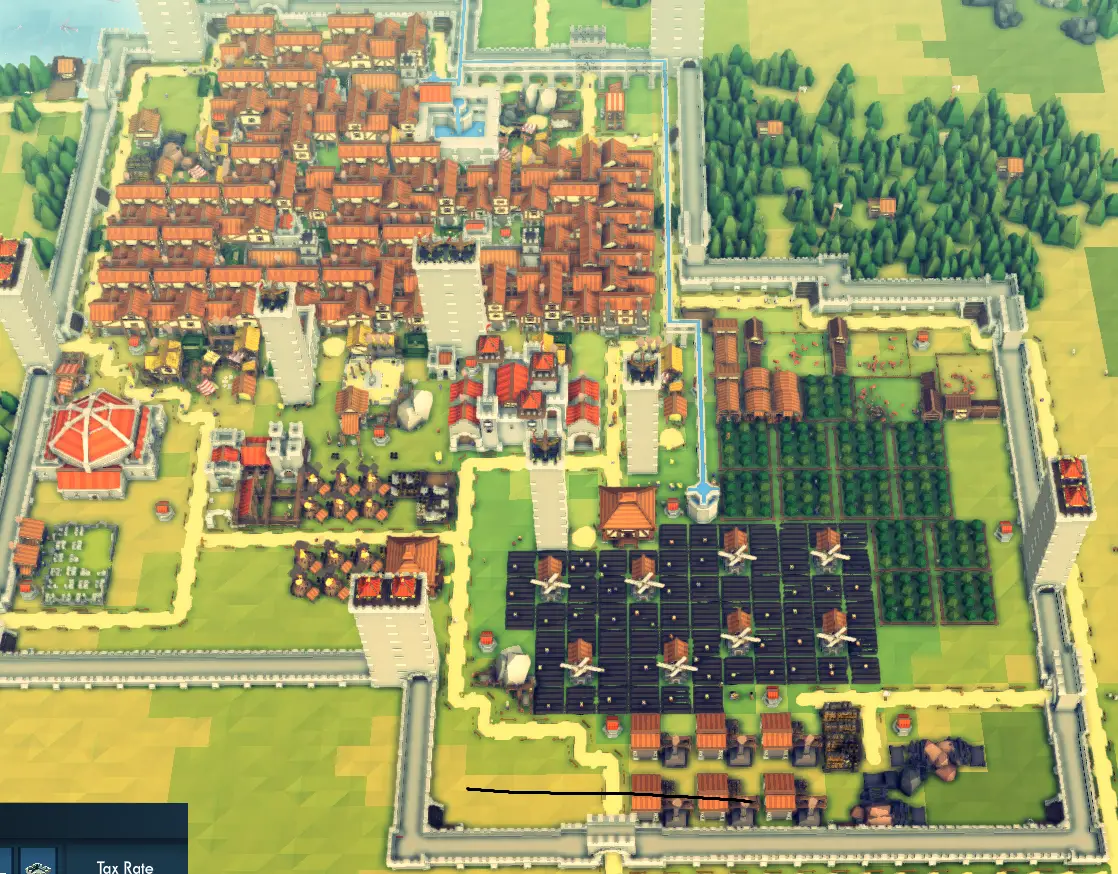
Once you have your town walled off, defended, and built enough beds for 1000 peasants, start stockpiling wood, حجر, tools, and money. Your population will be capped and unable to grow more, but that’s alright – having the resources needed for a rapid expansion into dangerous territory is more important. I would aim to have at least 2000 wood, 2000 حجر, 100 tools, and a good chunk of money (maybe 1000-2000 ذهب) ready to go before you step foot outside your walls.
Expanding to a Corner
With your starting town and stockpiled resources ready to go, it’s time to start building our glorious Mega-City! You’re going to want to pick a “corner” of your big landmass to head towards.
Don’t start towards a peninsula or any coastline that is really oddly-shaped. These take considerably more resources to defend and are difficult for us to put down large residential zones and farming districts.
Zoning
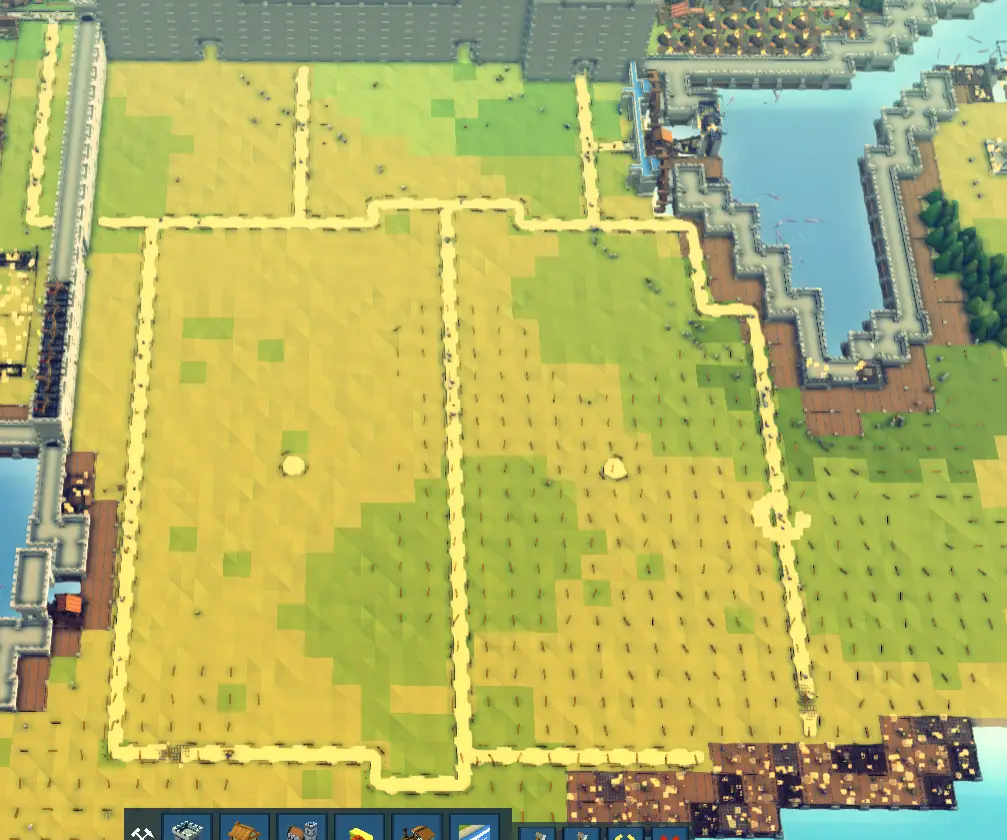
Look at the available land and determine where you want your fields and orchards (focus on high fertility areas and large zones of medium fertility). Then look at everything that is left over and plan out your large swaths of residential zones. In a later chapter, I describe several high-efficiency residential zone layouts, feel free to use those to start measuring out your residential areas. I like to build cheap Roads in an outline around each planned housing district so I know what space is left over.
The corner and coastline make excellent tree farms due to the irregular shape of the coast. I elaborate on creating tree farms in a later chapter. Any trees outside of your designated tree farm should be clear-cut to make space for food production and housing.
The empty spaces between your fields and residential zones are used for several other important functions: Norias, Swineherds, Butchers, Blacksmiths, Hospitals, and Fire Brigades.
Stockpile Transport
Once you’ve zoned your major agriculture and housing districts, build some Large Stockpiles in a central area of your expansion where they don’t interfere with your planned major zones, and start using Transport Carts to ferry wood, حجر, and tools from your stockpiles in the starter town to the newly created stockpiles in your expansion area. At the same time, start clear-cutting any trees that aren’t in your planned tree farm.
Shifting your resources takes time, but ultimately you’ll save considerable amounts of waiting when you’re rushing to build infrastructure and defenses. Vikings tend to ignore these early buildings and head towards population centers, so you don’t have to worry about those exposed stockpiles getting torched. The less distance your peasants have to travel when looking for wood and stone, the faster important buildings are finished.
Defenses
This is the tricky part. Piers and Castle Blocks in large quantities is still beyond what your limited resources can handle, so early on I’m still using the 2×1 towers sprinkled around my new expansion corner to handle the odd Viking incursion. Dragons will generally still prioritize your established food centers in the starter town, so your biggest concern are Vikings that sail in from the direction of your expansion corner (if they come in from the opposite side of the map, they hit your starter town, which is well protected).
Once your infrastructure is up and running (more on this in a later chapter) and you’re starting to lay down residential zones, then laying down Castle Blocks along the corner coastline will redirect Viking ships to head farther inland. You’re looking to funnel them into “kill zones”, where a concentration of towers can be utilized to wipe out Vikings before they reach the core of your new expansion area.
Putting down Piers (and Castle Blocks on those Piers) to ensure that Vikings cannot land in a sparsely protected area can be done later when you have the resources and income. Don’t wall off your entire expansion area before this can be done, because Vikings can “land” and drop off troops in Shallow Water (anything labelled Sea Water or Fresh Water). Only walling up to Deep Water will prevent landing (more on this in a later chapter).
Infrastructure
Always get food production, resource generation, and water sources prepared before building your residential districts. This includes having a tree farm and a steady source of Charcoal, having Norias, Aqueducts, and Reservoirs constructed, and having all your Quarries and Mines churning away.
Build your food storage buildings and enhancement buildings (windmills, reservoirs) أولاً, then lay down fields and orchards. Once your first harvest has been done and stored, you can move on to your residential buildings.
More details on infrastructure in a later chapter.
Prepping Food/Infrastructure before filling out the Residential Districts:
Residential Districts
أخيراً, you can start putting down block after block of residential zones, and focus on growing your population again. For your expansion corner, I would aim to have at least 2000+ peasants zoned in that area, bringing your population total to about 3000 (including the starter town). Once the residential zones are completed and your population is steadily growing, you can wall off the entire expansion corner and strengthen the defenses along your coastline.
More details on Residential Districts in a later chapter.
Further Expansion
With your central starting town and your now-fortified corner expansion zone, you are generating enough population, resources, and money to more rapidly expand along the coastline and fill up half of your landmass. After your corner expansion, pushing into new territory usually involves the following steps:
• Secure coastline (more on this in a later chapter) and build defenses first.
• Build food and infrastructure.
• Plop down residential district.
Defense becomes a little more straightforward as you cut off potential landing zones for the Vikings, funneling them into fewer kill zones to prevent them from reaching your city proper.
Later Expansions start with Piers and Walls:

Eventually, with close to half the land settled, you will want to redo your starter town. Generally this involves making sure you have a big surplus in food supply before razing any fields and orchards, and ensuring that you have hundreds of empty beds ready when you demolish old residential zones in your starter town. New zoning can be done to maximize efficiency of your residential layouts and adjust locations of your food production.
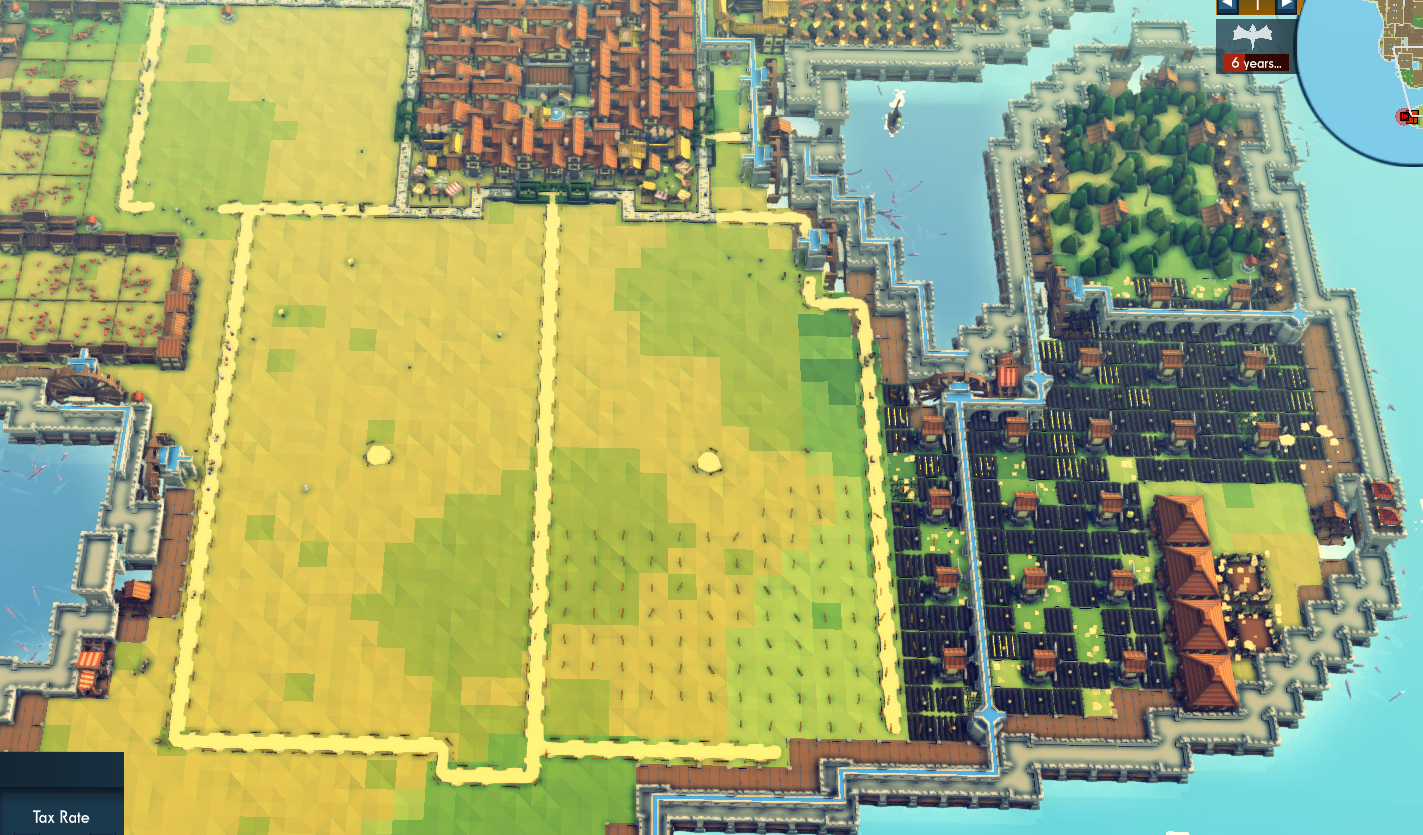
My corner expansion completed:
Expanding near my Starter Town, note the defensive walls are up early and the old walls have been torn down:
The entire side of the map settled, including the original corner expansion:
Creating Infrastructure / طعام
When expanding into a new area, always start with defensive preparation work (Piers, Castle Blocks for funneling Vikings), then move into food production.
Agriculture
Your food production areas will largely revolve around where the Very Fertile and Fertile patches are. Because these areas vary in size and shape, it’s very difficult to calculate precisely how much food is generated from any zone. لذلك, go with producing too much over too little – you can always pare back some food production area for other purposes at a later time.
Location matters as well. If your residential districts are very very far from a particular food source, then they’re not going to get that food type consistently, and health/happiness will suffer. على سبيل المثال, if you’re zoning for a new expansion area and notice that your planned residential district won’t be anywhere near some orchards, it might be time to plan out an orchard zone even if fertility isn’t great.
Distances from food sources can be mitigated by building Granary/Produce Storage/Butcher far from the actual food production but close to the residential zone in need, and using Transport Carts to shuttle an excess of food in the production zone to the storage units far away. This happened more frequently in those peninsula expansion zones, where there wasn’t much fertile land for placing new food production districts, while my primary food districts were overproducing large quantities.
Preparing food production zones, note that this is pushing into my starter town area, and that I already have water ready:
Irrigation
You’ll need Norias built ahead of time to supply water for both housing districts and food production. Residential zones benefit from active Reservoirs since irrigated Gardens generate additional happiness and Fountains can be used. Bath houses require a connection to a waterway, so you might as well irrigate the residential zone.
Figure out where you want Reservoirs to sit for your food zones, then plan for where the Noria will be built. Remember that each Noria can only push about 24 tiles of water through Aqueducts and Reservoirs, plan for multiple Norias connected to your waterways if you need to push longer distances. Connections can also be made to the Noria’s center tile directly in the “أمام” of the wheel, along with all tiles orthogonally adjacent to the back. Using Fresh Water from a coastline is ideal (since you’re limited on what you can build on a Pier), but if no nearby source is available then you’ll have to dig Moats. Fresh Water only appears in lakes, rivers, and sea bays that go deep into the mainland.
Aqueduct connections to a Noria:
Aqueducts can be built over several structures:
- Roads / Gardens
- Castle Blocks / Stone Gates
- المزارع
- Produce Storage
- Wells / Small Fountains
- Hovels
- Cemeteries
- Quarries / مناجم
- Small Markets
Note that they CANNOT be built over:
- Bridges
- Orchards
- Small Stockpiles
- طواحين الهواء
Fish and Meat
Fishing is rather straightforward – plop a Fishing Hut on any section of coastline that has fish, and watch the fish trickle in. It’s recommended to place Fishmongers close to the Fishing Hut so they get early access to any fish that are available. You don’t want your Marketeers to reach the Fishing Hut first! A Fishmonger can handle two Fishing Huts if they’re relatively close together, otherwise, I just would place a Fishmonger right next to each Fishing Hut. Fish is eternally in short supply for a large population, but it was only ever intended to be a space-efficient means to supplement your population’s protein requirements. I cover more about Fishing Hut placement and protection in a later chapter.
Swineherds and Butchers were not producing what I expected at first because I didn’t understand exactly how they worked. After some email exchanges with Lionshield support (who were extremely helpful!), I got the system down and my population was forever well-supplied with meat afterwards. You’ll want roughly 4 أو 5 Swineherds per Butcher. Similar to the Fishmonger, place Butchers close to the Swineherds so they get first access to any meat that “pops up”. When I say “pops up”, I mean that a pig has matured and is ready for slaughter, this happens periodically regardless of the weather. The pigs shown in the Swineherd building don’t really mean much, just keep in mind that properly working Swineherds will generate meat at a slow and steady rate. Note that Swineherds cannot be built on Piers!
Forests and Charcoal
Two areas that are difficult to use efficiently are jagged coastlines and smaller peninsulas. They sometimes feature fertile ground, but more often than not you’ll find them unsuitable for residential zoning (due to odd shapes or small area), but too barren to be ideal for agriculture. لكن, trees grow in every dirt square no matter how barren or oddly shaped the surroundings might be.
If a difficult-to-use coastline or peninsula already has trees, then cut the forest down to the tree farm you desire and insert Foresters at regular intervals. You can keep them at minimum spacing (4 tiles) and still have plenty of regrowth to sustain your logging operations. If there isn’t any forest there, you can use a statue of Lord Levi to spawn trees. The statue takes a large quantity of stone, but over time it will generate trees in the surrounding squares.
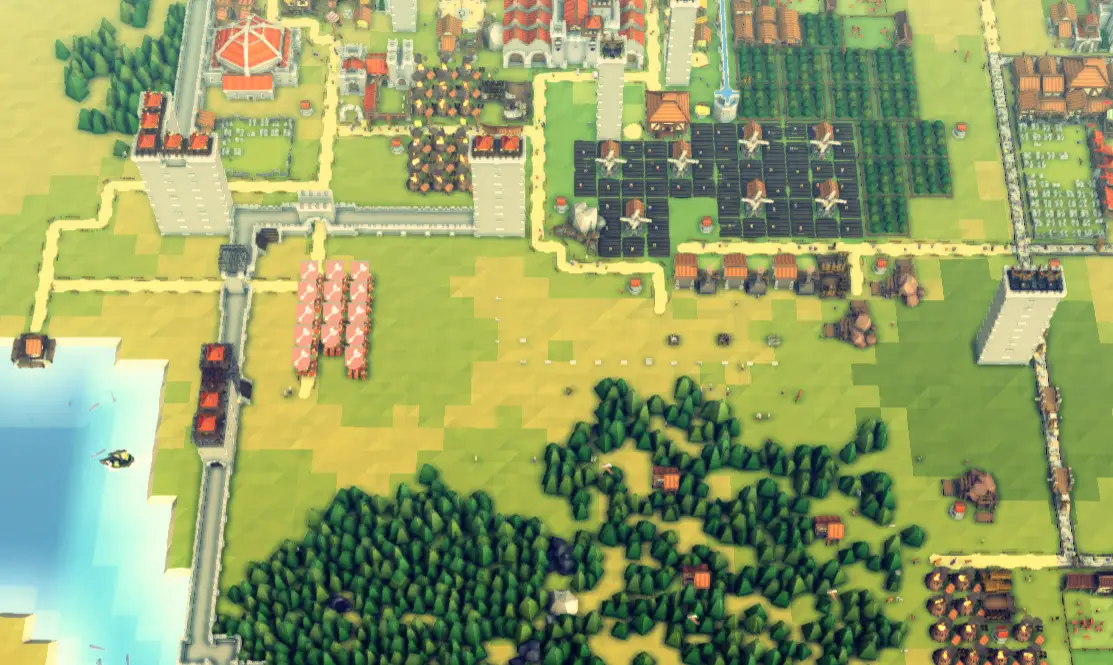
Creating forest in a peninsula:
Charcoal production should always be near the stockpile holding the wood gathered by your foresters. An ideal location for Charcoal Makers are the Piers built on the coastline adjacent to your forest (assuming it’s near the coastline). Trees will never grow on Piers, and you have very few buildings that would get placed around your tree farm, so charcoal production is a perfect fit for all that unused space.
Iron and Tools
Towards the endgame, Iron is ever in short supply. For a Mega-City with so much need for Tools, creating more Blacksmiths is pointless if they don’t have the Iron to drive Tool production. Weapons are not particularly needed, usually just one Blacksmith producing weapons is sufficient to field an army of 15-20 Archer squads.
Blacksmiths should be ideally located close to Iron gathering, charcoal production, أو كليهما. Whichever resource is too far away, use Transport Carts to haul the needed resource to a nearby Stockpile. بصورة مماثلة, you might need to haul Tools by Transport Cart from the Blacksmith zone to where your Butchers are located. Fishmongers tend to be less busy and can make the trek for tools themselves. لذلك, Blacksmith placement matters a bit less and can be in any area where you are not utilizing the space very well. Four Blacksmiths can use all the Iron from a Mine as quickly as it can generate it.
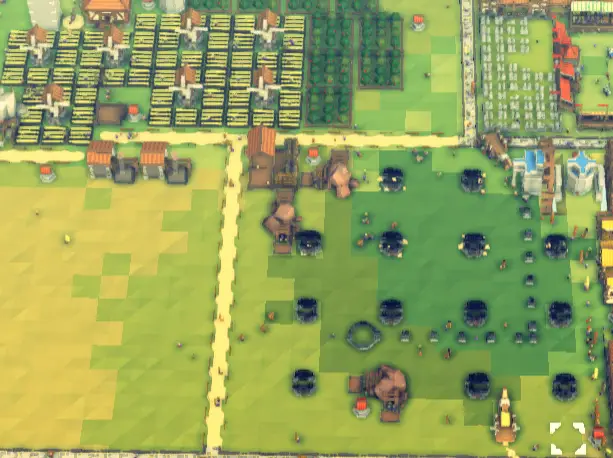
This is one of the primary reasons to establish an early Dock – you can buy much-needed Iron and Tools to supplement what little you can produce on your own. Tools don’t just get consumed by Butchers and Fishmongers. Their availability unlocks faster resource generation from Foresters, Quarries and Iron Mines (it’s unknown if these consume Tools, or just the presence of Tools enables the bonus). Proper expansion also means clearing away useless black rock and caves, each tile to be cleared requires a whopping 10 tools.
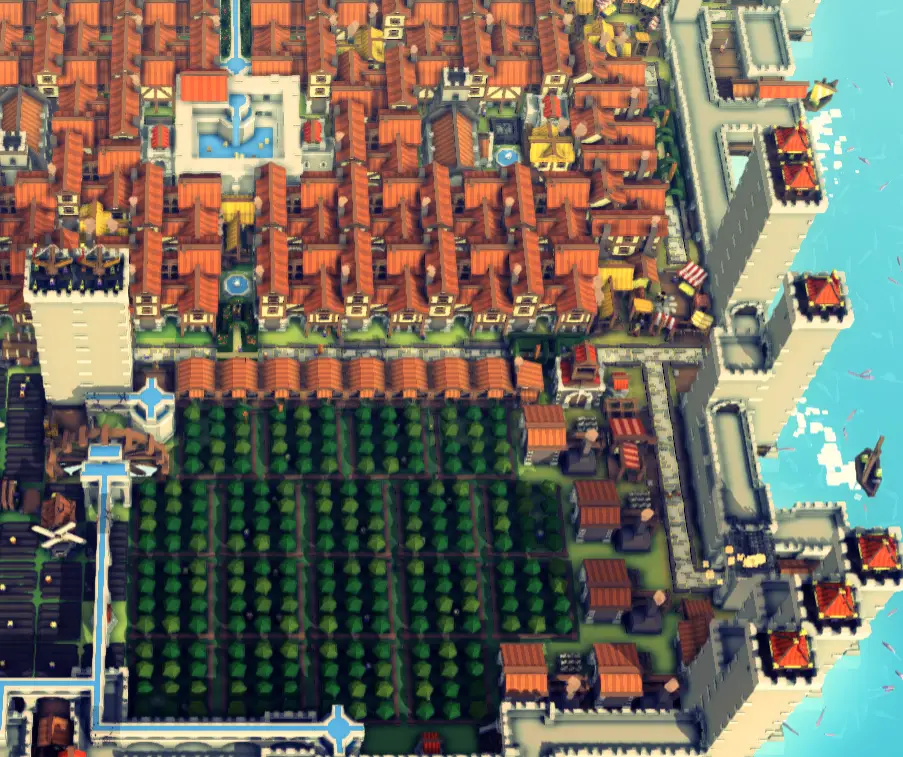
My central food/tree production zone with agriculture mostly following soil fertility:
Crafting Residential Zones
Residential Districts are fairly straightforward once you have a few templates to use. If you have enough space, plop a residential zone down. If you don’t, see what else the real estate could be used for to support other nearby residential zones.
Using Roads to outline my residential zones:
Visitors and Deaths
The number of incoming visitors scales with your population size, and you’ll have batches of visitors twice a year. Death by old age is constantly happening after your population has survived past 50 years or so, and the rate of deaths also scale with population size. The total deaths from old age that year are announced once per year. The number of visitors (per batch) is always a bit higher than the number of deaths by old age (per year).
If your happiness is insufficient or other events (Viking invasions) scare them away, you might end up seeing more peasants die from old age than the number of visitors settling down.
The Starter Town Residential District
At some point when you have well over 1000 empty beds (easily achieved if you’re laying down multiple residential zones at once), raze your starter town and re-use the space more efficiently. Peasants from the destroyed Manors immediately fill up an empty Manor with no loss of Happiness. Homelessness only occurs if you razed too many Manors and some peasants end up with no place to live, so if you only have a few hundred empty beds at a time, remove the old starter town residential zone piece by piece.
Happiness Buildings
The key about any building that generates Happiness in a radius is that houses farther from the building will receive less Happiness. That Library generating a whopping 15 سعادة? نعم, only the direct neighbors get that much. لكن, Happiness from two different sources of the same type
will stack, but only up to the cap of that building type. So that Manor getting +4 Happiness from Church A and +4 Happiness from Church B is still getting +6 Happiness in the Church category. This doesn’t seem to work quite as neatly with Gardens, since Gardens have a varying cap on the Happiness they generate depending on several conditions.
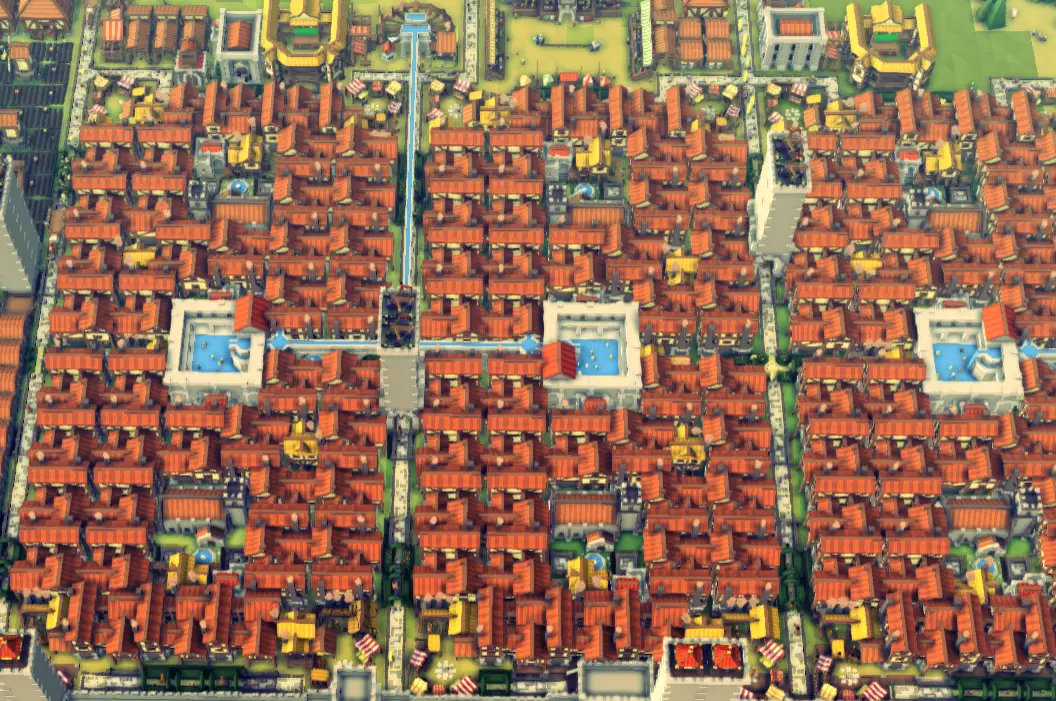
This serves to explain why my residential layouts look the way they do. The goal was to achieve 92-100 Happiness in a standalone district, maximizing the number of Manors each Happiness building affected. Residential zones placed next to each other saw average Happiness rise well over 100 due to the additive property of overlapping building radius. Residential zones placed next to each other also benefit from extra Happiness buildings not integrated into the zone itself (Theatres, Statues, Town Squares, إلخ). The Cathedral is a waste of space and is the only building I didn’t use.
By endgame, my average household Happiness was 110, particularly among the zones placed next to each other:
Happiness Building Chart:
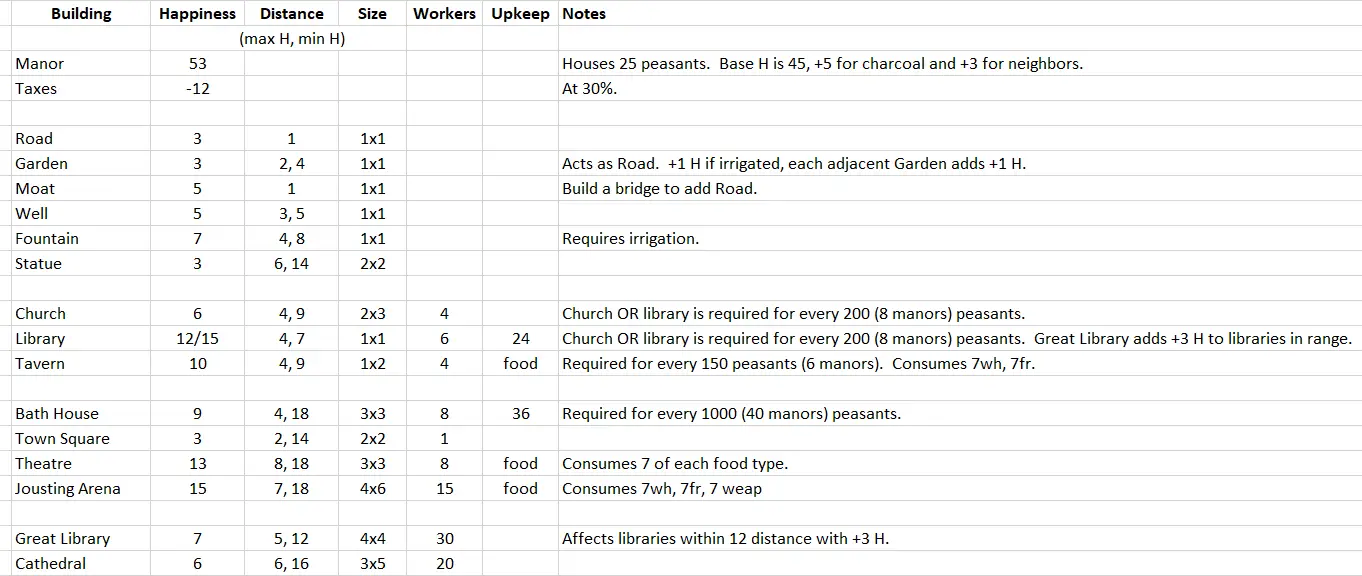
Base Manor Happiness is 45. Having Charcoal is +5 سعادة, and having neighbors (another house within 2 tiles) يكون +3.
General Tips and Tricks
- Digging a Moat and putting a Stone Bridge on it counts for both a “Waterfront” bonus and the Road bonus. I use this extensively for the “internal” Manors.
- لكن, Bridges cannot support Aqueducts, so if you have a waterway coming down the roads/gardens on the side of a housing district, those adjacent Manors will lose the “Waterfront” Happiness bonus since you have to use Gardens or Stone Roads.
- Bakeries are inserted inside the district because it’s a race condition on whether Heads of Households go to a Market for Wheat or a Bakery for Bread for that food category. Putting the Bakery closer to the Manors than the Market means that Bread is being picked first, maximizing the efficiency of Wheat (Bakeries also go to Markets for Wheat and Charcoal).
- Use Reservoirs (range of 8 tiles) to power Small Fountains, since you have to connect water to the Bath House anyways. Small Fountains work on Piers, but Wells do not!
- Small Markets are efficient in terms of space-to-storage, but ultimately lack the Marketeers to keep themselves constantly supplied. Better to use the large Markets.
- Most of these layouts are “missing” some buildings. This is based on the population-to-building requirements (على سبيل المثال, a Tavern is needed for every 150 peasants). These requirements can be satisfied irrespective of location, so the “missing” Tavern could be placed on some Pier far away for space efficiency. The smaller layouts assume the missing Bath House (BH) is placed adjacent to the district.
- Libraries and Churches share a “population requirement” (need 1 Church OR Library for every 200 peasants), but both are used because they contribute to different Happiness categories. Libraries are MUCH more space efficient and pump out more Happiness, but take considerable funds to maintain (a non-issue by the time you’ve gone past 1000 population).
- Gardens have short range, عن 2 tiles radius for maximum happiness, ending at 4 tiles radius.
13×23
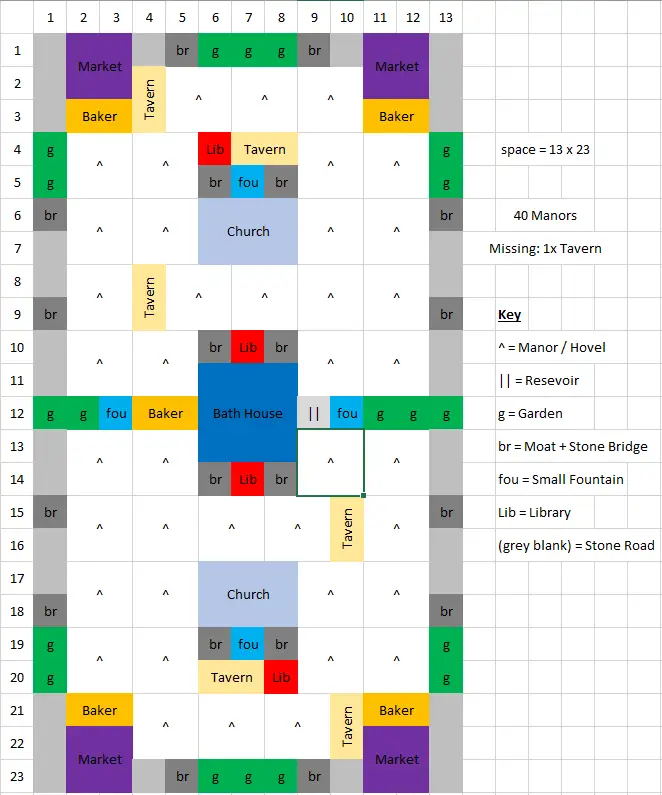
ملحوظات:
• This houses 1000 peasants exactly.
• This is the most efficient layout I have that also integrates the Bath House.
• You can build Roads around the Markets that are “sticking out”, but it’s optional since peasants can move through buildings, albeit at a slower speed.
12×12
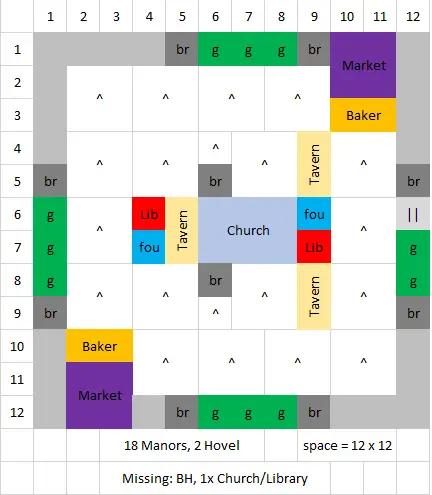
ملحوظات:
• This is the smallest housing district layout I have.
• You can easily adjust which corners the Markets are on (or move them outside the square).
14×14
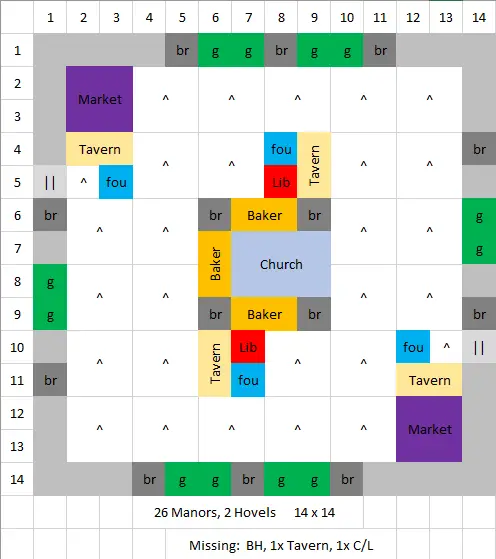
ملحوظات:
• Same as 12×12, you can easily adjust which corners the Markets are on (or move them outside the square).
Some of my bigger Residential Zones (mostly multiple 13×23 placed side-by-side):
Dealing with Dragons/Vikings
If you’re building your Mega-City in an easier mode, you can probably ignore this section entirely. This assumes hard mode difficulty, and also makes use of some wonky behavior in Viking path-finding. That behavior might have changed by the time you read this guide, so be aware of what could be outdated information.
Dragons are not really a problem after your starter town is set up and you have a steady income of gold with a sizable population. Although the number of dragons in an attack scales with your population, it never went higher than 7 dragons for me. The big red dragons fly faster than the small orange ones, effectively splitting the dragon attack into two “waves”, meaning my ballistae easily killed most of them before they even got off a single attack.
Eventually I just ignored dragons entirely, they were just a routine supply of meat (dead dragons that land on the ground turn into stacks of meat) for my peasants. By this time, you don’t even need to turn off Ballista Towers to conserve money, and it’s better to keep them on so they’ll accrue “experience” and deal higher damage.
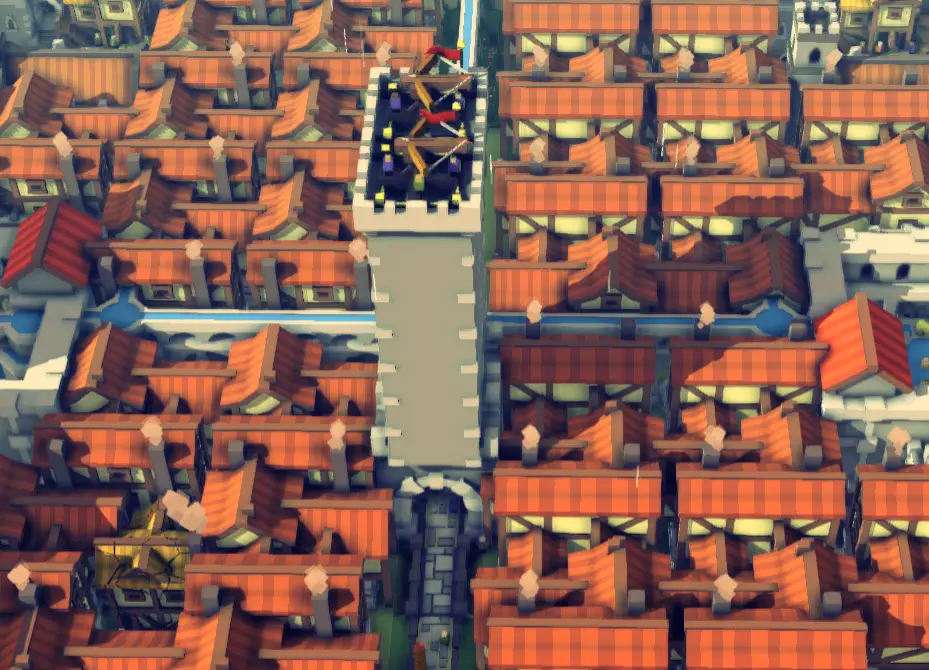
To conserve space, you can build a pair of Stone Gates over your roads, and put Castle Blocks and Ballista Towers on top of that. Remember that they reach max range at a height of 10 (it’s the blue dotted line).
Ballistae on Stone Gates:
Vikings scale with population size in what I think is a non-linear manner, and this can get to some truly ridiculous Viking incursions. Early on you’re more than covered with a few scattered Archer Towers, but by the time you’re measuring your population in the thousands, your Viking groups are being counted in the dozens. When I hit 12k population, I was seeing up to 110 Viking ships popping up during an attack.
Dealing with Vikings falls into two major categories: when they can still make landfall, and when they can’t.
Dealing with Landed Vikings
Vikings have some rudimentary pathing algorithms that will herd them towards a land-able shore if your coastline is partially walled off (more on this later), or a hole in your wall if you’re not enclosed in walls. Taking advantage of this to funnel them into specific landing points is crucial for concentrating your defenses and mowing them down before they breach your walls. Archer Towers and Ballistae will prioritize Ogres, and with good reason – each swing they do knocks off 10 hp from your wall.
• Castle Block: 1st block has 20hp, each block added on top adds 10hp.
• Stone Gate: has 40hp, each Castle Block added on top adds 10hp.
Early on, you’ll want at least a half dozen Archer Towers overlooking each of your kill zones, with maybe a pair of Ballistae a little farther inside your walls. Having a group of Archers trained from the Archer School becomes more and more important as the Viking hordes grow in size. Archer squads have poor path-finding when they start tripping over each other, so if you want to get them into your highest walls for better range (probably the same places you have your Archer Towers), you should move them ONE BY ONE so they go in an orderly line and never fumble around accidentally sharing space with each other. It’s a little painful, but micromanaging this becomes important when you have 30 Ogres bearing down on you in a conga line.
By the time I was down to a single landing point (and single kill zone), I had 25 Archer Towers and 18 squads of Archers to rain down death at my kill zone, and the Ogres were still able to whittle my wall down to 30% health at certain points.
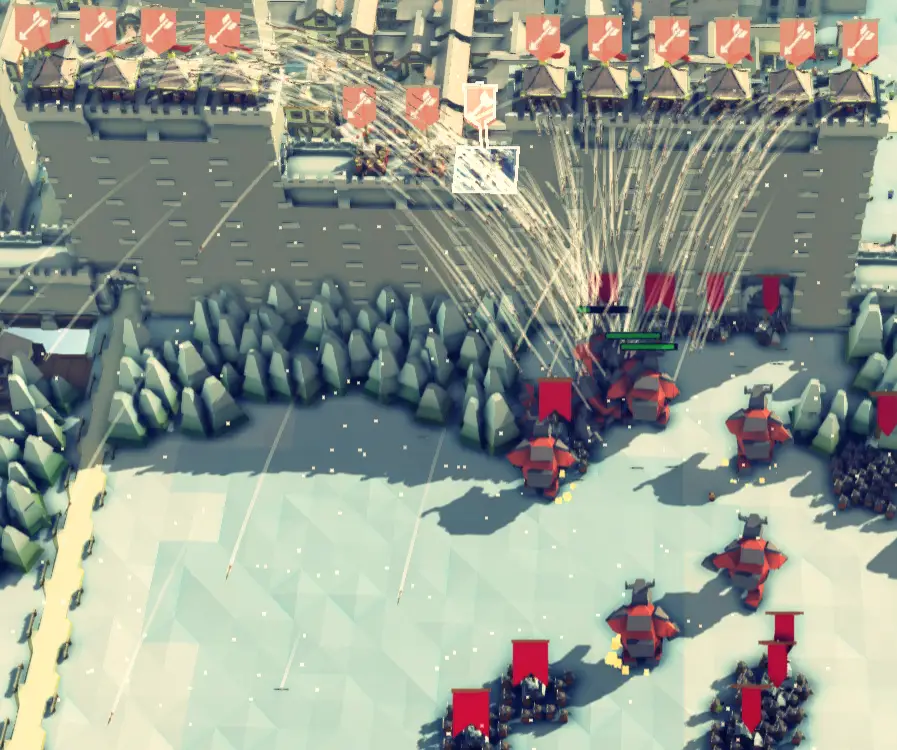
Early Viking Raids:
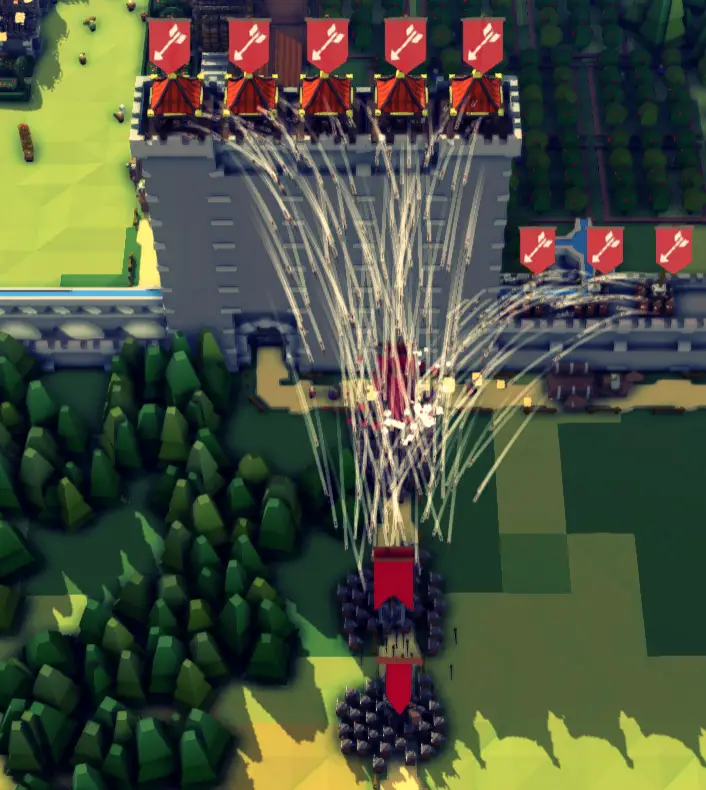
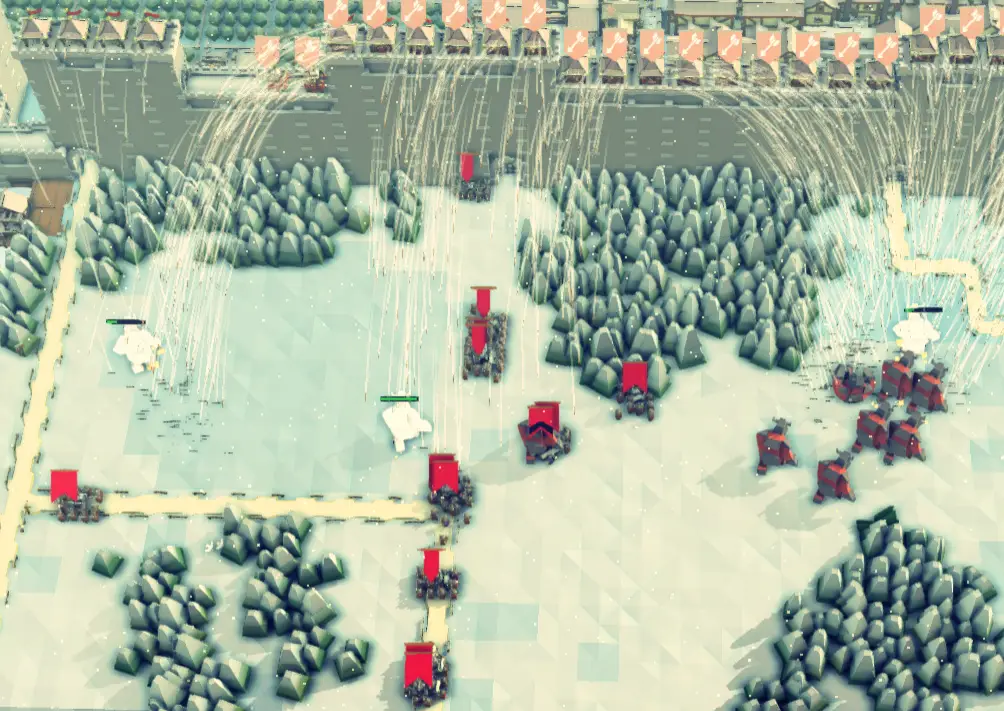
Mid-game Kill Zone:
End-game Kill Zone:
Walling off the Coastline
Eventually, you will have a significant portion of the coast walled off. When I say “walled off”, I mean properly walled off, which has some hidden details.
Important Notes:
- Vikings can “land” on shallow water. This is any light blue tile that says “Fresh Water” أو “Salt Water”.
- They can also get off on Piers. I think in earlier versions they could not, but it was fixed at some point.
- They cannot get off on a Castle Block, and two diagonally adjacent blocks are considered a contiguous wall with no gap.
- لكن, non-Ogre Vikings CAN climb up Castle Stairs and walk on top of your walls! Two diagonally adjacent Castle Blocks CANNOT be crossed in this fashion (for your troops too).
- If the nearest available “landing point” is too far, Viking ships will just said straight for your closest Sea Gate as if all the coastlines were walled off.
- Sea Gates incur some odd behavior in Viking ships, but only if you have a correct setup (more on this below).
عادة, Viking Catapult Ships (they carry Ogres) will constantly be chucking rocks at your walls, meaning their intent is to break through coastline walls to allow Ogres to land and head for inland walls. But if you make proper use of a Sea Gate, they don’t fire at all, and instead seemingly bug out by sailing straight into the gate and stopping there indefinitely.
Viking Ships bugged out:
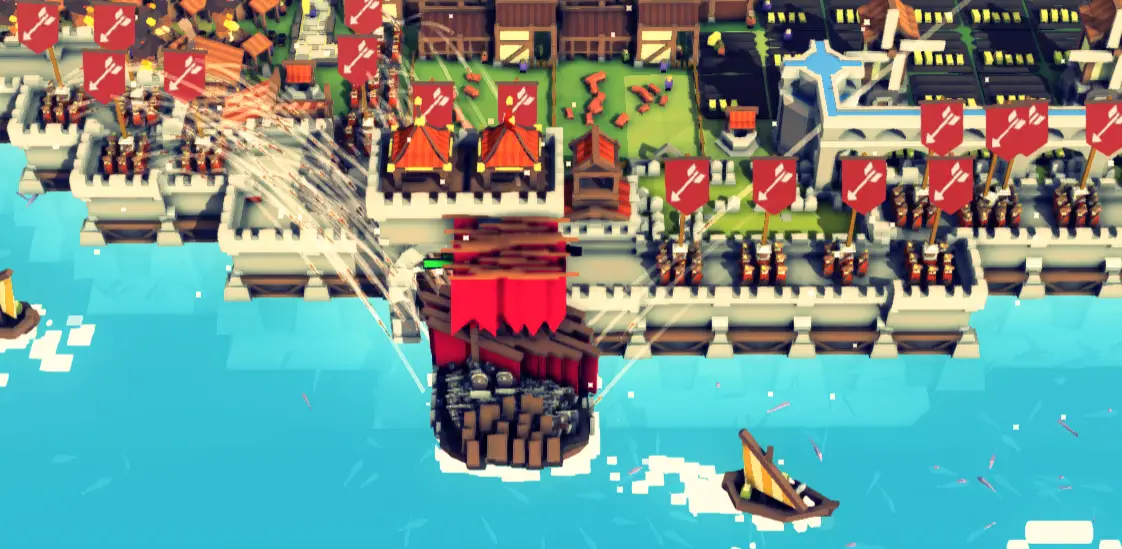
This requires a very specific setup, and it’s used at your Dock and all Fishing Huts. Fishing Huts normally represent weak spots in your coastline wall, as Vikings can land right on top of them. Using Sea Gates (يتذكر, they can only be placed on Shallow Water) right in front of the Fishing Hut will actually bug out the Fishing Hut (fishing boats never return to the hut to drop off fish), and will also fail to bug out the Viking ships. What you want to do is to keep at least 1 tile of Shallow Water adjacent to the Fishing Hut/Dock. This allows the fishing boat to “reach” the Fishing Hut (since the Sea Gate counts more as a wall and not an open water tile), and it also parks there during storms. At the same time, this tile of Shallow Water also seems to attract Viking Ships that cannot find another landing point, but they can never actually reach that tile because of the Sea Gate!
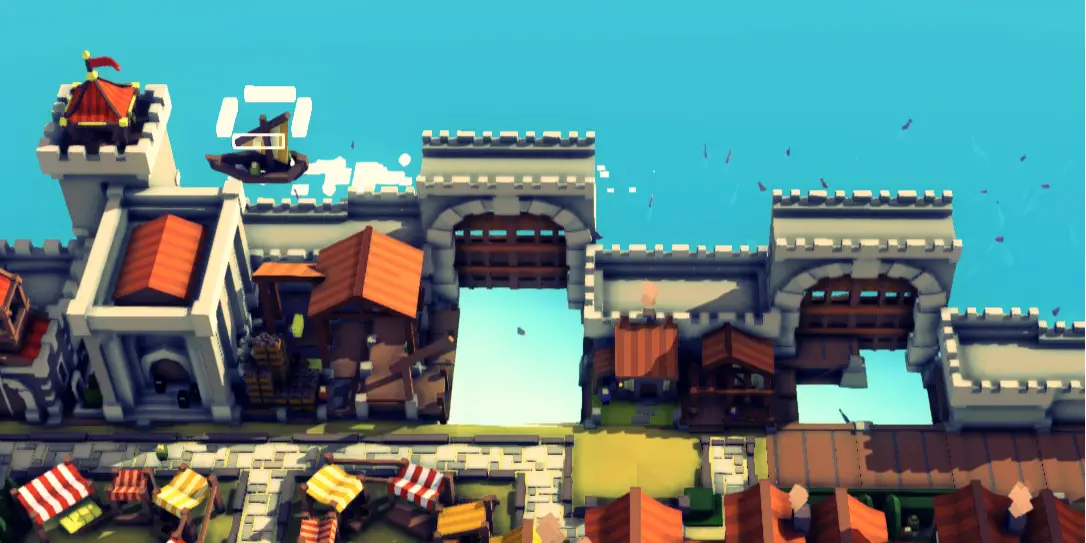
Proper Sea Gates, note that the Dock has 4 tiles of Shallow Water since the Merchant Ship is really big:
The result is that you can consolidate a couple Archer Towers at the Sea Gates that the Viking ships tend to go for, and just wait the several years it takes for them to finish wiping out 100 ships. Adding your mobile Archer squads to the Sea Gate under “attack” will speed up the process.
Dealing with Vikings without the Sea Gate Bug
In the event that the Sea Gate bug is fixed, or you don’t want to use this exploit, then dealing with Vikings becomes MUCH harder. My advice is to save the four “corners” of your land (or whatever juts out the most) as landing area “bait” leading Vikings into heavily fortified kill zones. Vikings tend to spawn from set directions (and sometimes from two different directions at once), so you can gauge where these spawn points are and craft the landing areas to be right in front of those spawn points. Build a ridiculous number of Archer Towers lining each kill zone, backed up by a good number of Ballista Towers inside the walls, and have a mobile Archer army ready to run to the zone that the Vikings land at. Line the exterior of the walls with Moats to slow down the Ogres and buy your Rain of Death some precious seconds to kill them before they reach the walls.
You’ll give up some real estate to establish these kill zones, but coastlines tend not to be very efficiently used anyways.
Space Efficiency Techniques
On flat, wide-open land, it’s easy to zone for what you need. But when you reach the weird coastline, or find yourself with odd gaps between your large zones, how do you make the most of them? Wasted space is wasted space, so it’s in your interest to use up ALL your space.
There are several buildings that are vital to have, but can be rather flexible in their location. These can be separated into two categories: Buildings that should still be close to residential zones, and buildings that can go anywhere.
Buildings to Spread Around Residential Zones
These buildings don’t need to be inside your residential districts, but are useful/mandatory to have nearby at the very least.
• Hospitals and Clinics are both required on a per-population count, and a good idea to spread around. The plague doctors will run out when a plague hits, and cure the infected to prevent both deaths and spreading. If they have to travel too far, then the plague will end up spreading more and killing more peasants. These happen frequently and will put a serious dent in your population, so it’s in your best interest to make sure medical coverage is decent over all your residential zones.
• Fire Brigades should be evenly spread out around your residential zones and food production zones. Not only do they help combat fire from Dragons, but the odd fire does appear, although this seems to be extremely rare if your Well/Fountain coverage is thorough. They’re not as useful by the time Dragons are marginalized, رغم ذلك, and can be skipped if you want more Hovels instead.
• Additional Happiness boosters can make good use of larger empty spots near your residential zones. Theatres can be great if you’ve got a big gaping 3×3 hole to fill in, but most of the time you’ll be finding yourself placing Statues and Town Squares in empty 2×2 holes for modest Happiness boosts. You’re required to place at least one Jousting Arena at some point, and the Great Library is useful for the research, so might as well make use of them. لكن, the Cathedral is a waste of space, and is the only building I never built.
• Eventually any leftover spots adjacent to my Residential Districts will find themselves filled with Cottages and Hovels. By this time, you have close to 10k peasants living in Manors boasting 100+ happiness. Adding a few Cottages and Hovels here and there with sub-100 Happiness isn’t going to change much, and it will get you that last couple dozen population count so you can claim that you’ve pushed as high as you can go!
Buildings to Spread Around the City in General
Much of the hard-to-use space are on the Piers that you build pushing a wall on the coastline. You can’t grow things on Piers, and they’re usually too far from your Happiness buildings to place Cottages and Hovels. لكن, there are some buildings are ideal for placing on Piers.
• Masons are necessary to keep your city in ship-shape repair, although no matter how many Masons I placed, I could never get my global building integrity to 100%. They’re also vital for repairing your walls after a Viking attack, so having them spread out around the city up against the walls is perfect.
• Extra Taverns are usually needed to fulfill the “1 Tavern for every 150 Peasants” requirement. Their location doesn’t matter, so stick them on the Piers at the edges of your City!
• I mentioned before how Charcoal Makers were often placed on Piers, since most of my tree farms were right next to the oddly-shaped coastline.
• Small Stockpiles for various resources that are needed all over the place (Tools, Charcoal) can be useful to have in areas where they are far from production lines.
• Cemeteries, and the Cemetery Caretaker are necessary for any population size. Interestingly, Cemeteries CAN be built on Piers, and this is one of the best ways to use lots of Pier space! Both the Cemeteries and the Caretakers should be spread out all around the city edges, so that Caretakers take less time to transport dead bodies to burial grounds. If they take too long, your population gets unhappy (I even had a Cemetery zone in the middle of my Mega-City since it was too far from the edges). ومن الغريب, peasants don’t mind living right next to a Cemetery.
Cemetery zone on my Piers:

Finishing Up
After the last zones were placed and all available space was filled, I rechecked several categories and made sure there were no gaps in coverage. Food and Charcoal (and by extension Tools) should already have been developed with proper supply chains along the way.
Final Checks
- All defenses, namely Ballistae coverage and sufficient Archer Towers at Viking incursion points.
- Water access coverage, keeping the chance of fire low across the entire city.
- Fire Brigade locations, to ensure major residential and food districts had adequate fire-fighting capabilties.
- Medical coverage, to minimize plague death and spreading.
- Cemetery availability, along with sufficient Caretakers placed around to minimize time for burying bodies.
- Masons placed all around the city, to aid repairs from Viking attacks and keep Building Integrity high.
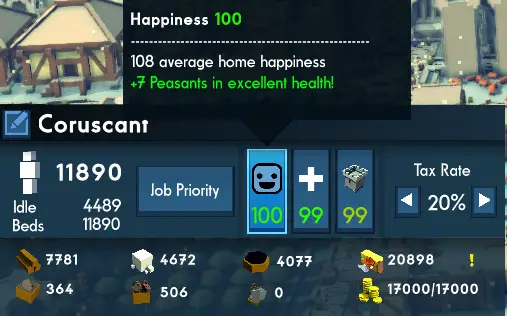
عند هذه النقطة, I waited until my population hit the cap (happened around year 380 لي), and then I went through a few more decades to make sure my supply chains were holding up and my resource generation and distribution were working to meet demands.
If you can go without making any adjustments for a few decades at max population, then congratulations! You’ve successfully built a happy and thriving Mega-City!
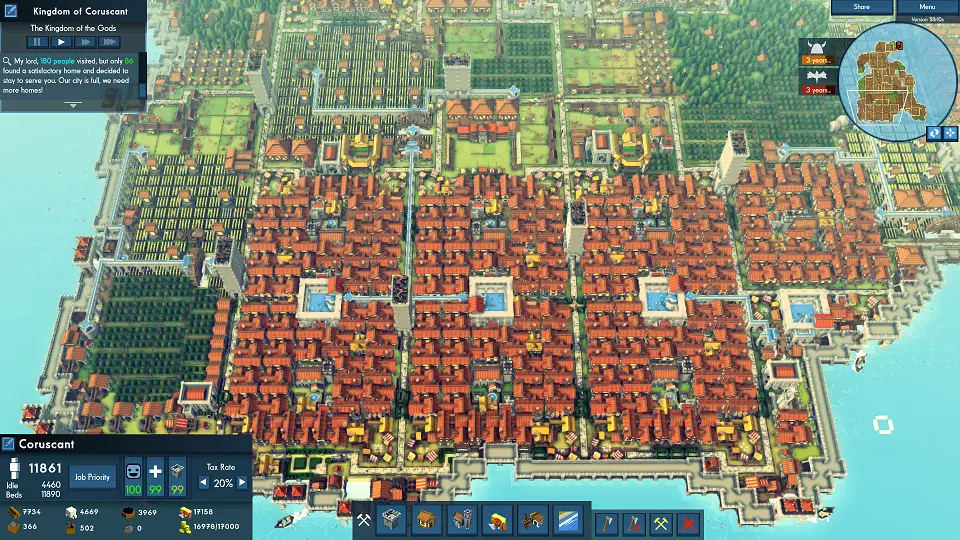
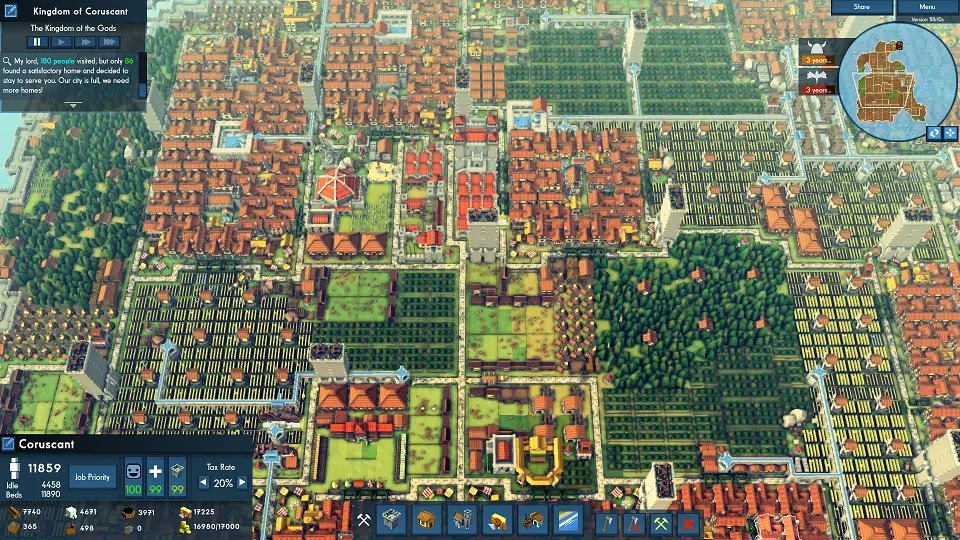
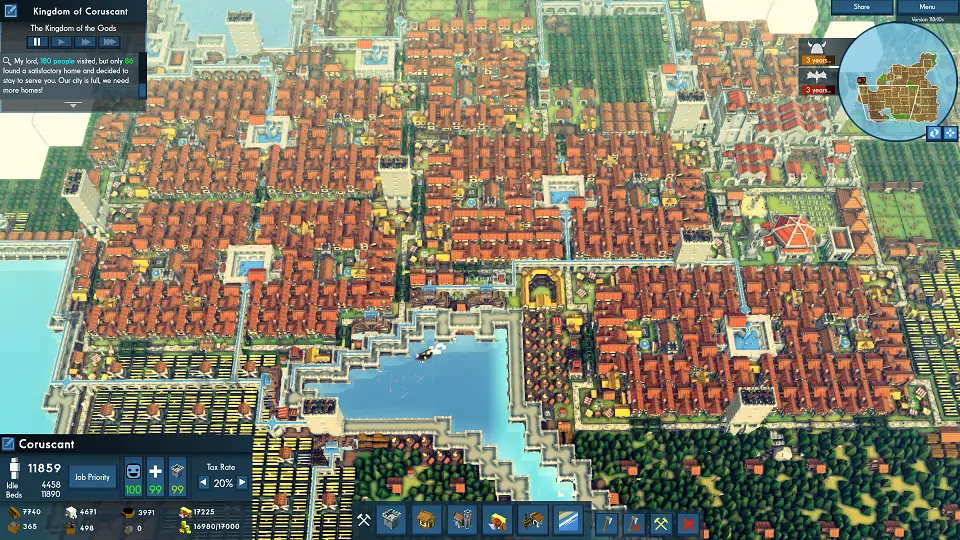
Final stats – 11.9k population:
The Last Expansion Areas (darn those peninsulas):
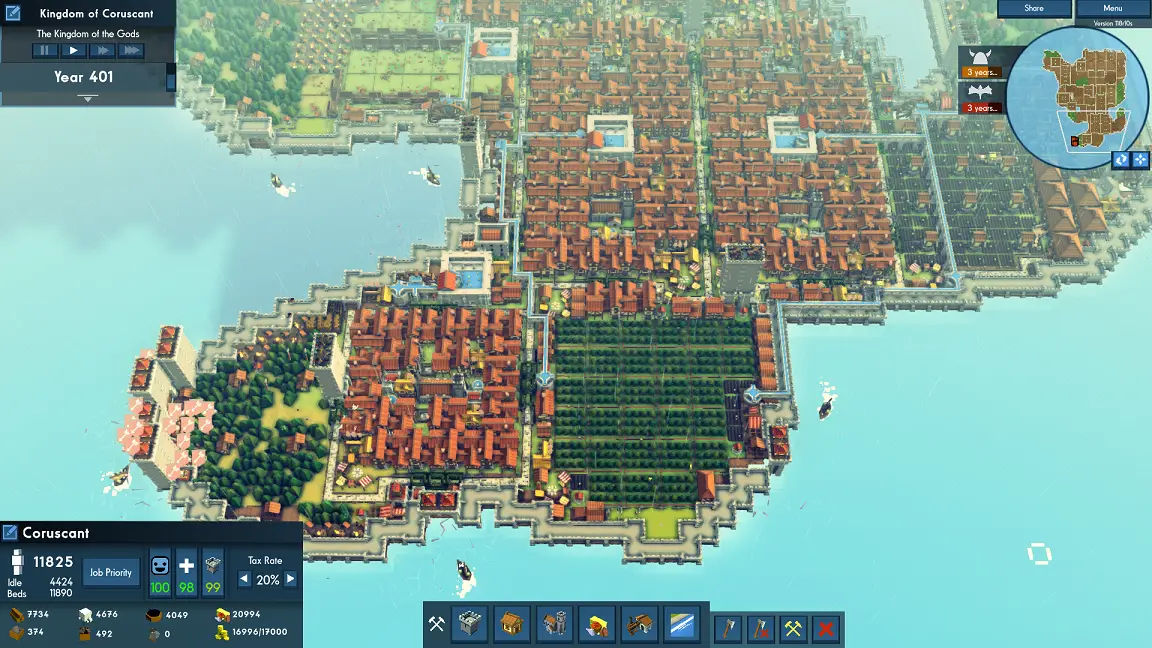
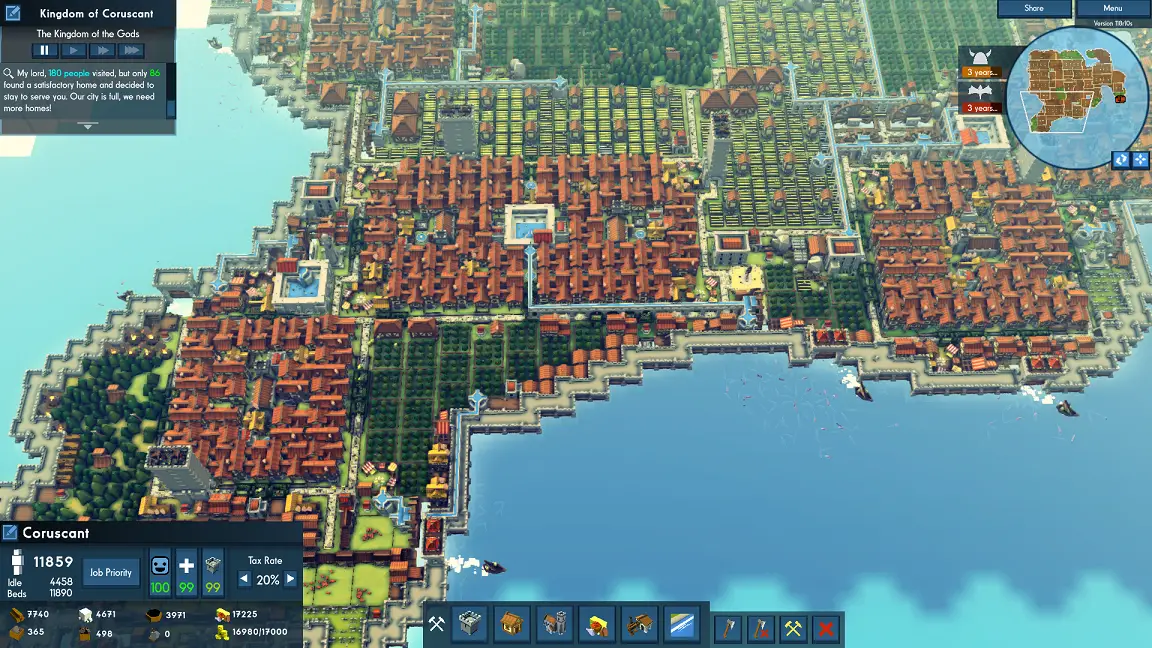
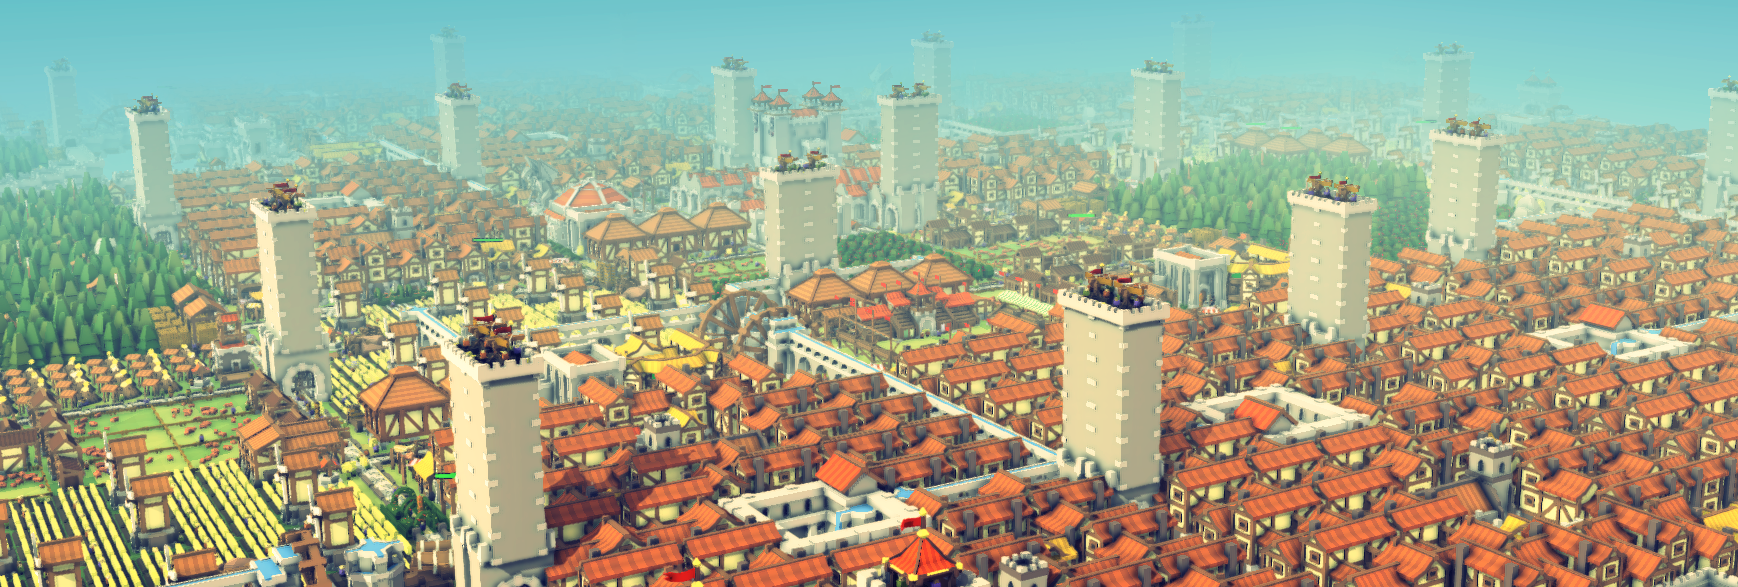
Final View of Mega-City:
خاتمة
Many thanks for reading this guide, I had a great time building this city and hope to see more players attempt to build a successful Mega-City as well! All suggestions and comments are welcome! I don’t mind if you link to or re-use parts of my guide, so long as you give proper credit.
Best of luck to all the great Kings and Queens out there!
Rejuvyn
هذا كل ما نشاركه اليوم من أجل هذا Kingdoms and Castles مرشد. تم إنشاء هذا الدليل وكتابته في الأصل بواسطة Rejuvyn. في حالة فشلنا في تحديث هذا الدليل, يمكنك العثور على آخر تحديث باتباع هذا وصلة.