- عنوان: Etrian Odyssey HD
- تاريخ الافراج عنه:
- المطور:
- الناشر:
Information about Etrian Odyssey HD is still incomplete. الرجاء مساعدتنا في ملء تفاصيل اللعبة باستخدام هذا نموذج الاتصال.
The ability to create dungeon maps is a prominent aspect of Etrian Odyssey. لكن, understanding the functions of all the buttons and grasping how path automation operates can be a bit challenging. To assist you, here’s a brief overview to get you acquainted!
One of the standout features of Etrian Odyssey is the ability to chart out your map while exploring. مع ذلك, the editor contains numerous buttons whose purposes may not be immediately clear.
Since there have been a few changes from the original DS version, whether you’re new to the series or just need a refresher, here’s a guide to the map features of Etrian Odyssey on PC!
Zoom out
Before delving into the specifics of each button’s functionality, here’s a useful tip to start with: make sure to zoom out on the map editing section!
Within the map toolset, you’ll notice two sets of four diagonal arrows.
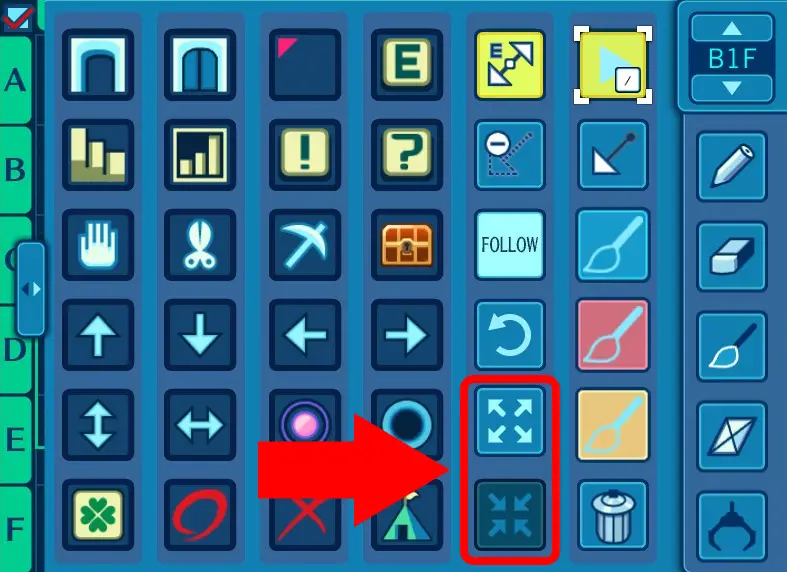
The upper set of arrows, pointing outward, is used to zoom in on the editing section of the map.
على الجانب الآخر, the lower set of arrows, pointing out, is used to zoom out the map.
Although it may initially seem counterintuitive, this design is likely intended to align with the motion of spreading or pinching two fingers on a phone or tablet for zooming.
It’s worth noting that the default zoom level may have been tailored to the original Nintendo DS resolutions, but now that we’re on PC, adjustments can be made.
To maximize the viewable area on the editable portion of the map, feel free to spam the lower zoom out button.
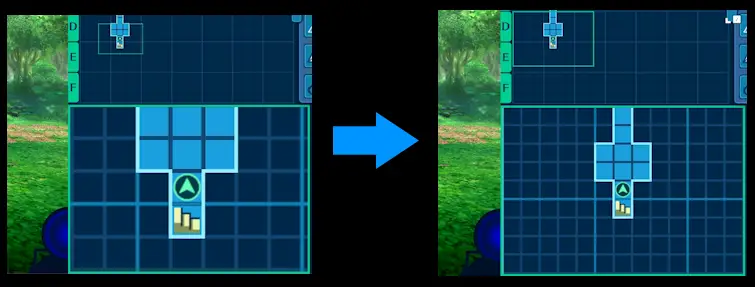
Here’s a comparison between the default zoom and being fully zoomed out:
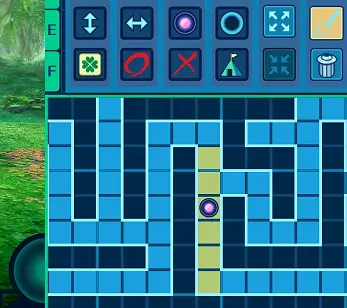
Interface Navigation
So here’s a quick overview of the interface while exploring the dungeon:
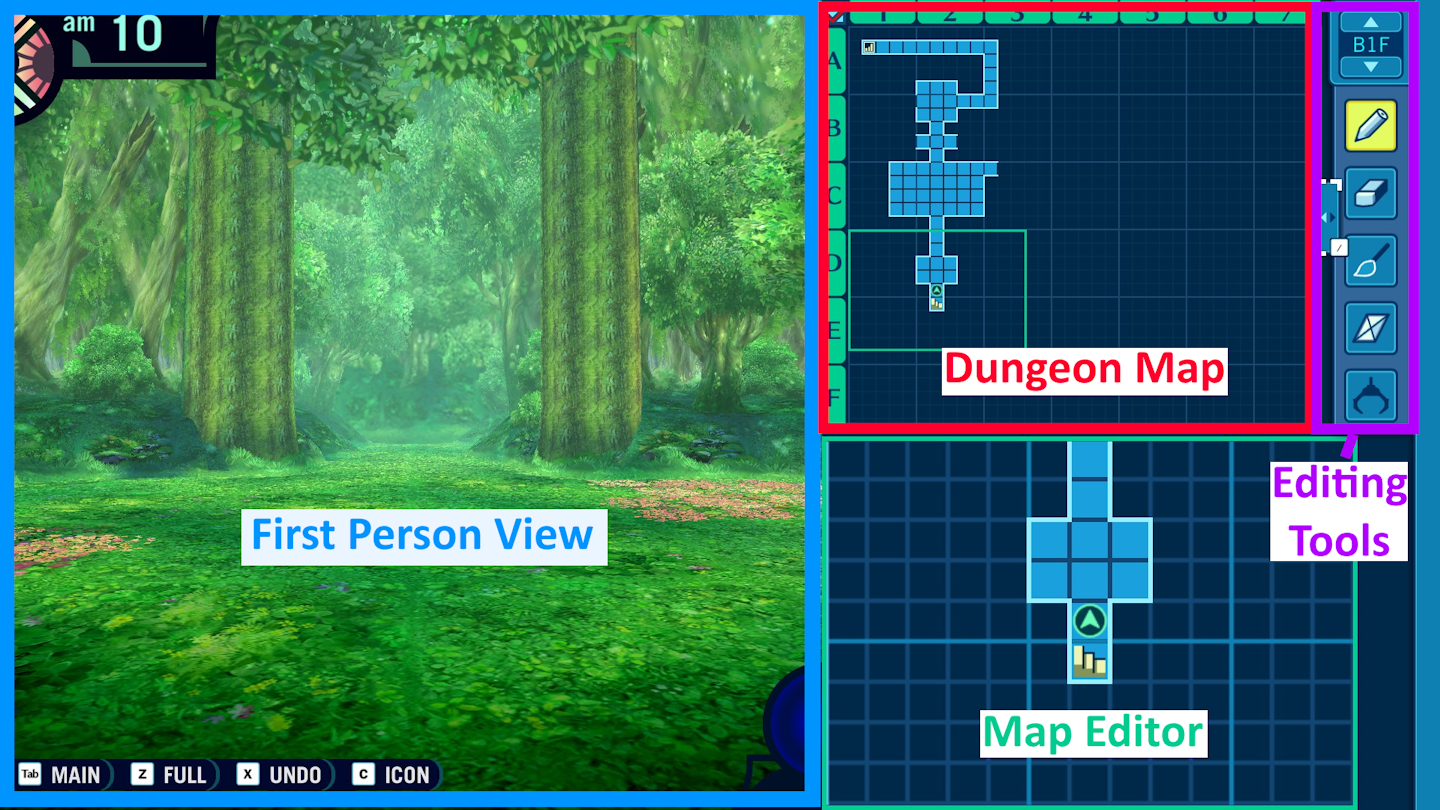
على الجانب الأيسر, you will find the first-person view of the game. To the right, at the top, is the complete dungeon map. Below the map is the map editor. أخيراً, in the upper right corner, you will see the map toolbox.
In the original DS version, the layout was slightly different. The top screen displayed the first-person view, while the bottom screen contained a single map that could be zoomed in and out of. لكن, with the increased screen real estate available now, the game’s layout has been adjusted accordingly.
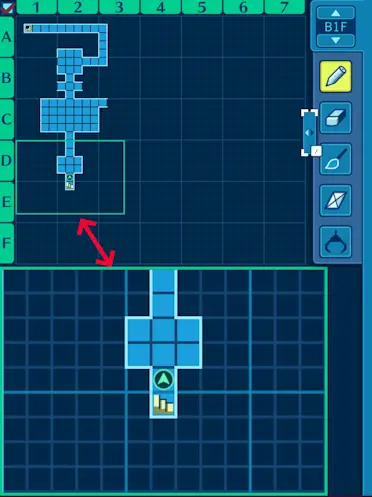
When examining the full map, you’ll observe a specific region highlighted by a green rectangle. This indicates the area currently being displayed in the map editor below.
To relocate the map editor to different positions, you have two options. أولاً, you can left-click on any location within the upper full map, causing the editor to instantly jump to that area. ثانيًا, you can right-click and drag within the map editor itself, enabling you to scroll and explore different parts of the map.
Editing Tools
Here are some additional explanations for the mentioned features:

By clicking the floor button, you can switch the displayed floor in both the full map and the map editor.

To indicate the dungeon walls, select the pencil tool and draw lines in the map editor.

If you wish to remove lines, select the eraser tool and click on them in the map editor.

The paintbrush tool allows you to color squares in the map editor, representing walkable areas of the dungeon. You can choose from three different colors available in the toolbox.
If Automap is enabled (which is the default setting), the game will automatically fill in tiles as you traverse them. لكن, you can also manually fill them in using the paintbrush tool. If desired, you can use a different color to differentiate tiles you have actually walked on.

The clear tile button resets any tile coloring, restoring them to the default dark blue color, indicating unexplored or inaccessible parts of the dungeon.

The crane icon serves the purpose of picking up markers in the map editor, allowing you to drag them to different locations. If you wish to delete a marker, you can find a trash can icon in the extended toolbox.
متنوع: What’s that checkbox?
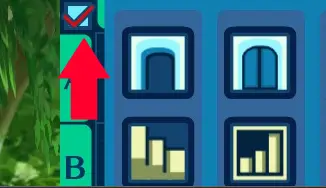
In the top left corner of the full map, you’ll notice a checkbox. When the checkbox is unchecked, you have the freedom to navigate within the dungeon, and if your map is set to display a specific floor, it will remain fixed on that floor. لكن, if you toggle the checkbox off and then back on, or if you move around while the checkbox is checked, the map display will jump to the floor you are currently on.
Toolbox Options

When the small tab linked to the primary map is clicked, a page containing various icons and buttons is displayed.
The initial four columns consist entirely of icons that can be easily dragged and placed on the map to serve as markers. Here is a compilation of the icons along with their commonly assigned purposes:
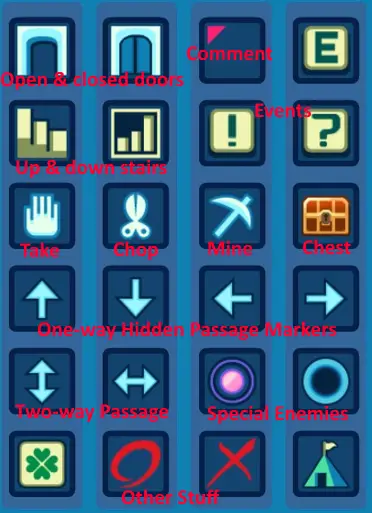
It’s important to note that the game itself does not have any specific requirements regarding the icons you choose. لذلك, there is no need to worry about selecting the “correct” icon for a particular purpose. على سبيل المثال, you can mark a doorway on the map using a pickaxe icon, and the game will not be affected by it.
Use what makes the most sense to you!

لكن, it’s worth mentioning the Comment marker, which stands out because it can be positioned on top of other markers.
Once you place the Comment marker, the game will prompt you to enter a brief note or label that will be associated with the specific square on the map.

Another distinctive marker is the Chest icon, which can be utilized to mark lootable boxes discovered in the dungeon. As soon as the box is looted, the icon on the map will automatically switch to an opened or empty chest icon.
The remaining tool buttons serve various functions.
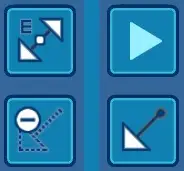
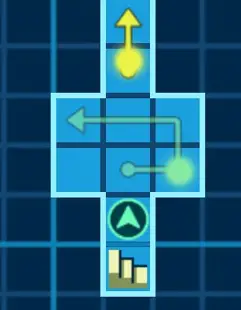
These four functions pertain to path editing, which is a slightly more advanced feature. I will revisit this topic towards the end of this guide.

The Follow button can be toggled on and off. When it’s activated, the map editing section will automatically adjust as you move within the dungeon, ensuring that the editor remains centered on your current location. Click the Follow button to deactivate it if you prefer the map editor to remain stationary when the party moves.

The circular arrow represents the Undo button. Its purpose is quite self-explanatory, as it reverses the most recent change you made. You can continue pressing it to undo multiple actions. لكن, please note that there is no “redo” button available.

التالي, we have the Zoom In/Out buttons for the map editor. I previously mentioned these as a tip at the beginning of this guide, but essentially, I highly recommend keeping the editor zoomed out for optimal functionality. Unless you have visual impairment or are playing on a small display, such as a Steam Deck, zooming out allows you to see a larger portion of the map at once, which is beneficial when sketching out lengthy hallways.
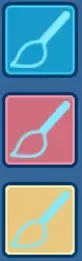
In the subsequent column, you’ll find different tile colors. The default flooring color is light blue, and the game automatically assigns this color to tiles when you step on them, based on the default settings.
The use of other colors is mostly optional and entirely up to you. One practical application I’ve discovered is utilizing different colors to mark the paths of formidable FOEs that appear on the map.
Here’s an example of using yellow floor tiles to denote the movements of an enemy FOE:

أخيرا, we have the trash can icon. By clicking on the trash can and then selecting markers on the map editor, you can easily delete them.
Automation Paths
So back to these guys:
Paths on the dungeon map are lines that can be drawn, as shown in the example. While paths can be used as a form of marker, their true power lies in the ability to automate movement through the dungeon.
Unless you possess exceptional dungeon exploration skills, it’s likely that you will need to traverse dungeon floors multiple times. Even after thoroughly exploring a floor, you may find yourself revisiting it frequently as you progress to lower levels and periodically return to the town for recharging.
To eliminate the need for manual navigation through familiar floors, you can draw a path. Once you step on any part of the path, your party will automatically follow the course you have traced through the dungeon.
Important note: While paths automate navigation, your party will still encounter random enemy encounters at the same frequency as if you were manually walking through the dungeon. Automation does not grant immunity from battles but rather saves time on repetitive movements.
It is also important to mention that accessing menus, such as healing after a battle, becomes challenging while auto-walking a path. لذلك, it is advisable to use path automation only on floors that have become easy for you to handle. بدلاً عن ذلك, be prepared to quickly disable the auto-walk (toggle the Path Play button off) when necessary, particularly after combat situations.
Drawing Paths:

To create a path, click on the Draw Path button, and then trace the desired path using the map editor.
It’s important to keep in mind that if you need to draw a path that extends beyond the boundaries of the map editor, you will first need to move the editor to the desired area. ثم, use the Edit Path button (explained below) to continue extending the path line. If you attempt to use the Draw Path button again, it will create a new path instead of extending an existing one.

The Delete Path button allows you to remove paths from the map editor. Simply click on the Delete Path button, and then click and release on a path in the map editor to delete it. If you click and hold on either the front or end of a path, you can drag the mouse to shorten the path.

على الجانب الآخر, the Edit Path button serves to modify existing paths. By clicking on a path, you can select it for editing. You can drag either end of the path to make it longer. لكن, please note that you cannot shorten a path using this method. If you move the path backwards, the game interprets it as a request for the path to loop back and forth in that specific area.
If you click and release on the path anywhere other than the start and end points, it will reverse the direction of the path.
In cases where multiple paths are drawn on a map, the Edit Path button can be used to select a specific path before pressing the Play Path button, which enables automation. الحديث عن…

The Play Path button is responsible for activating the auto-walking feature of a path. By pressing the Play Path button, the last path you drew or edited will be highlighted as a bright pink line, indicating that it is now enabled for auto-walking. If you haven’t drawn any paths yet, you can click the Play Path button first, and the next path you draw will automatically have auto-walking enabled.
Once a path is enabled, stepping on any of the included tiles will cause your party to start following the path automatically, as it was originally drawn.
To stop following the path, simply click the Play Path button again to disable auto-walking.
If you wish to walk off the path manually, you can use the directional controls. لكن, it may be a bit challenging to do so since you’ll be contending with the automation. One way to accomplish this is by utilizing the sidestep buttons (typically Q and E) unless you’re in a narrow hallway where you would bump into a wall.
Spoiler
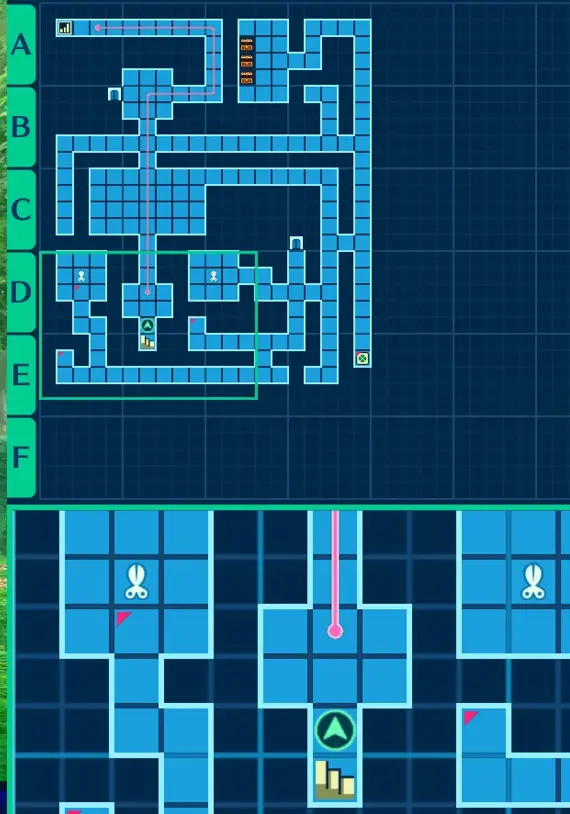
Here is a demonstration of an automated path that I drew to navigate through the first floor of the dungeon. Once inside the dungeon, I can take a few steps forward to activate the auto-walk feature, which will guide me to the end. If you would like to view the example, please mouse-over the black spoiler text. لكن, please note that it contains a complete version of the first floor map.
هذا كل ما نشاركه اليوم من أجل هذا Etrian Odyssey HD مرشد. تم إنشاء هذا الدليل وكتابته في الأصل بواسطة Acer. في حالة فشلنا في تحديث هذا الدليل, يمكنك العثور على آخر تحديث باتباع هذا وصلة.