Three complimentary charts help navigate the complicated production chains in Against The Storm. The first is a Venn diagram of the ingredients for all the food-related recipes. If you’re confused about whether mushrooms can go in the pie or put vegetables in a skewer, it should clarify that in the blink of an eye. The others are a couple of tables showing what races have what needs (foods and services), which buildings can satisfy them in which combinations, and recommendations as to which set will meet the most as easy as possible.
Food Ingredients
This Venn diagram shows which food ingredients go into what food recipes. It’s separated between “raw” food at the top and “cooked” (resolve to give) food at the bottom to prevent overwhelming clutter.
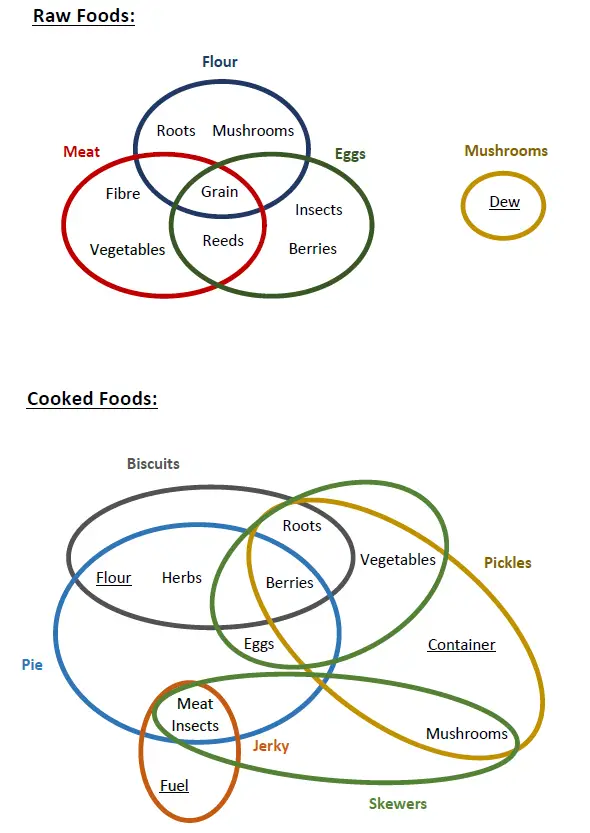
To make a recipe, you need the underlined ingredient (if there is one) AND *one* of the other elements in the circle of the same color. Skewers have two loops and you need one ingredient from each. Note that jerky is inside the lower skewer circle because it is an ingredient; لحمة, eggs, and mushrooms can be harvested directly from specific nodes without being produced by the ranch or greenhouse in the way shown. Container means pot/barrel/waterskin, and fuel is wood/coal/oil/marrow. The production chain for those isn’t included to prevent the diagram from spiraling out of control.
Food Needs
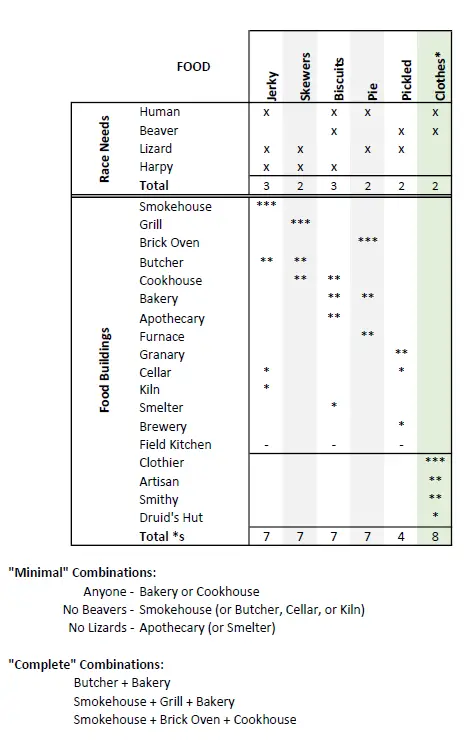
This table cross-references the different cooked food each race receives, with the buildings that can make those foods and the efficiency (0 stars to 3) at which they do so. Clothes are also included as they function similarly (except not contributing to not starving).
The minimal combinations at the bottom are the sets of the fewest buildings such you can produce at least 1 of the desired cook foods for each race present. The complete combinations are such that they together make all the cooked foods. Note that pickled food is omitted from this because the buildings that produce it have no overlap with the others.
Generally speaking, pickled food is to be avoided at the start as it has lower star recipes, is asked for by few species, and requires the difficult-to-produce barrels/pots/waterskins. It does, لكن, give more resolve than the other foods. على الجانب الآخر, jerky is often very easy to make in large quantities from multiple buildings and is liked by everyone but Beavers. As each settlement is different, with different blueprints available and resource nodes found, what is best in practice can vary wildly from these general guidelines.
Service Needs
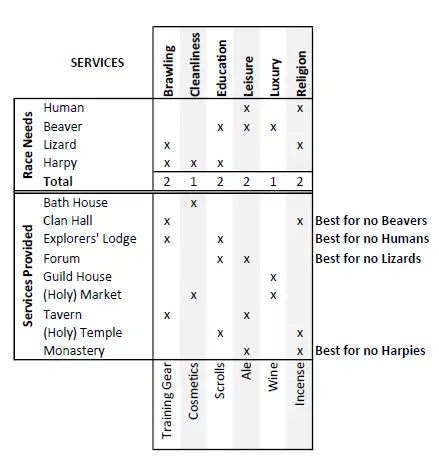
This table cross-references the different races’ service requirements with the buildings that provide those services.
As any settlement will have (bar some infrequent exceptions) 3 different races, it is often helpful to know which service building will satisfy the most requirements. For that combination of races, the ones listed will fulfil 2 requirements of one race and 1 for the remaining two, the best that can be done with a single service building.
Whether it’s actually “the best” depends on how many of each race you have, if you care about the resolve of some more than others, and which goods you can actually supply to it. The bonus impact of fully staffing the building is also not to be ignored. All bets are off if you plan to build, staff, and provide multiple service buildings. Take this as a suggestion of which buildings to consider rather than a cast iron rule of what to build.
هذا كل ما نشاركه اليوم من أجل هذا Against the Storm مرشد. تم إنشاء هذا الدليل وكتابته في الأصل بواسطة Olleus. في حالة فشلنا في تحديث هذا الدليل, يمكنك العثور على آخر تحديث باتباع هذا وصلة.